- Android — Developer Tools
- SDK tools
- Android
- Running DDMS
- How it works
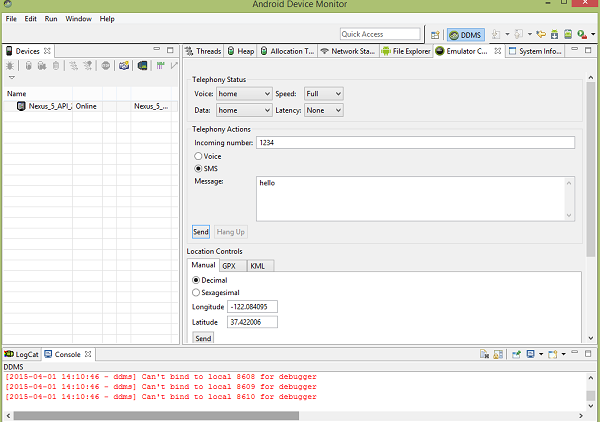
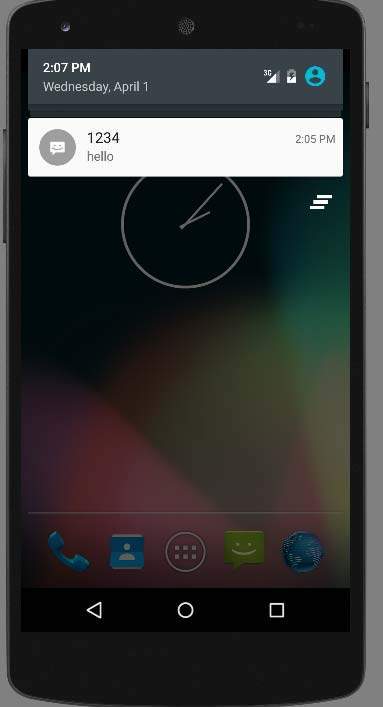
- Making SMS
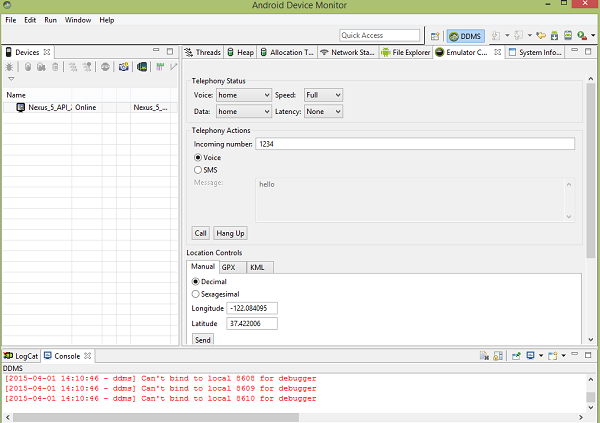
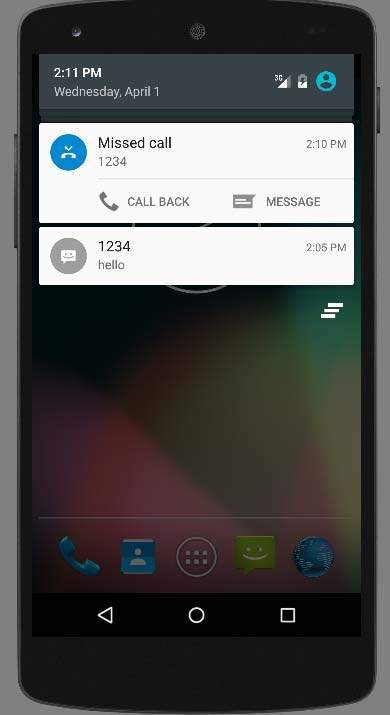
- Making Call
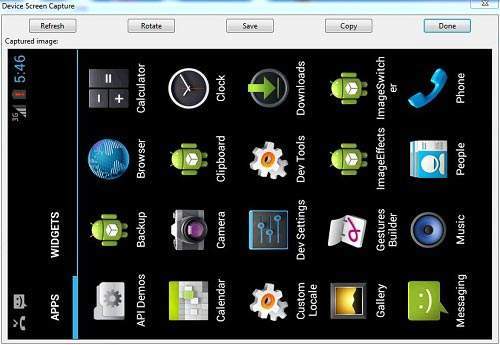
- Capturing ScreenShot
- Sqlite3
- Use Sqlite3 from a remote shell.
- Using Sqlite3 directly
- Platform tools
- Android Developer Tools
- In this document
- SDK Tools Integration
- Need help designing icons?
- Code Editors
- Google I/O Session Video
- Resource linking enhancements
- Graphical Layout Editor
- Canvas and outline view
- Google I/O Session Video
- Other canvas features
- Palette
- Google I/O Session Video
- Configuration chooser
- Google I/O Session Video
- Layout Refactoring Support
- Google I/O Session Video
- Updating the ADT Plugin
Android — Developer Tools
The android developer tools let you create interactive and powerful application for android platform. The tools can be generally categorized into two types.
SDK tools
SDK tools are generally platform independent and are required no matter which android platform you are working on. When you install the Android SDK into your system, these tools get automatically installed. The list of SDK tools has been given below −
| Sr.No | Tool & description |
|---|---|
| 1 | android This tool lets you manage AVDs, projects, and the installed components of the SDK This tool lets you debug Android applications |
| 3 | Draw 9-Patch This tool allows you to easily create a NinePatch graphic using a WYSIWYG editor |
| 4 | emulator This tools let you test your applications without using a physical device |
| 5 | mksdcard Helps you create a disk image (external sdcard storage) that you can use with the emulator |
| 6 | proguard Shrinks, optimizes, and obfuscates your code by removing unused code |
| 7 | sqlite3 Lets you access the SQLite data files created and used by Android applications |
| 8 | traceview Provides a graphical viewer for execution logs saved by your application Android Debug Bridge (adb) is a versatile command line tool that lets you communicate with an emulator instance or connected Android-powered device. We will discuss three important tools here that are android,ddms and sqlite3. AndroidAndroid is a development tool that lets you perform these tasks: Manage Android Virtual Devices (AVD) Create and update Android projects Update your sdk with new platform add-ons and documentation DDMS stands for Dalvik debug monitor server, that provide many services on the device. The service could include message formation, call spoofing, capturing screenshot, exploring internal threads and file systems e.t.c Running DDMSFrom Android studio click on Tools>Android>Android device Monitor. How it worksIn android, each application runs in its own process and each process run in the virtual machine. Each VM exposes a unique port, that a debugger can attach to. When DDMS starts, it connects to adb. When a device is connected, a VM monitoring service is created between adb and DDMS, which notifies DDMS when a VM on the device is started or terminated. Making SMSMaking sms to emulator.we need to call telnet client and server as shown below Now click on send button, and you will see an sms notification in the emulator window. It is shown below − Making CallIn the DDMS, select the Emulator Control tab. In the emulator control tab , click on voice and then start typing the incoming number. It is shown in the picture below − Now click on the call button to make a call to your emulator. It is shown below − Now click on hangup in the Android studio window to terminate the call. The fake sms and call can be viewed from the notification by just dragging the notification window to the center using mouse. It is shown below − Capturing ScreenShotYou can also capture screenshot of your emulator. For this look for the camera icon on the right side under Devices tab. Just point your mouse over it and select it. As soon as you select it , it will start the screen capturing process and will capture whatever screen of the emulator currently active. It is shown below − The eclipse orientation can be changed using Ctrl + F11 key. Now you can save the image or rotate it and then select done to exit the screen capture dialog. Sqlite3Sqlite3 is a command line program which is used to manage the SQLite databases created by Android applications. The tool also allow us to execute the SQL statements on the fly. There are two way through which you can use SQlite , either from remote shell or you can use locally. Use Sqlite3 from a remote shell.Enter a remote shell by entering the following command − From a remote shell, start the sqlite3 tool by entering the following command − Once you invoke sqlite3, you can issue sqlite3 commands in the shell. To exit and return to the adb remote shell, enter exit or press CTRL+D. Using Sqlite3 directlyCopy a database file from your device to your host machine. Start the sqlite3 tool from the /tools directory, specifying the database file − Platform toolsThe platform tools are customized to support the features of the latest android platform. The platform tools are typically updated every time you install a new SDK platform. Each update of the platform tools is backward compatible with older platforms. Some of the platform tools are listd below − Android Debug bridge (ADB) Android Interface definition language (AIDL) Источник Android Developer ToolsIn this documentImportant: Support for the Android Developer Tools (ADT) in Eclipse is ending, per our announcement. You should migrate your app development projects to Android Studio as soon as possible. For more information on transitioning to Android Studio, see Migrating to Android Studio. Android Developer Tools (ADT) is a plugin for Eclipse that provides a suite of tools that are integrated with the Eclipse IDE. It offers you access to many features that help you develop Android applications. ADT provides GUI access to many of the command line SDK tools as well as a UI design tool for rapid prototyping, designing, and building of your application’s user interface. If you still wish to use the ADT plugin for Eclipse, see Installing Eclipse Plugin. SDK Tools IntegrationNeed help designing icons?The Android Asset Studio is a web-based tool that lets you generate icons from existing images, clipart, or text. It also generates the icons with different DPIs for different screen sizes and types. Many of the tools that you can start or run from the command line are integrated into ADT. They include:
Code EditorsIn addition to Eclipse’s standard editor features, ADT provides custom XML editors to help you create and edit Android manifests, resources, menus, and layouts in a form-based or graphical mode. Double-clicking on an XML file in Eclipse’s package explorer opens the appropriate XML editor. Google I/O Session VideoView the segment on the XML editors for more information. Note: You can edit Android-specific XML files (such as a layout or manifest) in both a graphical mode and also an XML markup mode. You can switch between these modes with the pair of tabs at the bottom of each custom XML editor. In addition, some special file types that don’t have custom editors, such as drawables, animations, and color files offer editing enhancements such as XML tag completion. ADT provides the following custom, form-based XML editors: Graphical Layout Editor Edit and design your XML layout files with a drag and drop interface. The layout editor renders your interface as well, offering you a preview as you design your layouts. This editor is invoked when you open an XML file with a view declared (usually declared in res/layout . For more information, see Graphical Layout Editor. Android Manifest Editor Edit Android manifests with a simple graphical interface. This editor is invoked when you open an AndroidManifest.xml file. Menu Editor Edit menu groups and items with a simple graphical interface. This editor is invoked when you open an XML file with a declared (usually located in the res/menu folder). Resources Editor Edit resources with a simple graphical interface. This editor is invoked when you open an XML file with a tag declared. XML Resources Editor Edit XML resources with a simple graphical interface. This editor is invoked when you open an XML file. Resource linking enhancementsGraphical Layout EditorADT provides many features to allow you to design and build your application’s user interface. Many of these features are in the graphical layout editor, which you can access by opening one of your application’s XML layout files in Eclipse. The graphical layout editor is the main screen that you use to visually design and build your UI. It is split up into the following parts: Canvas In the middle of the editor is the canvas. It provides the rendered view of your layout and supports dragging and dropping of UI widgets directly from the palette. You can select the platform version used to render the items in the canvas. Each platform version has its own look and feel, which might be the similar to or radically different from another platform version. The canvas renders the appropriate look and feel for the currently selected platform version. This platform version does not need to be the same as the version that your application targets. The canvas also provides context-sensitive actions in the layout actions bar, such as adjusting layout margins and orientation. The layout actions bar displays available actions depending on the selected UI element in the canvas. Outline On the right side of the editor is the outline view. It displays a hierarchical view of your layout where you can do things such as reorder of views. The outline view exposes similar functionality as the canvas but displays your layout in an ordered list instead of a rendered preview. Palette On the left side of the editor is the palette. It provides a set of widgets that you can drag onto the canvas. The palette shows rendered previews of the widgets for easy lookup of desired UI widgets. Configuration Chooser At the top of the editor is the configuration chooser. It provides options to change a layout’s rendering mode or screen type. Figure 1. Graphical layout editor Canvas and outline viewGoogle I/O Session VideoView the segment on the canvas and outline view and the layout actions bar for more information. The canvas is the area where you can drag and drop UI widgets from the palette to design your layout. The canvas offers a rendered preview of your layout depending on factors such as the selected platform version, screen orientation, and currently selected theme that you specify in the configuration chooser. You can also drag and drop items into the outline view, which displays your layout in a hierarchical list. The outline view exposes much of the same functionality as the canvas but offers another method of organization that is beneficial for ordering and quickly selecting items. When you right-click a specific item in the canvas or outline view, you can access a context-sensitive menu that lets you modify the following attributes of the layout or view: View and layout properties When you right-click a view or layout in the canvas or outline view, it brings up a context-sensitive menu that lets you set things such as:
Animation preview and creation If your layout or view is animated, you can preview the animation directly in the canvas (when you select Android 3.0 or later as the platform version in the configuration chooser). Right-click an item in the canvas and select Play Animation. If animation is not associated with item, an option is available in the menu to create one. View the segment on the animation features for more information. Extract as Include You can extract parts of a current layout into its own layout file, which you can then include in any layout with a single line of XML. See Layout Refactoring Support for more information. Other canvas featuresThe canvas has additional features not available in the outline view:
Figure 2. Canvas portion of the layout editor showing a rendered preview of an application Figure 3. Outline view showing current layout’s structure PaletteGoogle I/O Session VideoView the segment on the palette for more information. The palette contains the UI widgets that you can drag and drop onto the canvas and add to your layout. The pallete categorizes the widgets and shows rendered previews for easier lookup. The main features of the palette include:
Figure 4. Palette showing available UI widgets Configuration chooserGoogle I/O Session VideoView the segment on the configuration chooser for more information. The configuration chooser allows you to create and configure different configurations of a layout for different situations, such as one for landscape and one for portrait mode. You can set the following options for each configuration of a layout:
Figure 5. Configuration chooser Layout Refactoring SupportGoogle I/O Session VideoView the segment on refactoring features for a rundown of the more important refactoring features. In both the graphical and XML layout editor, there are many features that help you quickly refactor your layouts. The following list describes the major refactoring support: Change layout This lets you change the layout on the fly and re-renders the canvas for you. You can apply this refactoring to any layout and the layout is converted to the new type if possible. In many cases, the opening and closing tags of the layout’s XML element are changed along with things such as ID attributes and their references. However, for some supported types, ADT attempts to preserve the layout, such as changing a LinearLayout to a RelativeLayout . Change widget This lets you select one or more widgets and converts them to a new widget type. In addition to changing the element name, it also removes any attributes that are not supported by the new widget type and adds in any mandatory attributes required by the new widget type. If the current ID of a widget includes the current widget type in its ID (such as a widget named «button1» ), then the ID is changed to match the new widget type and all references are updated. Extract as include This lets you extract views inside of an existing layout into their own separate layout file. An include tag that points to the newly created layout file is inserted into the existing layout file. Right-click the view or layout and select Extract as Include. . Extract string Extract strings from either XML or Java files into their own separate resource file. Extract style Extract style-related attributes from a layout and define them in a new styles.xml file. You can select multiple views and this refactoring extracts all of the same styles into one style and assigns that style to all the views that use it. Wrap-in container This lets you select one or more sibling elements and wrap them in a new container. This can be applied to the root element as well, in which case the namespace declaration attributes will be transferred to the new root. This refactoring also transfers layout_ attribute references to the new root, For example, suppose you have a RelativeLayout . If other widgets have layout constraints pointing to your widget, wrapping the widget causes these constraints to point to the parent instead. Quick Assistant Provides refactoring suggestions depending on the current context. Press Ctrl-1 (or Cmd-1 on Mac) in an editor, and Eclipse provides a list of possible refactorings depending on the context. The Quick Assistant provides fast access to all of the above refactorings, where applicable. For example, if you are editing an XML value and decide you want to extract it out as a string, place the text cursor in the string and press Ctrl-1 to see the refactoring context menu. Updating the ADT PluginFrom time to time, a new revision of the ADT Plugin becomes available, with new features and bug fixes. Generally, when a new revision of ADT is available, you should update to it as soon as convenient. In some cases, a new revision of ADT will have a dependency on a specific revision of the Android SDK Tools. If such dependencies exist, you will need to update the SDK Tools package of the SDK after installing the new revision of ADT. To update the SDK Tools package, use the Android SDK Manager, as described in Adding SDK Packages. To learn about new features of each ADT revision and also any dependencies on the SDK Tools, see the listings in the Revisions section. To determine the version currently installed, open the Eclipse Installed Software window using Help > Software Updates and refer to the version listed for «Android Development Tools». Follow the steps below to check whether an update is available and, if so, to install it.
If there are no updates available, a dialog will say so and you’re done. If you encounter problems during the update, remove the existing ADT plugin from Eclipse, then perform a fresh installation, using the instructions for Installing the ADT Plugin. Источник  Когда к мобильному устройству присоединены наушники  ОС Google Android развивается, и по всему видимому |