- Jetpack Compose — как легко построить UI на Android
- Преимущества Jetpack Compose
- Подключение к проекту
- How to Create User Interface Login & Register with Android Studio
- Adjustment of several layouts :
- Connect fragments with viewpager
- User Interface (UI) Design in Android App
- How to Develop User Interface (UI) in Android App?
- What is (User Interface) UI in Android?
- Building a Simple User Interface
- This lesson teaches you to
- You should also read
- Alternative Layouts
- Create a Linear Layout
- Add a Text Field
- Resource Objects
- Add String Resources
- Add a Button
- Make the Input Box Fill in the Screen Width
- Run Your App
Jetpack Compose — как легко построить UI на Android

В июле этого года вместе с Android Studio Arctic Fox вышла одна из долгожданных библиотек — Jetpack Compose. Она позволяет создавать пользовательский интерфейс в декларативном стиле и обещает быть революцией в построении UI.
Разбираемся, так ли это на самом деле, какие у библиотеки преимущества и недостатки. Подробности — в статье.
Преимущества Jetpack Compose
Jetpack Compose — это набор инструментов для разработки UI в Android-приложении. Он призван ускорить и упростить разработку пользовательского интерфейса, избавить от лишнего кода и соединить модель реактивного программирования с лаконичностью Kotlin.
Сразу с места в карьер — какие есть преимущества у библиотеки:
1. Меньше кода. Jetpack Compose позволяет писать меньше кода, а значит разработчик может больше фокусироваться на проблеме, с меньшим количеством тестов и дебага, а значит и багов.
2. Интуитивно понятный. Compose использует декларативный API — разработчику нужно лишь сказать, что сделать, а все остальное ляжет на плечи библиотеки.
3. Удобство внедрения. Compose совместим с любым существующим кодом. Например, можно вызвать Compose-код из вьюх (view) и, наоборот, вьюхи из Compose. Многие библиотеки вроде Jetpack Navigation, ViewModel и Coroutines уже адаптированы под Compose, что позволяет сравнительно быстро внедрить его в свой код. Кроме того, Android Studio Arctic Fox поддерживает превью создаваемых вьюх.
4. Имеет обширный инструментарий. Jetpack Compose позволяет создавать красивые приложения с прямым доступом к Android Platform API и build-in поддержкой Material Design, тёмной темы, анимаций и других крутых штук.
Далее пройдёмся по основным аспектам библиотеки и посмотрим, как сильно повышается производительность приложения.
Подключение к проекту
Чтобы подключить Jetpack Compose к проекту, необходимо указать некоторые строки кода в своем build.gradle.
В рутовом объявим переменную с версией Compose:
Здесь мы указываем, что в проекте будем использовать Jetpack Compose и объявляем необходимые зависимости (подробнее про зависимости можно почитать в официальном гайде).
Дальше всё просто. В активити (activity) объявлем Composable-функцию, строим иерархию вьюх с указанием необходимых атрибутов и смотрим результат.
Пройдемся по коду. Я написал две реализации вёрсток различной сложности:
1. Простая реализация
Добавляет TextView в вёрстку с текстом с конкатенацией Hello и аргумента, переданного в Greeting.
Важно отметить, что имена Composable-функций начинаются с заглавной буквы. Это соглашение по наименованию функций, поэтому если писать со строчной, то студия будет подсвечивать неверный нейминг.
2. Более сложная реализация
Этот вариант представляет собой скролящийся экран, который содержит изображение, текст и кнопку. Рассмотрим некоторые особенности:
Необходимо объявить Scroll State. Только не обычный, а тот, который позволяет сохранять состояние скролла сквозь рекомпозицию — rememberScrollState().
Column представляет собой ViewGroup с вертикальным расположением элементов.
Modifier позволяет управлять атрибутами, добавлять декорации и поведение к вьюхам.
Остальное интуитивно понятно. И это как раз одна из ключевых особенностей Jetpack Compose — даже если вы не использовали библиотеку ранее, то всё равно с ней разберётесь.
Добавить вьюхи в активити можно через extension setContent <>, например:
В общем-то, создание UI выглядит действительно просто. Теперь определим, насколько сильно оптимизируется приложение и как быстро пользователь увидит окончательный экран.
Для тестирования воспользуемся библиотекой Jetpack Benchmark, о которой, кстати, тоже рассказывали в отдельной статье. Код теста выглядит так:
Протестируем три версии установки вьюхи в активити:
При передаче ресурса в setContentView.
При передаче вьюхи в setContentView.
Итоги тестирования можно посмотреть в таблице: левый столбец — название теста, правый — время на выполнение:
Источник
How to Create User Interface Login & Register with Android Studio
ok, this is my first article in Medium. In this section, I want to share with you about the User Interface on Android and we will create a Login page and a Register page. Some components that I will use:
1. Viewpager
2. Fragment
3. Edittext
4. Button
5. Textview
6. Imageview
What about the results? let’s coding (follow step by step)
- Of course we must already have an Android Studio. if not, you can download it first on the official Android Studio website. If you already have one, please open your Android studio.
2. We create a new project by clicking “Start a new Android Studio project”. Fill in the application name column with “LoginApp”, then click next.

3. Select the minimum SDK you need or want, then click next.


4. Select “Empty Activity” and click next. After that, the “Activity Name” and “Layout Name” columns will appear, in this section just leave it like that, then click finish.

After you click finish, Android Studio will make you an Application with the name “LoginApp”.
After the application is successfully built, you can simply make adjustments to the following sections:
Open the colors.xml file in app/res/values/colors.xml, and change it like this:
Create a folder with the name “font” in the res folder, by right clicking on the res directory, select new / directory and name it “font”. After that, copy this font into font directory. (download the font 1 and font 2).
Create some Drawable Resource File in the drawable directory, by right-clicking on the drawable directory, select new / Drawable Resource File.
After that open file styles.xml and change like this :
Add the theme property in the Main Activity in the manifest, in the app / manifests / AndroidManifest.xml folder
So the AndroidManifest.xml file will be as follows:
After all the steps above are done, then make 2 fragments with the name fragment_login and fragment_register in the layout directory, by right-clicking on the layout directory, New/Fragment/Fragment (Blank)

Uncheck:
include fragment factory methods? and include interface methods?

Adjustment of several layouts :
change the activity_main.xml layout, fragment_login.xml and fragment_register.xml so that it will be as below
Open the strings.xml file in the res / values / strings.xml directory and change it to something like the following :
So that the overall structure of the project will be as follows :

Connect fragments with viewpager
Create an inner class in the MainActivity.java class with the name AuthenticationPapterAdapter. This class is a derivative of the FragmentPagerAdapter class and serves to connect Fragments with ViewPager,
Then call the class in the onCreate() method in MainActivity.java and connect with viewpager
So the MainActivity.java class will be like this
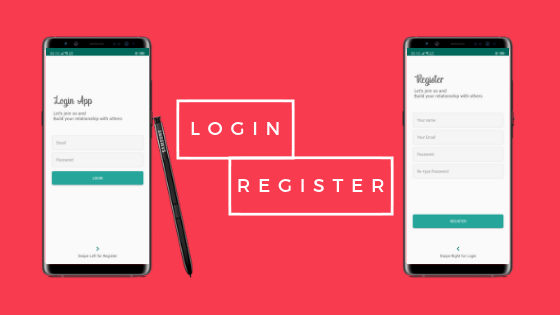
The display of the final application will be like this
Источник
User Interface (UI) Design in Android App
How to Develop User Interface (UI) in Android App?
This tutorial explains how to design User Interface (UI) for Android Android Application. It’s one of the more fun and also one of the more easier to understand topics.
What is (User Interface) UI in Android?
User Interface in an Android Application can be build using the layouts (ViewGroup objects) and widgets (View objects).
Various types of pre-installed UI components like the structured layout, objects and UI controls are provided in Android Studio which enables user to build a Graphical User Interface (GUI) for their Android app.
UI modules for special interfaces like dialog box, notifications box, menus etc are also provide by Android
Please follow the steps below in order to design UI (User Interface) for Android
So from here what I want to do is — click start a new Android studio project.
And you can actually name this — anything you want for example I’m going to name mine ‘Hamblaster’.
This is still good, we are still making something through the phone. Now, instead choosing the blank activity, what this would do is it would make that one default blank screen, but I wanna show you guys how to add activities manually. So, instead of that choose to add no activity.
So, when you click finish what’s gonna happen is it’s gonna load up and you’re pretty much gonna have an empty, completely empty project. I meanit’ss gonna have those core files, but check it out. Alright, so when it’s done setting up this is what you get.
Now, obviously if we click on project on the left-hand side, we can see that it does indeed have some files created for us but definitely no activities or screens anywhere and well, our app would be pretty stinking useless if the user didn’t have any screen to look at.
So let’s go ahead and do that first. So, make sure you’re in Android view, you can actually look at project view if you want, but I’m gonna be in Android view.
and in your app expand that and go to java, expand that as well and now remember this is where we are gonna be building the activity, if you remember from last time, this is actually where that file was.
So now, if you right click it and select new; scroll down to activity and we’ll just choose blank activity.
So again, once we’re looking at the screen — what this is, is basically if we click blank activity whenever we are setting up our project then this is where we would be but that’s how you do it manually and also whenever you add additional activities to whatever projects you’re working on in the future that’s how you do it.
Now, for right now, this example is only going to have one activity so I really don’t need to give anything like a name because I’m not really gonna get disorganised with one activity. However, since this is the only activity, its very important that you choose this — launcher activity.
Now, remember, the launcher activity is the very first screen that whenever android is trying to open your app its gonna look for this. So, without it if you have a bunch of activities and none of them are the launcher activity, then your app is not going to open correctly.
So, since this is your only activity we need to make it the launcher activity, aka the starting point.
So as soon as you create an activity what android studio is gonna do is it’s gonna create those 2 files first.
Below is the main activity, the job of the brains behind our activity.
And the interface.
No need to discuss everything because you guys already know what all that means. So, one other thing I want to point out is that there was one more thing that all of my activities had to be taken care of in the manifest so just look at the manifest and you probably have to do something here — open and check it out — Android studio actually took care of all of that for us, whenever we just created that new activity.
Again in the manifest, this is where all your activities have to be declared, it did everything for us. That is one of the reasons I love Android Studio.
Now just close out of that and we can continue with the good stuff. So over an ‘activity_main.xml’ the first thing I want to do is delete this little thing right here — this text.
So just go ahead select it like before and just delete it.
Now, just for this example, this is just to demonstrate a few things, so I’m building the very first page to the social network so what we need are a couple of things.
The first thing is this ‘Large Text’.
Alright, so that’s a little bit easier to read, I’m just gonna organize everything before I start customizing any of these widgets. So drag in ‘Large Text’ — it’ll say — “sign in or log in”, so this will be the log in screen. So under this, of course, we need two little input areas for the user to enter their log in information — an email and a password. So first, lets get the email, we should go down, its actually under text fields, so click that if its not expanded and for email — just drag that over and we can tell when its aligned with the middle because of this little green line. So drop that right there.
Alright looks pretty good. Now, under here we will have a password field, so drag that and drop it.
Now of course, if I was actually designing this then what I would do is I would have to make a little text area here that says — email and password. But for right now, just demonstrating some stuff.
Now, after they are done typing in their information they need some button to click on, so if you scroll way back up, its no way back up — its like 2 inches away but we are going to select this button and drag it right underneath here and you know what actually align this in the dead center of your app by using those little alignment things and alright, looking pretty good.
So, what I wanna do now, is I actually wanna change the text on this right here and also on the button.So select this ‘Large Text’,
and if we scroll down to a property called Text then what we can see is, it says ‘Large Text’ that’s the text that displays, what we actually wanna do is click on this and we’ll change it to something like ‘Sign In’ and hit enter.
Источник
Building a Simple User Interface
This lesson teaches you to
You should also read
In this lesson, you create a layout in XML that includes a text field and a button. In the next lesson, your app responds when the button is pressed by sending the content of the text field to another activity.
The graphical user interface for an Android app is built using a hierarchy of View and ViewGroup objects. View objects are usually UI widgets such as buttons or text fields. ViewGroup objects are invisible view containers that define how the child views are laid out, such as in a grid or a vertical list.
Android provides an XML vocabulary that corresponds to the subclasses of View and ViewGroup so you can define your UI in XML using a hierarchy of UI elements.
Layouts are subclasses of the ViewGroup . In this exercise, you’ll work with a LinearLayout .
Alternative Layouts
Declaring your UI layout in XML rather than runtime code is useful for several reasons, but it’s especially important so you can create different layouts for different screen sizes. For example, you can create two versions of a layout and tell the system to use one on «small» screens and the other on «large» screens. For more information, see the class about Supporting Different Devices.

Figure 1. Illustration of how ViewGroup objects form branches in the layout and contain other View objects.
Create a Linear Layout
- In Android Studio, from the res/layout directory, open the activity_my.xml file.
The BlankActivity template you chose when you created this project includes the activity_my.xml file with a RelativeLayout root view and a TextView child view.
In the Preview pane, click the Hide icon  to close the Preview pane.
In Android Studio, when you open a layout file, you’re first shown the Preview pane. Clicking elements in this pane opens the WYSIWYG tools in the Design pane. For this lesson, you’re going to work directly with the XML.
element.
The result looks like this:
LinearLayout is a view group (a subclass of ViewGroup ) that lays out child views in either a vertical or horizontal orientation, as specified by the android:orientation attribute. Each child of a LinearLayout appears on the screen in the order in which it appears in the XML.
Two other attributes, android:layout_width and android:layout_height , are required for all views in order to specify their size.
Because the LinearLayout is the root view in the layout, it should fill the entire screen area that’s available to the app by setting the width and height to «match_parent» . This value declares that the view should expand its width or height to match the width or height of the parent view.
For more information about layout properties, see the Layout guide.
Add a Text Field
As with every View object, you must define certain XML attributes to specify the EditText object’s properties.
The element should read as follows:
Here are the attributes you added:
android:id This provides a unique identifier for the view, which you can use to reference the object from your app code, such as to read and manipulate the object (you’ll see this in the next lesson).
The at sign ( @ ) is required when you’re referring to any resource object from XML. It is followed by the resource type ( id in this case), a slash, then the resource name ( edit_message ).
Resource Objects
A resource object is a unique integer name that’s associated with an app resource, such as a bitmap, layout file, or string.
Every resource has a corresponding resource object defined in your project’s gen/R.java file. You can use the object names in the R class to refer to your resources, such as when you need to specify a string value for the android:hint attribute. You can also create arbitrary resource IDs that you associate with a view using the android:id attribute, which allows you to reference that view from other code.
The SDK tools generate the R.java file each time you compile your app. You should never modify this file by hand.
For more information, read the guide to Providing Resources.
The plus sign ( + ) before the resource type is needed only when you’re defining a resource ID for the first time. When you compile the app, the SDK tools use the ID name to create a new resource ID in your project’s gen/R.java file that refers to the EditText element. With the resource ID declared once this way, other references to the ID do not need the plus sign. Using the plus sign is necessary only when specifying a new resource ID and not needed for concrete resources such as strings or layouts. See the sidebox for more information about resource objects.
android:layout_width and android:layout_height Instead of using specific sizes for the width and height, the «wrap_content» value specifies that the view should be only as big as needed to fit the contents of the view. If you were to instead use «match_parent» , then the EditText element would fill the screen, because it would match the size of the parent LinearLayout . For more information, see the Layouts guide. android:hint This is a default string to display when the text field is empty. Instead of using a hard-coded string as the value, the «@string/edit_message» value refers to a string resource defined in a separate file. Because this refers to a concrete resource (not just an identifier), it does not need the plus sign. However, because you haven’t defined the string resource yet, you’ll see a compiler error at first. You’ll fix this in the next section by defining the string.
Note: This string resource has the same name as the element ID: edit_message . However, references to resources are always scoped by the resource type (such as id or string ), so using the same name does not cause collisions.
Add String Resources
By default, your Android project includes a string resource file at res/values/strings.xml . Here, you’ll add a new string named «edit_message» and set the value to «Enter a message.»
- In Android Studio, from the res/values directory, open strings.xml .
- Add a line for a string named «edit_message» with the value, «Enter a message».
- Add a line for a string named «button_send» with the value, «Send».
You’ll create the button that uses this string in the next section.
The result for strings.xml looks like this:
For text in the user interface, always specify each string as a resource. String resources allow you to manage all UI text in a single location, which makes the text easier to find and update. Externalizing the strings also allows you to localize your app to different languages by providing alternative definitions for each string resource.
For more information about using string resources to localize your app for other languages, see the Supporting Different Devices class.
Add a Button
- In Android Studio, from the res/layout directory, edit the activity_my.xml file.
- Within the element, define a element immediately following the element.
- Set the button’s width and height attributes to «wrap_content» so the button is only as big as necessary to fit the button’s text label.
- Define the button’s text label with the android:text attribute; set its value to the button_send string resource you defined in the previous section.
Note: This button doesn’t need the android:id attribute, because it won’t be referenced from the activity code.
The layout is currently designed so that both the EditText and Button widgets are only as big as necessary to fit their content, as shown in figure 2.

Figure 2. The EditText and Button widgets have their widths set to «wrap_content» .
This works fine for the button, but not as well for the text field, because the user might type something longer. It would be nice to fill the unused screen width with the text field. You can do this inside a LinearLayout with the weight property, which you can specify using the android:layout_weight attribute.
The weight value is a number that specifies the amount of remaining space each view should consume, relative to the amount consumed by sibling views. This works kind of like the amount of ingredients in a drink recipe: «2 parts soda, 1 part syrup» means two-thirds of the drink is soda. For example, if you give one view a weight of 2 and another one a weight of 1, the sum is 3, so the first view fills 2/3 of the remaining space and the second view fills the rest. If you add a third view and give it a weight of 1, then the first view (with weight of 2) now gets 1/2 the remaining space, while the remaining two each get 1/4.
The default weight for all views is 0, so if you specify any weight value greater than 0 to only one view, then that view fills whatever space remains after all views are given the space they require.
Make the Input Box Fill in the Screen Width
To fill the remaining space in your layout with the EditText element, do the following:
- In the activity_my.xml file, assign the element’s layout_weight attribute a value of 1 .
- Also, assign element’s layout_width attribute a value of 0dp .
To improve the layout efficiency when you specify the weight, you should change the width of the EditText to be zero (0dp). Setting the width to zero improves layout performance because using «wrap_content» as the width requires the system to calculate a width that is ultimately irrelevant because the weight value requires another width calculation to fill the remaining space.
Figure 3 shows the result when you assign all weight to the EditText element.

Figure 3. The EditText widget is given all the layout weight, so it fills the remaining space in the LinearLayout .
Here’s how your complete activity_my.xml layout file should now look:
Run Your App
This layout is applied by the default Activity class that the SDK tools generated when you created the project. Run the app to see the results:
- In Android Studio, from the toolbar, click Run
 .
. - Or from a command line, change directories to the root of your Android project and execute:
 .
.Continue to the next lesson to learn how to respond to button presses, read content from the text field, start another activity, and more.
Источник


