- Access iCloud Drive files from your iPhone and other devices
- Use iCloud Drive on your iPhone, iPad, iPod touch, Mac, or PC
- Automatically save Pages, Numbers, and Keynote files to iCloud Drive
- Add Desktop and Documents files to iCloud Drive
- Manage your iCloud Drive files while offline
- How to access files while you’re offline
- Upload files to iCloud Drive to save changes made offline
- When changes to your files upload to iCloud
- Where to find missing files
- If your files don’t update to iCloud Drive
- How to address a Resolve Conflict message
- Access your iPhone App’s data and files
- Before you begin
- In-Depth Tutorial
- 1. Launch iMazing on your computer and connect your device.
- 2. Select your device in the iMazing’s sidebar, then click Back Up.
- 3. Select an app, then view its Backup folder
- 4. Browse files
- How to Access iPhone Files on PC or Mac in 5 Ways
- Part 1. How to Access Files on iPhone from PC with EaseUS MobiMover
- Part 2. How to Access iPhone Files on PC via iCloud
- Part 3. How to View iPhone Photos on PC via File Explorer
- Part 4. How to Access iPhone Files on PC via iCloud Drive
- Part 5. How to Browse iPhone Files on Mac
- Part 6. How to Transfer Files from iPhone to PC or Mac
- The Bottom Line
Access iCloud Drive files from your iPhone and other devices
Use iCloud Drive to manage, view, edit and update file versions across all of your devices.
Use iCloud Drive on your iPhone, iPad, iPod touch, Mac, or PC
Set up iCloud Drive to keep your files up to date across your devices.
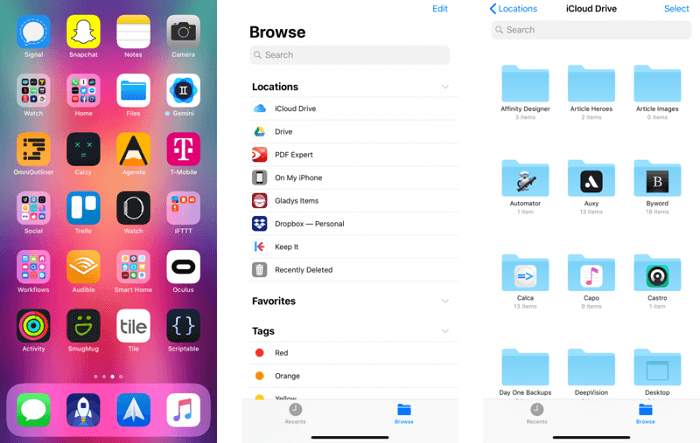
On your iPhone, iPad, and iPod touch with iOS 11 and later, you can access your files from the Files app when you have iCloud Drive set up. The Files app makes it easy to share your documents, collaborate in real time on your Pages, Numbers, and Keynote projects, and manage everything that you store in iCloud Drive.
If you don’t have the Files app on your device, update to iOS 11 or later. If you’re using iOS 9 or iOS 10, you can use the iCloud Drive app.
Automatically save Pages, Numbers, and Keynote files to iCloud Drive
You can update the settings on your iPhone, iPad, or iPod touch so that your documents automatically save to iCloud Drive, On My [device], or a third-party cloud service.
- Go to Settings.
- Choose to update the settings for Pages, Numbers, or Keynote.
- Tap Document Storage.
- Choose where you want to automatically save your documents.
If you choose iCloud Drive, changes you make to Pages, Numbers, and Keynote files on your Mac automatically save to iCloud Drive.
Add Desktop and Documents files to iCloud Drive
If you want to access files from your Mac on your other devices, you can add the Desktop and Documents folder to iCloud Drive.

Manage your iCloud Drive files while offline
If you’re offline and want to access, edit, and save documents in iCloud Drive, follow these steps first.
How to access files while you’re offline
To access your files offline, open the Files app on your iPhone, iPad, or iPod touch and follow these steps.
If you make changes to locally stored versions of your files while offline the changes won’t appear in iCloud Drive. Upload the updated versions of your files to iCloud Drive when you’re back online.
Upload files to iCloud Drive to save changes made offline
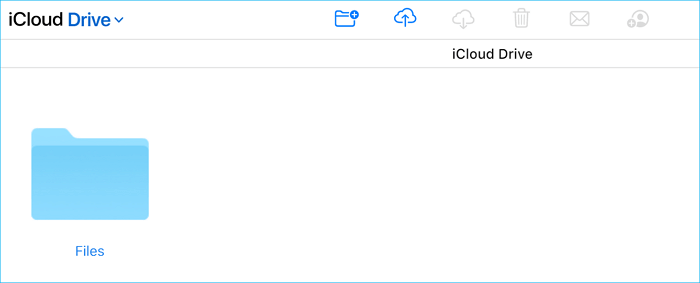
You can upload files to iCloud Drive from a Mac or PC by doing one of the following:
- Drag files from either your desktop or a folder window on your computer to the iCloud Drive window. You can also drag your files to a folder icon in the iCloud Drive window. If you drag to a folder icon, it’s highlighted to confirm that the item you’re dragging goes into the folder.
- Click the iCloud Drive upload button in the iCloud Drive toolbar. Select the files you want to upload, then click Choose.
If you don’t have enough space in iCloud for your upload, upgrade your iCloud storage or manage your iCloud storage to free up space.
When changes to your files upload to iCloud
The amount of time it takes for your changes to upload to iCloud depends on the app you’re using. Pages, Numbers, and Keynote regularly upload files to iCloud so you don’t lose any changes. Other apps upload your files to iCloud only after you save them to the iCloud Drive folder. To see your saved files on a Mac, go to Finder > iCloud Drive. On your iPhone, iPad, or iPod touch, go to the Files app. On a PC with iCloud for Windows, go to File Explorer > iCloud Drive.
If you still don’t see the latest changes or you see an «in-progress change» icon or the iCloud icon in the notification area (system tray), try to save a new document to the iCloud Drive folder. Then check the iCloud Drive folder to see if the changes appear.
Where to find missing files
When you turn on iCloud Drive, any documents that you already store in iCloud automatically move to iCloud Drive. You can see your files on iCloud.com, in the Files app on iOS 11 and later, in the Pages, Numbers, and Keynote apps, or in the iCloud Drive app on iOS 10 and iOS 9.
If you don’t see your files in any of those locations, set up iCloud Drive on all of your devices.
If you need to access a file that you deleted within the last 30 days, you can get it back from the Recently Deleted folder in the Files app, or on iCloud.com.
If your files don’t update to iCloud Drive
Check these things first:
- Make sure that you have enough iCloud storage. If you need more space in iCloud, you can buy more iCloud storage or free up space by deleting content.
- Sign in to iCloud on all of your devices and turn on iCloud Drive.
- Make sure that you have an active Internet connection on your Mac and on your iPhone, iPad, and iPod touch.
- Install the latest versions of Pages, Numbers, and Keynote. See which versions of Pages, Numbers, and Keynote you can use with iCloud Drive.
- Create a new document and save it to see if it uploads to iCloud. If it does, see if your other documents start uploading.
If you tried these steps and your files still don’t upload to iCloud, stay signed in to iCloud and save your updated files to a different folder on your Mac or PC. Then contact Apple Support for more help.
How to address a Resolve Conflict message
If you get a Resolve Conflict message when you open a file, choose the version of the document that you want to save. Then choose Keep to update the file in iCloud. This message means the file was updated on another device or from iCloud.com since the last time you signed in to iCloud.
Information about products not manufactured by Apple, or independent websites not controlled or tested by Apple, is provided without recommendation or endorsement. Apple assumes no responsibility with regard to the selection, performance, or use of third-party websites or products. Apple makes no representations regarding third-party website accuracy or reliability. Contact the vendor for additional information.
Источник
Access your iPhone App’s data and files
An iPhone may be a pocket computer, but it doesn’t work the way a desktop or laptop computer works. On a computer, you interact directly with stored files: you open them, work on them, and save them; you organize them in folders using macOS Finder or Windows File Explorer; and you can view them when you want.
iOS is very different, you don’t have access to the entire file system. There’s a good reason for this: it’s called sandboxing. This is a security feature that ensures that apps are sequestered, and no app — or its data or files — can communicate with another app. There are some exceptions to this, of course: you can access your photo library from apps other than Photos to send pictures via email or Messages; you can play music files with third-party music player apps; and so on. But in general, sandboxing means that apps can’t access other apps, their data, or their files. An app has only access to its own folder (sandbox).
Therefore the focus is on apps, and, while apps do work with files under the hood, you don’t usually see them. Some apps do allow you to see files, but it depends on the apps. The ones that let you see files generally allow these files to be synced from a computer, using File Sharing:
How to Transfer files and folders to an iPhone or iPad App from a Mac or PC.
But most apps don’t have File Sharing enabled. Also even if the app has File Sharing enabled, you cannot access other folders than the Documents folder. In an app’s sandbox you also have a Library folder containing app’s settings, configuration, and sometimes content:
How to export, backup and transfer iOS Apps’ Data and Settings.
With iMazing, you can access the Library folder of apps as well as nearly the entire iOS file system via a backup of your device.
Here’s how to browse files on your iOS device:
- Back Up your device. Make sure to encrypt your backup so iMazing can back up all your data.
- Select your device in iMazing, then click Apps.
- Select an app, then enter its Backup folder.
- Navigate that folder to find files. Select files you want to view; you may or may not be able to view them, depending on which apps are needed to read their data.
- Select files, then click Copy to Mac or Copy to PC to copy them to your computer. You may then be able to view their contents with an app that wasn’t used to create them.
- Export an app’s file and data to your computer to restore it later or transfer it to an other device: Export, backup and transfer iOS Apps’ Data and Settings
Before you begin
Download and install iMazing on your Mac or PC computer
In-Depth Tutorial
1. Launch iMazing on your computer and connect your device.
Download and install iMazing. Launch the app, and connect your device to your Mac or PC.
2. Select your device in the iMazing’s sidebar, then click Back Up.
Select your device in the sidebar, then click Back Up. Tell iMazing to back up your device; this may take a minute or two. Follow the instructions in this article to perform the backup.
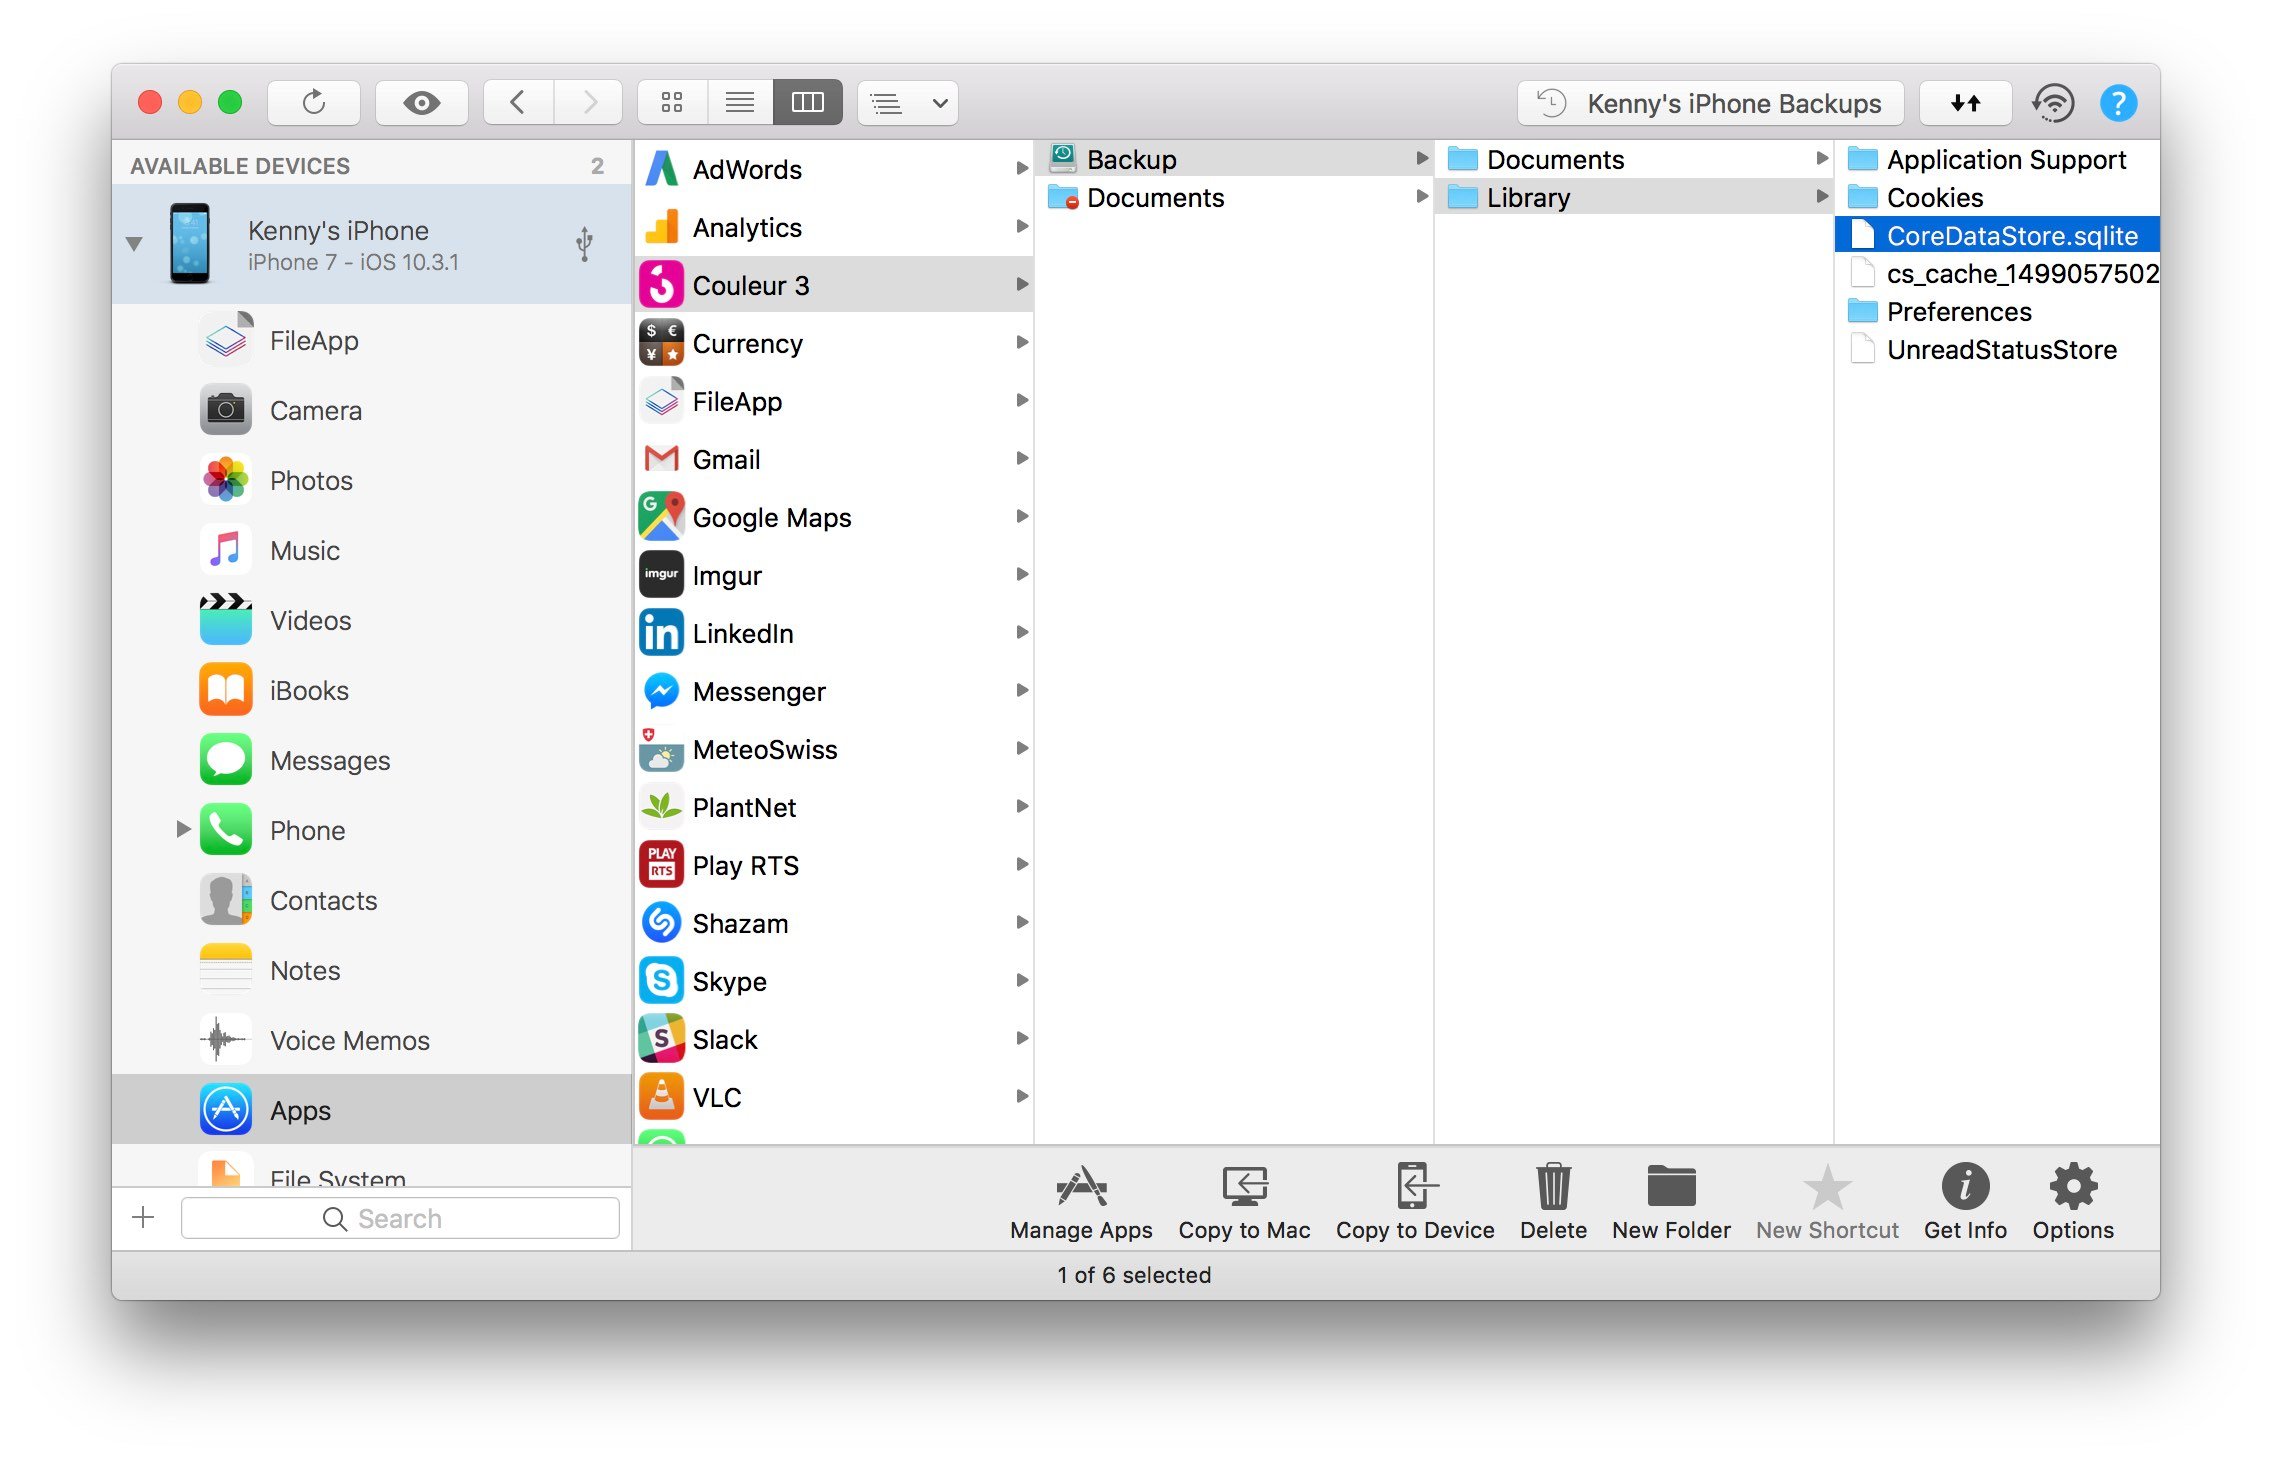
3. Select an app, then view its Backup folder
When the backup has completed, click your device in the iMazing sidebar. It expands to show its content: Apps, Camera, Photos, Music, and more.
Click Apps, then select the app whose files or data you want to view. You’ll see that for many apps the Documents folder shows a «Do Not Enter» icon; this means that these apps have not enabled file sharing. But this isn’t a problem. Since iMazing has just backed up your device, you can access these files from the app’s Backup folder. This folder gives you access to that part of your device’s backup that contains files and data for the specific app.
Select the Backup folder belonging to the app whose files you want to view.
4. Browse files
You can view these files in three ways from the View Mode button in iMazing’s toolbar: as icons, in list view, or in column view:
- Icon view: If you’re in Icon view, you can double click an app or a folder to view its contents, as you would on a computer. To move back in your viewing history, click the

Источник
How to Access iPhone Files on PC or Mac in 5 Ways
At one time or another, you want to view your iPhone files on a computer to transfer the data to or from your iPhone or to manage them more conveniently from the computer. If you do, there are five proven ways for you to access your iPhone files on a PC or Mac. Depending on the specific file types you want to view and the computer you are using, you will need different ways to access your iPhone files on the computer.
Part 1. How to Access Files on iPhone from PC with EaseUS MobiMover
Support files: Photos and Albums, Movies, TV shows, Music Videos, Music, Ringtones, etc
Are you wondering how to access iPhone files on a PC without iTunes? If so, why not try the reliable iOS data management softwareВ -В EaseUS MobiMover, which is designed for iOS data transfer, content management, and video download. With it, you are able to view and access your iPhone/iPad/iPod touch files on PC or Mac, transfer files to or from your iOS device, or download videos from YouTubeВ to your computer or iPhone/iPad/iPad Touch. Here are the files you can view on PC with the help of this tool:
- Photos: Photos and Albums
- Videos: Movies, TV shows, Music Videos
- Audios: Music, Ringtones, Voice Memos, Audiobooks
- Others: Contacts, Notes, Messages, Voice Mails, Books, and Podcasts
To access iPhone files on PC with EaseUS MobiMover:
Step 1.В Connect your iPhone to your computer with a USB cable, open EaseUS MobiMover, click «Content Management» and choose the category you want to view.В
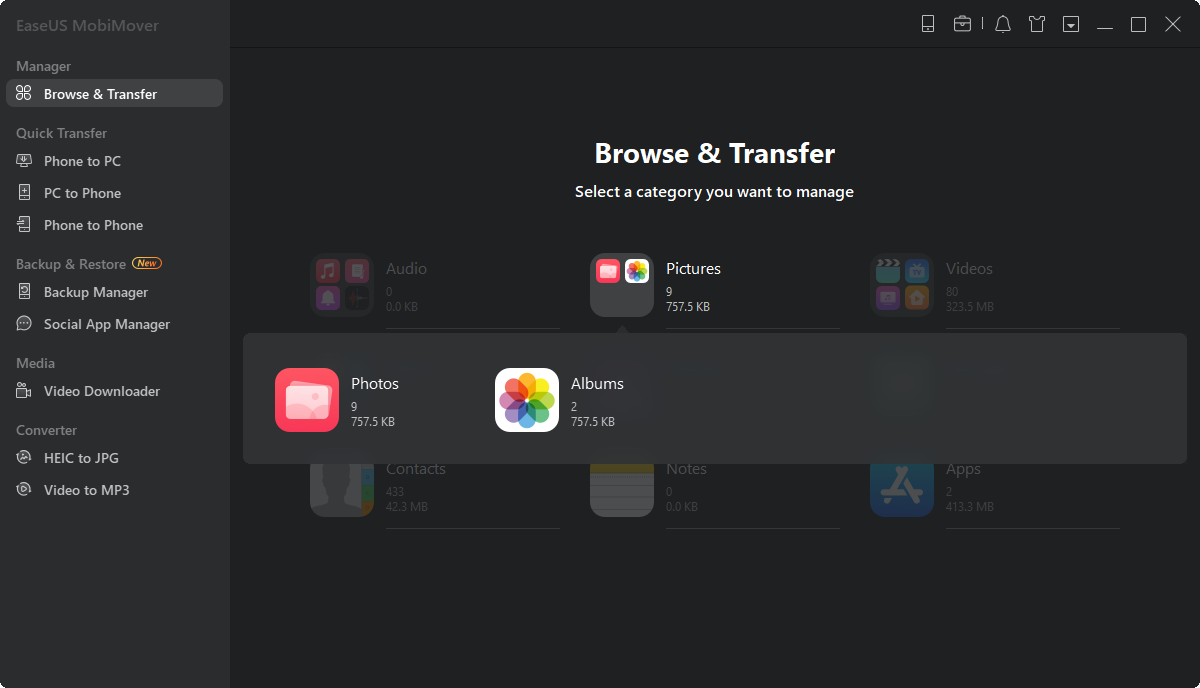
Step 2. After you choose the category, you can view all the items existing on your iPhone from your computer. What’s more, if you need to, you can transfer files to or from your iPhone using MobiMover.
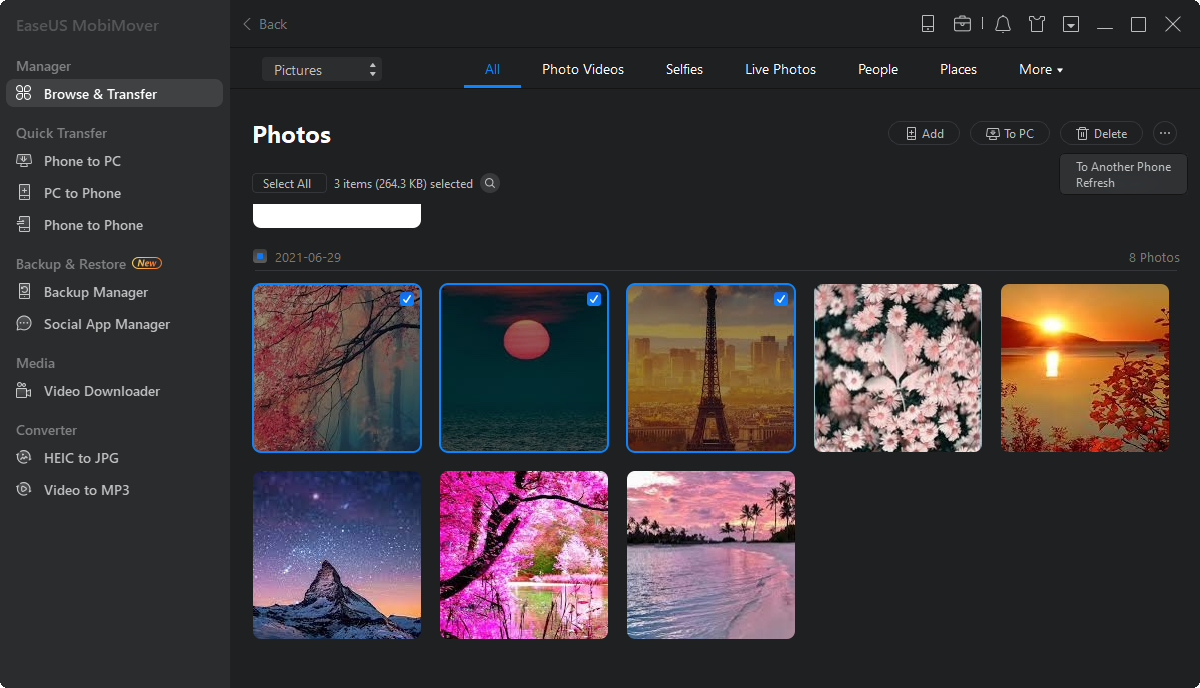
Step 3.В If you want to delete some unwanted files, just select the items and click «Delete», then tap on «Yes» to confirm your deletion.

The files you can view EaseUS MobiMover can also be transferred to PC using this tool if you need to. For more details, learn how to transfer files from iPhone to PCВ with EaseUS MobiMover.
Part 2. How to Access iPhone Files on PC via iCloud
Support files:В Mails, Contacts, Calendar, Photos, Notes, Reminders, Pages, Numbers, Keynote
In addition to using EaseUS MobiMover, you can also use iCloud to access files on your iPhone from a PC without iTunes. By enabling iCloud, you can view and access your iPhone files like photos, videos, contacts, notes, reminders, and more on the PC via iCloud.com.
To access iPhone files on PC:
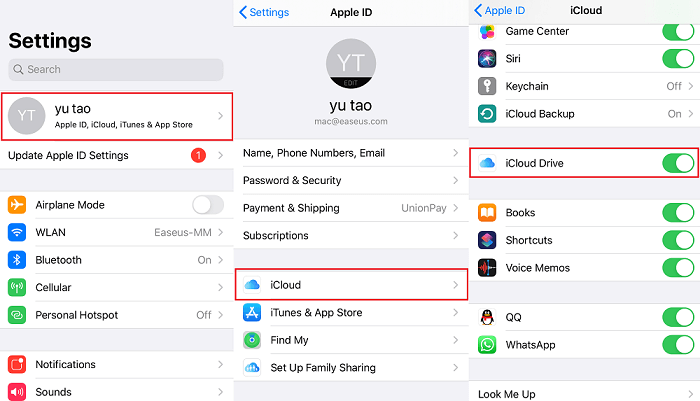
Step 1. Turn on iCloud according to the files you want to access. For example, if you want to access iPhone photos on PC, go to «Settings» > [your name] > «iCloud» > «Photos» and turn on «iCloud Photos».
Step 2. On your Windows PC, open a browser to visit iCloud.com, and then sign in with your Apple ID. (Make sure you are using the same Apple ID on your devices.)
Step 3. Among the options, click the one that contains the files you want to access, e.g. «Photos», «Notes», or «Contacts». Then, you can now see your iPhone files on your PC.
![]()
If you need to, you can also export contacts from iPhoneВ or download iCloud photos to PCВ via iCloud.com.
Part 3. How to View iPhone Photos on PC via File Explorer
Support files:В Photos
If the file type you want to access is photos, you can use Windows Explorer (called File Explorer in Windows 10) to get it done. No extra app is needed. The process is very simpleВ and all you need is aВ USB cable to connect your iPhone to the computer.В
To access iPhone photos on PC via File Explorer:
Step 1. Connect your iPhone to the Windows PC.
Step 2. Unlock your iPhone and click «Trust» in the prompt on your iPhone to trust the computer. If asked, enter your iPhone passcode.
Step 3. Open «This PC», double-click [your device name] > «Internal Storage» > «DCIM» > «100APPLE», and you will see all your iPhone photos and videos here.
Step 5. Then you can view your iPhone photos and videos freely or copy these items to transfer your iPhone photos/videos to your PC.
![]()
There is more than one solution to access iPhone photos on PC. For more workable tips, go to the guide on how to view iPhone photos on computer.
Part 4. How to Access iPhone Files on PC via iCloud Drive
Support files: Excel, Word, or PPT files
If you have ever enabled iCloud Drive on your iPhone, then all of your files and documents will be synced across all of your Apple devices. It is very convenient to access your files with iCloud Drive.В But this cloud serviceВ works on iPhone or iPad running iOS 13 or later and PC running Windows 10. If you want to access files stored in iCloud Drive, follow these steps.
Step 1. Turn on iCloud Drive on your iPhone
First of all, you’ll need to turn on iCloud Drive on your iPhone. to do it, you can go to Settings > Tap on [your name] > Tap «iCloud» > Turn on «iCloud Drive.»В Once you’ve done that, any documents you store in iCloud will be automatically synced to iCloud Drive.
Step 2. UploadВ Files toВ iCloud Drive
Then, you’ll need to open your Files app and upload files to your iCloud Drive.В If you don’t have it, just download one from App Store. If there’s one, open it > Click «Browse» > Tap «iCloud Drive» > Search for files youВ attempt to copy to your PC and upload them to iCloud Drive.
Step 3. Download files from iCloud Drive to your PC
Finally, you can download files to your PC. Here’s how: go to visit iCloud.com on your PC >В Sign in with your Apple ID (the one you use on your iPhone) >В Choose «iCloud Drive» >В Now you should see the items from your iPhone. Double-click to check the files.
Part 5. How to Browse iPhone Files on Mac
It’s no doubt that the iPhone has better compatibility with Mac, compared with Windows PC. To access iPhone files on Mac, both using EaseUS MobiMover and iCloud in Part 1 are advisable. If your Mac is running macOS Catalina, there is one more way for you to browse iPhone files on Mac, which is to use Finder.
With macOS Catalina, iTunes is not available any longer. Instead, Finder works to share files between your iPhone and Mac. Thus, Finder also allows you to access your iPhone files on Mac.
To view iPhone files on Mac via Finder:
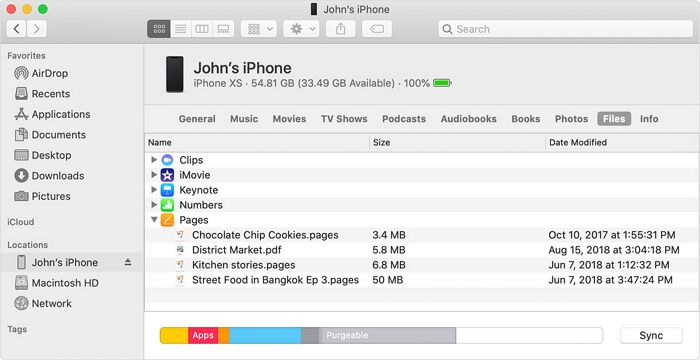
Step 1. Connect your iPhone to the Mac and open a Finder window.
Step 2. In Finder, select your iPhone in the «Locations» section.
Step 3. Choose the tab according to the files you want to view, including music, movies, TV shows, podcasts, audiobooks, books, photos, files, and more.
As mentioned, you can also transfer files from iPhone to Mac or vice versa using Finder:
To copy files from iPhone to Mac: Select the files you want to share and drag the files to a folder on your computer.
To transfer files from Mac to iPhone: Select the files you want to transfer and drag them to the app on your device.
Part 6. How to Transfer Files from iPhone to PC or Mac
After you view and access your iPhone files on the computer, you may want to transfer files from iPhone to PC or Mac to make a backup or copy files from computer to your iPhoneВ to enrich its content. No matter what you want, EaseUS MobiMover will help.
To transfer files from iPhone to PC or Mac:
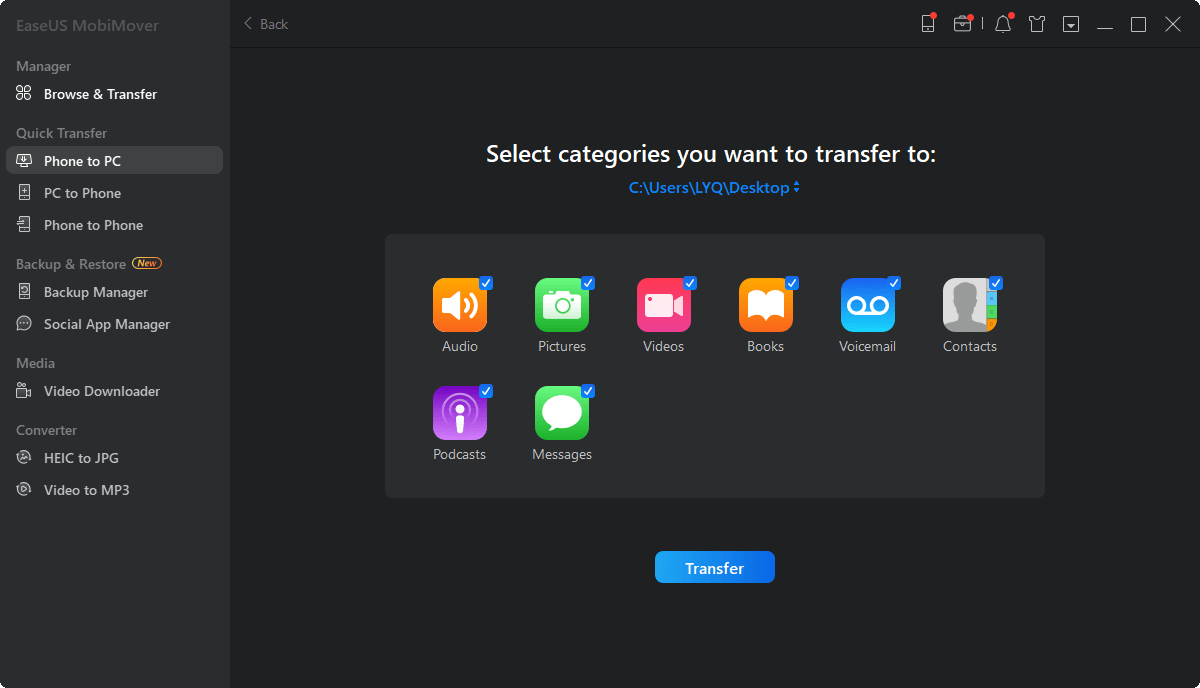
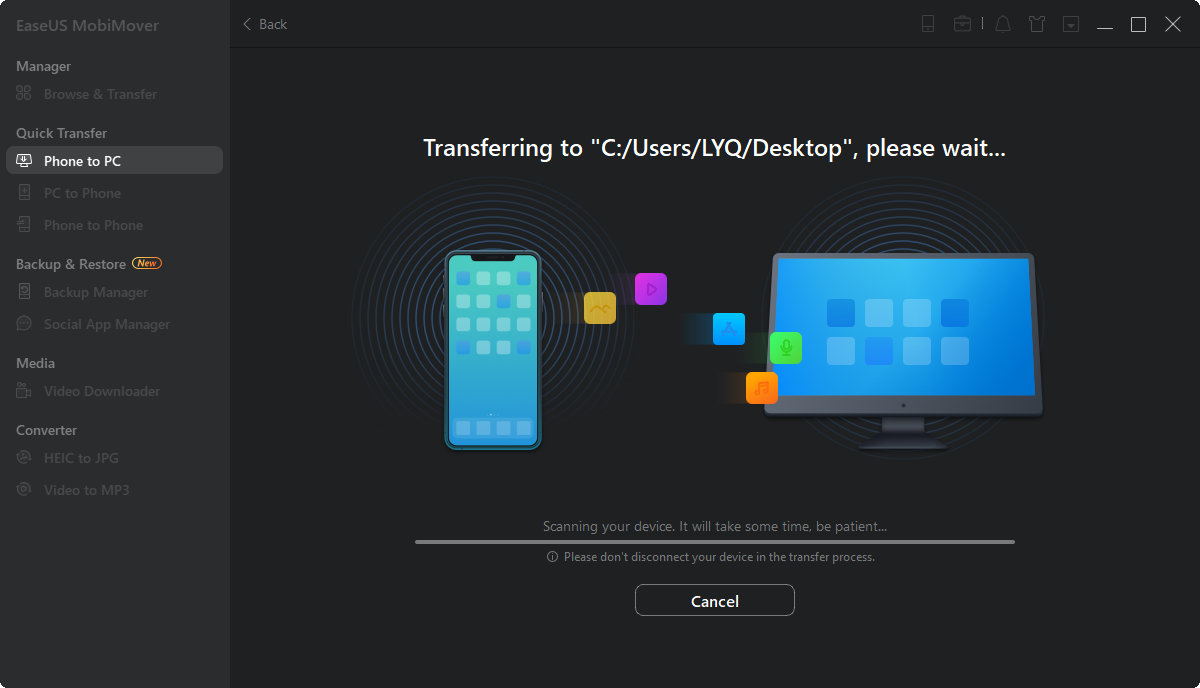
Step 1.В Connect your iPhone to your computer running Windows or Mac OS systems with a USB cable > StartВ EaseUS MobiMover > Click «Phone to PC» > Click «Next.»

Step 2.В Choose the type of files you wish to export >В Customize the destination for exported iPhone data > Click «Transfer» to copyВ iPhone files to the computer at a fast speed.
Step 3.В When the transferring finished, you can view, edit, keep or delete the content as you like.
The Bottom Line
Now you know how to access your iPhone files on a computer, be it a PC or a Mac. Besides, you also learn the simple steps to transfer files from your iPhone to PC/Mac or vice versa. I believe these tips will help you at one time or another when it comes to iOS data transfer.
о™љо™љо™љо™љо™љ
4.5 out of 5 stars, based on 10 votes
EaseUS MobiMover allows you to easily transfer all data from your iPhone to your PC. The app is available for both Windows and Macs so irrespective of which platform you use, you are covered.

EaseUs MobiMover solves this problem as it allows you to transfer data from an iPhone to a Mac, Mac to an iPhone, or from one iPhone to another iPhone fast.

EaseUS MobiMover is a program that allows you to share files between your iOS device and your PC in an easy manner. This is very useful, since both operative systems are not compatible.

EaseUS MobiMover for Mac and PC is a powerful tool for transferring data from your Apple mobile device to your computer, managing the variety of files that you create, and moving those huge videos quickly.

Related Articles — ALSO ON EaseUS SOFTWARE
Источник


