- Use the Finder to share files between your Mac and your iPhone, iPad, iPod touch
- Other ways to share
- What you need to use the Finder to share files
- See the iOS and iPadOS apps that can share files with your Mac
- Copy from your Mac to your device
- Copy from your device to your Mac
- Open shared files
- Back up shared files
- Delete shared files from your device
- Access your iPhone App’s data and files
- Before you begin
- In-Depth Tutorial
- 1. Launch iMazing on your computer and connect your device.
- 2. Select your device in the iMazing’s sidebar, then click Back Up.
- 3. Select an app, then view its Backup folder
- 4. Browse files
- Use the Files app on your iPhone, iPad, or iPod touch
- Find your files
- Save a copy of your file locally
- Move iCloud Drive files
- Look for files on your Mac or PC
- Organize your files
- Create new folders
- Add a tag
- Rename a tag
- Delete files
- Share folders and files with your friends or colleagues
- Use third-party apps in Files
- Add third-party apps
- Move third-party cloud files
- Do more with Files on iPadOS
- Connect to a file server
- Switch to Column View
- If you need help
Use the Finder to share files between your Mac and your iPhone, iPad, iPod touch
With macOS Catalina or later, you can use the Finder to share files between your iOS and iPadOS devices and your Mac.
Other ways to share
Learn about other ways you can share files between your Mac and your devices. These features work wirelessly.
iCloud Drive lets you securely access all of your documents from your iPhone, iPad, iPod touch, Mac, or PC. No matter which device you’re using, you’ll always have the most up-to-date documents when and where you need them.
With Handoff, you can start a document, email, or message on one device and pick up where you left off on another device. Handoff works with Apple apps such as Mail, Safari, Maps, Messages, Reminders, Calendar, Contacts, Pages, Numbers, and Keynote. It also works with some third-party apps.
AirDrop lets you instantly share your photos, videos, documents, and more with other Apple devices that are nearby.

What you need to use the Finder to share files
- macOS Catalina or later
- An iPhone, iPad, iPod touch with the latest version of iOS or iPadOS
- An iOS or iPadOS app that works with File Sharing
See the iOS and iPadOS apps that can share files with your Mac
- Open a Finder window.
- Connect your iPhone, iPad, or iPod touch to your computer with a USB cable.
- Select your device in the Finder. Learn what to do if your computer doesn’t recognize your device.
- Click the Files tab to see a list of apps that can share files. If you don’t see a Files section, your device doesn’t have any apps that can share files.
- Click the triangle next to an app to see the files that you can share.

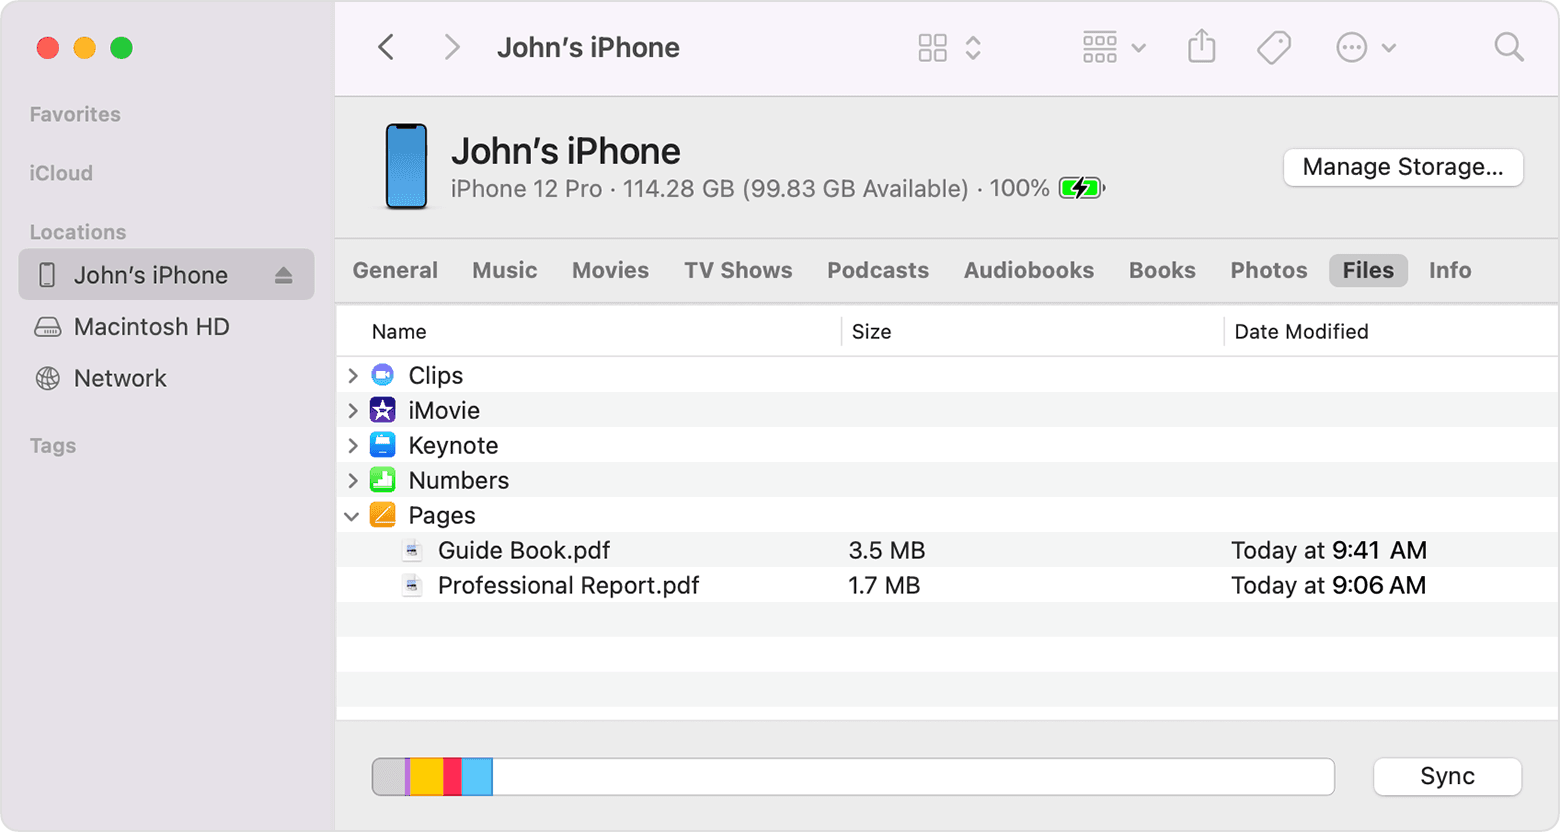
Copy from your Mac to your device
- Select the files that you want to copy. Select only files that work with the app. Check the app’s user guide to see which ones work.
- Drag the files to the app on your device. The Finder copies the files to your device.
Copy from your device to your Mac
- Select the files that you want to copy.
- Drag the files to a folder on your computer. The Finder copies the files to your computer.
Open shared files
On your iPhone, iPad, or iPod touch, use the app that you chose in the Files tab to open files that you shared from your computer.
Depending on the file type, some apps can’t open files in other apps or locations. You can see the list of files in the Files tab of the Finder when your device is connected to your computer.
Back up shared files
When iCloud or your computer backs up your device, it backs up your shared files as well.
If you delete an app with shared files from your iOS or iPadOS device, you also delete those shared files from your device and your iCloud or computer backup. To avoid losing shared files, copy the files to your computer before deleting the app from your device.
Delete shared files from your device
- Open a Finder window on your Mac.
- Connect your device to your computer using a USB cable.
- Select your device in the Finder. Learn what to do if your computer doesn’t recognize your device.
- Select the app from the list in the Files section.
- In the Documents list, select the file that you want to delete, then press the Delete key on your keyboard.
- When the Finder asks you to confirm, click Delete.
There might be other ways to delete files from an app. See the app’s user guide to find out more.
Источник
Access your iPhone App’s data and files
An iPhone may be a pocket computer, but it doesn’t work the way a desktop or laptop computer works. On a computer, you interact directly with stored files: you open them, work on them, and save them; you organize them in folders using macOS Finder or Windows File Explorer; and you can view them when you want.
iOS is very different, you don’t have access to the entire file system. There’s a good reason for this: it’s called sandboxing. This is a security feature that ensures that apps are sequestered, and no app — or its data or files — can communicate with another app. There are some exceptions to this, of course: you can access your photo library from apps other than Photos to send pictures via email or Messages; you can play music files with third-party music player apps; and so on. But in general, sandboxing means that apps can’t access other apps, their data, or their files. An app has only access to its own folder (sandbox).
Therefore the focus is on apps, and, while apps do work with files under the hood, you don’t usually see them. Some apps do allow you to see files, but it depends on the apps. The ones that let you see files generally allow these files to be synced from a computer, using File Sharing:
How to Transfer files and folders to an iPhone or iPad App from a Mac or PC.
But most apps don’t have File Sharing enabled. Also even if the app has File Sharing enabled, you cannot access other folders than the Documents folder. In an app’s sandbox you also have a Library folder containing app’s settings, configuration, and sometimes content:
How to export, backup and transfer iOS Apps’ Data and Settings.
With iMazing, you can access the Library folder of apps as well as nearly the entire iOS file system via a backup of your device.
Here’s how to browse files on your iOS device:
- Back Up your device. Make sure to encrypt your backup so iMazing can back up all your data.
- Select your device in iMazing, then click Apps.
- Select an app, then enter its Backup folder.
- Navigate that folder to find files. Select files you want to view; you may or may not be able to view them, depending on which apps are needed to read their data.
- Select files, then click Copy to Mac or Copy to PC to copy them to your computer. You may then be able to view their contents with an app that wasn’t used to create them.
- Export an app’s file and data to your computer to restore it later or transfer it to an other device: Export, backup and transfer iOS Apps’ Data and Settings
Before you begin
Download and install iMazing on your Mac or PC computer
In-Depth Tutorial
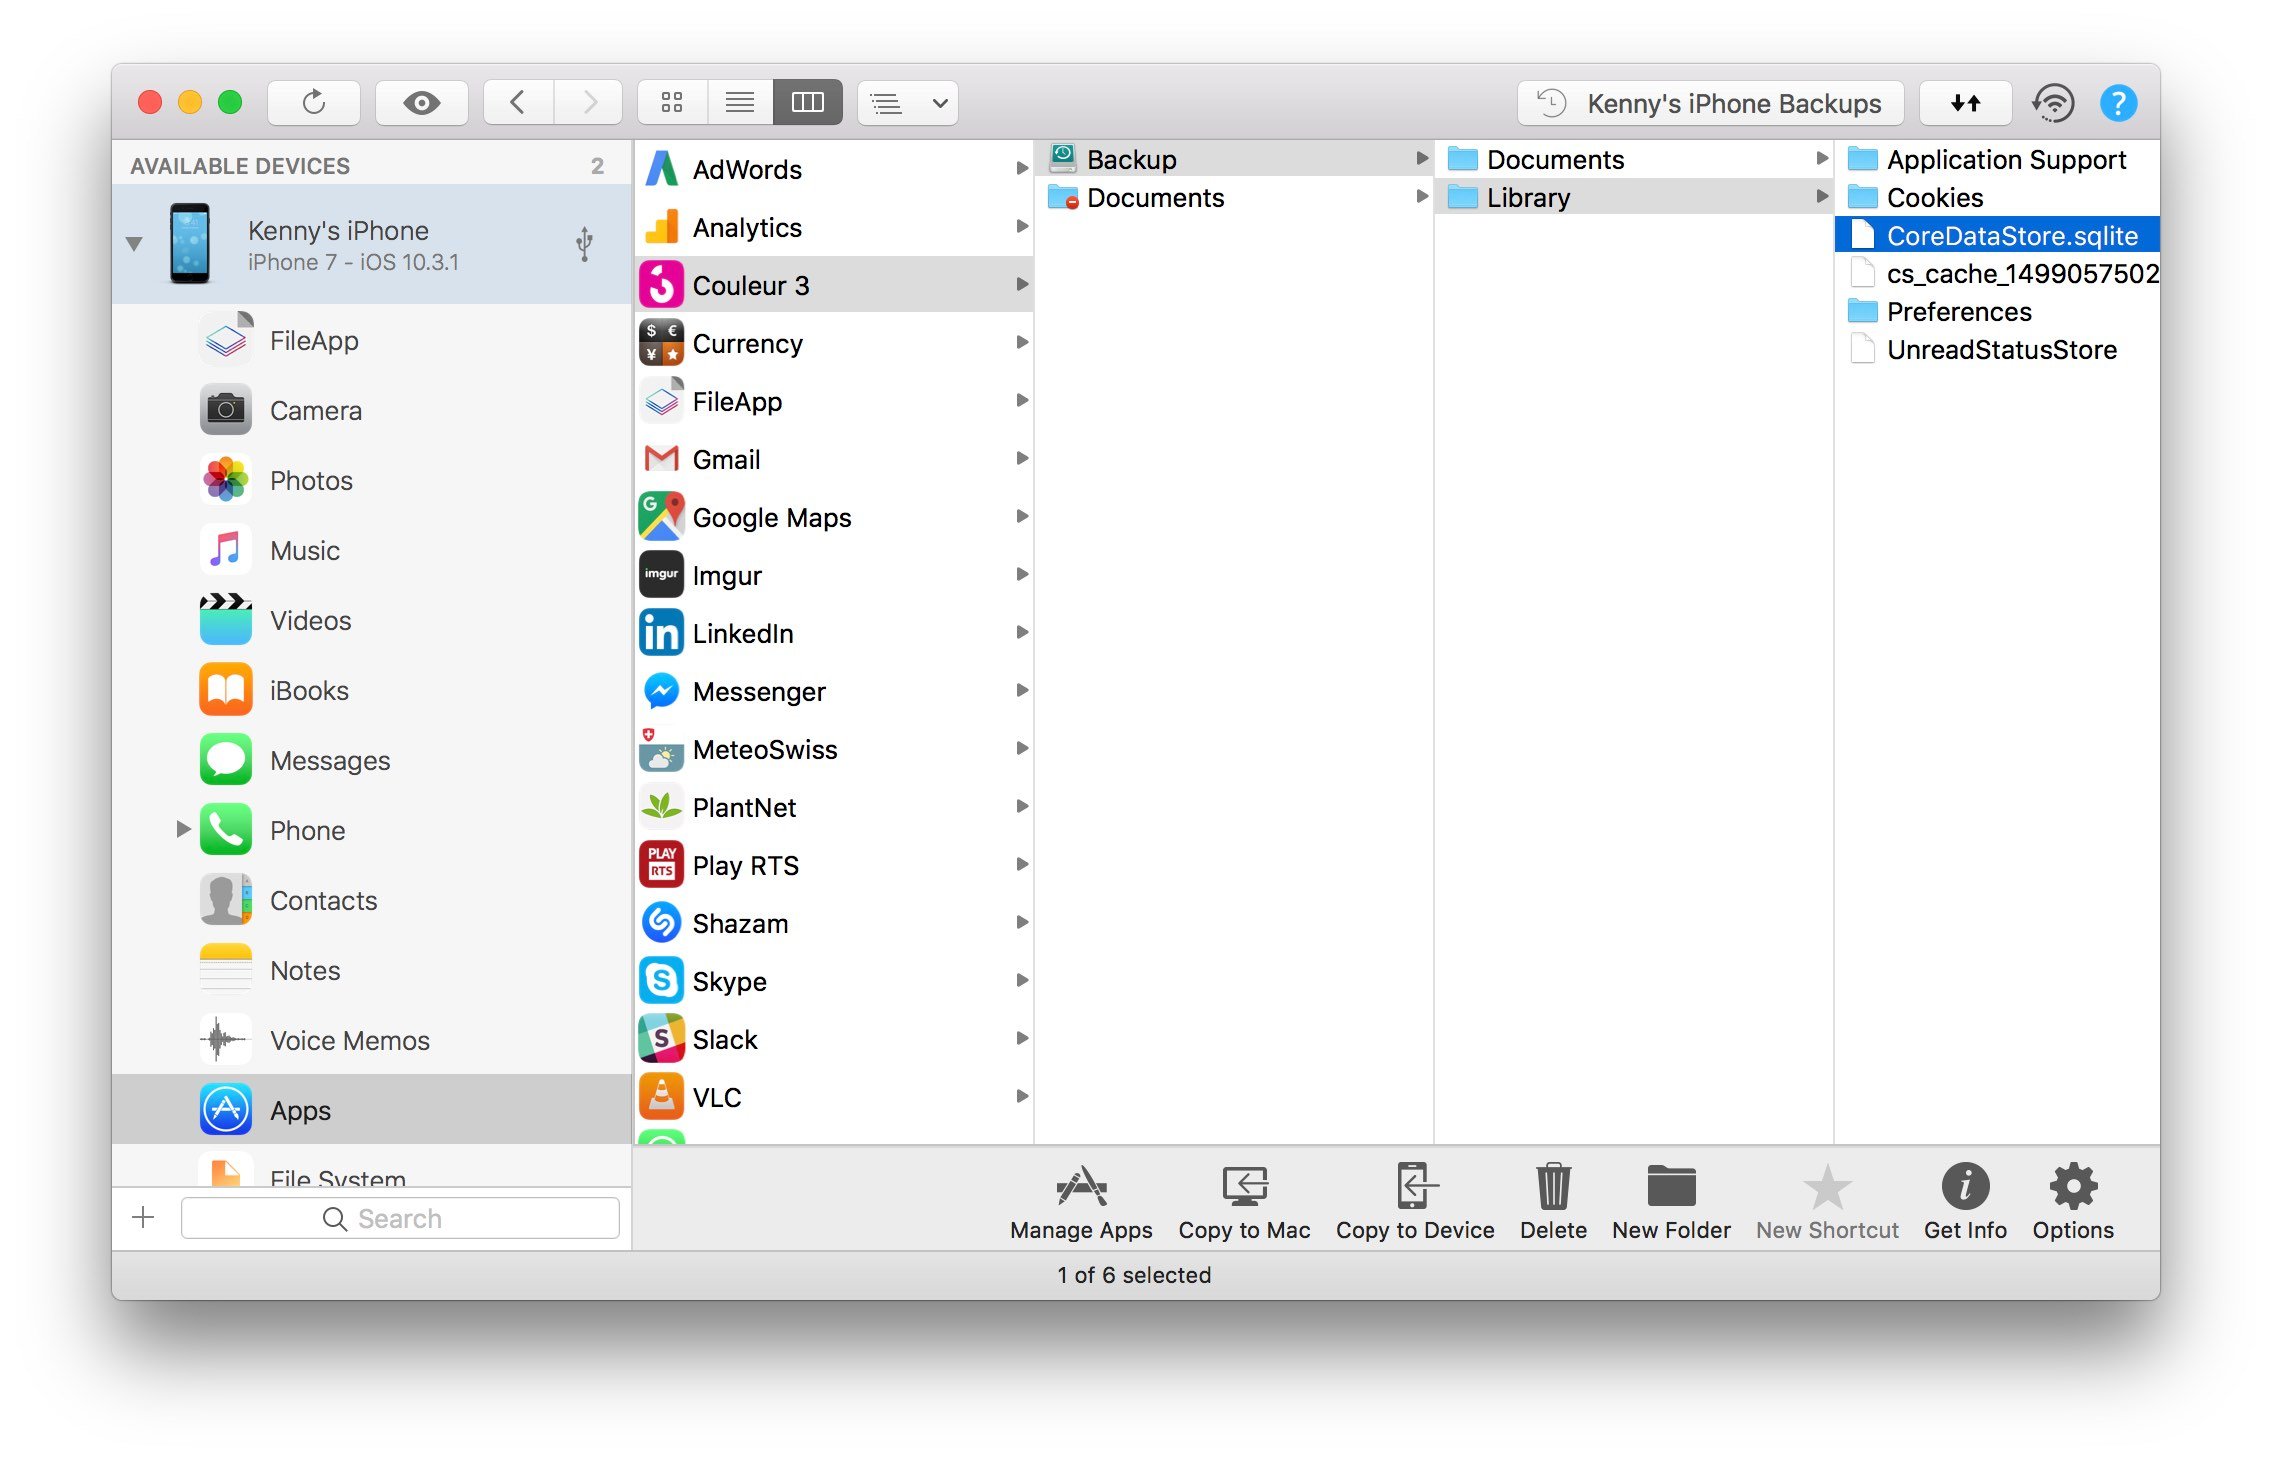
1. Launch iMazing on your computer and connect your device.
Download and install iMazing. Launch the app, and connect your device to your Mac or PC.
2. Select your device in the iMazing’s sidebar, then click Back Up.
Select your device in the sidebar, then click Back Up. Tell iMazing to back up your device; this may take a minute or two. Follow the instructions in this article to perform the backup.
3. Select an app, then view its Backup folder
When the backup has completed, click your device in the iMazing sidebar. It expands to show its content: Apps, Camera, Photos, Music, and more.
Click Apps, then select the app whose files or data you want to view. You’ll see that for many apps the Documents folder shows a «Do Not Enter» icon; this means that these apps have not enabled file sharing. But this isn’t a problem. Since iMazing has just backed up your device, you can access these files from the app’s Backup folder. This folder gives you access to that part of your device’s backup that contains files and data for the specific app.
Select the Backup folder belonging to the app whose files you want to view.
4. Browse files
You can view these files in three ways from the View Mode button in iMazing’s toolbar: as icons, in list view, or in column view:
- Icon view: If you’re in Icon view, you can double click an app or a folder to view its contents, as you would on a computer. To move back in your viewing history, click the

Источник
Use the Files app on your iPhone, iPad, or iPod touch
View and manage your files from any iPhone, iPad, or iPod touch. The Files app makes it simple to find what you’re looking for, no matter what device you’re currently using.
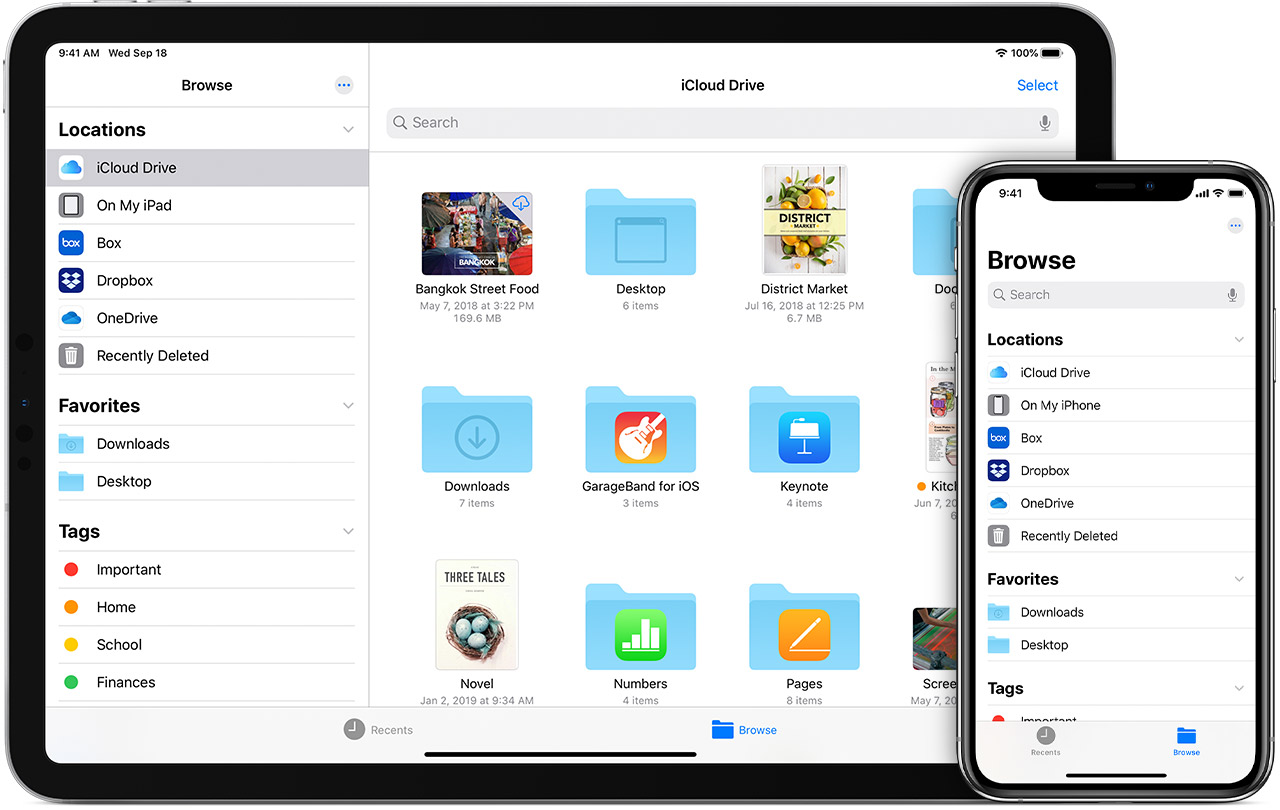
Find your files
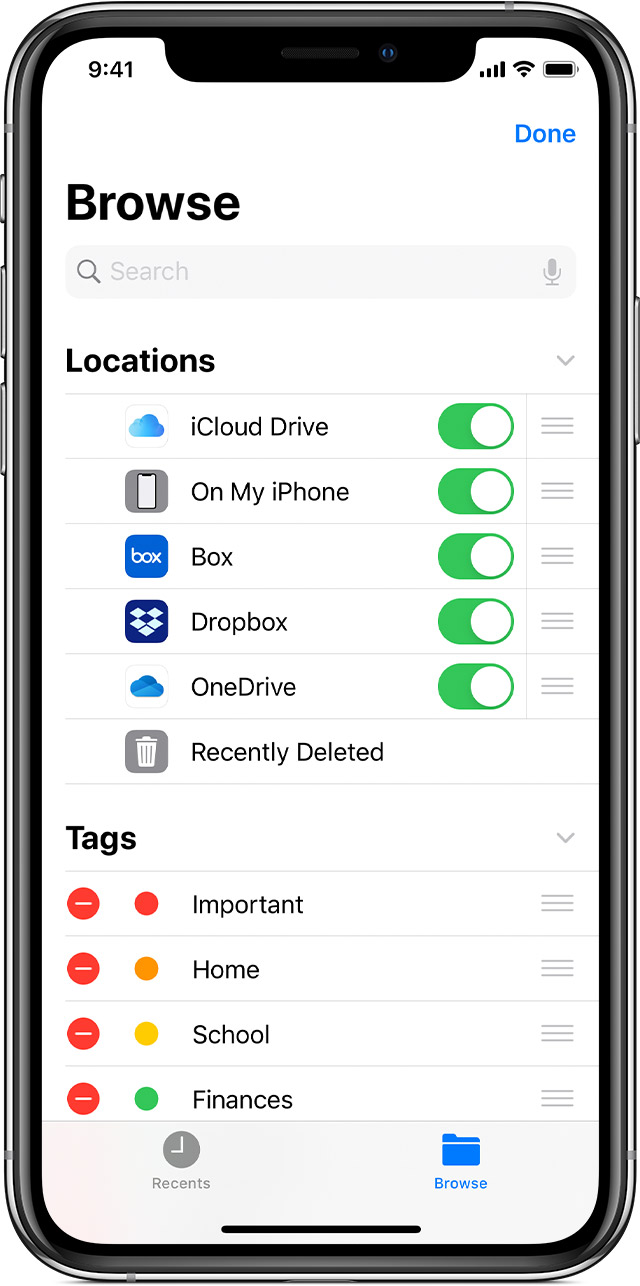
The Files app includes files on the device you’re using, as well as those in other cloud services and apps, and iCloud Drive. You can also work with zip files.* To access your files, just open the Files app and choose the location of the file you’re looking for.
Save a copy of your file locally
You can find locally stored files in On My [device], under Locations. On your iPad, simply drag files into the On My iPad folder to store them directly on your device. If you want to save a file locally on your iPhone or iPod touch, follow these steps.
- Go to the file that you want to store on your device.
- Tap Select > the file name > Organize .
- Under On My [Device], choose a folder or tap New Folder to create a new one.
- Tap Copy.
You can also long press on a file, choose Move, and select which folder you want to copy it to.
On iOS 12 or earlier, tap the file and choose Move. Then, under On My [device], choose Numbers, Keynote, or Pages, and tap Copy.
![]()
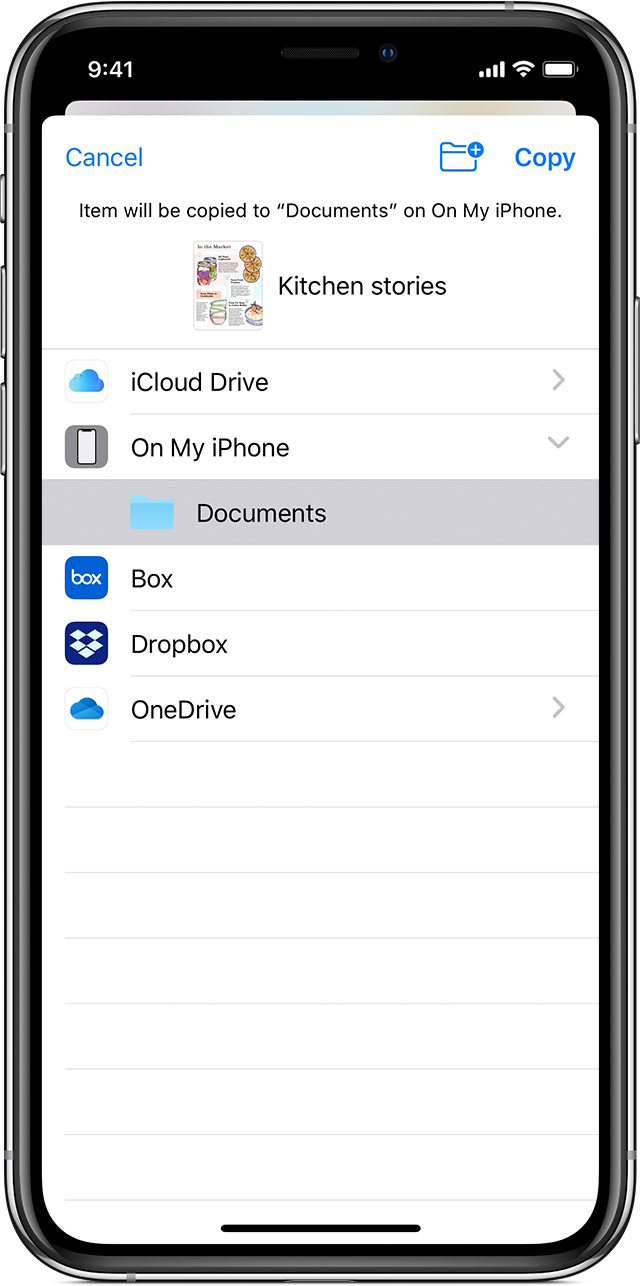
Move iCloud Drive files
- Go to the file that you want to move.
- Tap Select, then choose the file.
- Tap Organize .
- Under On My [Device], choose a folder or tap New Folder to create a new one.
- Tap Move.
You can also long press on a file, choose Move, and select which folder you want to copy it to.
Look for files on your Mac or PC
- On your Mac, choose Go > iCloud Drive from the menu bar, or click iCloud Drive in the sidebar of a Finder window.
- On iCloud.com, go to the iCloud Drive app.
- On your PC with iCloud for Windows, open File Explorer, then click iCloud Drive.
* Password protected zip folders or directories are not supported in the Files app.
Organize your files
It’s easy to organize all of the files stored in iCloud Drive — including Pages, Numbers, and Keynote documents. When you make changes on one device, your edits are automatically updated on every device using iCloud Drive.
You can make your own folders. Or rename the files and folders you already have when you press firmly on them.
Create new folders
- Go to Locations.
- Tap iCloud Drive, On My [device], or the name of a third-party cloud service where you want to keep your new folder.
- Swipe down on the screen.
- Tap More .
- Select New Folder.
- Enter the name of your new folder. Then tap Done.
On iOS 12 or earlier, tap New Folder . If you don’t see New Folder or it’s gray, then the third-party cloud service doesn’t support new folders.
View your files by name, date, size, or the tags that you add. With colorful and custom labels, you can assign tags to your files any way that you like. That means you’ll quickly find just the project or document you need.
Add a tag
- Tap Select.
- Tap the file that you want to tag.
- Tap Share > Add Tags .
- Choose the tag that you want to add.
Rename a tag
- Go to Locations.
- Tap More > Edit.
- Tap the name of an existing tag.
- Enter the name of your new tag.
- Tap Done.
![]()
Delete files
Select the files that you don’t want anymore and tap Delete . If you delete files from the iCloud Drive folder on one device, they delete on your other devices too. iCloud Drive removes the files from every device that you’re signed in to with the same Apple ID.
When you delete a file from iCloud Drive or On My [device], it goes into your Recently Deleted folder. If you change your mind or accidentally delete a file, you have 30 days to get it back. Go to Locations > Recently Deleted. Select the file that you want to keep and tap Recover. After 30 days, your files are removed from Recently Deleted.
You can also sign into iCloud.com from your Mac or PC, then go to iCloud Drive and check Recently Deleted.
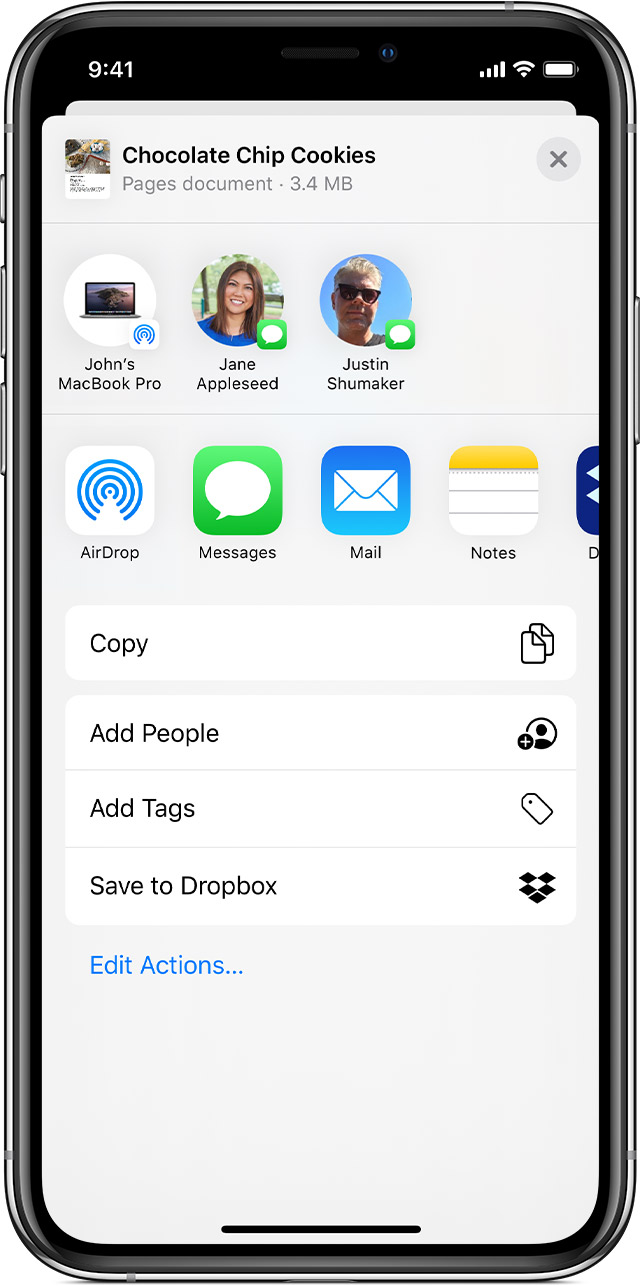
Share folders and files with your friends or colleagues
Want to share with a friend or colleague? You can share any folder or file stored in iCloud Drive directly from the Files app. In iCloud Drive, tap Select, choose the file or folder that you want to share, tap Share , and select Add People. You can share a folder or file through AirDrop, Messages, Mail, and more. Learn more about how folder sharing and file sharing work in iCloud Drive.
Or maybe you want to collaborate on a project in real time. The Files app lets you do that too with your Pages, Numbers, and Keynote documents. Select the file and tap Share or > Add People . You can invite them to collaborate through Messages, Mail, or copy and paste a link. Your participants are color-coded. And you can see when they’re online, actively working on your shared document.
Use third-party apps in Files
The Files app lets you add your third-party cloud services — like Box, Dropbox, OneDrive, Adobe Creative Cloud, Google Drive, and more — so that you can access all of your files on all of your devices. The files you keep in iCloud Drive automatically appear in the Files app, but you need to set up your other cloud services to access them in the Files app too.
Add third-party apps
- Download and set up the third-party cloud app.
- Open the Files app.
- Tap the Browse tab.
- Tap More > Edit.
- Turn on the third-party apps that you want to use in the Files app.
- Tap Done.
If you don’t see one of your third-party cloud services in the Files app, check with your cloud provider.
On iOS 12 or earlier, open the Files app then tap Locations > Edit to add third-party apps.
![]()
Move third-party cloud files
- Open the file that you want to move.
- Tap Share > Copy.
- Open the folder where you want to move your file.
- Firmly press the screen.
- Tap Paste.
Do more with Files on iPadOS
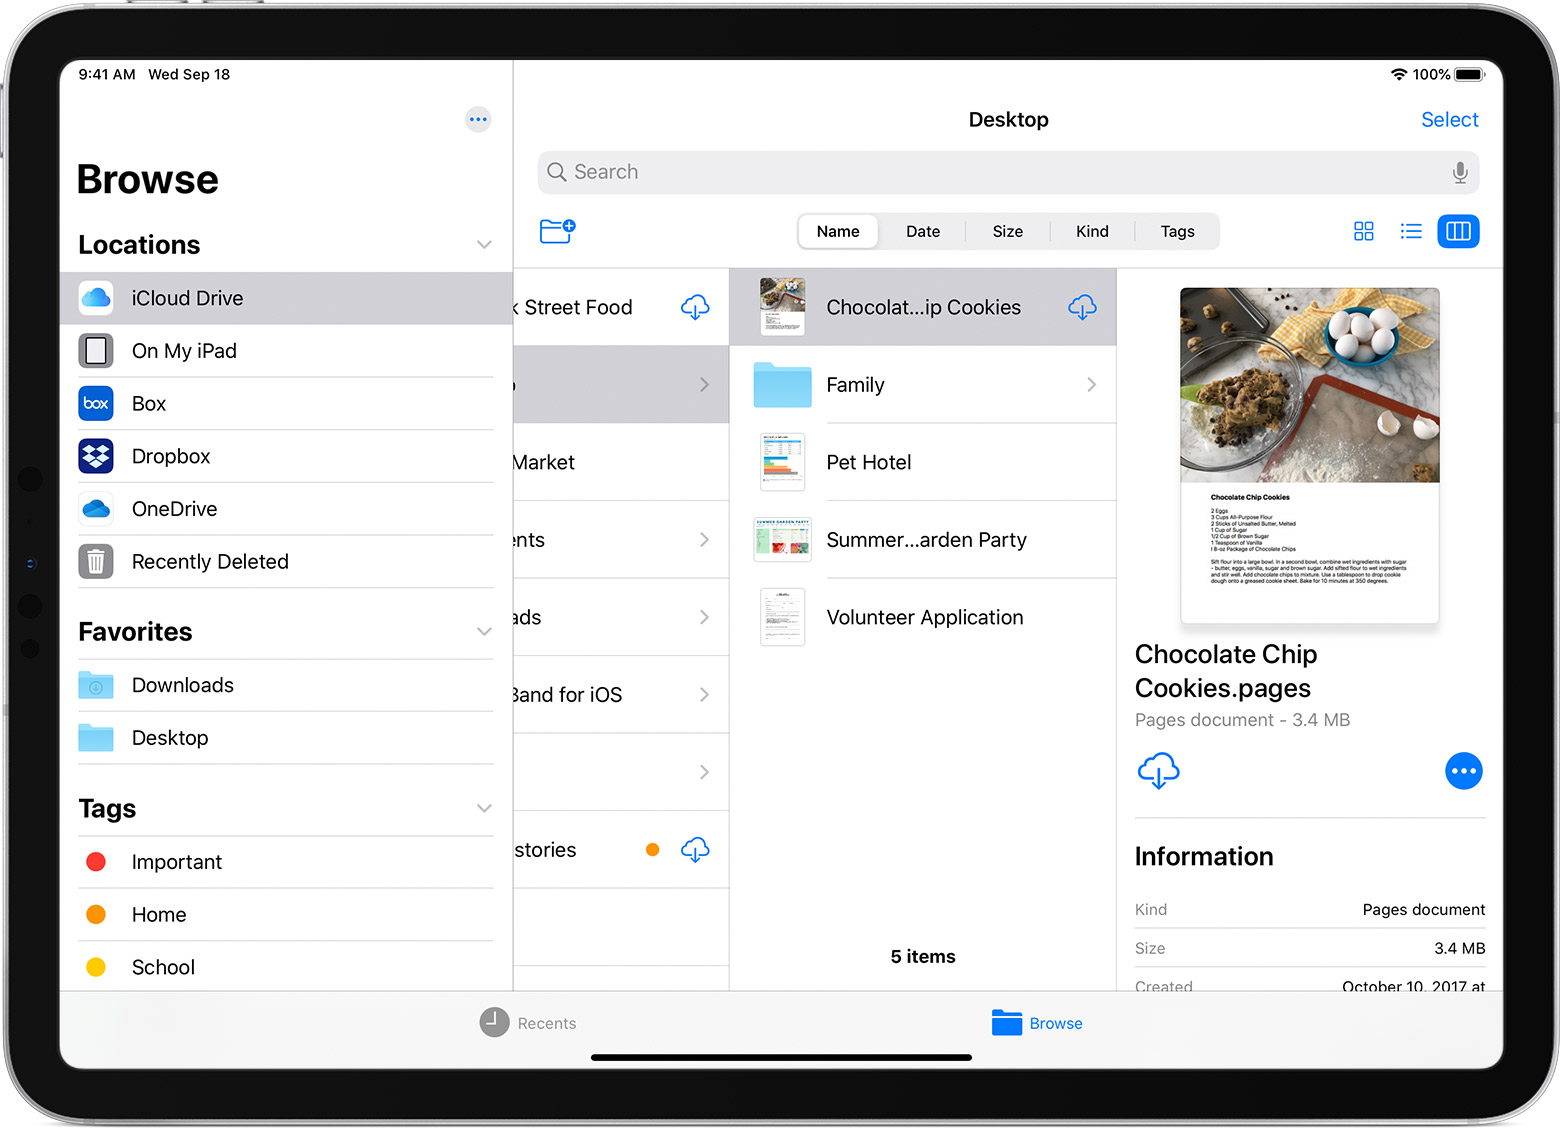
If you’re on iPadOS, you can access files on a USB flash drive, SD card, or hard drive through the Files app on iPadOS. Just connect the storage device, and then you can select it under Locations. You can also connect to unencrypted storage on a file server, if that storage is using the APFS, Mac OS Extended, MS-DOS (FAT), or ExFAT format. You also have the option to view your files in Column View, which is helpful if you have files nested in multiple folders. Column View lets you see previews of files and offers access to tools like markup and rotate without even opening a file.
Connect to a file server
- Open the Browse tab.
- Tap More .
- Select Connect to Server.
- Enter the SMB address.
- Tap Connect.
- The server name appears under Shared in the Browse menu.
Switch to Column View
- In landscape mode, open the Browse tab.
- Select a folder.
- Swipe down on the right side of the screen.
- Select Column View in the upper right.
- Tap a folder to expand its contents.
- Tap a file to see a preview.
To leave Column View, tap Grid View or List View , or use your iPad in portrait mode.
If you need help
- Update your iPhone, iPad, or iPod touch to the latest iOS, or iPadOS.
- Set up iCloud on all of your devices and turn on iCloud Drive.
- Make sure that you’re signed in to iCloud with the same Apple ID on all of your devices.
- If you want to upload, download, or share files using cellular data, open Settings, select Cellular, scroll down to iCloud Drive and any third-party cloud services you use, and turn it on for each service.
If you don’t want to access your iCloud Drive files in the Files app, you can choose to download and add only third-party cloud services instead.
![]()
Information about products not manufactured by Apple, or independent websites not controlled or tested by Apple, is provided without recommendation or endorsement. Apple assumes no responsibility with regard to the selection, performance, or use of third-party websites or products. Apple makes no representations regarding third-party website accuracy or reliability. Contact the vendor for additional information.
Источник


