- Understanding Android’s LayoutInflater.inflate()
- Understanding Android’s LayoutInflater.inflate()
- attachToRoot Set to True
- attachToRoot Set to False
- Avoiding Crashes, Misbehaviors and Misunderstandings
- Juan Pablo Claude
- Related Posts
- Splash Screens: The Final Right Way
- Coming soon: Kotlin Programming: The Big Nerd Ranch Guide, Second Edition
- Using StateFlow over LiveData for end-to-end operations
- View Binding in Android
- Getting started with View Binding
- Using View Binding in Fragments
- Start using View Binding
- One-Liner ViewBinding Library
- How to use View Binding in Android using Kotlin
- Enabling View Binding
- Using View Binding in Activities
- Using View Binding in Fragments
- • Inflate method
- • Bind method
- Using View Binding in RecyclerView Adapter
Understanding Android’s LayoutInflater.inflate()

Understanding Android’s LayoutInflater.inflate()
It’s easy to get comfortable with boilerplate setup code, so much so that we gloss over the finer details. I’ve experienced this with LayoutInflater (which coverts an XML layout file into corresponding ViewGroups and Widgets) and the way it inflates Views inside Fragment’s onCreateView() method. Upon looking for clarification in Google documentation and discussion on the rest of the web, I noticed that many others were not only unsure of the specifics of LayoutInflater’s inflate() method, but were completely misusing it.
Much of the confusion may come from Google’s vague documentation in regards to attachToRoot , the optional third parameter of the inflate() method.
Whether the inflated hierarchy should be attached to the root parameter? If false, root is only used to create the correct subclass of LayoutParams for the root view of the XML.
Maybe the confusion comes from a statement that ends in a question mark?

The general gist is this: If attachToRoot is set to true , then the layout file specified in the first parameter is inflated and attached to the ViewGroup specified in the second parameter.
Then the method returns this combined View, with the ViewGroup as the root. When attachToRoot is false , the layout file from the first parameter is inflated and returned as a View. The root of the returned View would simply be the root specified in the layout file. In either case, the ViewGroup’s LayoutParams are needed to correctly size and position the View created from the layout file.
Passing in true for attachToRoot results in a layout file’s inflated View being added to the ViewGroup right on the spot. Passing in false for attachToRoot means that the View created from the layout file will get added to the ViewGroup in some other way.
Let’s break down both scenarios with plenty of examples so we can better understand.
attachToRoot Set to True
Imagine we specified a button in an XML layout file with its layout width and layout height set to match_parent .
We now want to programmatically add this Button to a LinearLayout inside of a Fragment or Activity. If our LinearLayout is already a member variable, mLinearLayout , we can simply add the button with the following:
We specified that we want to inflate the Button from its layout resource file; we then tell the LayoutInflater that we want to attach it to mLinearLayout . Our layout parameters are honored because we know the Button gets added to a LinearLayout. The Button’s layout params type should be LinearLayout.LayoutParams.
The following would also be equivalent. LayoutInflater’s two parameter inflate() method automatically sets attachToRoot to true for us.
Another appropriate use of passing true for attachToRoot is a custom View. Let’s look at an example where a layout file uses a tag for its root. Using a tag signifies that the layout file allows for flexibility in terms of the type of root ViewGroup it may have.
This is a perfect use for a true attachToRoot parameter. The layout file does not have a root ViewGroup in this example, so we specify our custom LinearLayout to be its root. If our layout file had a FrameLayout as its root instead of , the FrameLayout and its children would inflate as normal. Then the FrameLayout and children would get added to the LinearLayout, leaving the LinearLayout as the root ViewGroup containing the FrameLayout and children.
attachToRoot Set to False
Let’s take a look at when you would want to set attachToRoot to false . In this scenario, the View specified in the first parameter of inflate() is not attached to the ViewGroup in the second parameter at this point in time.
Recall our Button example from earlier, where we want to attach a custom Button from a layout file to mLinearLayout . We can still attach our Button to mLinearLayout by passing in false for attachToRoot —we just manually add it ourselves afterward.
These two lines of code are equivalent to what we wrote earlier in one line of code when we passed in true for attachToRoot . By passing in false , we say that we do not want to attach our View to the root ViewGroup just yet. We are saying that it will happen at some other point in time. In this example, the other point in time is simply the addView() method used immediately below inflation.
The false attachToRoot example requires a bit more work when we manually add the View to a ViewGroup. Adding our Button to our LinearLayout was more convenient with one line of code when attachToRoot was true . Let’s look at some scenarios that absolutely require attachToRoot to be false .
A RecyclerView’s children should be inflated with attachToRoot passed in as false . The child views are inflated in onCreateViewHolder() .
RecyclerViews, not us, are responsible for determining when to inflate and present its child Views. The attachToRoot parameter should be false anytime we are not responsible for adding a View to a ViewGroup.
When inflating and returning a Fragment’s View in onCreateView() , be sure to pass in false for attachToRoot . If you pass in true , you will get an IllegalStateException because the specified child already has a parent. You should have specified where your Fragment’s view will be placed back in your Activity. It is the FragmentManager’s job to add, remove and replace Fragments.
The root_viewGroup container that will hold your Fragment in your Activity is the ViewGroup parameter given to you in onCreateView() in your Fragment. It’s also the ViewGroup you pass into LayoutInflater.inflate() . The FragmentManager will handle attaching your Fragment’s View to this ViewGroup, however. You do not want to attach it twice. Set attachToRoot to false .
Why are we given our Fragment’s parent ViewGroup in the first place if we don’t want to attach it in onCreateView() ? Why does the inflate() method request a root ViewGroup?
It turns out that even when we are not immediately adding our newly inflated View to its parent ViewGroup, we should still use the parent’s LayoutParams in order for the new View to determine its size and position whenever it is eventually attached.
You are bound to run into some poor advice about LayoutInflater on the web. Some people will advise you to pass in null for the root ViewGroup if you are going to pass in false for attachToRoot . However, if the parent is available, you should pass it in.

Lint will now warn you not to pass in null for root . Your app won’t crash in this scenario, but it can misbehave. When your child View doesn’t know the correct LayoutParams for its root ViewGroup, it will try to determine them on its own using generateDefaultLayoutParams.
These default LayoutParams might not be what you desired. The LayoutParams that you specified in XML will get ignored. We might have specified that our child View should match the width of our parent View, but ended up with our parent View wrapping its own content and ending up much smaller than we expected.
There are a few scenarios in which you will not have a root ViewGroup to pass into inflate() . When creating a custom View for an AlertDialog, you do not yet have access to its parent.
In this case, it is okay to pass in null for the root ViewGroup. It turns out that the AlertDialog would override any LayoutParams to match_parent anyway. However, the general rule of thumb is to pass in the parent if you’re able to do so.
Avoiding Crashes, Misbehaviors and Misunderstandings
Hopefully this post helps you avoid crashes, misbehaviors and misunderstandings when using LayoutInflater. Here are some key takeaways for different uses in certain circumstances:
- If you have a parent to pass into the root ViewGroup parameter, do so.
- Try to avoid passing in null for the root ViewGroup.
- Pass in false for the attachToRoot parameter when we are not the ones responsible for attaching our layout file’s View to its root ViewGroup.
- Do not pass in true for a View that has already been attached to a ViewGroup.
- Custom Views are a good use case to pass in true for attachToRoot .

Juan Pablo Claude
During his tenure at BNR, Juan Pablo has taught bootcamps on macOS development, iOS development, Python, and Django. He has also participated in consulting projects in those areas. Juan Pablo is currently a Director of Technology focusing mainly on managing engineers and his interests include Machine Learning and Data Science.
Schedule a call today! Our team of nerds are ready to help
Related Posts

Splash Screens: The Final Right Way
The impending release of Android 12 brings with it a group of new APIs for Android developers to learn and play with. Being a good citizen.

Coming soon: Kotlin Programming: The Big Nerd Ranch Guide, Second Edition
Kotlin has been changing at a steady pace over the years, and more and more developers are choosing Kotlin as their language of choice.

Using StateFlow over LiveData for end-to-end operations
Observing data asynchronously is such a core skill for mobile developers that you may imagine Android has a long-established set of simple APIs in.
Источник
View Binding in Android

We have learnt that every time we need to access a view from our XML layout into our Java or Kotlin code, we must use findViewById(). It was okay for small/personal projects where we use 5 to 6 views in a layout. But for larger projects we have comparatively more views in a layout, and accessing each view using the same findViewById() is not really comfortable.
What is View Binding?
View binding is a feature that allows you to more easily write code that interacts with views. Once view binding is enabled in a module, it generates a binding class for each XML layout file present in that module
Simply put, this allows us to access the views from the layout file in a very simple way by linking variables of our Kotlin or Java code with the XML views. When a layout is inflated, it creates a Binding object, which contains all the XML views that are casted to the correct type. This makes it really easier for us since we can retrieve all views in one line of code.
Getting started with View Binding
- Let’s start by enabling view binding in our project:
In build.gradle(:app) add the code in -> android
2. Before the onCreate() method, we create our binding object
3. Perform the following steps in onCreate() method:
- Call the inflate() method to create an instance of the binding class for the activity to use.
- Get reference to the root view
- Pass the root view to setContentView() [setContentView(binding.root)] instead of layout [setContentView(R.id.activity_main)]
4. To get reference of any view, we can use the binding object:
Using View Binding in Fragments
We follow the same steps:
- Before the onCreateView() method, we create our binding object
2. Initialize our binding object in onCreateView()
3. To get reference of any view, we can use the binding object
Note: The name of the binding class is generated by converting the name of the XML file to camel case and adding the word “Binding” to the end. Similarly, the reference for each view is generated by removing underscores and converting the view name to camel case . For example, activity_main.xml becomes ActivityMainBinding, and you can access @id/text_view as binding.textView.
View binding has important advantages over using findViewById():
- Null safety: Since view binding creates direct references to views, there’s no risk of a null pointer exception due to an invalid view ID.
- Type safety: The fields in each binding class have types matching the views they reference in the XML file. This means that there’s no risk of a class cast exception.
Start using View Binding
If you’re intrigued by View Binding and want to learn more about it, here’s some resources for you to learn:
One-Liner ViewBinding Library
You would have noticed that to use View Binding, we need to call the static inflate() method included in the generated binding class ( which creates an instance of the binding class for the activity or fragment )
Yesterday I came across an awesome library that makes ViewBinding one-liner ( By removing the boilerplate code and easily set ViewBindings with a single line )
One-liner ViewBinding Library : [Click Here]
Источник
How to use View Binding in Android using Kotlin
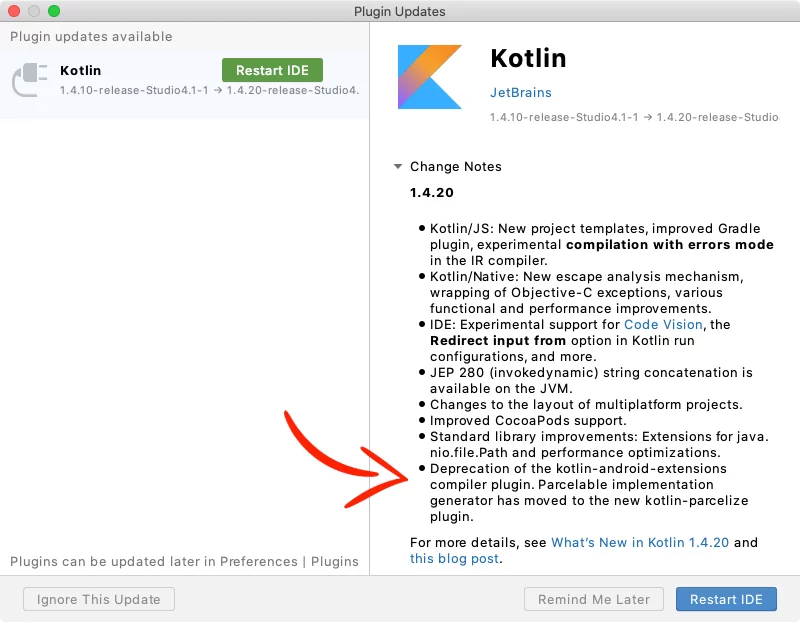
In Android Studio 4.1+, when you create a new Kotlin project and try to connect an XML layout file with your .kt file using Kotlinx synthetic, you’ll see you can’t do it anymore.
This is because they removed the plugin ‘Kotlin Android Extensions‘ as JetBrains deprecated it in the 1.4.20 version of Kotlin.
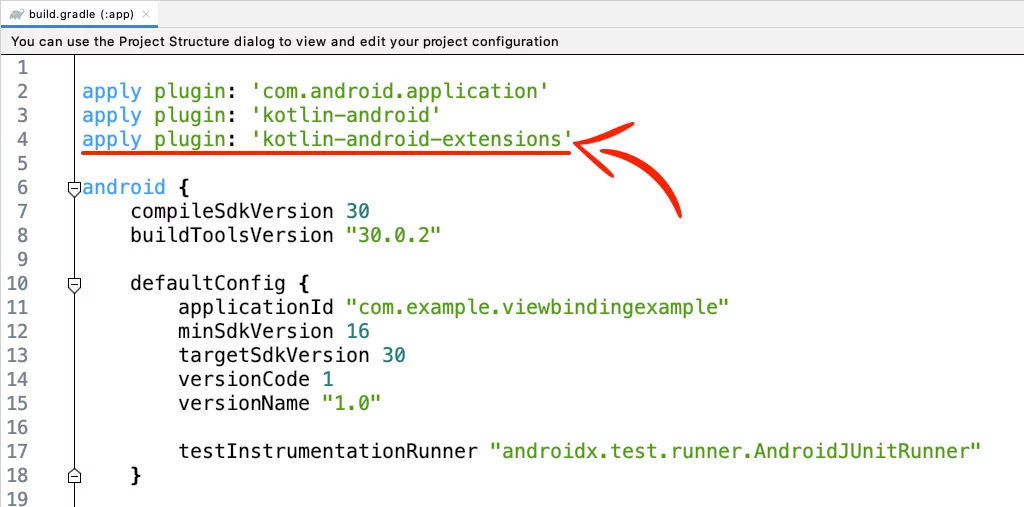
Now, the alternatives are:
- ButterKnife
- findViewById()
- View Binding
In this tutorial, I’ll show you how to implement View Binding in:
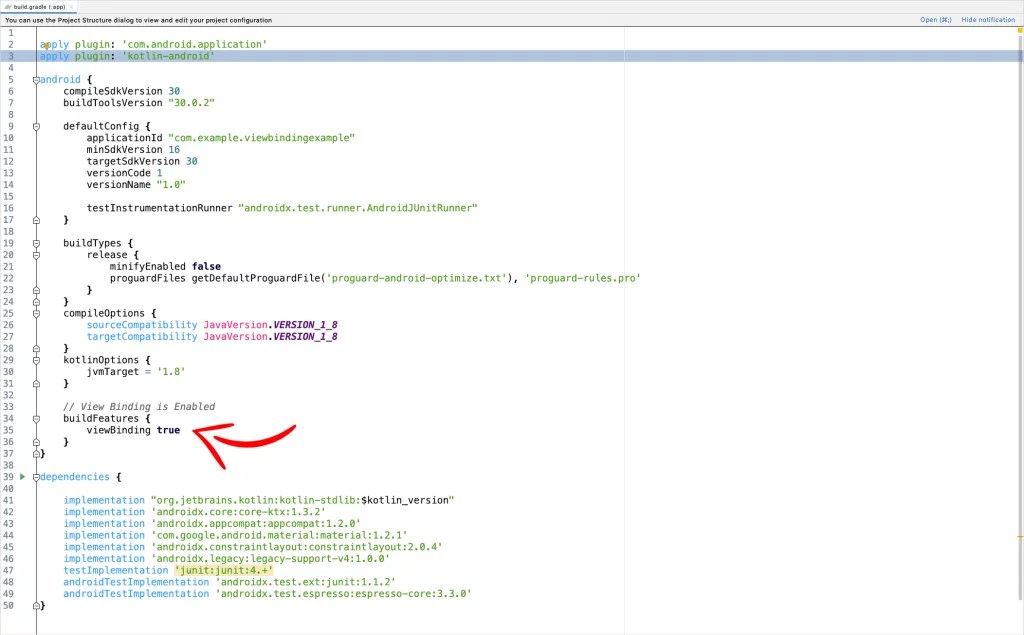
Enabling View Binding
In your module-level build.gradle file, add the following code to enable view binding.
This automatically will create binding classes for each XML file present in that module.
For example, if an XML file name is activity_main.xml, the generated binding class will have the name of this file in Pascal case and the word ‘Binding‘ at the end.
So the binding class will be ActivityMainBinding
If you don’t want to generate a binding class for a specific XML file, add the attribute tools:viewBindingIgnore=»true» in the root layout like that:
Using View Binding in Activities
To use View Binding in Activity, create an instance of the binding class, get the root view, and pass it to setContentView().
Now, you can reference your views like that:
Using View Binding in Fragments
There are two methods to use View Binding in Fragments:
• Inflate: You do the layout inflation and the binding inside the onCreateView method.
• Bind: You use an alternative Fragment() constructor that inflates the layout, and you do the binding inside the onViewCreated method
• Inflate method
In the onCreateView method, inflate your layout file and create the binding instance:
Because Fragments continue to live after the View has gone, it’s good to remove any references to the binding class instance:
• Bind method
At the top of your file, in the Fragment() constructor add your XML layout file, and create the binding inside the onViewCreated method (NOT the onCreateView):
Like I said before in the Inflate method, remove any references in the fragment’s onDestroyView() method:
Using View Binding in RecyclerView Adapter
To use View Binding in your RecyclerView adapter, add the binding class in your ItemViewHolder, and set the root layout:
Next, in the onCreateViewHolder method, do the layout inflation and return the ItemViewHolder with the binding.
And at the end, on the onBindViewHolder, you can reference any of the views through the binding of the holder:
If you have any questions, please feel free to leave a comment below
Источник


