Start New Activity on Button Click in Android
This tutorial is a step by step explanation of how to create a new activity and start the new activity on button click from our main activity or first activity. For example, for some reason, you want to open a new activity or the next activity using your first activity.
Please follow the steps given below to start a new activity on button click:
Step 1) Open a project which has only one activity which is our main activity.
Step 2) Now to add a new activity to your app, go to your app and select ‘android’
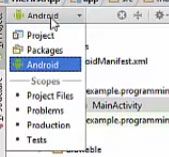
Step 3) And in the app category you just need to go to this ‘res’ folder ( ‘res’ stands for resources folder and inside this resources folder), there is a folder called ‘layout’ just right click on this layout folder and go to ‘new’ and we are going to go to ‘activity’ and select a blank activity.
![]()
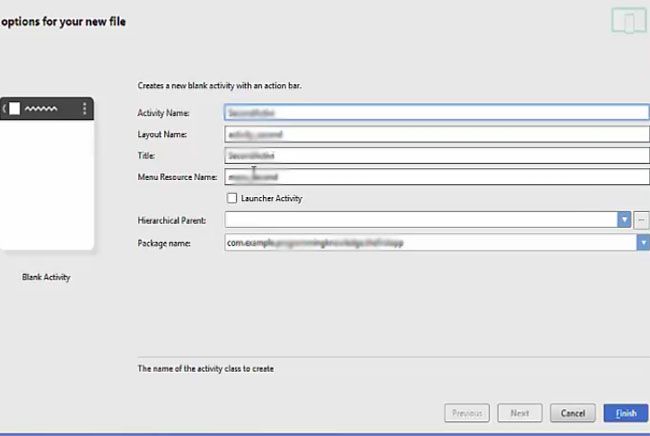
Step 4) So when you select the blank activity wizard will open. You can give a name to your activity and every other thing is by default created for you and just click ‘finish’.
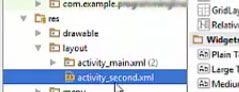
Step 5) Once you click ‘finish’, there will be a second activity which will be created for you and you will be able to see an extra xml file created for your second activity in your layout folder of your resources directory.
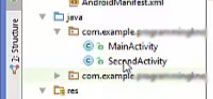
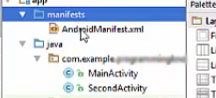
Step 6) Similarly, in your Java folder you will be able to see that there will be a new class added to your Java folder which is secondactivity.java file
Step 7) In the manifest folder , there will be a file called andoidmanifest.xml file and in here also you will be able to see that new activity is added to your main manifest xml file.
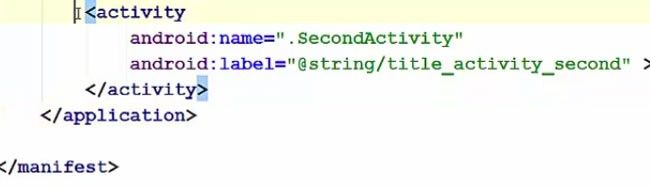
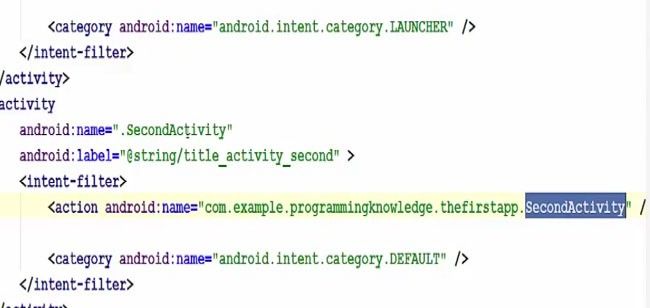
Step 8) Now we are going to add in this manifest file where your main activity xml element is there and now you have this second activity tag. So by default, it’s a blank tag in a sense that it just has the name and the title but unlike this main activity, it doesn’t have this intent-filter tag. So what we are going to do is we are going to copy this intent filter from our main activity, so just copy it into the second activity and also change the name in the action and the category second activity.
Step 9) Now we are ready to create code to open the second activity from our first activity. So open your first activity and add a button which will be used to open my second activity. Just change the text to open second activity for example and leave the ID as default.
Step 10) Now go to your mainactivity.java file and create a button variable
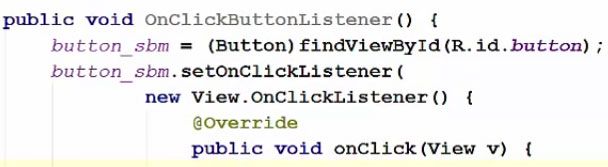
Step 11) Now just below the onCreate method create a new method (this new method id not going to take any argument) and cast this button to its ID

Step 12) And now take button_sbm variable and add or set a listener to this button variable and inside this setOnClickListener create a new OnClickliListener.
Step 13) Now inside this onClick method we are going to create an object of the intent class. It helps us to open the new activity which is our second activity.The constructor of this intent takes the argument which is the package name of your second activity or whatever activity you want to open. So as you remember that we have changed the name of this action tag so copy that path and pass it as an argument of this intent constructor.

Step 14) Now just call this intent to start the activity by a method called startactivity which takes intent as an argument therefore just pass your intent variable and now everything is done.

Complete Code
Step 15) Now we just need to call this method inside our onCreate method so just copy the name of this method and just call it inside our main method.

Step 16) So now our activity is running now which is our main activity. So when we click our button the second activity opens. By this button we can go back to our first activity and once again when we click our button, it opens our second activity.
Источник
Starting new activity on a button click
Prerequisite
If you not understand this lecture Starting new Activity on button click .you should also read my previous lectures. Project creation using android studio . After read lecture you will also able to create activity of your app.
Overview
Activity is a user interface Almost all the activity are interact with user.Activity is window in which you can place their different component of user interface.Activity display information and invite the user to act in a number of ways.In android, an activity is represent a single screen.
Introduction
In this lecture well we describe how to working multiple activates in a same application in previous lecture (Greeting appears here) only one activity we will use. But In this lecture we are describes how to working multiple activity on a same project.After read this lecture i hope you will create activity of your application.
Description of activity
Activity is a basic building block in android.Android Activity always has a User Interface.Android application consists of number of activity.when you create new activity it can be define in manifest file.In android, an activity is represent a single screen. Most applications have multiple activities to represent different screens. for example one activity to display a list of the application , another activity to display the application status.
You will done this section
- Detail Activity state
- create new activity
- create new layouts
- Declaring the activity in the manifest
- layout. XML code description
- Main Activity code description
- output
Detail Activity state
In android have four activity state. this helps in Android to identify activities that are no longer in use. that are describe in below pic.

- Activity running Activities are considered active or running.
- Paused When the device goes to sleep, or an activity is still visible when you playing a game and suddenly cal coming then you will paused a activity.And activity still alive all state.
- Activity background Stopped activities still try to retain their state and member information for as long as possible.
- Stop activity It is possible for an activity that is anywhere from paused to stopped.
Getting Started
Now we add two activity each activity associated two files. First is XML file that handle GUI and second is java class file that handle all logic that are use to built an application. First we create a java class file and assign name of a class then we create a new layout and connected the new layout with java class file .then repeats this steps again to create third activity and third layout like that create an other java class file assign the name of a class and create a new layout and connected the new java class file with new layout. Next step is include all new activity in manifest file. All detail is provides in steps.for more detail click on Starting new activitiy on a button click.
Step1 = SecondActivity ->Right click-> the ->package name ->select ->New option-> and click-> java class that will show in below.

Step2=Step1->WriteName->Ok.

Now a new class will add in this package that show in below pic name SecondActivity.

Now we create a another layout in XML file
Step3=Second_layout ->Right click> the ->layout folder-> select ->New option-> and click ->layout resource folder->

Step4=Step3->WriteName->Ok.

Now a new layout add in layout folder that show in below pic name second_layout.

Code are write in SecondActivity:
After write this code in second activity then SecondActivity and second layout will connected.
Источник
Полный список
В этом уроке мы:
— научимся использовать один обработчик для нескольких View-элементов
— научим Activity выступать в качестве обработчика
Создадим проект:
Project name: P0101_Listener
Build Target: Android 2.3.3
Application name: Listener
Package name: ru.startandroid.develop.listener
Create Activity: MainActivity
Будем работать с теми же View, что и в предыдущем уроке. Код для main.xml:
Один обработчик для двух кнопок
Итак, у нас есть TextView с текстом и две кнопки. Как и на прошлом уроке, мы сделаем так, чтобы по нажатию кнопки менялось содержимое TextView. По нажатию кнопки OK – будем выводить текст: «Нажата кнопка ОК», по нажатию Cancel – «Нажата кнопка Cancel». Но сейчас мы сделаем это с помощью одного обработчика, который будет обрабатывать нажатия для обеих кнопок.
Напомню механизм обработки событий на примере нажатия кнопки. Сама кнопка обрабатывать нажатия не умеет, ей нужен обработчик (listener), который присваивается с помощью метода setOnClickListener. Когда на кнопку нажимают, обработчик реагирует и выполняет код из метода onClick.
Соответственно для реализации необходимо выполнить следующие шаги:
— создаем обработчик
— заполняем метод onClick
— присваиваем обработчик кнопке
В нашем случае мы будем присваивать один обработчик обеим кнопкам, а внутри обработчика надо будет определять, какая именно кнопка была нажата.
Подготовим объекты и создадим обработчик:
Давайте заполнять метод onClick. На вход ему подается объект класса View, это как раз то, что нам нужно. Это View, на которой произошло нажатие, и, которая вызвала обработчик. Т.е. в нашем случае это будет либо кнопка OK либо Cancel. Нам осталось узнать ID этой View и сравнить его с нашими R.id.btnOk и R.id.btnCancel, чтобы определить какая именно это кнопка. Чтобы получить ID какой-либо View, используется метод getId. Для перебора результатов используем java-оператор switch.
Реализация метода onClick:
Если сейчас запустить приложение и проверить, то ничего не произойдет. Обработчик то мы создали, но не присвоили его кнопкам. Обеим кнопкам присваиваем один и тот же обработчик:
Вот теперь можем запускать и проверять, все должно работать.
Как вы понимаете, один обработчик может быть присвоен не двум, а любому количеству кнопок. И не только кнопкам. У остальных View-элементов тоже есть различные события, которые нуждаются в обработчиках. В дальнейшем мы еще будем с ними работать. А сейчас важно понять схему, как происходит обработка событий.
Отличие способа реализации на этом уроке от прошлого урока в том, что сейчас мы создали один объект-обработчик для обеих кнопок, а на прошлом уроке — два объекта, по одному каждой кнопке. Есть правило – чем меньше объектов вы создаете, тем лучше, т.к. под каждый объект выделяется память, а это достаточно ограниченный ресурс, особенно для телефонов. Поэтому создавать один обработчик для нескольких View это правильнее с точки зрения оптимизации. К тому же кода становится меньше и читать его удобнее.
Есть еще один способ создания обработчика, который вовсе не потребует создания объектов. Будет использоваться уже созданный объект – Activity
Activity, как обработчик
Кнопка присваивает себе обработчика с помощью метода setOnClickListener (View.OnClickListener l). Т.е. подойдет любой объект с интерфейсом View.OnClickListener. Почему бы классу Activity не быть таким объектом? Мы просто укажем, что Activity-класс реализует интерфейс View.OnClickListener и заполним метод onCreate.
Создадим для этого новый проект:
Project name: P0102_ActivityListener
Build Target: Android 2.3.3
Application name: ActivityListener
Package name: ru.startandroid.develop.activitylistener
Create Activity: MainActivity
Экран снова возьмем тот же самый:
Подготовим объекты и добавим реализацию интерфейса (implements onClickListener)
OnClickListener подчеркнут красным, т.к. его нет в импорте. Поэтому CTRL+SHIFT+O и выбираем View.OnClickListener.
Теперь Eclipse ругается на класс MainActivity. Это происходит потому, что для класса прописан интерфейс, но нет реализации методов этого интерфейса. Исправим это с помощью Eclipse. Наведите курсор на MainAcivity и выберите Add unimplemented methods
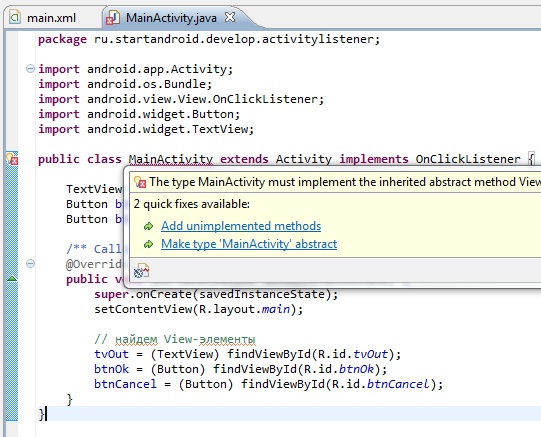
Eclipse добавит знакомый нам метод onClick. Только теперь этот метод будет реализован в Activity, а не в отдельном объекте-обработчике. Соответственно Activity и будет выступать обработчиком.
Заполним метод точно так же как и раньше. Ничего не изменилось. Ему на вход так же подается View (на которой произошло событие), по Id мы определим, какая именно эта View и выполним соответствующие действия:
Осталось в методе onCreate присвоить обработчик кнопкам. Это будет объект this, т.е. текущий объект MainActivity.
При такой реализации мы не создали ни одного лишнего объекта (Activity создается в любом случае) и затраты памяти минимальны, это рекомендуемый метод. Но, возможно, такой способ покажется сложным и непонятным, особенно если мало опыта в объектно-ориентированном программировании. В таком случае используйте ту реализацию, которая вам понятна и удобна. А со временем и опытом понимание обязательно придет.
Самая простая реализация обработчика
Есть еще один способ реализации. В layout-файле (main.xml) при описании кнопки пишем:
Т.е. используем атрибут onClick. В нем указываем имя метода из Activity. Этот метод и сработает при нажатии на кнопку.
Далее, добавляем этот метод в Activity (MainActivity.java). Требования к методу: public, void и на вход принимает View:
В методе прописываете необходимые вам действия, и они будут выполнены при нажатии кнопки.
Присоединяйтесь к нам в Telegram:
— в канале StartAndroid публикуются ссылки на новые статьи с сайта startandroid.ru и интересные материалы с хабра, medium.com и т.п.
— в чатах решаем возникающие вопросы и проблемы по различным темам: Android, Kotlin, RxJava, Dagger, Тестирование
— ну и если просто хочется поговорить с коллегами по разработке, то есть чат Флудильня
— новый чат Performance для обсуждения проблем производительности и для ваших пожеланий по содержанию курса по этой теме
Источник


