- Lessons
- Android programmatically include layout (i.e. without XML)
- 2 Answers 2
- Inflate layout programmatically within another layout
- 9 Answers 9
- Add layout to layout programmatically android
- Identify Language of Text with Firebase API Android Example
- Organize Photos by Content Android Example
- Android Barcode Scanning Example
- Extracting Text from Images Android
- Google Places SDK for Android Tutorial
- Android Widget Example
- Android MotionLayout Examples
- Android Fragments Transition Animation Example
- Model View ViewModel MVVM Android Example
- Android Model View Presenter MVP Pattern Example
- Android Kotlin ListView Example
- About
- How to Programmatically Add Views to Views
- 7 Answers 7
Lessons
In this lesson we will:
— create layout programmatically, not using layout-files
Up to this moment, we have been creating screens using layout-files. But we can do the same programmatically.
Let’s create a project:
Project name: P0161_DynamicLayout
Build Target: Android 2.3.3
Application name: DynamicLayout
Package name: ru.startandroid.develop.dinamiclayout
Create Activity: MainActivity
Open MainActivity.java and pay attention to the following line:
Recall that in this line we specify that Activity will use layout-file main.xml as a screen. There is a different implementation of this method that takes as a parameter not a layout-file, but a View-element and makes it a root element. In layout-files a root element is usually LinearLayout, so we will use it too.
Update the imports CTRL+SHIFT+O. Eclipse will ask which exactly LayoutParams we want to use. We will explore this in more detail. Let’s recall the theory about screens. A screen consists of the ViewGroup and View elements inside it.
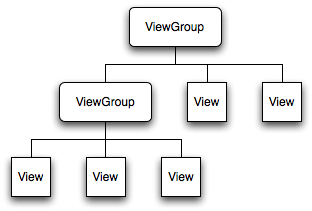
ViewGroup classes we are already familiar with — LinearLayout, TableLayout, RelativeLayout and others. Every of these ViewGroup classes has LayoutParams inner class. The base class for these LayoutParams is ViewGroup.LayoutParams.
ViewGroup.LayoutParams has only two attributes: height and width. It’s subclass — ViewGroup.MarginLayoutParams inherits these two attributes and has four of its own: bottomMargin, leftMargin, rightMargin, topMargin. LinearLayout.LayoutParams class, which is by-turn a subclass of ViewGroup.MarginLayoutParams, inherits already 6 attributes from it and adds two of its own: gravity and weight.
So a LinearLayout object has inner class LinearLayout.LayoutParams with layout-attributes. And these attributes are distributed for all child Views and ViewGroups.
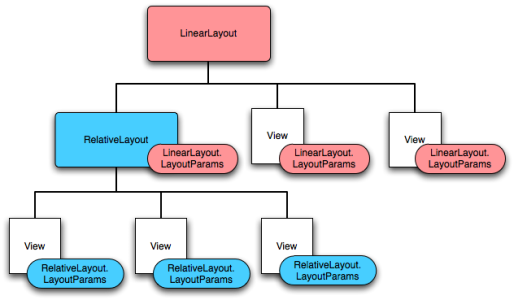
So View, which is inside LinearLayout has one set of layout-parameters:
View from RelativeLayout — has different:
There are some mutual elements as these ViewGroups have the same parents.
Let’s return to Eclipse, it still awaits our choice. Let’s use ViewGroup.LayoutParams base class

Let’s look throught the code. We create LinearLayout and specify vertical orientation. Then we create LayoutParams. The constructor takes two parameters: width and height. We set both as MATCH_PARENT. After this, setContentView method is invoked. LinearLayout and LayoutParams are passed to it as parameters. This means that LinearLayout with layout-attributes from LayoutParams will be the root element.
If we run the application now we will see nothing, as LinearLayout is transparent. Let’s start adding View-components to our LinearLayout.
We again create LayoutParams object with width = wrap_content and height = wrap_content attributes. Now if we assign this object to one of the Views, this View will have width and height defined by its content.
After this we create a TextView, update its text, set it previously created LayoutParams object and add it to LinearLayout using addView(View child) method.
The same with the Button — create, update text, and then use another implementation of addView(View child, ViewGroup.LayoutParams params) method, which simultaneously adds the Button to the LinearLayout and sets the Button the specified LayoutParams. Result will be the same as with the TextView, but instead of two lines of code we use only one.
Note that for two View objects I’ve used one LayoutParams object — lpView. And if I now change the properties of this objects, both views will change correspondingly.
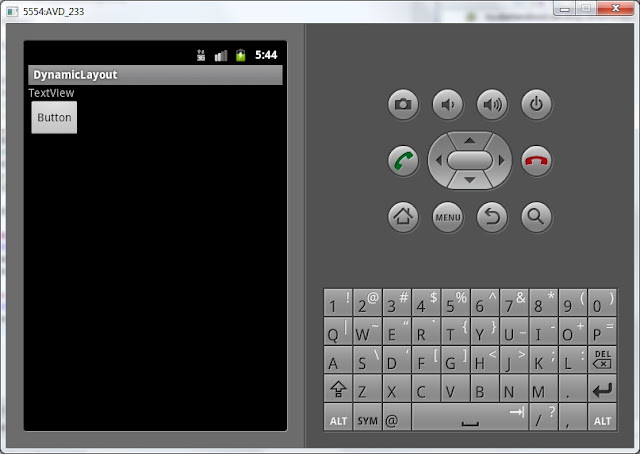
Save and launch the application. We can see that the components have appeared on the screen. And we can see that their height and width is defined by their content (wrap_content).
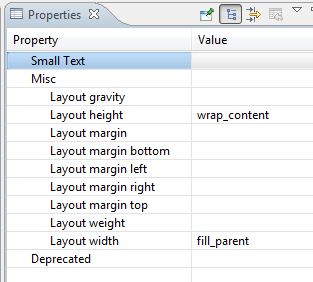
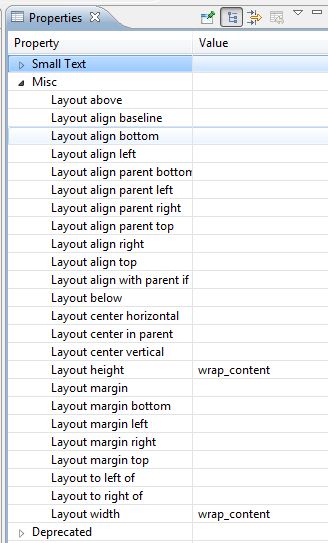
lpView object has a basic type android.view.ViewGroup.LayoutParams. It means it will allow to configure only width and height. But for a View in the LinearLayout, for example, left margin or aligning by right edge are available. And if we want to apply them, we need to use LinearLayout.LayoutParams:
Have a look at the code. We create an object of LinearLayout.LayoutParams type using the same constructor as for common LayoutParams, specifying width and height. Then we specify a left margin = 50. Margin here is specified in pixels. The algorithm is the same further: create an object, update the text and add it to the LinearLayout with setting LayoutParams.
Analogically, add the component with alignment:
Save and launch. Button1 has a margin of 50px. And button2 is aligned by its right edge:

Most likely, this topic will not be absolutely clear at first. That’s why in the following two lessons we will revise the knowledge and will have some practice with adding elements on the screen and configuring them.
The complete lesson code:
In the next lesson we will:
— add components on the screen while application is running.
Присоединяйтесь к нам в Telegram:
— в канале StartAndroid публикуются ссылки на новые статьи с сайта startandroid.ru и интересные материалы с хабра, medium.com и т.п.
— в чатах решаем возникающие вопросы и проблемы по различным темам: Android, Kotlin, RxJava, Dagger, Тестирование
— ну и если просто хочется поговорить с коллегами по разработке, то есть чат Флудильня
— новый чат Performance для обсуждения проблем производительности и для ваших пожеланий по содержанию курса по этой теме
Источник
Android programmatically include layout (i.e. without XML)
So I’ve created an Activity subclass called CustomTitlebarActivity. Essentially, each main activity in my app will have a custom titlebar with many common features such as a Home button, a title, a search button, etc. In my current implementation, I am still explicitly using an include statement in the layout XML for each CustomTitlebarActivity:
It seems natural that I should be able to do this within CustomTitlebarActivity. I have two questions: What code can replace this include tag, and where should I put the code? (My first instinct would be to put it in CustomTitlebarActivity’s setContentView method.)
On a related note, I would appreciate insight into better ways to reuse android UI code (even if, per se, the titlebars need to vary slightly between activities.)

2 Answers 2
I met this issue too, and I just solved it now. I think my solution is easier:
create a inflater:
inflate the child layout:
add it into parent:
It’s done, enjoy it!

Personally, I’d probably write my Activity subclass to always setContentView to a layout file containing a vertical fill_parent LinearLayout containing only my title bar:-
Then I’d define an abstract getContentAreaLayoutId() method in CustomTitlebarActivity that returns the layout ID of the content below the titlebar for each subclass; the base onCreate() of CustomTitlebarActivity would then just call
Alternatively, you could have your abstract method for getting the content area return a View rather than an int , giving you more flexibility to construct your views dynamically (but forcing you to inflate them yourself in the simple just dump this XML layout here case).
Источник
Inflate layout programmatically within another layout
I need help with my android app. I need inflate a layout within another layout and I dont know how I do. My xml code is this:
item.xml — I need inflate multiple xml (depending on a variable number)
This is my main xml:
9 Answers 9
You could use something like

You can implement this like below:

In some point you should gain access to your inflater inside your activity, you can call it with this code:
Where context is this or this.getActivity() if it is a Fragment. Then inflate your layour with:
Then use addView(layout) to your container_destacado:

Kotlin code to do so:

You have the LinearLayout on which you want to inflate other childs:
Once you loaded the item.xml with an inflater, you can just use

in Kotlin with editable textview elements on item.xml

Below is a working code from one of my projects:
Hope that helps!
If someone couldn’t get the addView() it’s because the view is not a layout.
Источник
Add layout to layout programmatically android
This post shows how to translate text between languages with an example.
Identify Language of Text with Firebase API Android Example
This post explains how to build a feature in android app that identifies the language of given text.
Organize Photos by Content Android Example
This post explains how to create in android a feature that lets user organize photos by its content.
Android Barcode Scanning Example
This post explains how to develop barcode scanning feature in android app using Firebase machine learning kit which provides barcode scanning API.
Extracting Text from Images Android
To recognize and extract text from images, Firebase ML kit can be used. Firebase ML kit offers machine learning features and is based on Google ML technologies.
Google Places SDK for Android Tutorial
Using Google places SDK for Android, current places, place details, nearby places and photos associated with a place can be displayed in apps and place search capability can be developed.
Android Widget Example
One of the excellent features of Android is that app’s information and features can be displayed as mini apps on home screens. These mini apps are called widgets.
Android MotionLayout Examples
MotionLayout is a subclass of ConstraintLayout. It allows you to animate property changes of UI elements which are part of a layout.
Android Fragments Transition Animation Example
To minimize the number of un-installations of your app, you need to build it in such way that it performs well, works on all devices and is user friendly.
Model View ViewModel MVVM Android Example
Model View ViewModel (MVVM) is an architectural pattern applied in applications to separate user interface code from data and business logic.
Android Model View Presenter MVP Pattern Example
If you want to build android apps which can be tested and modified easily, you need to implement user interface architectural pattern in your app.
Android Kotlin ListView Example
It is very common in most of the applications that a list of data items is displayed in UI. In android applications, list of data items can be shown to users using ListView.
About
Android app development tutorials and web app development tutorials with programming examples and code samples.
Источник
How to Programmatically Add Views to Views
Let’s say I have a LinearLayout , and I want to add a View to it, in my program from the Java code. What method is used for this? I’m not asking how it’s done in XML, which I do know, but rather, how can I do something along the lines of this sample code?
Like one can do in Swing.
7 Answers 7
Calling addView is the correct answer, but you need to do a little more than that to get it to work.
If you create a View via a constructor (e.g., Button myButton = new Button(); ), you’ll need to call setLayoutParams on the newly constructed view, passing in an instance of the parent view’s LayoutParams inner class, before you add your newly constructed child to the parent view.
For example, you might have the following code in your onCreate() function assuming your LinearLayout has id R.id.main :
Making sure to set the LayoutParams is important. Every view needs at least a layout_width and a layout_height parameter. Also getting the right inner class is important. I struggled with getting Views added to a TableRow to display properly until I figured out that I wasn’t passing an instance of TableRow.LayoutParams to the child view’s setLayoutParams.

The best way I found is to use the inflate static method of View.
where yourViewXML is something like R.layout.myView
please notice that you need a ViewGroup in order to add a view (which is any layout you can think of)
so as an example lets say you have a fragment which it view already been inflated and you know that the root view is a layout, and you want to add a view to it:
EDIT:
Kotlin code for the example above (view is the getView() of a fragment)

This is late but this may help someone 🙂 🙂 For adding the view programmatically try like
This will create your entire view programmatcally. You can add any number of view as same. Hope this may help. 🙂

LinearLayout is a subclass of ViewGroup, which has a method called addView. The addView method should be what you are after.
The idea of programmatically setting constraints can be tiresome. This solution below will work for any layout whether constraint, linear, etc. Best way would be to set a placeholder i.e. a FrameLayout with proper constraints (or proper placing in other layout such as linear) at position where you would expect the programmatically created view to have.
All you need to do is inflate the view programmatically and it as a child to the FrameLayout by using addChild() method. Then during runtime your view would be inflated and placed in right position. Per Android recommendation, you should add only one childView to FrameLayout .
Here is what your code would look like, supposing you wish to create TextView programmatically at a particular position:
Step 1:
In your layout which would contain the view to be inflated, place a FrameLayout at the correct position and give it an id, say, «container».
Step 2 Create a layout with root element as the view you want to inflate during runtime, call the layout file as «textview.xml» :
BTW, set the layout-params of your frameLayout to wrap_content always else the frame layout will become as big as the parent i.e. the activity i.e the phone screen.
If not set, because a child view of the frame, by default, goes to left-top of the frame layout, hence your view will simply fly to left top of the screen.
Step 3
In your onCreate method, do this :
(Note that setting last parameter of findViewById to null and adding view by calling addView() on container view (frameLayout) is same as simply attaching the inflated view by passing true in 3rd parameter of findViewById() . For more, see this.)
Источник


