Creating a Search Field in Your Android app
Last Updated: 01/21/2016
Nelson Glauber
Senior Software Engineer at CESAR
Search is a feature existing in a large number of Android applications. Providing a way to search content inside your app is very important as it helps users to find the content that they want.
However, this search must be fast and efficient as getting information may be the main reason the user opened your app. The Android SDK provides a set of APIs to implement this pattern in your app, and in this post we’ll review the first steps needed to implement it into your application.
Hands on!
Let’s get started! Create a new project in Android Studio using the «Empty activity» template. Once the project is created, add a new menu file and name it as res/menu/menu_search.xml :
Our menu file contains just one item responsible to display a search button. When the user presses this button, it expands and shows a text field allowing the use to enter the term to be searched. The widget responsible for this task is the SearchView as we can see in the app:actionViewClass attribute. Defining app:showAsAction with the value collapseActionView allows SearchView to expand itself when the button is tapped.
Notice we are using the support library here to keep compatibility across Android versions.
Once we create a menu file, we’re going to load it in the MainActivity like described below:
Inside onCreateOptionsMenu() we are loading the menu resource file using inflate() . Through the Menu object we are finding the MenuItem that contains the SearchView widget. Setting an OnQueryTextListener object to the SearchView our app can detect two events:
- onQueryTextChange is called when the user types each character in the text field;
- onQueryTextSubmit is triggered when the search is pressed.
So, you could implement whatever you want in these methods to perform a search (access a SQLite database or a web service, for example). That’s it! This is the easiest way to implement a search functionality in your app.
Improving searching experience
The previous approach works fine, but in general a search operation is needed to help users find what they want. A good way to do this is showing some suggestions while the user is typing. To demonstrate this approach, we will display a list of cities while the user types the city’s name in the SearchView . This list is stored in a server. The first thing we have to do is create a searchable configuration. So, add a new file to the project at res/xml/searchable.xml :
Let’s understand the properties defined in this file:
- Voice search button was enabled using android:voiceSearchMode property.
- While the user is typing, the query() method will be called in a content provider that responds to android:searchSuggestAuthority (we’ll see this provider just later).
- When the user selects a suggestion in the list, a new activity will be called using the action described in android:searchSuggestIntentAction property.
- android:searchSuggestIntentData complements the previous property because it defines a Uri pattern for the Intent triggered when the user clicks in a suggestion.
As we know, content providers usually accesses a SQLite database to store and retrieve data, but we can use it to access the web too, as the Android documentation says clearly:
Content providers «may be called from many threads at once, and must be thread-safe».
In this example, the suggestions will be retrieved from a JSON file stored in a web server. Create a new content provider naming it CitySuggestionProvider and just implement query() (the others are empty):
When the user starts to type the text, our provider is called using an uri like below. content://ngvl.android.demosearch.citysuggestion/search_suggest_query/santos?limit=50
The system calls our provider adding search_suggest_query/
in the end of the uri. A limit of results is set to 50 by default, and it is passed as a query parameter. It’s important to note that the search operation is done outside the UI thread so we can perform a HTTP request like we did. In this example we are storing the city’s list in memory, but in practice we can use a table in our SQLite database.
Using the Uri object, we’ve got the text parameter using getLastPathSegment() and max number of suggestions to be returned using getQueryParameter() . After reading the content from the web, a MatrixCursor was built to represent the suggested cities list. One important detail in here is column names. The columns «_id» and «suggest_text_1» are obligatory. You can use more columns or create a subclass of cursor adapter to customize your suggestions list.
As I said before, our suggestions are stored in a JSON file on a web server. So here, we are performing the request to retrieve the cities’ list and reading it as a JSON file using OkHttp library. So, don’t forget to add this dependency in the build.gradle file:
Be sure the android:authorities is the same as declared in the searchable configuration file.
After that, we also need to connect the activity with the searchable configuration. Change the activity declaration in AndroidManifest.xml :
Using the value android.app.searchable for the tag, we are defining the activity has a searchable configuration. Now we have set this information to the SearchView widget. Modify the onCreateOptionsMenu() to look like below:
Run the application and start typing some text inside the SearchView. You’ll see that some suggestions are displayed:

Nice! Our suggestions feature is working. But what happens when a suggestion is chosen? Or if I pressed the search button in the keyboard?
Handling suggestions and search action
At this moment, when the user presses the search button or selects a suggestion in the list, a new instance of the MainActivity is created and displayed. To avoid this, we can set our activity’s launch mode as singleTop in AndroidManifest.xml and implement onNewIntentMethod() :
When the user clicks on the search button, the activity is called using ACTION_SEARCH, but when selecting a suggestion, the ACTION_VIEW is used (as we defined in searchable configuration file). If you run the application now and perform a search, the same instance of MainActivity is used instead of creating a new one.
You can use this approach without problem, but you could need (or prefer) to perform the search in another activity. To do that, we are going to create a new searchable activity that will be called when the user presses the search button or selects a suggestion.
Its declaration in AndroidManifest.xml must be like this:
Remember to remove these same configurations ( and ) from the MainActivity declaration. So now, we have to perform a little change in the MainActivity .
With this implementation, when the user presses the return/search button, a new activity is started using the action » android.intent.action.SEARCH » and one parameter called » query «. This parameter represents the text typed by the user in the SearchView . The code below shows how to handle a search in the SearchableActivity :
Once you have a query parameter you can search whatever you want. For example, a local database/content provider or in a web service.
Conclusion
In this post, we implemented a search feature in an Android app and saw how easy it is. These are just the first steps, for more details check Android Search training tutorial.
The source code of this sample is available at my GitHub.
Источник
Использование Android Search Dialog. Пример простого приложения

Данная статья предназначена для тех, кто уже написал свой HelloWorld для Android и знает, что такое Activity и Intent, а так же где находится манифест, и зачем нужны layout’ы. В противном случае, можно ознакомиться с этим материалом, например, на developer.android.com.
В статье описывается создание несложного приложения, которое использует механизм реализации поиска, основанный на возможностях встроенного фреймворка. После прочтения вы также сможете настроить свое приложение таким образом, чтобы оно осуществляло поиск по данным, используя стандартный Android Search Dialog.
Немного теории
Android Search Dialog (далее — «диалог поиска») управляется с помощью поискового фреймворка. Это означает, что разработчику не нужно задумываться над тем как его нарисовать или как отловить поисковый запрос. За вас эту работу сделает SearchManager.
Итак, когда пользователь запускает поиск, SearchManager создает Intent, и направляет его к Activity, которое отвечает за поиск данных (при этом сам запрос помещается в экстры). То есть по сути в приложении должно быть хотя бы одно Activity, которое получает поисковые Intent’ы, выполняет поиск, и предоставляет пользователю результаты. Для реализации потребуется следующее:
- Конфигурационный xml файл (в нем содержится информация о диалоге)
- Activity, которое будет получать поисковые запросы, выполнять поиск и выводить результаты на экран
- Механизм вызова поискового диалога (так как не все устройства с Android на борту имеют на корпусе кнопку поиска)
Конфигурационный файл
xml version =»1.0″ encoding =»utf-8″ ? >
searchable xmlns:android =»http://schemas.android.com/apk/res/android»
android:label =»@string/app_name»
android:hint =»@string/search_hint»
>
searchable >
* This source code was highlighted with Source Code Highlighter .
Обязательным атрибутом является только android:label, причем он должен ссылаться на строку, которая является такой же, что и название приложения. Второй атрибут, android:hint используется для отображения строки в пустом диалоге. Например, это может быть «Поиск по Видео» или «Поиск контактов» и т.п. Этот атрибут указывает на то, по каким данным осуществляется поиск. Также важно знать, что элемент searchable поддерживает множество других атрибутов, подробнее можно прочесть Здесь.
Создаем Activity
Минимально, всё что нам нужно от пользовательского интерфейса Activity — это список для вывода результатов поиска и механизм вызова поискового диалога. Так и сделаем, добавив только поле для ввода текста и кнопку, чтобы мы сами могли заполнять базу. Забегая вперед, скажу, что данные будем хранить в БД SQLite.
Опишем интерфейс Activity следующим образом (файл находится в res/layout/main.xml).
xml version =»1.0″ encoding =»utf-8″ ? >
LinearLayout xmlns:android =»http://schemas.android.com/apk/res/android»
android:orientation =»vertical»
android:layout_width =»fill_parent»
android:layout_height =»fill_parent» >
LinearLayout
android:orientation =»horizontal»
android:layout_width =»fill_parent»
android:layout_height =»wrap_content»
android:gravity =»top» >
EditText
android:id =»@+id/text»
android:layout_width =»wrap_content»
android:layout_height =»wrap_content»
android:hint =»@string/text»
android:layout_weight =»100.0″/>
Button
android:id =»@+id/add»
android:layout_width =»wrap_content»
android:layout_height =»wrap_content»
android:text =»@string/add»/>
LinearLayout >
ListView
android:id =»@android:id/list»
android:layout_width =»fill_parent»
android:layout_height =»wrap_content»/>
TextView
android:layout_gravity =»left»
android:id =»@android:id/empty»
android:layout_width =»fill_parent»
android:layout_height =»fill_parent»
android:text =»@string/no_records»/>
LinearLayout >
* This source code was highlighted with Source Code Highlighter .
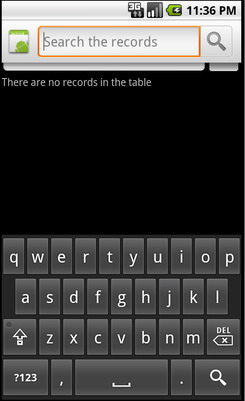
Выглядит следующим образом:

Также нам понадобится layout для вида элемента списка, опишем его простейшим образом (файл находится в res/layout/record.xml)
xml version =»1.0″ encoding =»utf-8″ ? >
TextView
android:id =»@+id/text1″
xmlns:android =»http://schemas.android.com/apk/res/android»
android:layout_width =»wrap_content»
android:layout_height =»wrap_content»
/>
* This source code was highlighted with Source Code Highlighter .
Также, не забываем про файл ресурсов, где хранятся наши строки (файл в res/values/strings.xml)
xml version =»1.0″ encoding =»utf-8″ ? >
resources >
string name =»app_name» > SearchExample string >
string name =»add» > Add string >
string name =»text» > Enter text string >
string name =»no_records» > There are no records in the table string >
string name =»search_hint» > Search the records string >
string name =»search» > Search string >
resources >
* This source code was highlighted with Source Code Highlighter .
xml version =»1.0″ encoding =»utf-8″ ? >
manifest xmlns:android =»http://schemas.android.com/apk/res/android»
package =»com.example.search»
android:versionCode =»1″
android:versionName =»1.0″ >
application android:icon =»@drawable/icon» android:label =»@string/app_name» >
activity android:name =».Main»
android:label =»@string/app_name» >
intent-filter >
action android:name =»android.intent.action.MAIN»/>
category android:name =»android.intent.category.LAUNCHER»/>
intent-filter >
intent-filter >
action android:name =»android.intent.action.SEARCH»/>
intent-filter >
meta-data
android:name =»android.app.searchable»
android:resource =»@xml/searchable»
/>
activity >
application >
uses-sdk android:minSdkVersion =»5″/>
* This source code was highlighted with Source Code Highlighter .
Сейчас, вы уже можете проверить, все ли вы сделали правильно. Вызвать диалог на эмуляторе можно, например, нажав кнопку поиска. Ну или если вы проверяете на девайсе, то зажав «Меню». Выглядеть должно примерно так:
Выполнение поиска
Получение запроса
Так как SearchManager посылает Intent типа Search нашему Activity, то всё что нужно сделать это проверить на Intent этого типа при старте Activity. Тогда, если мы получаем нужный Intent, то можно извлекать из него экстру и выполнять поиск.
Поиск данных
Так как тип структуры хранения данных для разных приложений может различаться, то и методы для них свои. В нашем случае, проще всего выполнить запрос по таблице БД SQLite запросом LIKE. Конечно, лучше использовать FTS3, он значительно быстрее, подробнее о FTS3 можно прочесть на сайте SQLite.org. В идеале, также нужно всегда рассчитывать, что поиск может занять продолжительное время, поэтому можно создать какой-нибудь ProgressDialog, чтобы у нас не завис интерфейс, и чтобы пользователь знал, что приложение работает.
Вывод результатов
Вообще вывод результатов — это проблема UI, но так как мы используем ListView, то для нас проблема решается простым обновлением адаптера.
Исходный код
Наконец, привожу полный исходный код двух классов с комментариями. Первый — Main, наследник ListActivity, он используется для наполнения БД и вывода результатов. Второй класс — RecordsDbHelper, он реализует интерфейс для взаимодействия с БД. Самые важные методы — добавление записей и поиск совпадений, с помощью запроса LIKE.
import android.app.ListActivity;
import android.app.SearchManager;
import android.content.Intent;
import android.database.Cursor;
import android.os.Bundle;
import android.view.Menu;
import android.view.MenuInflater;
import android.view.MenuItem;
import android.view.View;
import android.widget.Button;
import android.widget.EditText;
import android.widget.SimpleCursorAdapter;
public class Main extends ListActivity <
private EditText text;
private Button add;
private RecordsDbHelper mDbHelper;
@Override
public void onCreate(Bundle savedInstanceState) <
super.onCreate(savedInstanceState);
setContentView(R.layout.main);
//Создаем экземпляр БД
mDbHelper = new RecordsDbHelper( this );
//Открываем БД для записи
mDbHelper.open();
//Получаем Intent
Intent intent = getIntent();
//Проверяем тип Intent
if (Intent.ACTION_SEARCH.equals(intent.getAction())) <
//Берем строку запроса из экстры
String query = intent.getStringExtra(SearchManager.QUERY);
//Выполняем поиск
showResults(query);
>
add = (Button) findViewById(R.id.add);
text = (EditText) findViewById(R.id.text);
add.setOnClickListener( new View.OnClickListener() <
public void onClick(View view) <
String data = text.getText().toString();
if (!data.equals( «» )) <
saveTask(data);
text.setText( «» );
>
>
>);
>
private void saveTask( String data) <
mDbHelper.createRecord(data);
>
private void showResults( String query) <
//Ищем совпадения
Cursor cursor = mDbHelper.fetchRecordsByQuery(query);
startManagingCursor(cursor);
String [] from = new String [] < RecordsDbHelper.KEY_DATA >;
int [] to = new int [] < R.id.text1 >;
SimpleCursorAdapter records = new SimpleCursorAdapter( this ,
R.layout.record, cursor, from , to);
//Обновляем адаптер
setListAdapter(records);
>
//Создаем меню для вызова поиска (интерфейс в res/menu/main_menu.xml)
public boolean onCreateOptionsMenu(Menu menu) <
MenuInflater inflater = getMenuInflater();
inflater.inflate(R.menu.main_menu, menu);
return true ;
>
public boolean onOptionsItemSelected(MenuItem item) <
switch (item.getItemId()) <
case R.id.search_record:
onSearchRequested();
return true ;
default :
return super.onOptionsItemSelected(item);
>
>
>
* This source code was highlighted with Source Code Highlighter .
import android.content.ContentValues;
import android.content.Context;
import android.database.Cursor;
import android.database.SQLException;
import android.database.sqlite.SQLiteDatabase;
import android.database.sqlite.SQLiteOpenHelper;
import android.util.Log;
public class RecordsDbHelper <
public static final String KEY_DATA = «data» ;
public static final String KEY_ROWID = «_id» ;
private static final String TAG = «RecordsDbHelper» ;
private DatabaseHelper mDbHelper;
private SQLiteDatabase mDb;
private static final String DATABASE_CREATE = «CREATE TABLE records(_id INTEGER PRIMARY KEY AUTOINCREMENT, »
+ «data TEXT NOT NULL);» ;
private static final String DATABASE_NAME = «data» ;
private static final String DATABASE_TABLE = «records» ;
private static final int DATABASE_VERSION = 1;
private final Context mCtx;
private static class DatabaseHelper extends SQLiteOpenHelper <
DatabaseHelper(Context context) <
super(context, DATABASE_NAME, null , DATABASE_VERSION);
>
@Override
public void onCreate(SQLiteDatabase db) <
@Override
public void onUpgrade(SQLiteDatabase db, int oldVersion, int newVersion) <
Log.w(TAG, «Upgrading database from version » + oldVersion + » to »
+ newVersion + «, which will destroy all old data» );
db.execSQL( «DROP TABLE IF EXISTS tasks» );
onCreate(db);
>
>
public RecordsDbHelper(Context ctx) <
this .mCtx = ctx;
>
public RecordsDbHelper open() throws SQLException <
mDbHelper = new DatabaseHelper(mCtx);
mDb = mDbHelper.getWritableDatabase();
return this ;
>
public void close() <
mDbHelper.close();
>
//Добавляем запись в таблицу
public long createRecord( String data) <
ContentValues initialValues = new ContentValues();
initialValues.put(KEY_DATA, data);
return mDb.insert(DATABASE_TABLE, null , initialValues);
>
//Поиск запросом LIKE
public Cursor fetchRecordsByQuery( String query) <
return mDb.query( true , DATABASE_TABLE, new String [] < KEY_ROWID,
KEY_DATA >, KEY_DATA + » LIKE» + «‘%» + query + «%'» , null ,
null , null , null , null );
>
>
* This source code was highlighted with Source Code Highlighter .
Источник


