- A Complete Guide to Learn XML For Android App Development
- Basics of User Interface(UI)
- Different Types of XML Files Used in Android Studio
- Add xml file to android app
- Getting the SDK
- Creating a Backend
- Adding the SDK
- Configuring SDK Properties
- Authentication Properties
- Configuring Your Android Manifest File
- Calling Mobile APIs
- Loading the Backend’s Configuration
- Authenticating and Logging In
- Calling Platform APIs
- Calling Custom APIs
- Libraries and Dependencies
- Next Steps
A Complete Guide to Learn XML For Android App Development
XML stands for Extensible Markup Language. XML is a markup language much like HTML used to describe data. It is derived from Standard Generalized Markup Language(SMGL). Basically, the XML tags are not predefined in XML. We need to implement and define the tags in XML. XML tags define the data and used to store and organize data. It’s easily scalable and simple to develop. In Android, the XML is used to implement UI-related data, and it’s a lightweight markup language that doesn’t make layout heavy. XML only contains tags, while implementing they need to be just invoked.
The simple syntax of XML is
So in this article, there is a deep discussion on how to learn and understand what XML is for Android Development.
Basics of User Interface(UI)
Basically in Android XML is used to implement the UI-related data. So understanding the core part of the UI interface with respect to XML is important. The User Interface for an Android App is built as the hierarchy of main layouts, widgets. The layouts are ViewGroup objects or containers that control how the child view should be positioned on the screen. Widgets here are view objects, such as Buttons and text boxes. Considering the following simple example of the activity_main.xml file.
Output UI:

In the above example of XML file, There are 2 view groups one is LinearLayout and another is RelativeLayout and the TextView1 and TextView2 is child widgets under the ViewGroup1 that is LinearLayout. EditText1, EditText2, and Button are the child widgets under ViewGroup2 that is RelativeLayout. ViewGroup2(RelativeLayout) is nested under the ViewGroup1 which produces the following hierarchy.
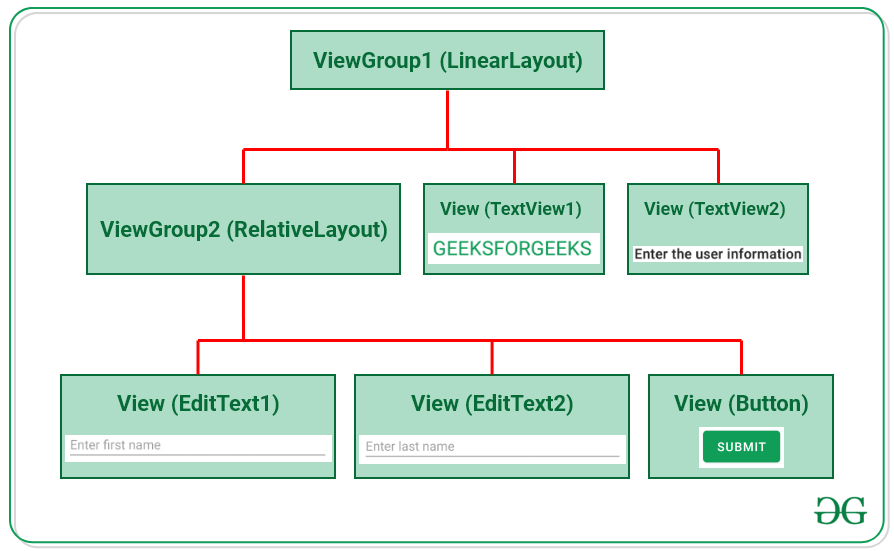
From the hierarchy, it’s been observed that every widget like EdtText, TextView, or Button is one of the View. These Views are contained inside the ViewGroup, like RelativeLayout, LinearLayout, FrameLayout, etc.
Different Types of XML Files Used in Android Studio
Different XML files serve different purposes in Android Studio. The list of various XML files in Android Studio with their purposes is discussed below.
1. Layout XML files in android
The Layout XML files are responsible for the actual User Interface of the application. It holds all the widgets or views like Buttons, TextViews, EditTexts, etc. which are defined under the ViewGroups. The Location of the layout files in Android is:
app -> src -> main -> res -> layout
Источник
Add xml file to android app
Oracle Mobile Cloud Enterprise ( OMCe ) provides an SDK for Android that makes it easy to use OMCe ’s features.
Getting the SDK
To get the OMCe client SDK for Android, go to the Oracle Mobile Cloud Enterprise Downloads page on OTN.
Creating a Backend
You create a backend to serve as a secure gateway between your app and OMCe features, such as platform and custom APIs. For your app to access these resources, it authenticates with a backend.
Click  to open the side menu and select Mobile Apps > Backends .
Click New Backend .
Once you complete the dialog and the backend is created, keep the Settings page open.
You’ll need to configure your app with some of this information.
Adding the SDK
Assuming a basic app setup, without intervening frameworks, here’s what you would do to add the Android client SDK to an app
If you haven’t already done so, unzip the Android client SDK zip.
Copy the SDK jars into the libs folder in your app’s project. If this folder doesn’t exist, create it at the same level in your hierarchy as your src and build folders.
Import the IDMMobileSDK.jar into the project. (In Android Studio, select File > New > New Module , click Import .JAR/.AAR Package , click Next , select IDMMobileSDK.jar and click Next .)
In the source tree for the application, create a folder called assets (at the same level as the java and res folders).
In the SDK bundle, locate the oracle_mobile_cloud_config.xml file and copy it to the assets folder.
In your app’s build.gradle file, make sure the following are among the dependencies registered so that the SDK libraries are available to the app.
Open assets/oracle_mobile_cloud_config.xml and fill in the environment details for the mobile backend that the app will be using.
Configuring SDK Properties
To use the client SDK in an Android app, you need to add a oracle_mobile_cloud_config.xml configuration file to the app and fill it in with environment details for your backend in OMCe . In turn, the SDK classes use this information to construct HTTP headers for REST calls made to OMCe .
You package the configuration file in your app’s main bundle in the assets folder at the same level as the java and res folders. For example, in the sample GettingStarted app, it’s in /GettingStarted/src/main/assets .
The file is essentially divided into the following parts:
The mobileBackend element and its contents.
You include this part if you are using a backend with the app. The SDK classes use the environment and authentication details you specify there to access the backend and construct HTTP headers for REST calls made to APIs.
Elements that apply to the configuration as a whole, such as logLevel and oAuthTokenEndpoint . These elements generally, but don’t have to, appear at the top of the file.
The following code sample shows the structure of a oracle_mobile_cloud_config.xml file.
The values that you need to fill in for a given backend can be found on the Settings and App Profile pages for that mobile backend.
Here are some more notes on the file’s elements.
oAuthTokenEndPoint — The URL of the OAuth server from where your application gets its authentication token. This key needs to be provided for all apps that rely on OAuth to authenticate. You get this from the backend’s Settings page.
logLevel — Determines how much SDK logging is displayed in the app’s console. The default value is ERROR . Other possible values (in increasing level of detail) are WARNING , INFO , and DEBUG . It is also possible to specify NONE .
enableAnalytics — When set to true , analytics are collected for system and custom events that were defined with the legacy Mobile Cloud Service analytics features. This option has no impact on the current analytics features.
enableLogger — When set to true , logging is included in your app.
logHTTP — When set to true , the SDK logs the HTTP and HTTPS headers in requests and responses.
mobileBackend — An element containing authentication details for your backend and other optional details, such as synchronization properties.
You get the authentication details, such as the OAuth and HTTP credentials, from the backend’s Settings page.
mobileBackend/baseUrl — The base URL for all APIs that you call through the backend. You get this from the backend’s Settings page.
mobileBackend/authentication — Contains the following sub-elements:
The type sub-element, with possible values of oauth , basic , facebook , and tokenExchange .
One or more sub-elements for authentication types, each containing authentication credentials.
You can also add the offlineEnabled key and set its value to true .
See Authentication Properties for examples of each authentication type.
Authentication Properties
The contents and sub-elements of authentication depend on what kind of authentication the app will be using.
OAuth
Set the value of the element to oauth .
Fill in the clientID and clientSecret credentials provided by the backend.
Optionally, if you want to disable offline authentication, add the enableOffline element and set it to false .
At the top level of the file, supply the oAuthTokenEndPoint value.
The resulting authentication element might look something like this:
HTTP Basic
Set the value of the type element to basic .
Fill in the mobileBackendID and anonymousKey that are provided by the backend.
Optionally, if you want to disable offline authentication, add the enableOffline sub-element and set it to false .
The resulting authentication element might look something like this:
Token Exchange
If you are authenticating using a third-party token, do the following:
Set the value of the element to tokenExchange .
Create a sub-element and fill in the OAuth Consumer credentials provided by the backend.
The resulting authentication element might look something like this:
Facebook Login
For Facebook login:
Set the value of the property to facebook .
Create a sub-element.
Fill in with any relevant Facebook permissions (optional).
Within , created a element and fill in the HTTP Basic credentials provided by the backend.
The resulting authentication element might look something like this:
Configuring Your Android Manifest File
Permissions for operations such as accessing the network and finding the network state are controlled through permission settings in your application’s manifest file, AndroidManifest.xml . These permissions are required:
permission.INTERNET — Allows your app to access open network sockets.
permission.ACCESS_NETWORK_STATE — Allows your app to access information about networks.
Other permissions are optional. For example, there are a number of permissions necessary for the app to be able to receive notifications. For a rundown on the available permissions, see Android Manifest Permissions in the Google documentation.
Add the permissions at the top of your AndroidManifest.xml file, as shown in the following example:
Adding the client SDK to your application may require you to configure your AndroidManifest.xml file to add new permissions or activities. For example, if you add the Notifications individual SDK library, you may also need to add a new broadcast receiver. For more information, see Setting Up a Mobile App for Notifications.
Calling Mobile APIs
In OMCe , a backend is a logical grouping of custom APIs, storage collections, and other resources that you can use in your apps. The backend also provides the security context for accessing those resources.
Here are the general steps for using a backend in your Android app:
Add the client SDK to your app.
Fill in the oracle_mobile_cloud_config.xml with environment and authentication details for the backend.
Add an SDK call to your app to load the configuration info.
Add an SDK call to your app to handle authentication.
Add any other SDK calls that you want to use.
Loading the Backend’s Configuration
For any calls to OMCe APIs using the Android client SDK to successfully complete, you need to have the backend’s configuration loaded from the app’s oracle_mobile_cloud_config.xml file. You do this using the MobileManager class:
Authenticating and Logging In
Here is some sample code that you can use for authentication through OMCe in your Android apps.
First you initialize the authorization agent and set the authentication type to OAUTH :
Then you use the authenticate method to attempt authentication. The call includes parameters for Android context, user name, password, and a callback that completes the authorization process:
Here’s the definition for the callback:
SSO with a Third-Party Token
First, your app needs to get a token from the third-party token issuer. The way you can obtain the token varies by issuer. For detailed information on obtaining third-party tokens and configuring identity providers in OMCe , see Third-Party SAML and JWT Tokens.
Once you have the token, initialize the authorization agent and use the token in your authorization call.
Then you use the authenticateUsingTokenExchange method to attempt authentication.
Here’s the callback:
The default expiration time for storing a third-party token in OMCe is 6 hours. You can adjust this time by changing the Security_TokenExchangeTimeoutSecs policy. See Modifying Policies in Administering Oracle Mobile Cloud, Enterprise .
SSO with a Third-Party Token — Staying Logged In
You can also code the app to keep the user logged in, even when closing and restarting the app.
In the above example, the authenticateUsingTokenExchange() method is called with the third parameter ( storeToken ) set to false . If you set this parameter to true and the token exchange is successful, the MCS token is stored in a secure store and the user remains logged in until the token expires.
You can then use the loadSSOTokenExchange method on the Authorization object to load the stored token. If a token can’t be retrieved from the secure store, the method returns false .
Here’s some code that tries to load a saved token and, if it fails, restarts the authentication process:
When you have the token stored in the secure store, it remains associated with the mobile backend that the app originally used. Therefore, if the app is updated to use a different mobile backend (or mobile backend version), you need to clear the saved token and re-authenticate.
HTTP Basic Authentication
The code for handling login with HTTP Basic is nearly the same as the code for OAuth.
First you initialize the authorization agent and set the authentication type to BASIC_AUTH :
Then you use the authenticate method to attempt authentication. The call includes parameters for Android context, user name, password, and a callback that completes the authorization process.
Here’s the definition for the callback:
For Facebook login, you use classes in the oracle_mobile_android_social library.
First you initialize the authorization agent and set the authentication type to Facebook :
Using a CallbackManager object from Facebook’s SDK, initiate authentication.
Here’s code you can use for the callback that is passed above:
Override the onActivityResult() method to use the callback:
Calling Platform APIs
Once the mobile backend’s configuration info is loaded into the app, you can make calls to client SDK classes.
The root object in the Android SDK is MobileManager . The MobileManager object manages MobileBackend objects.
The MobileBackend object manages connectivity, authentication, and other transactions between your application and its associated backend, including calls to platform APIs and any custom APIs you have defined. It manages calls to platform APIs through instances of ServiceProxy such as Storage and Location .
Here’s an example of how you would use these classes to upload an image using the Storage API:
The ServiceProxy instance created there manages calls to the Storage platform API, including the constructing of the HTTP headers with the mobile backend credentials necessary to access the API.
And here’s how you could retrieve an image using the Storage API:
Calling Custom APIs
The client SDK provides the CustomHttpResponse class, the GenericCustomCodeClientCallBack interface, and the invokeCustomCodeJSONRequest method in the authorization classes to simplify the calling of custom APIs in OMCe . You can call a REST method (GET, PUT, POST, or DELETE) on an endpoint where the request payload is JSON or empty and the response payload is JSON or empty.
You use GenericCustomCodeClientCallBack to create a handler for the response (which is returned in the form of a CustomHttpResponse object.)
Then, to call the custom API, you call invokeCustomCodeJSONRequest(GenericCustomCodeClientCallBack restClientCallback, JSONObject data, String functionName, RestClient.HttpMethod httpMethod) on your Authorization object.
To make a call to a custom API endpoint, you could use something like this:
Libraries and Dependencies
The following SDK libraries (JAR files) are included in the Android client SDK:
omce-android-sdk-shared- .jar — The base library for the SDK, including functionality required by the other libraries as well as utility classes for accessing and authenticating with mobile backends.
IDMMobileSDK.jar — The identity management library used by all applications.
omce-android-sdk-location- — The Location library, which lets you access details about location devices that have been registered in OMCe and the places and assets they are associated with.
omce-android-sdk-notifications- .jar — The Notifications library, which lets you set up your application to receive notifications sent from your mobile backend.
omce-android-sdk-social- — The Social Login library, which allows you to set up your app to use Facebook login.
omce-android-sdk-storage- .jar — The Storage library, which lets you write code to access storage collections that are set up with your mobile backend.
omce-android-sdk-sync- — The Sync Client library, which allows you to cache application data when the device running your app is disconnected from the network, then sync up the data when the network connection is reestablished.
The SDK is modular, so you can package just the libraries that your app needs. Just be aware of the following dependencies:
Every Android application developed for OMCe must have the shared ( oracle-mobile_android_shared- .jar ) and IDMMobileSDK.jar libraries.
If the Storage library is installed, the Sync Client library must also be installed.
Next Steps
Once you have the Android SDK set up, you can start using it to add OMCe features to your app.
Источник


