- Adding Vector Assets in Android Studio
- Adding Vector Assets in Android Studio
- Используем иконки из библиотеки Material Design
- Используем иконки из библиотеки Material Design : 1 комментарий
- How to create adaptive icons for Android using Android Studio
- How to Create Android App Icons using Image Asset Studio
- Run Image Asset Studio
- Custom Image
- Clip Art
- Text String
- Creating Launcher Icon
- Adaptive and legacy launcher icon
- Legacy launcher icon only
- Creating ActionBar Icons and Tab Icons
- Creating Notification icons
- How to Delete an App Icon from a project
Adding Vector Assets in Android Studio
In the previous lesson, you added a menu item to your toolbar. In this lesson, you’ll learn how to add an icon for a menu item.
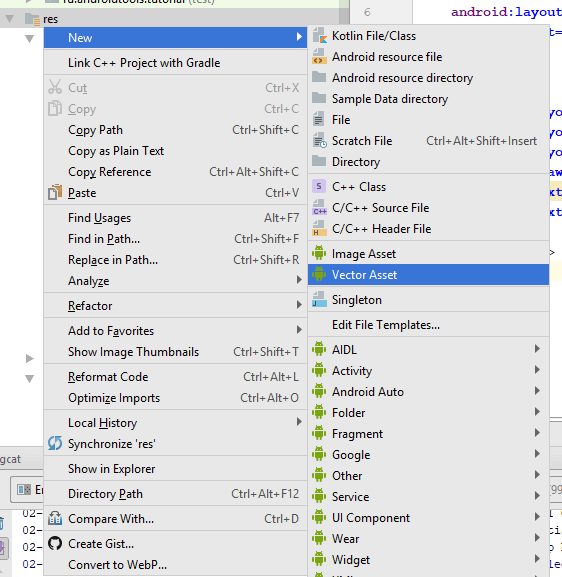
Right-click the res > drawable folder in the Explorer area on the left of Android Studio. From the menu that appears, select New > Vector Asset:
When you click on Vector Asset, you’ll see the Configure Vector Asset dialogue box appear in earlier versions of Android Studio:
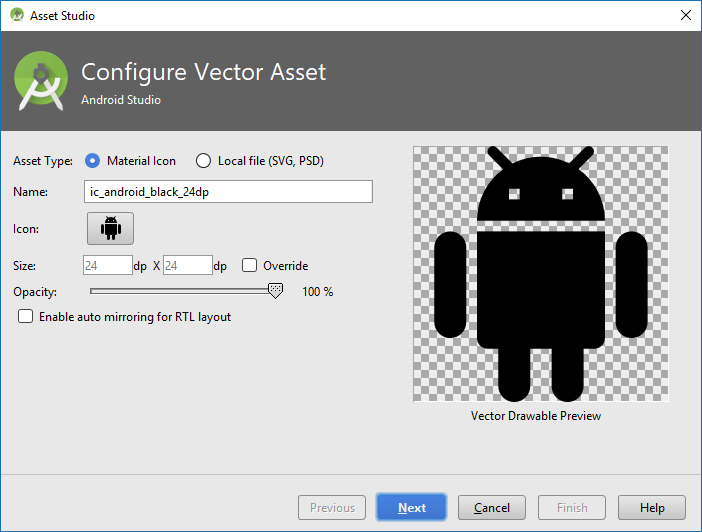
In later versions, you’ll see this dialog box:
Notice the highlighted button in the image above. Click this button, either Icon or Clip Art, to see lots of icons you can choose from:
Select an icon that reflects what your menu item will do. We’ve gone for a smiley-face for our favourites menu item:
Although the Size says 24dp by 24dp, you can change this. Select the Override checkbox and the size text boxes will activate. Type a new size for your icon. We’ll leave ours on 24, though.
Click the Next button to see what folder your icon is going in to:
Now click the Finish button to add the image to your drawable folder.
You can now use this drawable as an icon for your toolbar.
With your favourites_page menu item still selected, click on the icon property. Click the Pick a Resource button again to bring up the Resources dialogue box. You should see your new icon there, in the drawable section:
Click OK and your properties area should look like this:
If you want to change the colour of a Vector Asset, double click the XML file in the drawable folder (not the ic_launcher ones). You should see something like this:
A vector image is one built with paths. The path data connects series of points. Contrast this with a bitmap where images are built from a series of dots on a grid. So you can’t change the path data without change the image. But you can change the fill colours.
For the smiley-face we’ve chosen the first two paths in the XML file are for the eyes. The third set of points are for the mouth and the circle. (There is no fill for the background.) You can change the hexadecimal values from #000000 to anything you like. Click the black colour squares in the margins to bring up a colour dialogue box. Select some new colour for your vector shape.
You’re not quite ready to test it out, though, as the icon won’t show until we add some code later.
Let’s add two more menu items. Try to do these two yourself.
Add a new menu item to your layout. Change the ID to web_page. Set the title for your web string resource via the Resources dialogue box. Set the showAsAction to ifRoom. Add a new Vector Asset to your drawable folder, choosing any icon you like. Set the icon property to your new drawable. Your Properties area might then look something like this:
And your layout might look like this:
Add a third menu item to your layout. Change the ID to settings. Set the title to your settings_page string resource via the Resources dialogue box. Set the showAsAction to never. Because this menu item will never appear on the toolbar, you don’t need an icon. Your Properties area might then look something like this:
Your layout will look something like this one:
Now that we have all our menu items in place, we can switch to the Java code. We’ll start that in the next lesson below.
Источник
Adding Vector Assets in Android Studio
In the previous lesson, you added a menu item to your toolbar. In this lesson, you’ll learn how to add an icon for a menu item.
Right-click the res > drawable folder in the Explorer area on the left of Android Studio. From the menu that appears, select New > Vector Asset:
When you click on Vector Asset, you’ll see the Configure Vector Asset dialogue box appear in earlier versions of Android Studio:
In later versions, you’ll see this dialog box:
Notice the highlighted button in the image above. Click this button, either Icon or Clip Art, to see lots of icons you can choose from:
Select an icon that reflects what your menu item will do. We’ve gone for a smiley-face for our favourites menu item:
Although the Size says 24dp by 24dp, you can change this. Select the Override checkbox and the size text boxes will activate. Type a new size for your icon. We’ll leave ours on 24, though.
Click the Next button to see what folder your icon is going in to:
Now click the Finish button to add the image to your drawable folder.
You can now use this drawable as an icon for your toolbar.
With your favourites_page menu item still selected, click on the icon property. Click the Pick a Resource button again to bring up the Resources dialogue box. You should see your new icon there, in the drawable section:
Click OK and your properties area should look like this:
If you want to change the colour of a Vector Asset, double click the XML file in the drawable folder (not the ic_launcher ones). You should see something like this:
A vector image is one built with paths. The path data connects series of points. Contrast this with a bitmap where images are built from a series of dots on a grid. So you can’t change the path data without change the image. But you can change the fill colours.
For the smiley-face we’ve chosen the first two paths in the XML file are for the eyes. The third set of points are for the mouth and the circle. (There is no fill for the background.) You can change the hexadecimal values from #000000 to anything you like. Click the black colour squares in the margins to bring up a colour dialogue box. Select some new colour for your vector shape.
You’re not quite ready to test it out, though, as the icon won’t show until we add some code later.
Let’s add two more menu items. Try to do these two yourself.
Add a new menu item to your layout. Change the ID to web_page. Set the title for your web string resource via the Resources dialogue box. Set the showAsAction to ifRoom. Add a new Vector Asset to your drawable folder, choosing any icon you like. Set the icon property to your new drawable. Your Properties area might then look something like this:
And your layout might look like this:
Add a third menu item to your layout. Change the ID to settings. Set the title to your settings_page string resource via the Resources dialogue box. Set the showAsAction to never. Because this menu item will never appear on the toolbar, you don’t need an icon. Your Properties area might then look something like this:
Your layout will look something like this one:
Now that we have all our menu items in place, we can switch to the Java code. We’ll start that in the next lesson below.
Источник
Используем иконки из библиотеки Material Design
Во время разработки приложений часто возникает ситуация, когда нужно найти какие-либо изображения, например, иконки для кнопок. Для этого случая у Google есть своя библиотека Material Design Icons, содержащая различные иконки на все случаи жизни.
Хотя вы можете искать нужные иконки в исходнике на GitHub, Android Studio позволяет импортировать иконки, не заходя на сторонние сайты. Для этого вам достаточно кликнуть правой кнопкой на папку res и выбрать New — Image Asset.
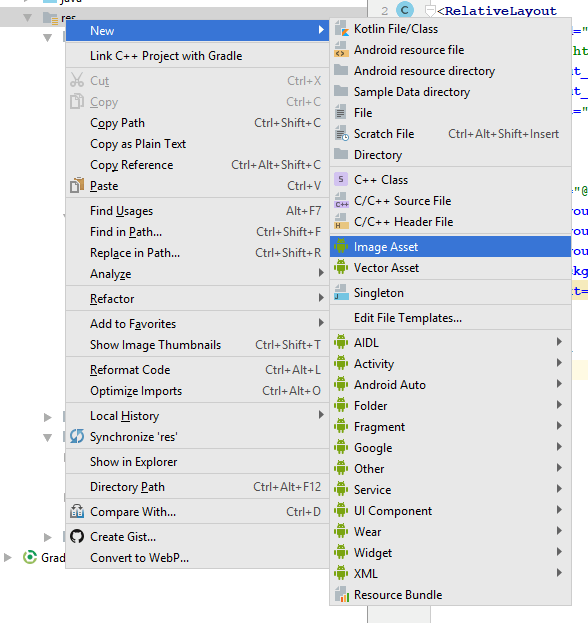
Откроется окно Asset Studio. Здесь вы можете настроить иконку своего приложения, иконки тулбара и уведомлений. В данном случае нам нужно выбрать Action Bar and Tab icons.
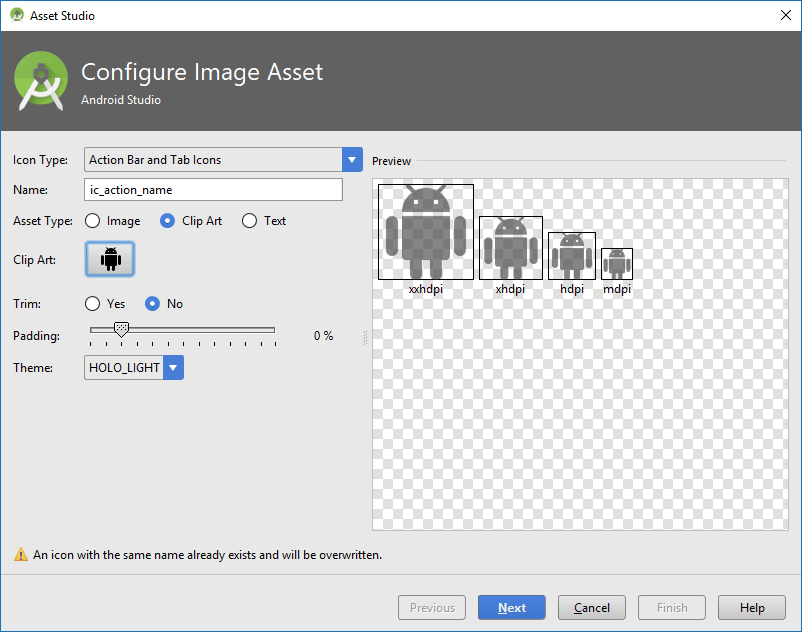
Здесь нужно выбрать тип Clip Art и нажать на иконку, после чего появится список всех доступных в библиотеке иконок.
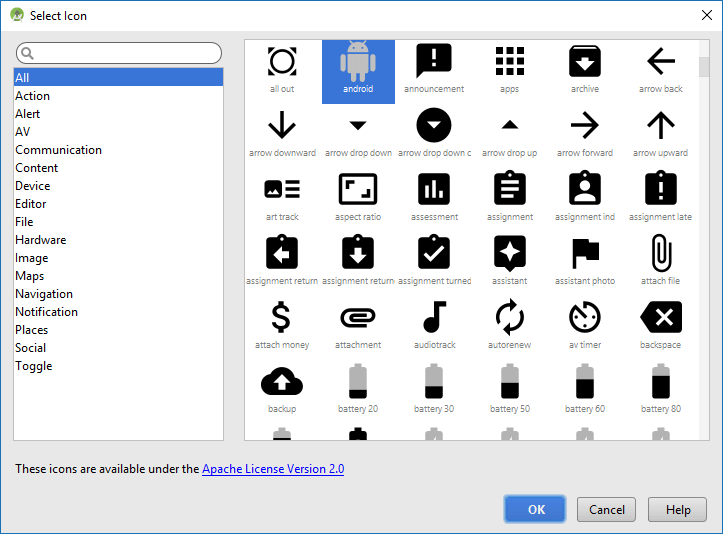
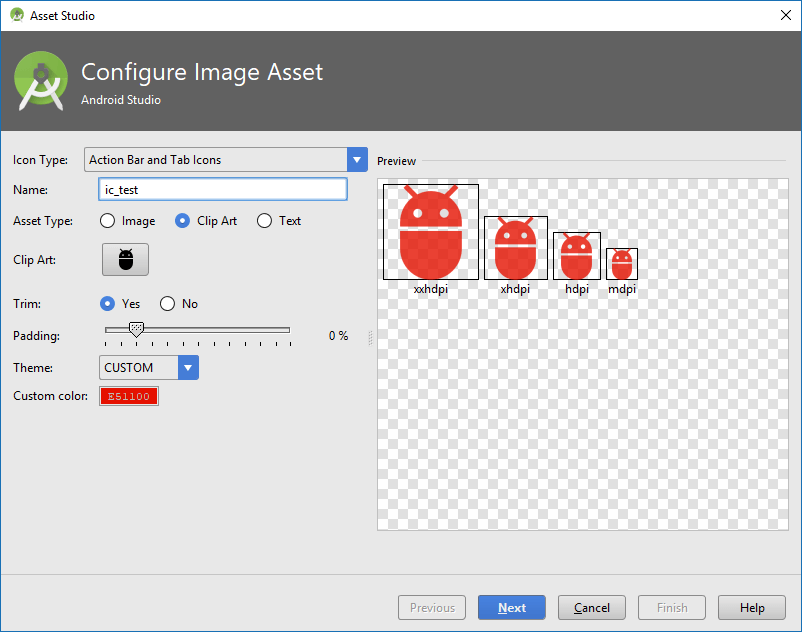
Для удобства они разбиты на категории, также вы можете ввести название иконки в поиске. После выбора иконки вы вернётесь на предыдущее окно, где можете при необходимости сменить тему (HOLO_DARK, HOLO_LIGHT или CUSTOM) для настройки цвета иконки, а также задать имя для иконки и отступы от границы. При регулировке отступов в окошке справа вы увидите, как иконки будет смотреться при разных разрешениях экрана.
После нажатия на Next вы увидите, в каких папках будут созданы иконки, и, нажав Finish, завершите их создание. После этого вы можете применять добавленные иконки в своём приложении.

В случае, если под рукой нет Android Studio, вы можете зайти на сайт Android Asset Studio, где аналогично можете создавать иконки для приложений.
Кроме стандартных PNG изображений есть также возможность импортировать векторные изображения. Для этого вместо Image Asset нужно будет выбрать Vector Asset.
В открывшемся окне мы сможете импортировать своё векторное изображение, либо взять готовое из библиотеки.
В результате в проект импортируется XML-файл, содержащий информацию о векторном изображении. Вы можете использовать его точно также, как и обычные PNG-изображения.
Однако в случае, если нужно показать векторное изображение на версии ниже Android 5.0 Lolipop, в файле build.gradle модуля приложения нужно дописать следующую строку.
Кроме того, при добавлении вектора через XML на старых версиях может возникнуть краш приложения, поэтому лучше всего добавлять их программно с помощью класса VectorDrawableCompat.
Используем иконки из библиотеки Material Design : 1 комментарий
Когда используешь Android Asset Studio скачивается архив с png файлами разных размеров, как их сразу все импортировать в android studio?
Источник
How to create adaptive icons for Android using Android Studio
I have found myself with an issue on my android applications not been able to use adaptive icons, resulting in ugly app icons and strange shapes in different launchers, so. the solution was create adaptive icons and works perfectly. 🙂
On API’s > 26 android implements adaptive icons, is possible that this causes issues on app icon in existing applications, just like the following example.
Example: Old app icons
To avoid this is necessary to create an adaptive icon. To do so, you need the following assets:
- Image icon without background, example below (foreground)
- Color background

Foreground icon image
With this elements you need to follow these steps to generate the icon with the Image Asset Studio.
- Open the project in Android Studio
- Select the app folder
- Go to File → New → Image Asset
- On «Foreground Layer» select the provided image and resize in order to get the proper aspect for the icon
- On “Background Layer» use the background provided
- Click on Next button and then Finish
- After that, the icons are created on the «mipmap-* * * *» folder

Foreground layer configuration
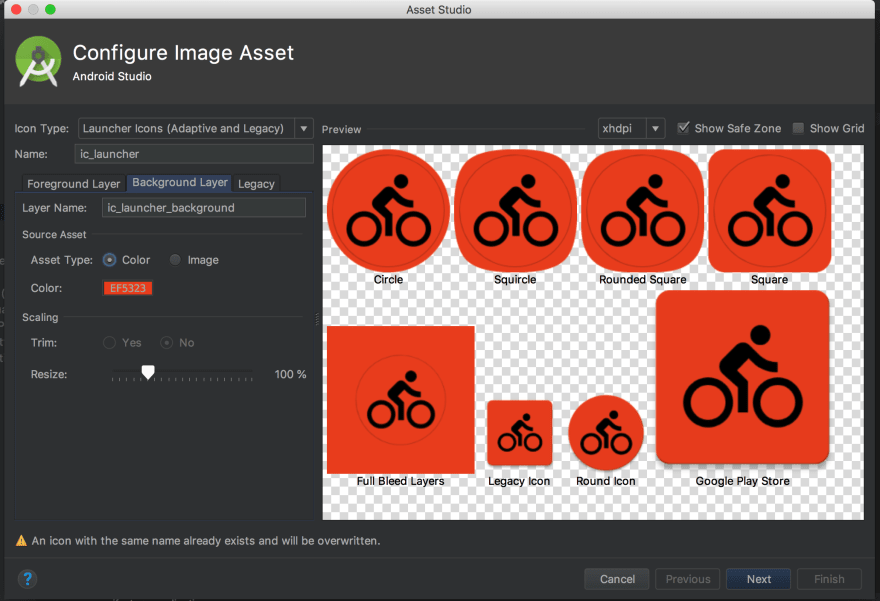
Background layer configuarion
Last screen and creation of assets
You need to add the new rounded icons to the respective roundIcon option on the AndroidManifest.xml
Exit fullscreen mode
After apply the changes. The app icon will look according to the the guidelines of android for adaptive icons.

Example: Android 9, API 28 stock launcher
Example: Android 7.0, API 24, Smart Launcher
Источник
How to Create Android App Icons using Image Asset Studio
Creating an application interface that the user will like and will be unlikely to forget can be intimidating. But creating an attractive launcher icon for your app, that the user will first come across while looking at your app, anyway needs more brainstorming. For Android, you need to create these graphics that have to be compatible and supporting to all devices running Android, sizes varying from a smartphone to TV. The introduction of Android Image Asset Studio in Android Studio has made it easy. In this article, you will see how you can easily create your application icon in one go.
Image Asset Studio is a tool introduced in Android Studio 3. It can be used to generate app icons for all the screen densities in one go, using custom images, material design icons as well as text strings. Application icon in Android includes the following,
- Launcher Icon: represents your app and the first thing that user sees
- ActionBar Icon & Tab Icon: representing actions in the ActionBar and Tabs of the app
- Notification Icon: represents your app notification when a user is outside your app

Here is a list of icon/image sizes that you need to create for different screen densities, for each image that you use in your application. No matter if you are a good designer, creating each of these is tedious!

Image Asset Studio helps to create all these icons for all screen densities and stores them in respective density folders. It provides a preview of all the icons that will be created, in different shapes, with options to edit them. Let’s see how to create each one of them.
Run Image Asset Studio
- In the Project Window, select the project hierarchy.
- Right-click on the res folder and choose New -> Image Asset.

3. Create the icon for your app i.e.
- Launcher icon which may be Adaptive and Legacy Launcher Icon (if your app supports Android 8.0 or above) or just the Legacy Launcher Icon(for Android version less than or equal to 7.1)
- ActionBar Icons and Tab Icons
- notification icon as per your requirement.
4. You can select the following Asset Type. The icon appears on the right side, in the preview panel.
Custom Image
You can use custom images of PNG (recommended), JPG or GIF (avert) format and adjust it to create icons. Set the path of your custom image if you select this.
Clip Art
You can select the icons from the list of Google Material Design Icons provided in the dialog. Click on the clip art icon to get the dialog with icon set.
Text String
You can use the fonts installed on your computer to generate the icons out of the text strings. It will create these text-based icons in PNG format in respective drawable-density folders. Set the string and select the font to use it.
If you are comfortable learning from video, you can refer to this for Launcher Icons and App Bar Icons:
Creating Launcher Icon
Launcher Icons represent our app in the device home screen, on the app list screen, in the Google Play Store and everywhere else. Android 8.0 (Oreo) and above supports Adaptive Icons and can be displayed in different shapes across various platforms. Image Asset Studio provides the option to create these adaptive icons as well as the legacy icons for Android 8.0 below. It also creates web icons(512 x 512 px) that represents our app on the Google Play Store.
The Launcher Icons are stored in the res/mipmap-density folder.
Adaptive and legacy launcher icon
If your app doesn’t support android version 8.0 or above, create legacy icon only for your app.
After opening Image Asset Studio, follow the steps below to create the legacy icons for your android app.
- For Icon Type field, select Launcher Icons (Adaptive & Legacy).
- For Foreground Layer tab, select the Asset type to be an image, clip art or text.
- Then for the Background Layer tab, select a Color or set the Image path for the Asset type to set the background.
- Then the Legacy tab, check the default settings. You can choose whether you want to generate the legacy icon, round icon and the icon for the web(Google Play Store Icon).
- Optionally
- Name: Change the name of the foreground and background layer. If the resource with the specified name exists, it will be indicated by an error message. The name can contain lowercase characters, digits and underscore only.
- Trim: Chose yes to adjust the margin between the foreground icon graphic and the background, else select no to keep the source asset as it is.
- Color: Set the color for the clip art or the text asset. Click the field, select the color, click chose and preview your icon.
- Resize: Use the slider to resize your icon. It is disabled for background layer where Color is the asset type.
7. Chose the resource directory for your image asset.
- main/res: For all source set including debug and release
- debug/res: For debugging only
- release/res: For only one version of build, overrides main source set
- custom source set: To define a new source set File -> Project structure -> app -> Build Types. Refer to Configure Build Variants for details
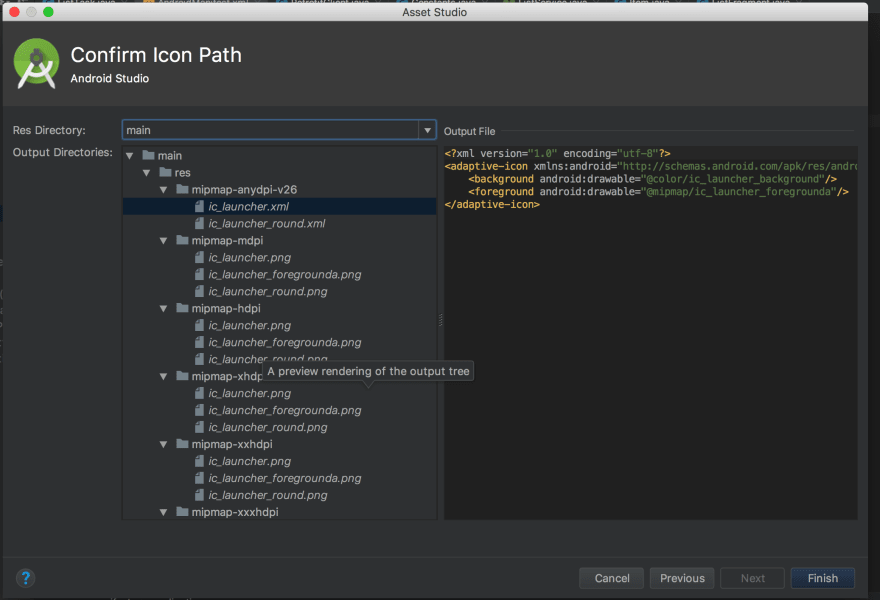
Output Directories shows the list of folders in which the icons will be created in the Project view in Project Window.
Check the mipmap folders for the Launcher Icons.
Legacy launcher icon only
If your app supports android version 8.0 or above, create adaptive and legacy launcher icon for your app.
After opening Image Asset Studio, follow the steps below to create adaptive and legacy icons for your android app.
- For Icon Type field, select Launcher Icons (Legacy Only).
- Select the Asset type to be an image, clip art or text.
- Optionally
- Name: Change the name of the icon if you don’t want to use the default name. If the resource with the specified name exists, an error message will indicate it. The name can contain lowercase characters, digits and underscore only.
- Trim: Chose yes to adjust the margin between the foreground icon graphic and the background, else select no to keep the source asset as it is.
- Padding: Adjust the source set padding for all four sides. You will have the review on the right side.
- Foreground: Set the color for the clip art or the text asset. Click the field, select the color, click chose and preview your icon.
- Background: Set the color for the background. Click the field, select the color, click chose and preview your icon.
- Scaling: Select crop or S hrink to fit to fit the icon size
- Shape: Select the shape to set a backdrop for the icon. For transparent, select none.
- Effect: Select dogear if you want the dogear effect for your icon, else select none.
5. Chose the resource directory for your image asset.
- main/res: For all source set including debug and release
- debug/res: For debugging only
- release/res: For only one version of the build, overrides main source set
- custom source set: To define a new source set File -> Project structure -> app -> Build Types. Refer to Configure Build Variants for details
Check the mipmap folders for the Launcher Icons.
Creating ActionBar Icons and Tab Icons
ActionBar icons are the ones present on the ActionBar that represents individual action. Whereas, the tab icons are used in the apps having multiple tabs. Using material icons for this category is recommended.
The ActionBar and Tab Icons are stored in the res/drawable-density folder.
You can also use Vector Asset Studio to have XML vectors for these categories of icons. It will reduce the size of your APK considerably.
After opening Image Asset Studio, follow the steps below to create action bar and tab icons for your android app.
- For Icon Type field, select Action Bar and Tab Icons.
- Select the Asset type to be an image, clip art or text.
- Optionally
- Name: Change the name of the icon if you don’t want to use the default name. If the resource with the specified name exists, an error message will indicate it. The name can contain lowercase characters, digits and underscore only.
- Trim: Chose yes to adjust the margin between the foreground icon graphic and the background, else select no to keep the source asset as it is.
- Padding: Adjust the source set padding for all four sides. You will have the review on the right side.
- Theme: Select holo_light or holo_dark as per your app theme. Select custom to set a custom color for the icon.
5. Chose the resource directory for your image asset.
- main/res: For all source set including debug and release
- debug/res: For debugging only
- release/res: For only one version of build, overrides main source set
- custom source set: To define a new source set File -> Project structure -> app -> Build Types. Refer to Configure Build Variants for details
Check the drawable folders for the Icons created.
Creating Notification icons
To learn from the video:
The user sees the notification when he is outside your app. Notification icons come up with these notifications.
The Notification Icons are stored in the res/drawable-density folder. There are a few other folders created too.
- for Android 2.2 (API 8) or lower — icons stored in res/drawable-density
- for Android 2.3 to 2.3.7 (API 9 & 10) — icons stored in res/drawable-density-v9. Gray version of the icon is created
- Android 3 (API 11) or higher — icons stored in res/drawable-density-v11. A white version of the icon is created.
After opening Image Asset Studio, follow the steps below to create notification icons for your android app.
- For Icon Type field, select Notification Icons.
- Select the Asset type to be an image, clip art or text.
- Optionally
- Name: Change the name of the icon if you don’t want to use the default name. If the resource with the specified name exists, an error message will indicate it. The name can contain lowercase characters, digits and underscore only.
- Trim: Chose yes to adjust the margin between the foreground icon graphic and the background, else select no to keep the source asset as it is.
- Padding: Adjust the source set padding for all four side. You will have the review on the right side.
5. Chose the resource directory for your image asset.
- main/res: For all source set including debug and release
- debug/res: For debugging only
- release/res: For only one version of build, overrides main source set
- custom source set: To define a new source set File -> Project structure -> app -> Build Types. Refer to Configure Build Variants for details
Check the drawable folders for the Icons created.
How to Delete an App Icon from a project
To delete the app icon,
- Select Android View in Project Window
- Expand the mipmap and drawable folder for the launcher and other icons respectively.
- Select the sub-folder that matched the name of your icon. It contains the icons of all densities that you created.
- Right-click on the sub-folder and hit delete.
Dialog for Safe Delete appears. - If you want, select options to find the places where the icon is used and hit OK.
If you chose to search for usage and the icon has any use in the project, you can view it and then confirm delete. You should delete or replace this reference to successfully compile the project. Android Studio then deletes the file from the project and the drive. - Chose Build -> Clean Project.
Источник


