- Adding menu items android
- Определение меню в xml
- Наполнение меню элементами
- Обработка нажатий в меню
- Программное создание меню
- Add/remove item menu menuItem dynamically
- 6 Answers 6
- Related
- Hot Network Questions
- Subscribe to RSS
- How to add Options Menu to Fragment in Android
- 21 Answers 21
- menu.xml
- Standalone Toolbar
- Step-1
- Step-2
- Step-3
- Adding Icons and Menu Items to an Android Toolbar
Adding menu items android
Меню в приложениях представляет класс android.view.Menu , и каждая activity ассоциируется с объектом этого типа. Объект android.view.Menu может включать различное количество элементов, а те в свою очередь могут хранить подэлементы.
Определение меню в xml
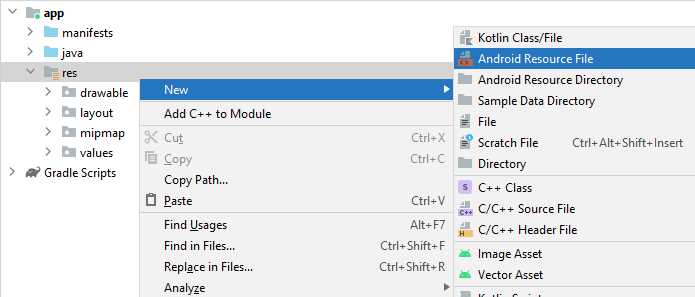
Меню, как и файлы интерфейса или изображений, также представляет собой ресурс. Однако при создании нового проекта с Empty Activity по умолчанию нет никаких ресурсов меню, поэтому при необходимости их нужно добавлять вручную. Так, для определения ресурсов меню в проекте нажмем правой кнопкой мыши в проекте на каталог res и далее в открывшемся списоке выберем пункт New -> Android Resource File :
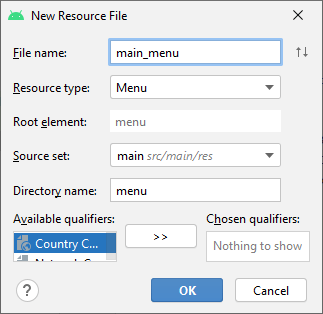
Далее в появившемся окне укажем для имени файла название main_menu , а для поля Resource Type (тип ресурса) выберем Menu :
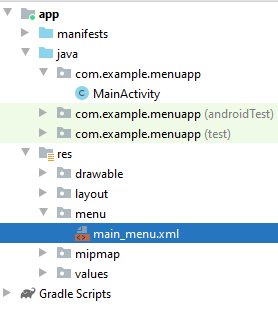
После этого в каталоге res будет создан подкаталог menu, в котором будет находиться файл main_menu.xml .
По умолчанию этот файл определяет один пустой элемент menu:
Изменим содержимое файла, определив несколько пунктов:
Тег является корневым узлом файла и определяет меню, состоящее из одного или нескольких элементов и .
Элемент представляет объект MenuItem, которой является одним из элементов меню. Этот элемент может содержать внутренний подэлемент , с помощью которого создается подменю.
Элемент включает следующие атрибуты, которые определяют его внешний вид и поведение:
android:id : уникальный id элемента меню, который позволяет его опознать при выборе пользователем и найти через поиск ресурса по id
android:icon : ссылка на ресурс drawable, который задает изображение для элемента ( android:icon=»@drawable/ic_help» )
android:title : ссылка на ресурс строки, содержащий заголовок элемента. По умолчанию имеет значение «Settings»
android:orderInCategory : порядок следования элемента в меню
Наполнение меню элементами
Мы определили меню с тремя элементами, но само определение элементов в файле еще не создает меню. Это всего лишь декларативное описание. Чтобы вывести его на экран, нам надо использовать его в классе Activity. Для этого надо переопределить метод onCreateOptionsMenu . Итак, перейдем к классу MainActivity и изменим его следующим образом:
Метод getMenuInflater возвращает объект MenuInflater , у которого вызывается метод inflate() . Этот метод в качестве первого параметра принимает ресурс, представляющий наше декларативное описание меню в xml, и наполняет им объект menu, переданный в качестве второго параметра.
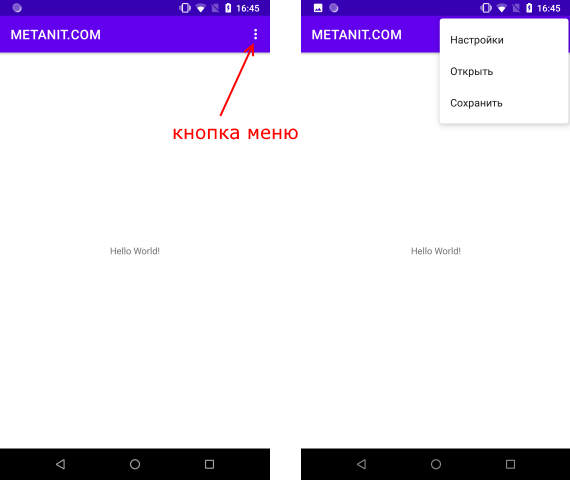
Запустим приложение по умолчанию и нажмем на кнопку меню в правом верхнем углу:
Обработка нажатий в меню
Если мы нажмем на любой из пунктов меню, то ничего не произойдет. Чтобы привязать к меню действия, нам надо переопределить в классе activity onOptionsItemSelected .
Для вывода выбранного элемена меню в файле activity_main.xml определим текстовое поле с >
И изменим класс MainActivity:
Чтобы понять, какой пункт меню выбран, вначале получаем его идентификатор int >. Затем пробегаемся в конструкции switch..case и выбираем нужный вариант и в зависимости от выбора производим определенные действия — в данном случае устанавливаем текст TextView.

Стоит отметить, что в данном случае, если наша задача заключалась, чтобы просто в выводе текста выбранного пункта меню, то мы вместо конструкции switch просто могли написать так:
Программное создание меню
Кроме определения элементов меню в xml, можно также создать меню программным способом. Для добавления новых пунктов меню используется метод add() класса Menu .
Например, изменим код MainActivity :
Использованная версия метода add() принимает заголовок для пункта меню.
Источник
Add/remove item menu menuItem dynamically
I have a problem, I want to add item in a toolbar (material design) programatically .
This is a my menu :
I know change text , color , background, and @override listener
I don’t know how I can add a menu ítem with a category » android:orderInCategory=»300 «
Note : I have all fragment, without 1 Activity

6 Answers 6
Try this Toolbar has option getMenu() which return menu

First of all put the item you want to display/hide in your xml file. Let’s say it’s «action_settings» as mentioned in your code, override the «onCreateOptionsMenu»
If you do not have access to the toolbar, you can do the following:
1 — Add the item to the menu through onCreateOptionsMenu():
2 — Create a boolean equal to true if the item must be visible
3 — Hide or show the item according to the value of your boolean in onPrepareOptionsMenu()
In your onCreateOptionmenu, try this code
you can also add setting like xml. You can check by itemid(«100») in onOptionsItemSelected.
If you don’t want to use 100 as ItemId, you can create ids resource file. And can use like this,
In your menu XML file, you can add a menu item not visible (android:visible=false) and render visible when you want.
@Chitrang Thanks to idea, I solved with this line :
Options select R.menu.item1,2,x
2 Solution : Create custom toolbar : into «android.support.v7.widget.Toolbar» and can you managment all icons.
Related
Hot Network Questions
Subscribe to RSS
To subscribe to this RSS feed, copy and paste this URL into your RSS reader.
site design / logo © 2021 Stack Exchange Inc; user contributions licensed under cc by-sa. rev 2021.12.3.40888
By clicking “Accept all cookies”, you agree Stack Exchange can store cookies on your device and disclose information in accordance with our Cookie Policy.
Источник
How to add Options Menu to Fragment in Android
I am trying to add an item to the options menu from a group of fragments.
I have created a new MenuFragment class and extended this for the fragments I wish to include the menu item in. Here is the code:
For some reason the onCreateOptionsMenu appears not to run.
21 Answers 21
Call the super method:
Put log statements in the code to see if the method is not being called or if the menu is not being amended by your code.
Also ensure you are calling setHasOptionsMenu(boolean) in onCreate(Bundle) to notify the fragment that it should participate in options menu handling.
I had the same problem, but I think it’s better to summarize and introduce the last step to get it working:
Add setHasOptionsMenu(true) method in your Fragment’s onCreate(Bundle savedInstanceState) method.
Override onCreateOptionsMenu(Menu menu, MenuInflater inflater) (if you want to do something different in your Fragment’s menu) and onOptionsItemSelected(MenuItem item) methods in your Fragment.
Inside your onOptionsItemSelected(MenuItem item) Activity’s method, make sure you return false when the menu item action would be implemented in onOptionsItemSelected(MenuItem item) Fragment’s method.
Activity
Fragment


If you find the onCreateOptionsMenu(Menu menu, MenuInflater inflater) method is not being invoked, make sure you call the following from the Fragment’s onCreate(Bundle savedInstanceState) method:
If you need a menu to refresh a webview inside a specific Fragment , you can use:
Fragment:
menu.xml

Use the android.support.v7.widget.Toolbar and just do:
Standalone Toolbar
Most of the suggested solutions like setHasOptionsMenu(true) are only working when the parent Activity has the Toolbar in its layout and declares it via setSupportActionBar() . Then the Fragments can participate in the menu population of this exact ActionBar:
Fragment.onCreateOptionsMenu(): Initialize the contents of the Fragment host’s standard options menu.
If you want a standalone toolbar and menu for one specific Fragment you can to do the following:
Yes, it’s that easy. You don’t even need to override onCreate() or onCreateOptionsMenu() .
PS: This is only working with android.support.v4.app.Fragment and android.support.v7.widget.Toolbar (also be sure to use AppCompatActivity and an AppCompat theme in your styles.xml ).
In the menu.xml you should add all the menu items. Then you can hide items that you don’t want to see in the initial loading.
menu.xml
Add setHasOptionsMenu(true) in the onCreate() method to invoke the menu items in your Fragment class.
FragmentClass.java
You don’t need to override onCreateOptionsMenu in your Fragment class again. Menu items can be changed (Add/remove) by overriding onPrepareOptionsMenu method available in Fragment.
In my case, here is the steps.
Step-1
Step-2
Step-3

You need to use menu.clear() before inflating menus.
If you want to add your menu custom


I’ve had the same problem, my fragments were pages of a ViewPager. The reason it was happening is that I was using child fragment manager rather than the activity support fragment manager when instantiating FragmentPagerAdapter.


Your code is fine. Only the super was missing in the method :

I was getting crazy because none of the answers here worked for me.
To show the menu I had to call: setSupportActionBar(toolbar)
Note: if your toolbar view isn’t in the same activity layout you can’t use the call above directly from your activity class, in this case you’ll need to get that activity from your fragment class and then call the setSupportActionBar(toolbar) . Remembering: your activity class should extends the AppCompatActivity.
Hope that this answer help you.
Set setHasMenuOptions(true) works if application has a theme with Actionbar such as Theme.MaterialComponents.DayNight.DarkActionBar or Activity has it’s own Toolbar, otherwise onCreateOptionsMenu in fragment does not get called.
If you want to use standalone Toolbar you either need to get activity and set your Toolbar as support action bar with
which lets your fragment onCreateOptionsMenu to be called.
Other alternative is, you can inflate your Toolbar’s own menu with toolbar.inflateMenu(R.menu.YOUR_MENU) and item listener with
Setting the options menu after creating the fragment view worked well for me.
My problem was slightly different. I did everything right. But I was inheriting the wrong class for the activity hosting the fragment.
So to be clear, if you are overriding onCreateOptionsMenu(Menu menu, MenuInflater inflater) in the fragment, make sure your activity class which hosts this fragment inherits android.support.v7.app.ActionBarActivity (in case you would want to support below API level 11).
I was inheriting the android.support.v4.app.FragmentActivity to support API level below 11.
One thing I would add to this and the reason it was not working for me.
It is similar to Napster’s answer.
Make sure your fragment’s hosting activity extends AppCompatActivity , not FragmentActivity !
From the Google Reference Documentation for FragmentActivity:
Note: If you want to implement an activity that includes an action bar, you should instead use the ActionBarActivity class, which is a subclass of this one, so allows you to use Fragment APIs on API level 7 and higher.
To update Napster’s answer — ActionBarActivity now being deprecated, use AppCompatActivity instead.
Источник
Adding Icons and Menu Items to an Android Toolbar
You now need to add some icons to the toolbar you added in the previous lesson. There’s also a thing called the Overflow Menu. This is for items that won’t fit on the toolbar. You’ll then typically see three dots. Press the dots and you see a sub menu appear. This sub menu is the Overflow Menu. Let’s see how to do that.
Items that go on your toolbars come from a separate XML file that is placed in a menu folder. You then attach the XML file to your toolbar using Java code.
First, we’ll need the menu folder.
In the Explorer area on the left of Android Studio, right-click the res folder. From the menu that appears, select New > Android resource directory:
When you get the dialogue box up, select menu from the Resources type dropdown:
The Directory name box at the top will then change to menu:
Click OK to create a menu folder inside of your res directory:
Now right click your new menu folder. From the menu that appears, select New > Menu resource file:
When you get the New Resource File dialogue box up, type menu_items as the file name:
Click OK to create a new XML file in your menu folder:
The XML file will open up in Design view in your main coding area. It should look something like this: (Later versions of Android Studio will have a Cast Button item at the top.)
Have a look on the left, though, and notice the Palette and the Component Tree. You can drag items from the Palette onto either your Component Tree or directly onto your toolbar.
Drag a Menu Item from the Palette to your Component Tree or toolbar:
Your Component Tree will then look like this:
And your layout will look like this:
Notice that the layout is showing the three dots for the Overflow Menu, and a menu item with the default name of item.
With your new menu item selected, have a look at the properties area on the right:
We’ll need IDs for the menu items. Type favourites_page as the ID. For the title, click the Pick a Resource button to the right of the title area. Then select the favourites string resource you set up in the previous lesson:
Click OK and your layout will update with your new title:
The title will appear only if a menu item is pushed to the Overflow Menu. It is pushed to the Overflow Menu if there is not enough room on the toolbar. But only if you have specified this in the showAsAction property. Click inside of this property to see the following box appear in earlier versions of Android Studio:
In later versions, you need to click the little flag. You’ll then see the same dialog box but in a different design:
Select the one for ifRoom. This means that the item will appear on the toolbar if there is room for it, otherwise it will get pushed to the Overflow Menu. The never means that it will never appear on the toolbar but always on the Overflow Menu; always means it will always appear on the toolbar; withText means that the title you add will always be displayed. (The collpaseActionView item is used with something called an Action Layout. We won’t be using these.)
Your properties area should look like this, so far:
You’ll probably want an icon to appear for your toolbar items. Instead of designing one yourself, there are lots of inbuilt ones you can use. You add these to the drawable folder as a Vector asset. You’ll learn how to do that in the next lesson below.
Источник


