- Support Library Setup
- In this document
- See also
- Downloading the Support Libraries
- Choosing Support Libraries
- Adding Support Libraries
- Adding libraries without resources
- Adding libraries with resources
- Using Support Library APIs
- Manifest Declaration Changes
- Code Samples
- What is Android Support Library and How to add it in Android Studio?
- What is Android support library?
- Method 1 – How to add support library in Android Studio
- Method 2 – How to add support libray in Android Studio
- Android — Support Library
- Support Library Features
- Downloading the Support Libraries
- Choosing Support Libraries
- Changes in Android build.gradle
Support Library Setup
In this document
See also
How you setup the Android Support Libraries in your development project depends on what features you want to use and what range of Android platform versions you want to support with your application.
This document guides you through downloading the Support Library package and adding libraries to your development environment.
Downloading the Support Libraries
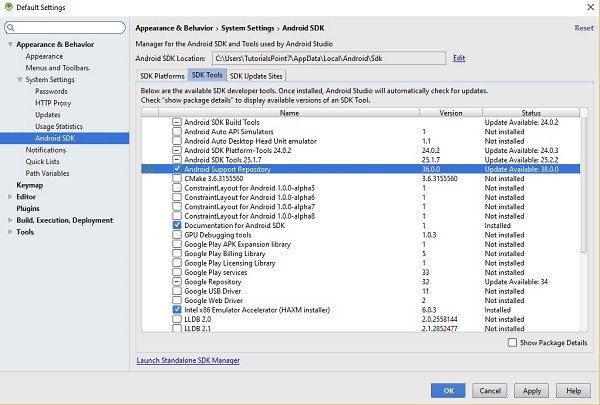
The Android Support Library package is provided as a supplemental download to the Android SDK and is available through the Android SDK Manager. Follow the instructions below to obtain the Support Library files.
To download the Support Library through the SDK Manager:
- Start the Android SDK Manager.
- In the SDK Manager window, scroll to the end of the Packages list, find the Extras folder and, if necessary, expand to show its contents.
- Select the Android Support Library item.
Note: If you’re developing with Android Studio, select and install the Android Support Repository item instead.

Figure 1. The Android SDK Manager with the Android Support Library selected.
After downloading, the tool installs the Support Library files to your existing Android SDK directory. The library files are located in the following subdirectory of your SDK: /extras/android/support/ directory.
Choosing Support Libraries
Before adding a Support Library to your application, decide what features you want to include and the lowest Android versions you want to support. For more information on the features provided by the different libraries, see Support Library Features.
Adding Support Libraries
In order to use a Support Library, you must modify your application’s project’s classpath dependencies within your development environment. You must perform this procedure for each Support Library you want to use.
Some Support Libraries contain resources beyond compiled code classes, such as images or XML files. For example, the v7 appcompat and v7 gridlayout libraries include resources.
If you are not sure if a library contains resources, check the Support Library Features page. The following sections describe how to add a Support Library with or without resources to your application project.
Adding libraries without resources
To add a Support Library without resources to your application project:
- Make sure you have downloaded the Android Support Library using the SDK Manager.
- Create a libs/ directory in the root of your application project.
- Copy the JAR file from your Android SDK installation directory (e.g., /extras/android/support/v4/android-support-v4.jar ) into your application’s project libs/ directory.
- Right click the JAR file and select Build Path > Add to Build Path.
- Make sure you have downloaded the Android Support Repository using the SDK Manager.
- Open the build.gradle file for your application.
- Add the support library to the dependencies section. For example, to add the v4 support library, add the following lines:
Adding libraries with resources
To add a Support Library with resources (such as v7 appcompat for action bar) to your application project:
Create a library project based on the support library code:
- Make sure you have downloaded the Android Support Library using the SDK Manager.
- Create a library project and ensure the required JAR files are included in the project’s build path:
- Select File > Import.
- Select Existing Android Code Into Workspace and click Next.
- Browse to the SDK installation directory and then to the Support Library folder. For example, if you are adding the appcompat project, browse to /extras/android/support/v7/appcompat/ .
- Click Finish to import the project. For the v7 appcompat project, you should now see a new project titled android-support-v7-appcompat.
- In the new library project, expand the libs/ folder, right-click each .jar file and select Build Path > Add to Build Path. For example, when creating the the v7 appcompat project, add both the android-support-v4.jar and android-support-v7-appcompat.jar files to the build path.
- Right-click the library project folder and select Build Path > Configure Build Path.
- In the Order and Export tab, check the .jar files you just added to the build path, so they are available to projects that depend on this library project. For example, the appcompat project requires you to export both the android-support-v4.jar and android-support-v7-appcompat.jar files.
- Uncheck Android Dependencies.
- Click OK to complete the changes.
You now have a library project for your selected Support Library that you can use with one or more application projects.
Add the library to your application project:
- In the Project Explorer, right-click your project and select Properties.
- In the category panel on the left side of the dialog, select Android.
- In the Library pane, click the Add button.
- Select the library project and click OK. For example, the appcompat project should be listed as android-support-v7-appcompat.
- In the properties window, click OK.
Note: If you are using the android-support-v7-mediarouter support library, you should note that it depends on the android-support-v7-appcompat library. In order for the v7 mediarouter library to compile, you must import both library projects into your development workspace. Then follow the procedure above to add the v7 appcompat project as a library to the v7 mediarouter library project.
- Make sure you have downloaded the Android Support Repository using the SDK Manager.
- Open the build.gradle file for your application.
- Add the support library feature project identifier to the dependencies section. For example, to include the appcompat project add compile «com.android.support:appcompat-v7:18.0.+» to the dependencies section, as shown in the following example:
Using Support Library APIs
Support Library classes that provide support for existing framework APIs typically have the same name as framework class but are located in the android.support class packages, or have a *Compat suffix.
Caution: When using classes from the Support Library, be certain you import the class from the appropriate package. For example, when applying the ActionBar class:
- android.support.v7.app.ActionBar when using the Support Library.
- android.app.ActionBar when developing only for API level 11 or higher.
Note: After including the Support Library in your application project, we strongly recommend using the ProGuard tool to prepare your application APK for release. In addition to protecting your source code, the ProGuard tool also removes unused classes from any libraries you include in your application, which keeps the download size of your application as small as possible. For more information, see ProGuard.
Further guidance for using some Support Library features is provided in the Android developer training classes, guides and samples. For more information about the individual Support Library classes and methods, see the android.support packages in the API reference.
Manifest Declaration Changes
If you are increasing the backward compatibility of your existing application to an earlier version of the Android API with the Support Library, make sure to update your application’s manifest. Specifically, you should update the android:minSdkVersion element of the tag in the manifest to the new, lower version number, as shown below:
The manifest setting tells Google Play that your application can be installed on devices with Android 2.1 (API level 7) and higher.
If you are using Gradle build files, the minSdkVersion setting in the build file overrides the manifest settings.
In this case, the build file setting tells Google Play that the default build variant of your application can be installed on devices with Android 2.2 (API level 8) and higher. For more information about build variants, see Build System Overview.
Note: If you are including the v4 support and v7 appcompat libraries in your application, you should specify a minimum SDK version of «7» (and not «4» ). The highest support library level you include in your application determines the lowest API version in which it can operate.
Code Samples
Each Support Library includes code samples to help you get started using the support APIs. The code is included in the download from the SDK Manager and is placed inside the Android SDK installation directory, as listed below:
- 4v Samples: /extras/android/support/samples/Support4Demos/
- 7v Samples: /extras/android/support/samples/Support7Demos/
- 13v Samples: /extras/android/support/samples/Support13Demos/
- App Navigation: /extras/android/support/samples/SupportAppNavigation/
Источник
What is Android Support Library and How to add it in Android Studio?
In this post, you will learn about the Android Support Library and How to add in your Android Studio project.
In Android app development, support libraries have an important role. Without them, It might difficult to provide a consistent look and feel in all devices.
Okay, tell me in detail.
What is Android support library?
There are many devices still running in Jelly bean and below versions. So you need to give the same importance for old and new devices While making an app. Otherwise, the App in old devices looks dull when compared to new ones.
That may affect the app’s market. To avoid this trouble, Android introduced the Support library. These are set of code libraries that provide backward compatibility and you can find it on Android SDK. These libraries experiences revisions for fresh features and bug fixes. Package name shows which Android Version it supports from.
For example : android.support.v7.app.AppCompatActivity – It can be used with API level 7 and higher.
After the release of support-library 26.0.0, support for minimum API level change it to API level 14 . So Don’t confuse with v* notation
The Android Support library includes
- Palette – It used to take out colors from image.
- CardView – Provides card look like widget.
- leanback – Helps to make UI for TV apps.
- Mediarouter – Supports for Media Routes.
- gridLayout – Arranges widgets in grid manner.
- RecyclerView – New version of ListView and GridView.
- AppCompat – Provides support for ActionBars.
- support-v4 library – User Interface features and other components.
- MultiDex – helps to make apk contains multiple dex files.
- RenderScript – Enables latest features of RenderScript .
- Annotations – improves code .
If you are a beginner and experimenting with online tutorials, there may be a chance to edit the gradle file directly for adding the library as a dependency, sometimes wait for a download too.
Before doing that you can perform the following procedures to find and add an available version of the same support library. You can use this way to add AppCompat, Design, CardView, RecyclerView and so on.
There are two methods you are going to learn here. First one is simple and fast. The second method is an old one. But it’s good to know about that.
We assume that you have opened Android Studio and your project.
Method 1 – How to add support library in Android Studio
- Open build.gradle(Module:app) file
Use ALT + ENTER and select Add library dependency
Select from the list, Here I am adding CardView.
Method 2 – How to add support libray in Android Studio
File->Project Structure you can use “Ctrl + Alt + Shift + S ” key combinations.
click the app module.
Click the Dependencies tab, you will see already added libraries below. click the + Button shown in the Right side of the window.
Choose library dependency from available options.
Choose library dependency dialog will be visible now. You can search here or choose the desired library that you want from the list. After your selection, just click OK.
The selected library will be added as a dependency in your dependencies tab list and click OK.
Conclusion
The Android Support library helps to reduce the headache of developers by providing backward compatibility. Users also feel fresh and happy with their old device. There is no complexity in adding support library in Android Studio. You can do it in simple steps. I assume the above words might have helped you.
Источник
Android — Support Library
When you develop an app on a latest version of android like 5.x and you also want it to run on those devices which are running older versions of android like 3.2 e.t.c. you can’t do that until you add backward compatibility to your code.
To provide this backward compatibility android provides you the Android Support Library package. The Android Support Library package is a set of code libraries that provide backward-compatible versions of Android framework APIs as well as features that are only available through the library APIs. Each Support Library is backward-compatible to a specific Android API level.
Including the Support Libraries in your Android project is considered a best practice for application developers, depending on the range of platform versions your app is targeting and the APIs that it uses.
Support Library Features
The Android Support Library package contains several libraries that can be included in your application. Each of these libraries supports a specific range of Android platform versions and set of features.
In order to effectively use the libraries, it is important to consider that which API level you want to target as each library supports different API level.
Following is a brief description of android support libraries and API level they support.
| Sr.No | Version & Features |
|---|---|
| 1 |