- Software Advanced Android-x86 Installer For Windows v1.8
- GitHub — supremegamers/awin-installer-dev: Easily install multiple android-x86 operating system on windows in a few clicks.
- Android-x86
- Run Android on your PC
- Installation
- Introduction
- Step by Step
- Upgrade
- Auto Installation
- Auto Update
- Other boot options
- Advanced
- Create a bootable USB stick for Android-x86
- Multi-Boot
- Updated (2010)
- Issues
- VMware
- Advanced android x86 installer
- About
- Advanced android x86 installer
- About
- Software Advanced Android-x86 Installer For Windows v1.8
- GitHub — supremegamers/awin-installer-dev: Easily install multiple android-x86 operating system on windows in a few clicks.
Software Advanced Android-x86 Installer For Windows v1.8
Advanced Android-x86 Installer is an windows executable which can help you install possibly any android-x86 operating system directly from windows. It also helps you in installing multiple clones of the same operating system and multi-booting them. Not only that, you can also directly pre-install latest GearLock while installing an android-x86 OS with it.
Feature Highlights
- Additional Ext2/3/4 partition support directly from windows.
Supports both Legacy and uEFi BIOS.
Ability to directly install latest GearLock during OS installation.
Built-in partitioning program to manage/create partitions from windows for you OS.
Install/create multiple instances/clones of the same/different OS and multi-boot them.
Video Tutorial
If you are having difficulties with understanding what and how to do then check this out.
Tested With
- BlissOS
- PrimeOS
- RemixOS
- PhoenixOS
- LineageOS
- Official Android-x86
Note: It will likely do fine with almost anything newer/older.
If you are interested in to include this installer with your android-x86 operating system .ISO’s then you can refer to the repo below to learn more.
GitHub — supremegamers/awin-installer-dev: Easily install multiple android-x86 operating system on windows in a few clicks.
Here I’m listing some of the common issues which are mainly over grub2win and extFS.
- Can’t find grub2win on boot over a uEFI BIOS.
—>>>> It’s because sometimes Windows takes over grub2win.
—>>>> So, boot from your BIOS boot menu, you will find grub2win there.
Getting error while grub2win installation
—>>>> Most likely your boot partition is a bit messed up.
—>>>> Try to revert any modifications made from softwares like EasyBCD, EasyUEFI etc.
—>>>> Sometimes the installer fails to mount your Ext2/3/4 filesystems as read and write, thus it gets mounted as read-only and it remains in panic-mode.
—>>>> The only solution to resolve this issue is to RESTART windows and then following the same installation process, but that time skip partitioning since you’ve already done that.
Thanks To
This installer relies on some external programs to enrich itself, without them it wouldn’t have been cool enough.
- David Pickens for his Grub2Win. (Used as the bootloader for multi-booting)
- Igor Pavlov for 7-zip. (Used for reading ISO files)
- @DiskGenius Eassos Ltd for their Free-Partition-Manager. (Used as the partition-tool)
Also special thanks to the early-beta testers: @Night, @Ahmad Moemen, @PAIN
Источник
Android-x86
Run Android on your PC


Installation
Introduction
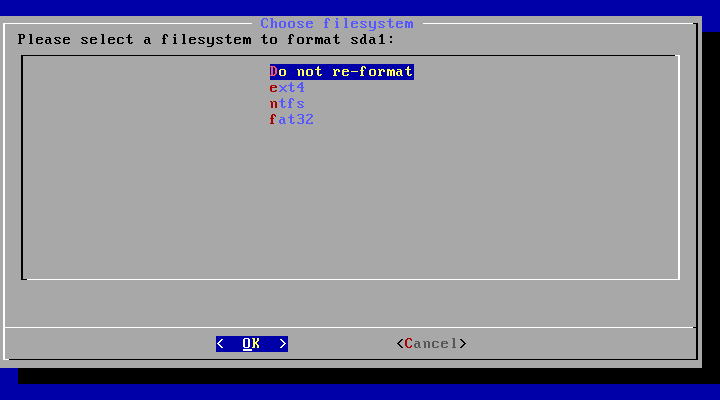
In particular, you can install Android-x86 to an NTFS filesystem to co-exist with Windows. See the Advanced Section for more details.
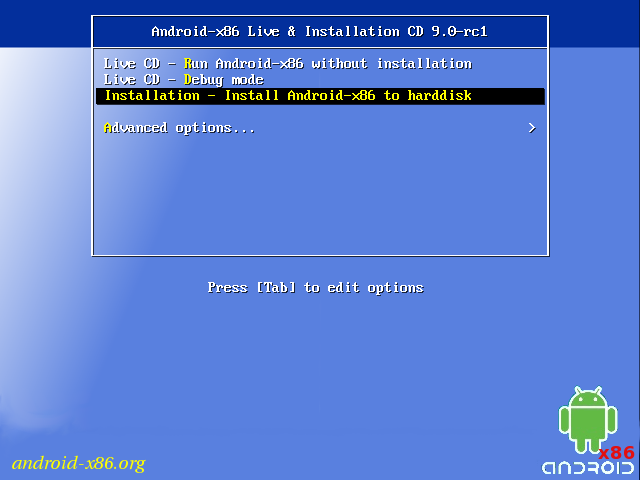
Step by Step
- Download an iso image from a mirror site. Usually you should just use the latest image.
- Burn the iso image to cdrom, or create a bootable USB disk (recommended). See the Advanced Section for details.
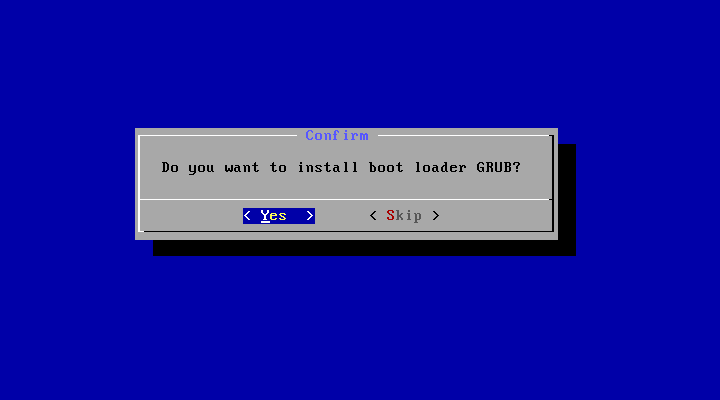
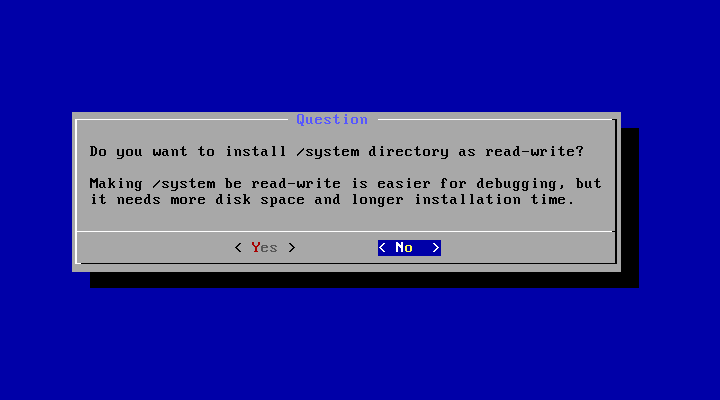
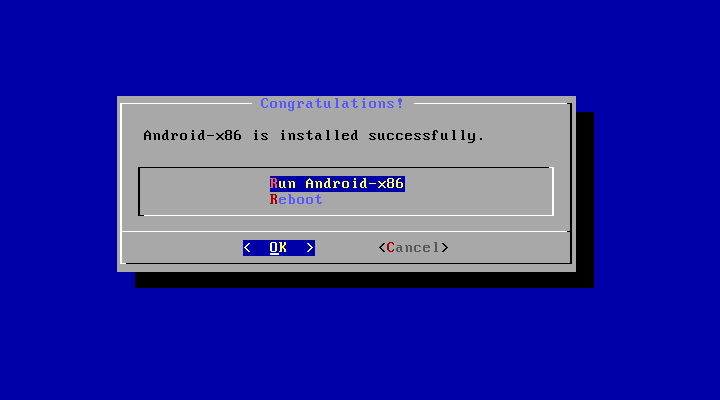
- Boot from the Android-x86 installation CD/USB, choose the ‘Install Android-x86 to harddisk’ item, as shown below:

Upgrade
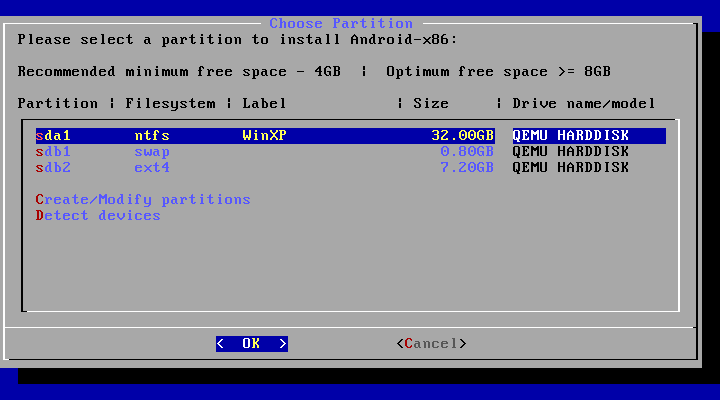
You may upgrade an older Android-x86 installation by the installer. Just select the partition containing the older installation. The installer will prompt if you’d like to upgrade it:
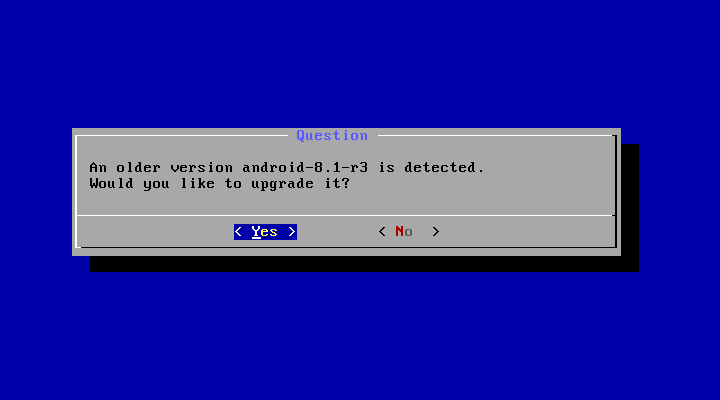
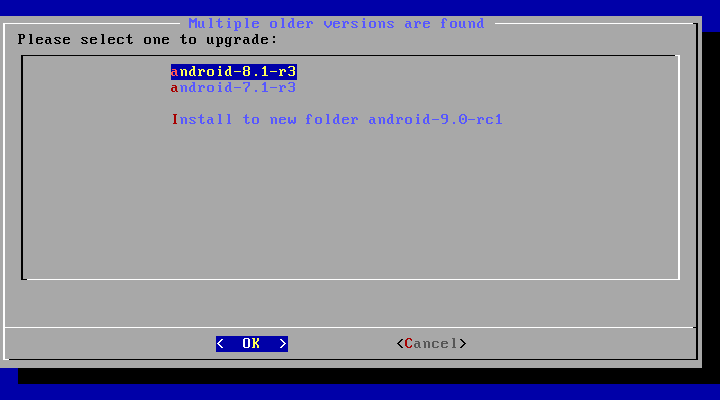
If there are multiple older versions in the same partition, the installer will ask which version to upgrade:
Auto Installation
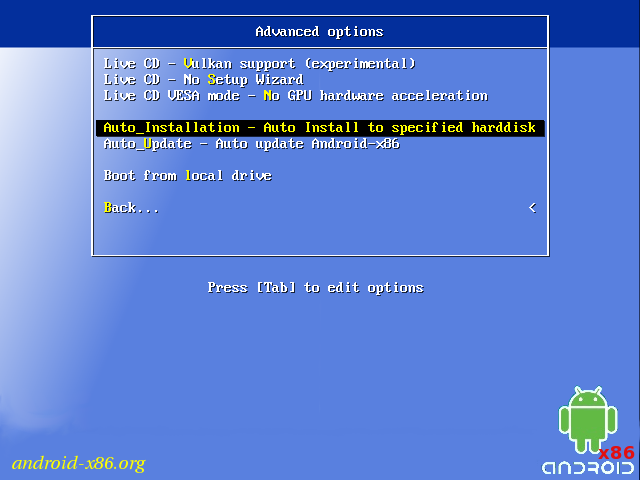
If you want to use Android-x86 as the only OS in your device, you may choose «Auto Installation» under the «Advanced options».
The installer will prompt you to confirm:
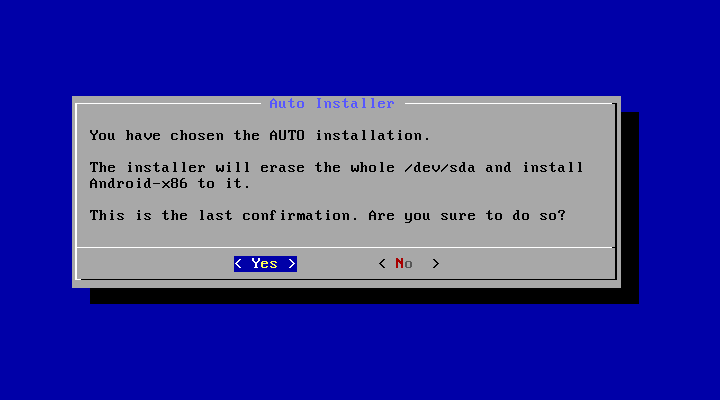
After you select ‘Yes’, the installer will erase the whole content of the hard disk, partition and install Android-x86 to it.
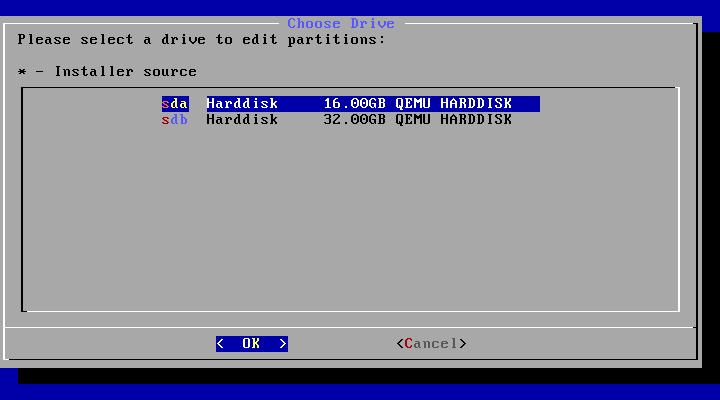
If you have multiple hard drives, the installer will let you choose which one to use. Be careful to choose the correct one.
Auto Update
By choosing «Auto Update» under the «Advanced options», the installer could update an older installation automatically.
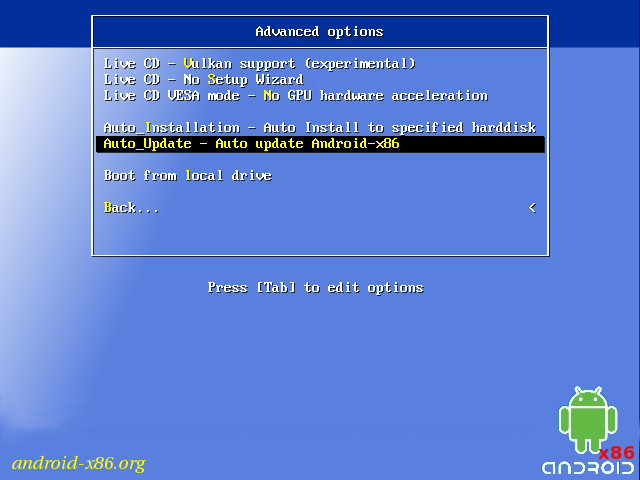
In this mode, the installer searches a partition named «Android-x86» or the first ext4 partition, and update the older installation in it automatically. If no such a partition is found, the auto update mode will be cancelled.
Other boot options
- Live CD — Run Android-x86 without installation
The item means to boot Android-x86 directly. This is useful to check if your hardware is compatible with Android-x86 quickly. All data is stored in RAM (tmpfs) and will lose after poweroff.
Live CD — Debug mode
See the debug howto for more details.
Live CD — Vulkan support (experimental)
Enable the experimental Vulkan support. Not all GPUs support it.
Live CD — No Setup Wizard
Skip the Setup Wizard. It’s useful if you want to test some apps quickly in live mode.
Live CD VESA mode — No GPU hardware acceleration
Disable GPU hardware acceleration. If you encounter black screen after booting, you may try this mode to see if it’s bootable.
Advanced
Create a bootable USB stick for Android-x86
There are several tools which could be used to create a bootable USB stick for Android-x86. The following tools are available for Windows users:
- Win32 Disk Imager — see demo video.
- UNetbootin — see demo video.
- Rufus — see demo video.
- Linux Live USB Creator (LiLi) — Obsolete software, but used to officially support Android-x86 until v4.4.
For Linux users, just use the standard dd command like:
Multi-Boot
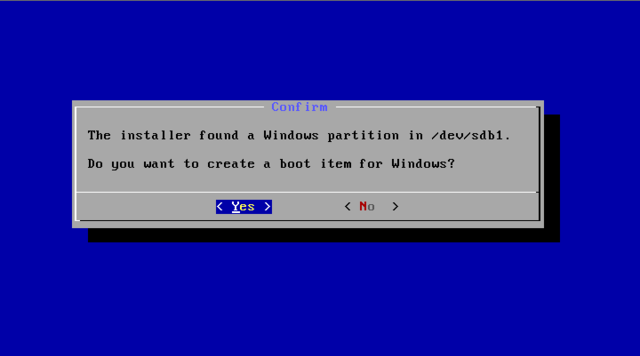
To boot other operating systems, you have to add items for them to /grub/menu.lst. For example, to boot Windows, add the following:
This assumes Windows is installed to the first partition of the first hard disk. Alternatively, you need to change rootnoverify to the appropriate value. See Grub Manual for details.
Updated (2010)
Issues
VMware
You have to change your virtual disk type to be IDE because the default type in VMware is SCSI, and Android-x86 kernel is not configured to support SCSI. You can follow these steps:
- Create a virtual machine.
- Edit virtual machine settings after the virtual machine created.
- Choose the hard disk and remove it.
- Add a hard disk to create a new virtual disk, then you can choose IDE as your virtual disk type.
- When finished, you can install android-x86 normally.
Источник
Advanced android x86 installer
Androidx86 Installer for Windows
This installer will help users install Android-x86 on PC from windows, without HDD repartioning or messing things up

- Support UEFI-Enabled PCs
- Support Legacy-BIOS PCs
- Install/Uninstall Android directly from Windows
- Install to Any FAT32/NTFS partitions
- No partition formatting or any data corruption
- UEFI-Enabled x64 PC
- Secure Boot Disabled
- Bitlocker Disabled on target drive
- Windows 8/8.1/10
- .Net Framework 4.5
- Android System image with UEFI Support from Android-x86.org
- Update Detection of RemixOS image
- Fix UEFI Init Fail with Surface Pro devices
- Add Support for RemixOS
- Fix reading large UEFI entries
- Fix using img file from path with spaces
- Trial period Removed
- Add GPU Options to GRUB Bootlist
- User-defined Data size
- Responsive UI
- Installation Status update
- Support Devices with 32-bit firmware
- Support booting from NTFS with compression enabled
- log includes more info about Device BIOS
External Components used:
- GRUB2 Bootloader GNU GRUB
- Android icon by benbackman
- MaterialDesignXamlToolkit by ButchersBoy
- 7zip by Igor Pavlov
- mke2fs tools by Cygwin
- UEFILib by ExtremeGTX
About
This installer will help users install Android-x86 on UEFI-Enabled PC from windows, without HDD repartioning or messing things up
Источник
Advanced android x86 installer
Advanced Android-x86 Installer Dev
If you just simply include the installer executable in your ISO root then that should be enough. The files in the repo are just to help swap the files which are already pre-packed with the installer, you don’t have to essentially include these in your ISO if you don’t want to change anything. But if you want to use custom icon, grub config, preset name-version and control how the installer should behave then this is for you.
All you need is the windows folder from this repo at your ISO root. (Ignore the other files and directories)
Below I will try to explain what each of the files are used for.
It can predefine some of the meta-data and functions the installer is to use as preset instead of the default values. For example, if you want to sepcify your operating system NAME and VERSION then you can do it in this file.
By default the installer uses it’s own icon for desktop shortcuts unless you put a custom logo.ico inside your ISO/windows folder. So basically, when you put your own logo.ico inside the windows folder, the installer will use that for desktop shortcut instead of it’s own.
- Delete this file if you don’t wish to change it.
This is the ascii art which is shown before rebooting thru the desktop shortcut created for your OS by the installer. By default it uses a ascii art of Android-x86 unless you put a custom version of yours.
- Delete this file if you don’t wish to change it.
If you want to change the grub submenu structure then you can do it over this file.
- Delete this file if you don’t wish to change it.
This file gets dynamically merged at the bottom of C:\grub2\grub.cfg . If you want to change the structure of that then you may edit it.
- Delete this file if you don’t wish to change it.
About
Easily install multiple android-x86 operating system on windows in a few clicks.
Источник
Software Advanced Android-x86 Installer For Windows v1.8

Advanced Android-x86 Installer is an windows executable which can help you install possibly any android-x86 operating system directly from windows. It also helps you in installing multiple clones of the same operating system and multi-booting them. Not only that, you can also directly pre-install latest GearLock while installing an android-x86 OS with it.
Feature Highlights
- Additional Ext2/3/4 partition support directly from windows.
Supports both Legacy and uEFi BIOS.
Ability to directly install latest GearLock during OS installation.
Built-in partitioning program to manage/create partitions from windows for you OS.
Install/create multiple instances/clones of the same/different OS and multi-boot them.
Video Tutorial
If you are having difficulties with understanding what and how to do then check this out.
Tested With
- BlissOS
- PrimeOS
- RemixOS
- PhoenixOS
- LineageOS
- Official Android-x86
Note: It will likely do fine with almost anything newer/older.
If you are interested in to include this installer with your android-x86 operating system .ISO’s then you can refer to the repo below to learn more.
GitHub — supremegamers/awin-installer-dev: Easily install multiple android-x86 operating system on windows in a few clicks.
Here I’m listing some of the common issues which are mainly over grub2win and extFS.
- Can’t find grub2win on boot over a uEFI BIOS.
—>>>> It’s because sometimes Windows takes over grub2win.
—>>>> So, boot from your BIOS boot menu, you will find grub2win there.
Getting error while grub2win installation
—>>>> Most likely your boot partition is a bit messed up.
—>>>> Try to revert any modifications made from softwares like EasyBCD, EasyUEFI etc.
—>>>> Sometimes the installer fails to mount your Ext2/3/4 filesystems as read and write, thus it gets mounted as read-only and it remains in panic-mode.
—>>>> The only solution to resolve this issue is to RESTART windows and then following the same installation process, but that time skip partitioning since you’ve already done that.
Thanks To
This installer relies on some external programs to enrich itself, without them it wouldn’t have been cool enough.
- David Pickens for his Grub2Win. (Used as the bootloader for multi-booting)
- Igor Pavlov for 7-zip. (Used for reading ISO files)
- @DiskGenius Eassos Ltd for their Free-Partition-Manager. (Used as the partition-tool)
Also special thanks to the early-beta testers: @Night, @Ahmad Moemen, @PAIN
Источник


