- Use AirDrop on your Mac
- Share content with AirDrop
- Receive content with AirDrop
- If you can’t see the other device in AirDrop
- How to use AirDrop on your iPhone, iPad, or iPod touch
- Before you begin
- How to use AirDrop
- On your iPhone 11 or later
- On your iPhone XS or earlier, iPad, or iPod touch
- How to accept AirDrop
- How to adjust AirDrop settings
- Как включить AirDrop на Mac: настройка
- Как включить AirDrop на Mac
- Как передавать данные между MacBook
- Как передавать файлы с iPhone на Mac и обратно
- Использование AirDrop на Mac для отправки файлов на соседние устройства
- Отправка объектов через AirDrop
- Получение объектов через AirDrop
- Как разрешить другим пользователям отправлять объекты по AirDrop на Ваш Mac
- Использование Пункта управления для управления AirDrop
Use AirDrop on your Mac
With AirDrop, you can wirelessly send documents, photos, videos, websites, map locations, and more to a nearby Mac, iPhone, iPad, or iPod touch.
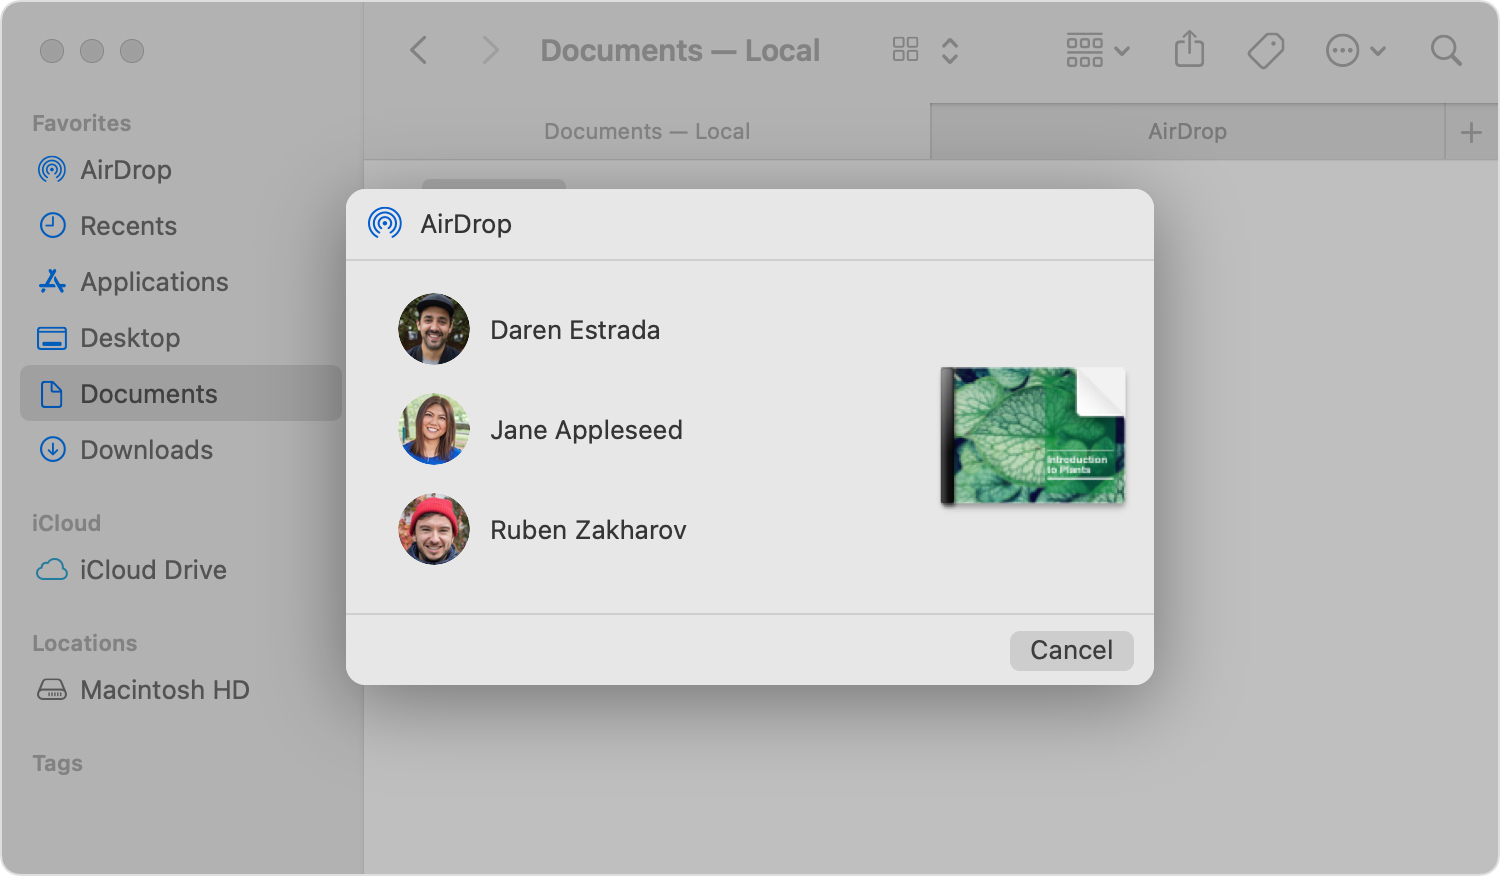
Share content with AirDrop
- Open the file that you want to send, then click Share button in the app window. Or Control-click the file in the Finder, then choose Share from the shortcut menu.
- Choose AirDrop from the sharing options listed.
- Choose a recipient from the AirDrop sheet:

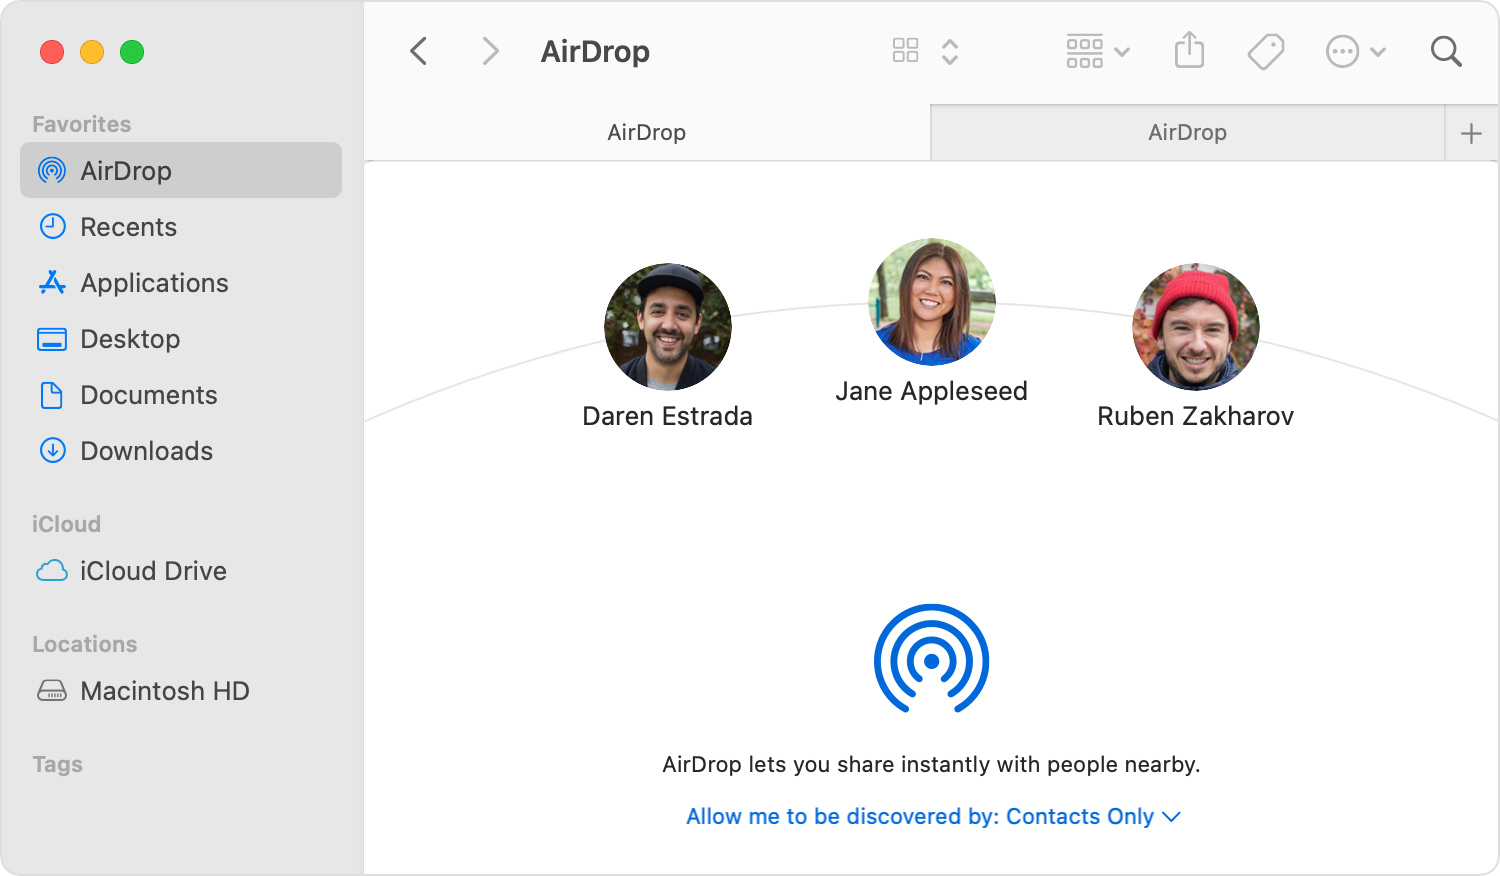
Or open an AirDrop window, then drag files to the recipient:
- Select AirDrop in the sidebar of a Finder window. Or choose Go > AirDrop from the menu bar.
- The AirDrop window shows nearby AirDrop users. Drag one or more documents, photos, or other files to the recipient shown in the window.
Receive content with AirDrop
When someone nearby attempts to send you files using AirDrop, you see their request as a notification, or as a message in the AirDrop window. Click Accept to save the files to your Downloads folder.

If you can’t see the other device in AirDrop
Make sure that your devices meet these requirements:
- Both devices are within 30 feet (9 meters) of each other and have Wi-Fi and Bluetooth turned on.
- Each Mac was introduced in 2012 or later (excluding the 2012 Mac Pro) and is using OS X Yosemite or later. To find out, choose Apple menu > About This Mac.
- Each iPhone, iPad, or iPod touch is using iOS 7 or later, with Personal Hotspot turned off.
Make sure that your devices can receive AirDrop requests:
- Choose Go > AirDrop from the menu bar in the Finder, then check the ”Allow me to be discovered by” setting in the AirDrop window. iPhone, iPad, and iPod touch have a similar setting. If set to receive from Contacts Only, both devices must be signed in to iCloud, and the email address or phone number associated with the sender’s Apple ID must be in the Contacts app of the receiving device.
The Contacts Only option is available on devices that support iOS 10 and later, iPadOS, and macOS Sierra 10.12 and later. If AirDrop is set to Contacts Only on a device with an earlier software version, you can change the option to Everyone while using AirDrop, then change it back when not in use. - Choose Apple menu > System Preferences, then click Security & Privacy. Click the Firewall tab, then click the lock and enter your administrator password when prompted. Click Firewall Options, then deselect “Block all incoming connections.”
 and enter your administrator password when prompted. Click Firewall Options, then deselect “Block all incoming connections.”
Источник
How to use AirDrop on your iPhone, iPad, or iPod touch
Use AirDrop to share and receive photos, documents, and more with other Apple devices that are nearby.
Before you begin
- Make sure that the person you’re sending to is nearby and within Bluetooth and Wi-Fi range.
- Check that you and the person you’re sending to have Wi-Fi and Bluetooth turned on. If either of you have Personal Hotspot on, turn it off.
- Check if the person you’re sending to has their AirDrop set to receive from Contacts Only. If they do, and you’re in their Contacts, they need to have your Apple ID’s email address or mobile number in your contact card for AirDrop to work.
- If you’re not in their Contacts, have them set their AirDrop receiving setting to Everyone in order to receive the file.
You can put your AirDrop receiving setting to Contacts Only or Receiving Off at any time to control who can see your device and send you content in AirDrop.
![]()

How to use AirDrop
Follow the steps for your device.
On your iPhone 11 or later
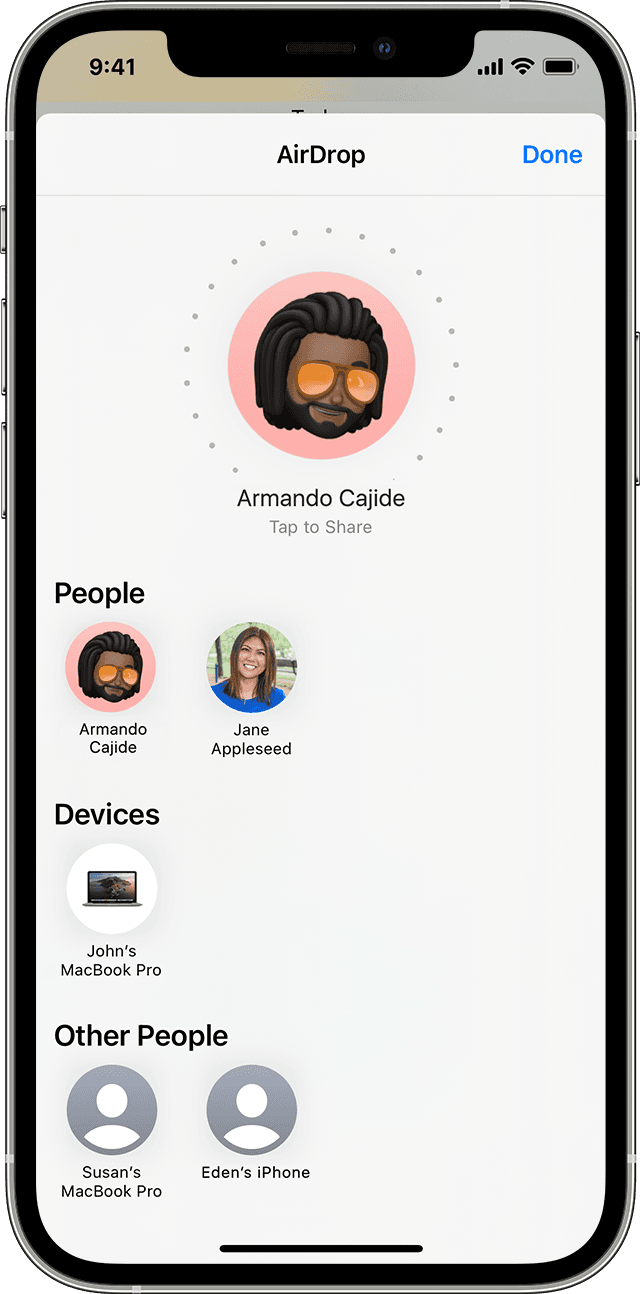
- Open an app, then tap Share or the Share button . If you share a photo from the Photos app, you can swipe left or right and select multiple photos.
- Tap the AirDrop button.
- If the person that you want to share with also has an iPhone 11 or later model, point your iPhone in the direction of the other iPhone.
- Tap the profile picture of its user at the top of the screen. Or you can use AirDrop between your own Apple devices. If you see a red numbered badge on the AirDrop button, there are multiple devices nearby that you can share with. Tap the AirDrop button, then tap the user that you want to share with. Learn what to do if you don’t see the AirDrop user or your other device.
If the person you’re sharing content with is in your Contacts, you’ll see an image with their name. If they’re not in your Contacts, you’ll see just their name without an image.
![]()
On your iPhone XS or earlier, iPad, or iPod touch
- Open an app, then tap Share or the Share button . If you share a photo from the Photos app, you can swipe left or right and select multiple photos.
- Tap the AirDrop button.
- Tap the AirDrop user that you want to share with. Or you can use AirDrop between your own Apple devices. If you see a red numbered badge on the AirDrop button, there are multiple devices nearby that you can share with. Tap the AirDrop button, then tap the user that you want to share with. Learn what to do if you don’t see the AirDrop user or your other device.
If the person you’re sharing content with is in your Contacts, you’ll see an image with their name. If they’re not in your Contacts, you’ll see just their name without an image.
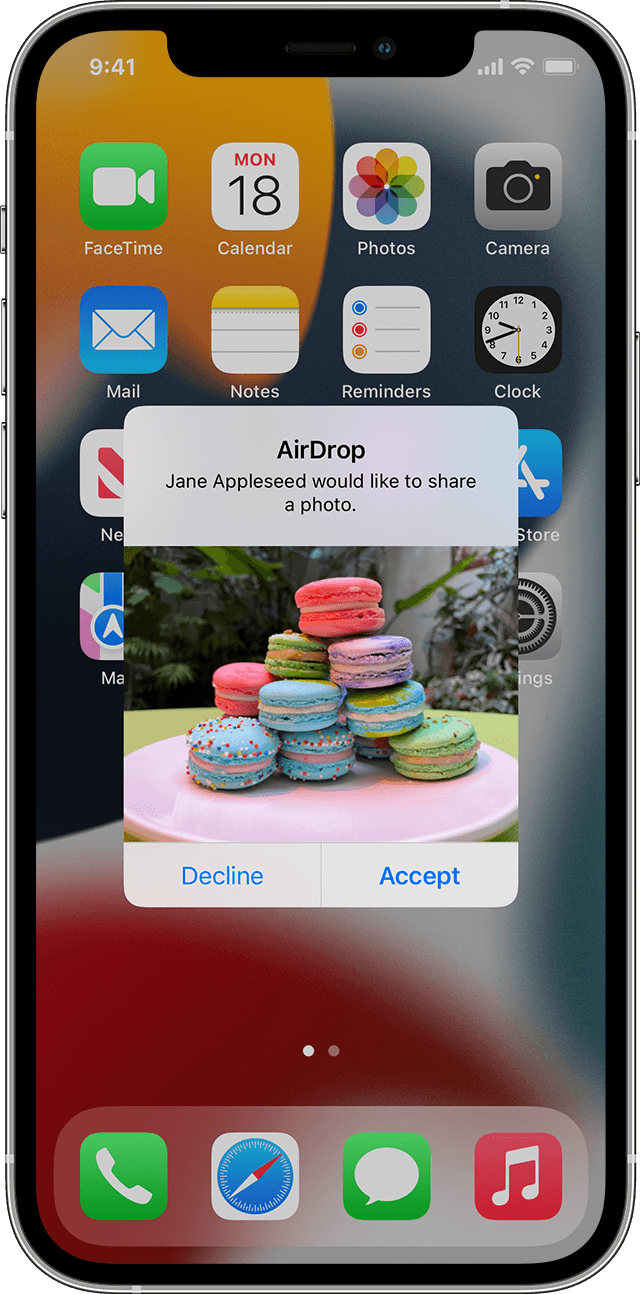
How to accept AirDrop
When someone shares something with you using AirDrop, you see an alert with a preview. You can tap Accept or Decline.
If you tap Accept, the AirDrop will come through within the same app it was sent from. For example, photos appear in the Photos app and websites open in Safari. App links open in the App Store so you can download or purchase the app.
If you AirDrop something to yourself, like a photo from your iPhone to your Mac, you won’t see an option to Accept or Decline — it’ll automatically get sent to your device. Just make sure that both devices are signed in with the same Apple ID.
How to adjust AirDrop settings
To choose who can see your device and send you content in AirDrop:
- Go to Settings, tap General.
- Tap AirDrop, then choose an option.
You can also set your AirDrop options in Control Center. Here’s how:
- On iPhone X or later, swipe down from the upper-right corner of the screen to open Control Center. Or follow the same motion to open Control Center on your iPad with iOS 12 or later or iPadOS. On your iPhone 8 or earlier or iPod touch, swipe up from the bottom of the screen.
- Press firmly or touch and hold the network settings card in the upper-left corner.
- Touch and hold the AirDrop button , then choose one of these options:
- Receiving Off: You won’t receive AirDrop requests.
- Contacts Only: Only your contacts can see your device.
- Everyone: All nearby Apple devices using AirDrop can see your device.
If you see Receiving Off and can’t tap to change it:
- Go to Settings > Screen Time.
- Tap Content & Privacy Restrictions.
- Tap Allowed Apps and make sure that AirDrop is turned on.
![]()
The Contacts Only option is available on devices that support iOS 10 and later, iPadOS, or macOS Sierra 10.12 and later. If AirDrop is set to Contacts Only on your device with an earlier software version, you’ll need to adjust AirDrop settings to the Everyone option in Settings or from Control Center. You can select the Everyone option while using AirDrop and disable it when not in use.
Источник
Как включить AirDrop на Mac: настройка
время чтения: 3 минуты
Часто пользователи продукции Apple не знают о возможности передавать файлы с iPhone на Mac, что можно сделать с помощью специальной функции, разберем, как включить AirDrop на Mac и передать данные с телефона.
Большая часть пользователей продукции Apple не знают о том, что компания разработала специальную функцию для того, чтобы передавать файлы между устройствами iOS и MAC OS. Это технология AirDrop, при использовании которой можно быстро передать фото, видео и другие файлы на свой Mac или iPhone. И давайте разберемся, как работает эта система, каким образом передать файлы, и как включить AirDrop на MacBook. Подробно, что такое AirDrop мы рассказывали в отдельной статье.

Как включить AirDrop на Mac
Как включить AirDrop на Макбуке:
- Открыть Finder.
- В левой боковой панели найдите функцию AirDrop.
- Открываем вкладку и нажимаем «Включить Bluetooth».
- После включения настраиваем обнаружение внизу вкладки.
Мы разобрались, как включить Аирдроп на Маке. Теперь функция включена, и можно осуществлять передачу данных.

Как передавать данные между MacBook
Основным назначением этого обеспечения стала быстрая передача данных между устройствами. После того, как мы выяснили, как включить AirDrop на Mac, можно начинать передачу данных. Чтобы передать данные на другой Mac, понадобится:
- Включить функцию на обеих устройствах, таким способом, как было указано.
- Откройте АирДроп на двух Мак.
- Дождитесь подключения обеих устройств к сети, на это уйдет несколько секунд. После подключения вы увидите второй Мак во вкладке АирДроп.
- После подключения, зажимаем мышкой на нужном файле и перетаскиваем его на иконку второго устройства.
- В это же время на нем подтверждаем получение.
Полученные файлы появятся в папке «Загрузки», где их можно будет просмотреть.
Как передавать файлы с iPhone на Mac и обратно
С тем, как включить АирДроп на Макбуке разобрались, теперь нужно уделить внимание передаче файлов.
Чтобы отправить фото с Мака на Айфон нужно сделать следующее:
- Включаем АирДроп на смартфоне (делается это через панель управления или настройки).
- Выбираем на устройстве нужный файл.
- Нажимаем правой кнопкой мыши.
- Далее ищем «Поделиться» — «AirDrop».
- В высветившемся окне выбираем устройство, на которое нужно отправить файл.
- На iPhone в это время придет уведомление о том, что вам отправляют изображение, нужно подтвердить принятие.
После этого файл окажется на телефоне в соответствующей папке в зависимости от его типа.
Для того, чтобы передать данные с iPhone на Mac инструкция примерно одинакова:
- На устройстве открывается AirDrop, настройка на Mac должна быть выполнена для видимости всем устройствам.
- Далее на Айфоне также включаем функцию.
- Заходим в «Фото», «Видео» или другую папку, с которой нужно передать данные.
- Нажимаем «Поделиться».
- Выбираем «AirDrop».
- Во всплывшем окне указываем получателя.
- На Маке необходимо подтвердить загрузку.
После этого все нужные файлы будут загружены практически мгновенно.
Отметим, передавать можно данные, независимо от их размера и типа. Потому вы можете пересылать на свой смартфон или Mac фото, видео, документы и другие данные мгновенно.
Источник
Использование AirDrop на Mac для отправки файлов на соседние устройства
AirDrop позволяет передавать по беспроводной сети документы, фото, адреса на карте, веб-страницы и другие объекты на находящиеся поблизости Mac, iPhone и iPad.

Отправка объектов через AirDrop
Используя функцию AirDrop на Mac, можно отправлять объекты из Finder, с рабочего стола и напрямую из приложений, например Safari или «Карты».
С рабочего стола или из окна Finder. Нажмите объект, удерживая клавишу Control. Во всплывающем меню выберите «Поделиться» > «AirDrop», затем выберите устройство, на которое нужно передать объект.
Из Finder: Нажмите «AirDrop» в боковом меню Finder, затем перетяните объект на устройство, на которое нужно его передать.
Из приложения. Нажмите кнопку «Поделиться»  в панели инструментов приложения, выберите AirDrop, затем выберите устройство, на которое нужно отправить объект.
Получение объектов через AirDrop
На компьютере Mac, если другой пользователь отправляет Вам объект с помощью AirDrop, Вы можете принять и сохранить либо отклонить его.
Если Вы отправляете объект с одного устройства на другое (например, с iPhone на компьютер Mac) и у Вас выполнен вход в iCloud с одним и тем же Apple ID на обоих устройствах, объект будет автоматически принят и сохранен.
В отобразившемся уведомлении AirDrop на Mac нажмите всплывающее меню «Принять», затем выберите подходящий вариант.
Полученный объект можно найти в папке «Загрузки» или в приложении, которое Вы выбрали для открытия и сохранения объекта.
Если пользователь, который хочет отправить Вам файл, не видит Вашего компьютера Mac, убедитесь в том, что на нем задана настройка, разрешающая другим пользователям отправлять Вам объекты с помощью AirDrop.
Как разрешить другим пользователям отправлять объекты по AirDrop на Ваш Mac
На Mac нажмите значок Finder  в Dock, чтобы открыть окно Finder.
В окне AirDrop нажмите всплывающее меню «Разрешить мое обнаружение» и выберите подходящий вариант.
Использование Пункта управления для управления AirDrop

С помощью Пункта управления можно быстро включить или выключить AirDrop, а также выбрать, кто может отправлять Вам файлы с помощью AirDrop.
На Mac нажмите «Пункт управления»  в строке меню, затем выполните одно из следующих действий.
Включение или выключение AirDrop. Нажмите значок AirDrop  .
.
Выбор пользователей, которые смогут отправлять Вам файлы. Нажмите стрелку  рядом с пунктом «AirDrop», затем выберите «Только с контактами» или «Все».
Примечание. Вариант «Только с контактами» доступен на устройствах с системой iOS 10, iPadOS, macOS 10.12 или новее. Если на устройстве с более старой версией системы выбран вариант «Только с контактами», выберите в Пункте управления вариант «Все», чтобы получать файлы через AirDrop. Можно включить этот вариант только на время передачи файлов, а потом снова отключить.
AirDrop использует Bluetooth и Wi-Fi для передачи объектов с устройства на устройство. Скорее всего, Bluetooth и Wi-Fi на Вашем Mac уже включены. В ином случае Вам будет предложено включить их перед отправкой объекта.
Чтобы проверить, поддерживают ли AirDrop Ваш Mac и то устройство, на которое Вы отправляете файлы, см. инструкции в статье службы поддержки Apple Использование AirDrop на компьютере Mac.
Источник


