- How to Create a Complete Backup of Android Phone
- Part 1: Why do you need a complete backup of your Android phone
- Part 2: Complete Backup of Your Android Phone (Rooted)
- Using Titanium to backup Android phone
- Part 3: Complete Backup of Your Android Phone (Non-Rooted)
- Using Easy Backup & Restore to backup your Android phone
- Part 4: The Alternative ways to Completely Backup your Android Phone
- Backup Android — One Stop Solution to Conplete Backup Andriod Phone
- How to backup your Android phone with Mobile
- Video tutorial of Backup Android Phone with TunesGo
- Conclusion:
- All about android backup
How to Create a Complete Backup of Android Phone
Now many Android Smartphones do not have a feature that allows users to backup their data on a PC or the Internet. Data on your phone is very crucial, and you need to have a separate copy stored somewhere, other than you phone, in the case of an unseen happenstance. SMS, Multimedia, and even applications should be stored as a separate copy for security. It is important to keep all your data on a computer, and here, you will see how to completely backup Android phone data.
Part 1: Why do you need a complete backup of your Android phone
No matter how careful you are, going to great lengths to ensure that your Android phone does not get lost or stolen, you will one day have to consider getting a new phone. The old phone may have simply вЂdied’ on you due to age. If you have not backed up your data, then you lose everything and have to start afresh.
With the backup feature, you can now store information which you can then access in future. Whether it is pictures of a great vacation, or important contacts, Android backup is the best way to go about securing your data.
You may also have applications running on the phone, and need to restore the information to a new phone; with the backup feature, you can seamlessly get information that you used in applications transferred to your new phone. This way, you will not feel the difference of getting a new phone; you can still play games, interact on social media, and more, using this feature.
Now, there are several ways how to backup Android phone on your PC. There are a myriad of application that can be used to achieve this goal. Most of these can be divided into two main categories: Backing up a rooted phone, or a non-rooted phone.
Part 2: Complete Backup of Your Android Phone (Rooted)
Now, before you go ahead, you need to know what the term вЂRooted Phone’ means; this means that the phone has access to the root of the Android system. In other words, you can run the phone as an administrator and make changes to some of the Android features.
When learning how to completely backup android devices, Titanium Android backup is probably the best solution. This is because Titanium allows you to backup everything on your phone at once. You can restore the complete backup at any time, and Titanium allows you to schedule the backup so that you have a regular copy of your phone’s data on your PC.
Titanium allows you to backup applications that you are currently using without closing them, and they can be saved as ZIP files. Titanium also allows you to transfer files from the SD card to your phone very easily.
Using Titanium to backup Android phone
Step 1 Make sure that you have Titanium on your phone and that it has access to root privileges. Your phone needs to have USB debugging enabled
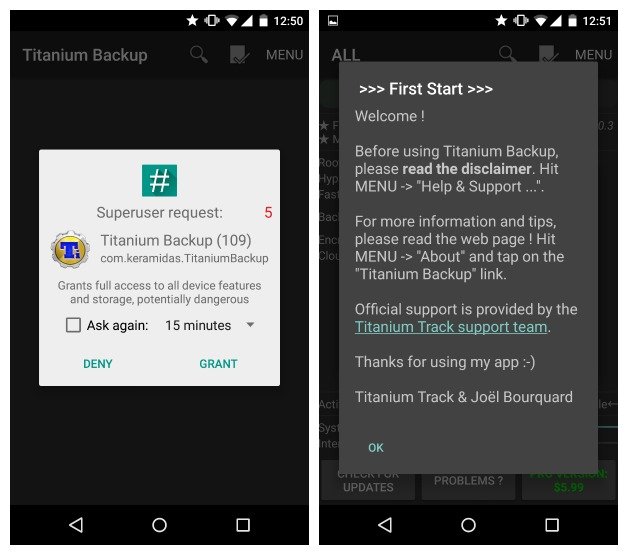
Step 2 You will be presented with three tabs: the first is the Overview tab which gives you all the information on the apps and data on your device. The second one is the Backup/Restore tab which you will use to restore the data on your phone. The third one allows you to schedule regular backups.
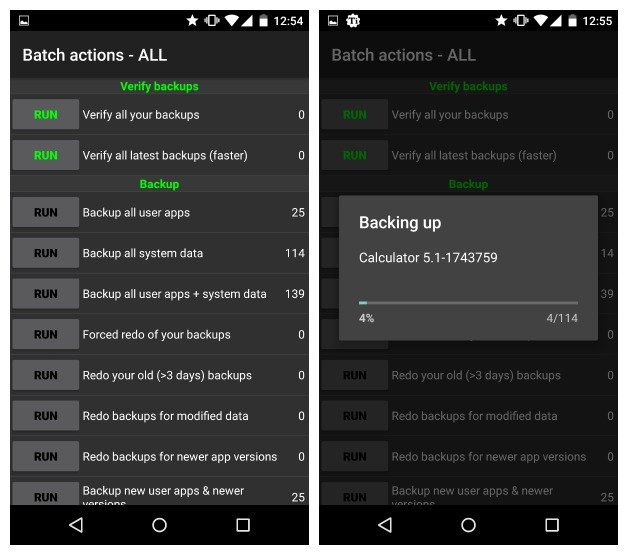
Step 3 When you look at the Backup/Restore tab, you will see a list of all the contents on your phone, and icons which show whether the content has been backed up or not. A smiley face indicates backed up files and a triangular warning sign indicates files that have not been backed up.

Step 4 Tap the little document that has a checkmark next to it at the top of the application to start the backup of system data or apps. You will then be taken to the batch actions list.
Step 5 From the list tap Run on the actions that you want done. For example, if you want to just backup your system data, simply tap Run, near the Backup All System Data. You can also tap Backup User Apps when you want to backup the user apps.
Step 6 Wait for a while as Titanium goes through the process of backing up your files.
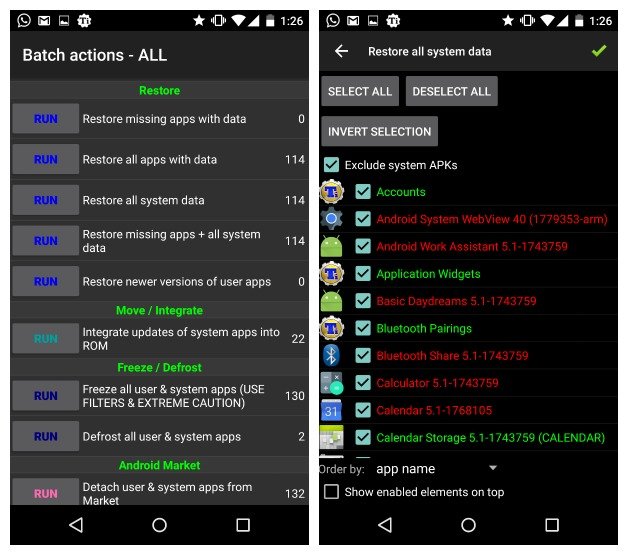
Step 7 Upon completion, Titanium will label your backup with the date you saved it. Titanium allows you to create a file called update.zip which you can flash to restore all data and apps to your phone. Titanium also allows you to restore files directly.
Step 8 To directly restore data from Titanium, simply go to the batch actions screen and at the bottom you will see the option to restore all data and apps.
Step 9 When you want to restore anything simply tap Run next to the actions that you need to restore.
Step 10 You can then restore everything you backed up or parts of it. Just make your choice and tap on the green mark at the top right side of the screen.
Part 3: Complete Backup of Your Android Phone (Non-Rooted)
A non-rooted Android phone is one that does not allow you to have access to the root data. This means that you cannot access the system files, and hence it is safer. There are applications which you can use to backup data on non-rooted Android phones.
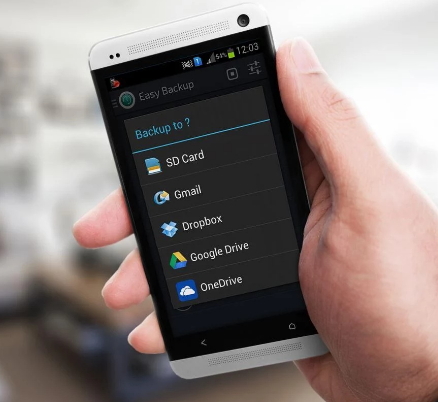
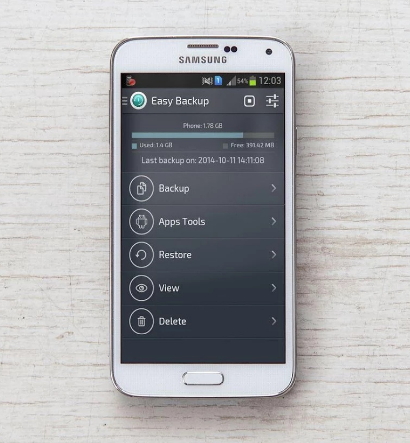
When searching for how to completely backup android devices, the Play Store has several solutions that you can use to backup none-rooted Android phones. Easy Backup & Restore is a simple application that you can use to backup your text messages, calendar, contacts, bookmarks and call logs.
One downside of this application is that it cannot backup your documents, videos, music or photos. This is because you can easily do this using a USB cable.
Using Easy Backup & Restore to backup your Android phone
Step 1 When you launch Easy Backup & Restore, it will ask you if you want to create a backup. Simply click Yes.
Step 2 You will be presented with at list of data that you can backup. Simply check those which you want to backup and then tap OK

Step 3 The application will ask you for the location where the backup should be saved. Simply type the location and tap OK.
Step 4 You can also save to a cloud service if you have an account. You can also save everything on your SD card.
Step 5 The application allows you to give the backup a unique name so that you can create backups from multiple devices. The time and date of the backup is automatically appended to the file.
Step 6 The progress of the Backup is displayed, and once complete, you get a summary of the data stored, before getting the Backup Completed notification.
Part 4: The Alternative ways to Completely Backup your Android Phone
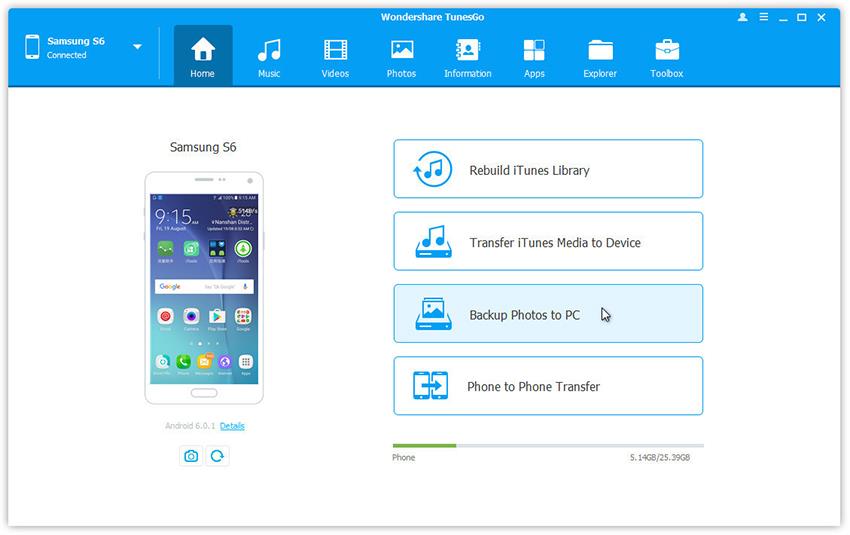
There are many other ways how to backup Android devices with just a simple click. these are perhaps the best for those who are new to this process. TunesGo by Wondershare is a great utility for backing up your Android data. With a simple click, you get a full Android backup of your phone on your PC.

Backup Android — One Stop Solution to Conplete Backup Andriod Phone
- Backup your music, photos, videos, contacts, SMS etc. to computer and restore them easily
- Manage, export&import your Contacts and SMS, deduplicate Contacts, reply SMS with computer
- One-click Root — root your Android phones/tablets to take full control of your device.
- Phone to Phone Transfer — transfer music, photos, videos, contacts, SMS between two mobiles ( both Android and iPhone are supported)
- App Manager — Install, uninstall, import or backup Apps in batch
- Gif Maker — create Gif from photos, motion photos, videos
- iTunes Manager — Sync iTunes Music to Android or transfer music from Android to iTunes
- Fully compatible with 3000+ Android devices (Android 2.2 — Android 8.0) from Samsung, LG, HTC, Huawei, Motorola, Sony etc.
How to backup your Android phone with Mobile
Step 1 Download, install and launch Wondershare TunesGo on your computer.
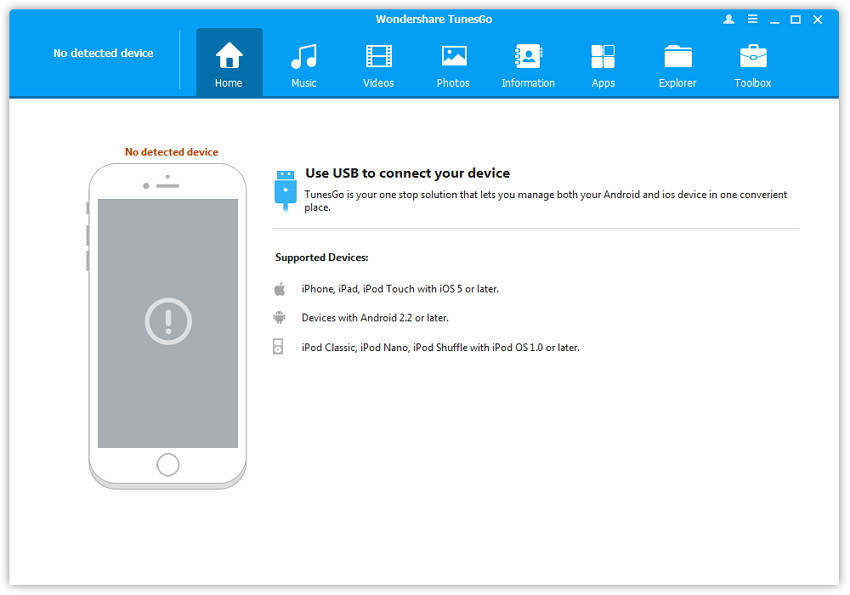
Make sure connect your android phone successful,please check these tips How to
Step 2 You will find a feature Backup Photos to PC on the interface.One click backup your andrioid phone photos.
Step 3 Select Music tap. Once your media loads, choose your wanted songs and click Export > Export to PC and backup.
![]()
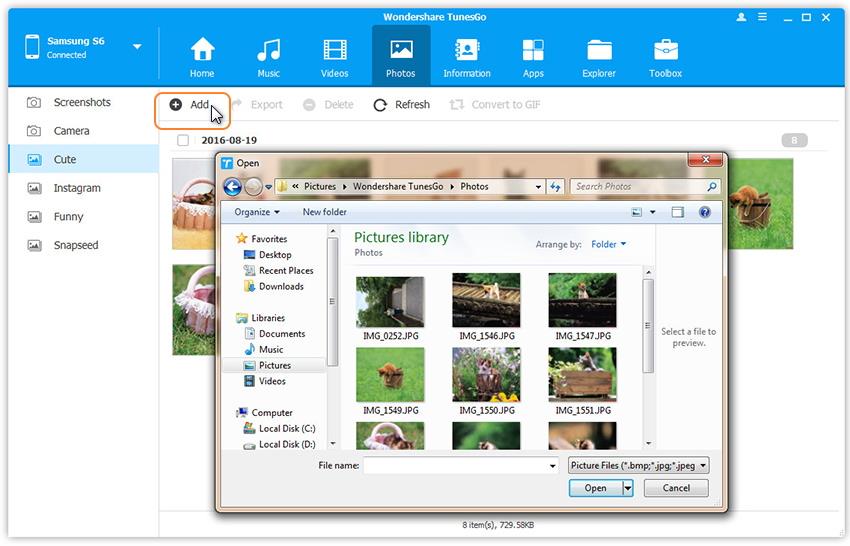
Step 4 Select Videos tap. Once your media loads, click Add > Add File or Add Folder.

Step 5 Click Photos tap. All the albums will be displayed on the left. Select one to import photos from PC to selected Android photo album to backup.
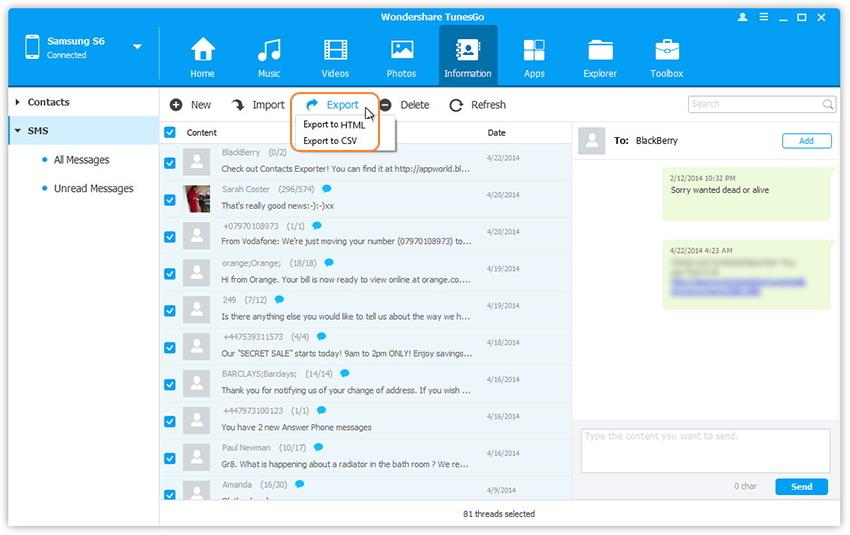
Step 6 Export and Backup Messages. Select Information tap. Click SMS on the left panel. All messages will be shown on the right.
Video tutorial of Backup Android Phone with TunesGo
Conclusion:
It is very important that you store your Android data so you can access it at any time. Having a full Android backup of your phone on your computer ensures that you have an exact and progressive copy of your phone for future use. If you should lose any of the data, you can simply restore it and still keep the copy on the PC. This is very crucial for all Android device users.
Источник
All about android backup
Обычно для этого требуется разблокировать загрузчик устройства, после чего вся информация которая не была сохранена будет утеряна. Подробнее вы можете найти в теме вашего устройства на 4pda.
В той же теме, наверняка будет инструкция, как получить Рут доступ, например через Magisk.
Однако, после этого возможно придется установить фикс, чтобы работал гугл пей и NFC оплата.
Если вы забрались так далеко, можете в теме вашего устройства посмотреть другие прошивки, на случай, если ваше устройства давно не обновлялось, и у него старые патчи безопасности. Обновление системы безопасности Android
C помощью этого кастом Рекавери забекапить нужную инфу. (Надо иметь ввиду, что там не всегда будут доступны для бэкапа абсолютно все разделы, но нужные, с прошивкой и данными должны быть).
Обычно бэкапят Data, System, Boot и Vendor (если есть). Есть и другие разделы, содержащие например IMEI, об этом ниже:
Так же может присутствовать «внутренний накопитель» или internal storage (user data), это все эти файлы и папки которые вы видите в памяти телефона без Рут доступа, но кастом рекавери разделил таким образом Data и Data/media.
Не много подробнее о назначении разделов:
Boot — Загрузка андроида начинается с раздела boot — там хранится в том числе ядро системы.
System — Затем загружается прошивка — system. Часто ее можно скачать отдельно, так что потерять в принципе не жалко.
Vendor раздел отвечает за правильную работу устройства, он тоже часто идет вместе с прошивкой, так что его можно достать из официальной прошивки с сайта производителя или на странице вашего устройства на 4пда
Ну и Data это конкретно ваша инфа, приложения настройки и сохранения игр все тут) Как я уже писал, бывает Рекавери разделяет дату и внутренний накопитель (Data/media), так вот, на внутреннем накопителе хранится то, что вы и сами могли видеть в памяти телефона фотки и тд.
Еще тут описывал, что там хранится.
Надо учитывать, что data раздел обычно зашифрован, в заводском состоянии, поэтому с помощью кастом Рекавери его форматируют и потом уже загружают прошивку.
Часто не лишним будет сохранить и другие важные разделы, на всякий случай:
EFS — Тут хранятся WiFi/BlueTooth MAC’s, IMEI, в общем все то, что вы не хотели бы потерять) (Схема с восстановлением, (MODEMST1, MODEMST2, FSG, BACKUP) где fsg или backup соответственно хранят инфу модемов на случай утери)
Persist — Этот раздел содержит данные калибровки сенсоров wifi, bluetooth, camera, DRM , sns.reg, и тд, тоже
Например у меня после смены прошивок поменялся Persist раздел, и при перезагрузке телефона писалось «Хранилище повреждено, устройство под угрозой (в опасности)»
Восстановление раздела из бэкапа помогло.
Ну и всякое прочее, вроде
CUST (так же CUSTOM или PRELOAD в некоторых случаях) — Предзагруженные приложения и региональные настройки, устанавливаемые при первом запуске. Иногда при смене прошивки на кастом нужно очистить этот раздел.
MISC (FOTA на старых устройствах) — Раздел на котором хранится информация для bootloader, что за чем загружать, или запустить рекавери, если OTA обновление не удалось. Если удалить, система будет грузится как обычно, то есть boot затем system.
Есть такие приложения для бэкапа данных с использованием Рут прав, например ® Titanium Backup
Однако, стоит учесть, что он не бэкапит папки приложения размещенные в общедоступной памяти телефона, т.е. (data/media)
Отдельно хочу отметить молодое (могут присутствовать баги) приложение, которое может создавать резервные копии пригодные для восстановления через кастом Рекавери, TWRP:
®Migrate
Удобно, когда нужно перенести данные на другую прошивку.
Когда Рут есть, можно так же с помощью ADB пробовать. (Или Adb Run)
Для аппаратов на базе SoC Qualcomm HDDRawCopy eMMC RAW Tool
Владельцам устройств с процессорами МТК при наличии пк можно скопировать полный образ всех данных (вообще всех) через flashtool
Готовый raw образ можно разбить на разделы и сконвертировать в пригодный для последующей прошивки вид с помощью этой утилиты
WwR MTK
Но чтобы прошить через ADB надо будет различить бутлоадер, или загрузчик, по нашему)
Надо учитывать что без форматирования через кастом Рекавери data раздел будет зашифрован, а пароля вы конечно не знаете)
Поэтому такой бэкап можно использовать (восстанавливать) в исходном виде, или использовать не зашифрованные разделы.
А так, кастом Рекавери может все стереть, а заодно и шифрование, чтобы в будущем бэкап был читаемым.
Тут тоже указаны некоторые утилиты для работы с файловой системой https://habr.com/ru/post/236397/
И вот для устройств с процессором Qualcomm и emmc памятью.
Восстановление и решение проблем с eMMC
Создан набор скриптов Windows (.cmd-файлы) для резервного копирования/восстановления разделов с помощью утилиты emmcdl (часть проекта Android-хост-knife).
Скачать:eMMC_DL_Tool_for_customer_ENG_V5.2.0R.zip (12.92 МБ)
Работа с программой:https://freeandroidroo…download-emmc-dl-tool/
Проверено на RN3P, но может быть использован с другими компании Qualcomm-устройств.
emmcdl использует «знакомый» модуль для взаимодействия с внутренней памяти устройства в режим 9008/edl. С prog_emmc_firehose_8976_ddr.mbn от «быстрой загрузки» прошивки, считывание/запись Таблица разделов и разделов (в том числе энергонезависимой, как modemst1/2,fsg etc.).
В этом списке раздела, успешно восстанавливаются IMEI телефона, MАС-адреса и статус загрузчика разблокировки после случайного повреждения памяти.
Может быть использован для создания файлов rawprogram0.xml прошивки с помощью MiFlash (рекомендуется) или другая утилита от Qualcomm.
qcpartsbackup11.7z (73.11 КБ)
. Не для новичков! Взято отсюда.
Сообщение отредактировал konstantinqq — 24.04.21, 08:52
Как сохранить резервную копию сразу на компьютер.
Очень полезно в тех случаях, когда под рукой нет подходящего размера флешки.
Можно конечно в кастом Рекавери смонтировать OTG накопитель, типа внешнего жесткого диска, но это такое.
При помощи ADB:
ADB и все, что с помощью него можно сделать
Или утилита в которой не надо вручную вводить команды
® Adb Run
Или так https://habr.com/ru/post/236397/
(Там что то писали про бэкап через кастом Рекавери сразу в пк.
Через кастом Рекавери:
Смонтируйте разделы, и скопируйте с помощью ADB.
Для удобства, на пк я использую файловый менеджер total Commander с плагином adb.
Разделы видятся как папки, соответственно скопировать можно файлы внутри.
Адб работает и без кастомного Рекавери с включенной отладкой по USB, но в этом случае может не хватить прав, чтобы работать с системными файлами.
Сообщение отредактировал konstantinqq — 25.10.20, 10:42
Хотелось бы больше и лучше, поэтому если есть желание — делитесь.
Кому не понятно, напишите понятно и добавьте в шапку)
Да я упомянул не все способы, но вы можете упомянуть их сами, поделившись с другими полезной информацией.
Если кому интересно как я делал полный бэкап телефона на МТК, с одним только флештулом и как создал с нуля scatter файл, в котором вся инфа о разделах. Blackview BV9100 — Обсуждение (Пост konstantinqq #89796538)
PS
Передавать данные на пк в режиме «передача данных» (MTP) может быть небезопасно если кабель не качественный, поэтому лучше пользуйтесь ADB (я например, активирую режим отладки в телефоне, подключаю к пк, и в качестве файлового менеджера использую Total Commander с плагином ADB, режим Native 8.1. При этом, при первом подключении нужно на телефоне нажать разрешить этому компьютеру отладку, если спросит.
Пс
Что делать, если раздел system только для чтения? Ответ
Сообщение отредактировал konstantinqq — 12.05.20, 19:50
Доброго времени суток.
Добавлено 18.06.2020, 14:56:
Доброго времени суток. Народ помогите ,кто знает.После восстановления бекапа через TWRP Recovery не восстановились фото и видео. Приложения и настройки , сообщения,контакты встали. А фото и видео почемуто не вскрываются.Не сколько раз делал. Ничего.
Источник


