- Maximizing Battery Life and Lifespan
- General Performance Tips
- Update to the latest software.
- Avoid extreme ambient temperatures.
- Remove certain cases during charging.
- Store it half-charged when you store it long term.
- Tips for iPhone, iPad, and iPod touch
- Update to the latest software.
- Optimize your settings.
- Enable Low Power Mode.
- View Battery Usage information
- Plug in and power on your computer to charge your device.
- Tips for Apple Watch
- Update to the latest software.
- Adjust your settings.
- View Battery Usage information
- Plug in and power on your computer to charge your Apple Watch.
- Tips for iPod shuffle, iPod nano, and iPod classic
- Update to the latest software.
- Optimize your settings.
- Plug in and power on your computer to charge your iPod.
- Tips for MacBook Air and MacBook Pro.
- Update to the latest software.
- Optimize your settings.
- Plug in and power on your MacBook to charge other devices.
- Charge your AirPods and learn about battery life
- Charge your AirPods
- How to charge your AirPods
- Learn about the status light
- Check the battery percentage
- On your iPhone, iPad, or iPod touch
- On your Mac
- Learn about battery life
- What you can expect with AirPods (3rd generation)
- What you can expect with AirPods Pro
- What you can expect with AirPods (2nd generation)
- Learn about Optimized Battery Charging on AirPods Pro and AirPods (3rd generation)
Maximizing Battery Life and Lifespan
“Battery life” is the amount of time your device runs before it needs to be recharged. “Battery lifespan” is the amount of time your battery lasts until it needs to be replaced. Maximize both and you’ll get the most out of your Apple devices, no matter which ones you own.
General Performance Tips
Update to the latest software.
Apple software updates often include advanced energy-saving technologies, so always make sure your device is using the latest version of iOS, macOS, or watchOS.
Avoid extreme ambient temperatures.
Your device is designed to perform well in a wide range of ambient temperatures, with 62° to 72° F (16° to 22° C) as the ideal comfort zone. It’s especially important to avoid exposing your device to ambient temperatures higher than 95° F (35° C), which can permanently damage battery capacity. That is, your battery won’t power your device as long on a given charge. Charging the device in high ambient temperatures can damage it further. Software may limit charging above 80% when the recommended battery temperatures are exceeded. Even storing a battery in a hot environment can damage it irreversibly. When using your device in a very cold environment, you may notice a decrease in battery life, but this condition is temporary. Once the battery’s temperature returns to its normal operating range, its performance will return to normal as well.
iPhone, iPad, iPod, and Apple Watch Comfort Zone
iPhone, iPad, iPod, and Apple Watch work best at 32° to 95° F (0° to 35° C) ambient temperatures. Storage temperature: -4° to 113° F (-20° to 45° C).
MacBook Comfort Zone
MacBook works best at 50° to 95° F (10° to 35° C) ambient temperatures. Storage temperature: -4° to 113° F (-20° to 45° C).
Remove certain cases during charging.
Charging your device when it’s inside certain styles of cases may generate excess heat, which can affect battery capacity. If you notice that your device gets hot when you charge it, take it out of its case first. For Apple Watch Edition models, make sure the cover of the magnetic charging case is off.
Store it half-charged when you store it long term.
If you want to store your device long term, two key factors will affect the overall health of your battery: the environmental temperature and the percentage of charge on the battery when it’s powered down for storage. Therefore, we recommend the following:
- Do not fully charge or fully discharge your device’s battery — charge it to around 50%. If you store a device when its battery is fully discharged, the battery could fall into a deep discharge state, which renders it incapable of holding a charge. Conversely, if you store it fully charged for an extended period of time, the battery may lose some capacity, leading to shorter battery life.
- Power down the device to avoid additional battery use.
- Place your device in a cool, moisture-free environment that’s less than 90° F (32° C).
- If you plan to store your device for longer than six months, charge it to 50% every six months.
Depending on how long you store your device, it may be in a low-battery state when you remove it from long-term storage. After it’s removed from storage, it may require 20 minutes of charging with the original adapter before you can use it.
Tips for iPhone, iPad, and iPod touch
Update to the latest software.
Always make sure your device is using the latest version of iOS.
- If you are using iOS 5 or later, see if you need an update. Go to Settings > General > Software Update.
- If an update is available, you can plug your device into a power source and update wirelessly or plug it into your computer and update with the latest version of iTunes.
Optimize your settings.
There are two simple ways you can preserve battery life — no matter how you use your device: adjust your screen brightness and use Wi‑Fi.
Dim the screen or turn on Auto-Brightness to extend battery life.
- To dim, open Control Center and drag the Brightness slider to the bottom.
- Auto-Brightness adjusts your screen to lighting conditions automatically. To activate it, go to Settings > Accessibility. Tap Display & Text Size, then turn on Auto-Brightness.
When you use your device to access data, a Wi‑Fi connection uses less power than a cellular network — so keep Wi‑Fi on at all times. To turn on Wi‑Fi, go to Settings > Wi‑Fi to access a Wi‑Fi network.
Enable Low Power Mode.
Introduced with iOS 9, Low Power Mode is an easy way to extend the battery life of your iPhone when it starts to get low. Your iPhone lets you know when your battery level goes down to 20%, and again at 10%, and lets you turn on Low Power Mode with one tap. Or you can enable it by going to Settings > Battery. Low Power Mode reduces display brightness, optimizes device performance, and minimizes system animations. Apps including Mail will not download content in the background, and features like AirDrop, iCloud sync, and Continuity will be disabled. You can still use key functions like making and receiving phone calls, email, and messages, accessing the Internet, and more. And when your phone charges up again, Low Power Mode automatically switches off.
View Battery Usage information
With iOS, you can easily manage your device’s battery life, because you can see the proportion of your battery used by each app (unless the device is charging). To view your usage, go to Settings > Battery.
Here are the messages you may see listed below the apps you’ve been using:
Background Activity. This indicates that the battery was used by the app while it was in the background — that is, while you were using another app.
- To improve battery life, you can turn off the feature that allows apps to refresh in the background. Go to Settings > General > Background App Refresh and select Wi-Fi, Wi-Fi & Cellular Data, or Off to turn off Background App Refresh entirely.
- If the Mail app lists Background Activity, you can choose to fetch data manually or increase the fetch interval. Go to Settings > Accounts & Passwords > Fetch New Data.
Location and Background Location. This indicates that the app is using location services.
- You can optimize your battery life by turning off Location Services for the app. Turn off in Settings > Privacy > Location Services.
- In Location Services, you can see each app listed with its permission setting. Apps that recently used location services have an indicator next to the on/off switch.
Home & Lock Screen. This indicates that the Home screen or Lock screen was displayed on your device. For example, the display was awakened by pressing the Home button or by a notification.
- If an app frequently wakes your display with notifications, you can turn off push notifications for the app in Settings > Notifications. Tap the app and set Allow Notifications to Off.
No Cell Coverage and Low Signal. This indicates either that you are in a poor cell coverage area and your iOS device is searching for a better signal or that you’ve used your device in low-signal conditions, which has affected your battery life.
- You can optimize your battery life by turning on Airplane mode. Open Control Center and tap the Airplane mode icon. Note that you cannot make or receive calls while in Airplane mode.
Plug in and power on your computer to charge your device.
Make sure your computer is plugged in and powered on when you’re using it to charge your iOS device via USB. If your device is connected to a computer that’s turned off or is in sleep or standby mode, your device’s battery may drain. Note that iPhone 3G and iPhone 3GS cannot be charged with a FireWire power adapter or FireWire-based car charger.
Tips for Apple Watch
Update to the latest software.
Always make sure your Apple Watch is using the latest version of watchOS.
- To see if you need an update, open the Apple Watch app on your iPhone and go to My Watch > General > Software Update.
- If an update is available, connect your iPhone to Wi-Fi, attach the charger to your Apple Watch (make sure it has at least 50% charge), and update wirelessly.
Adjust your settings.
There are a few ways you can preserve battery life on your Apple Watch:
- During running and walking workouts, turn on Power Saving Mode to disable the heart rate sensor. To do this, open the Apple Watch app on iPhone, go to My Watch > Workout, and turn on Power Saving Mode. Note that when the heart rate sensor is off, calorie burn calculations may not be as accurate.
- For longer workouts, you can choose to use a Bluetooth chest strap instead of the built-in heart rate sensor. To pair the Bluetooth chest strap with your watch, make sure the strap is in pairing mode, then open Settings on Apple Watch, select Bluetooth, and choose from the list of Health Devices.
- If you’re very active with your hands and your watch display turns on more than you think it should, you can prevent the display from turning on every time you raise your wrist. Open Settings on Apple Watch, select General, select Wake Screen, and turn Wake Screen on Wrist Raise off. When you want to turn on the display, just tap it or press the Digital Crown.
- Disabling Bluetooth on your iPhone increases the battery drain on your Apple Watch. For more power-efficient communication between the devices, keep Bluetooth enabled on iPhone.
View Battery Usage information
To view your usage and standby information, open the Apple Watch app on iPhone and go to My Watch > General > Usage.
Plug in and power on your computer to charge your Apple Watch.
If you want to charge from your computer, make sure it is plugged in and powered on when you’re using it to charge your Apple Watch via USB. If your Apple Watch is connected to a computer that’s turned off or is in sleep or standby mode, the Apple Watch battery may drain.
If your Apple Watch battery needs service, use Apple or an authorized service provider.
Tips for iPod shuffle, iPod nano, and iPod classic
Update to the latest software.
Always make sure your iPod is using the latest version of Apple software. Put your iPod in its dock or plug it into your computer, and iTunes will notify you of available updates.
Optimize your settings.
Hold and pause. Set the Hold switch when you’re not using your iPod. This will prevent iPod from accidentally waking up and using unnecessary power. If you’re not listening to your iPod, pause it, or turn it off by pressing the Play button for two seconds.
Equalizer (EQ). Adding EQ to playback increases use of your iPod processor, since EQ isn’t encoded in the song. Turn EQ off if you don’t use it. If, however, you’ve added EQ to tracks in iTunes, you’ll need to set EQ to “flat” in order to have the effect of “off,” because iPod keeps your iTunes settings intact.
Backlight. Setting the backlight to “always on” will significantly reduce your battery life. Use the backlight only when necessary.
Plug in and power on your computer to charge your iPod.
Make sure your computer is plugged in and powered on when you’re using it to charge your iPod via USB. If your iPod is connected to a computer that’s turned off or is in sleep or standby mode, the iPod battery may drain.
Tips for MacBook Air and MacBook Pro.
Update to the latest software.
Always make sure your MacBook is using the latest version of macOS. If you’re connected to the Internet, macOS automatically checks for software updates every week, but you still control when the updates are installed. To confirm that you’re using the latest software, go to the Apple menu and choose Software Update.
Optimize your settings.
Energy. The Energy Saver preference pane includes several settings that determine power levels for your MacBook. Your MacBook knows when it’s plugged in and runs accordingly. When using battery power, it dims the screen and uses other components sparingly. If you change this setting to maximize performance, your battery will drain more quickly.
Brightness. Dim the screen to the lowest comfortable level to achieve maximum battery life. For instance, when watching a video on an airplane, you may not need full brightness if the cabin lights are off.
Wi-Fi. Wi-Fi consumes power, even if you are not using it to connect to a network. You can turn it off in the Wi-Fi status menu in the menu bar or in Network preferences.
Applications and peripherals. Disconnect peripherals and quit applications not in use. Eject an SD card if you’re not currently accessing it.
Plug in and power on your MacBook to charge other devices.
Make sure your MacBook is plugged in and powered on when you’re using it to charge other devices via USB. Otherwise those devices may drain the battery in your MacBook faster than normal. If another device is connected to your MacBook when it’s turned off or in sleep or standby mode, the device’s battery may drain.
Источник
Charge your AirPods and learn about battery life
Learn how to charge your AirPods and their charging case, and how to get longer battery life for your AirPods.
Charge your AirPods
To charge your AirPods, put them in your case. Your case holds multiple, full charges for your AirPods, so you can charge on the go. To keep your AirPods charged, put them in the case when you’re not using them.
How to charge your AirPods
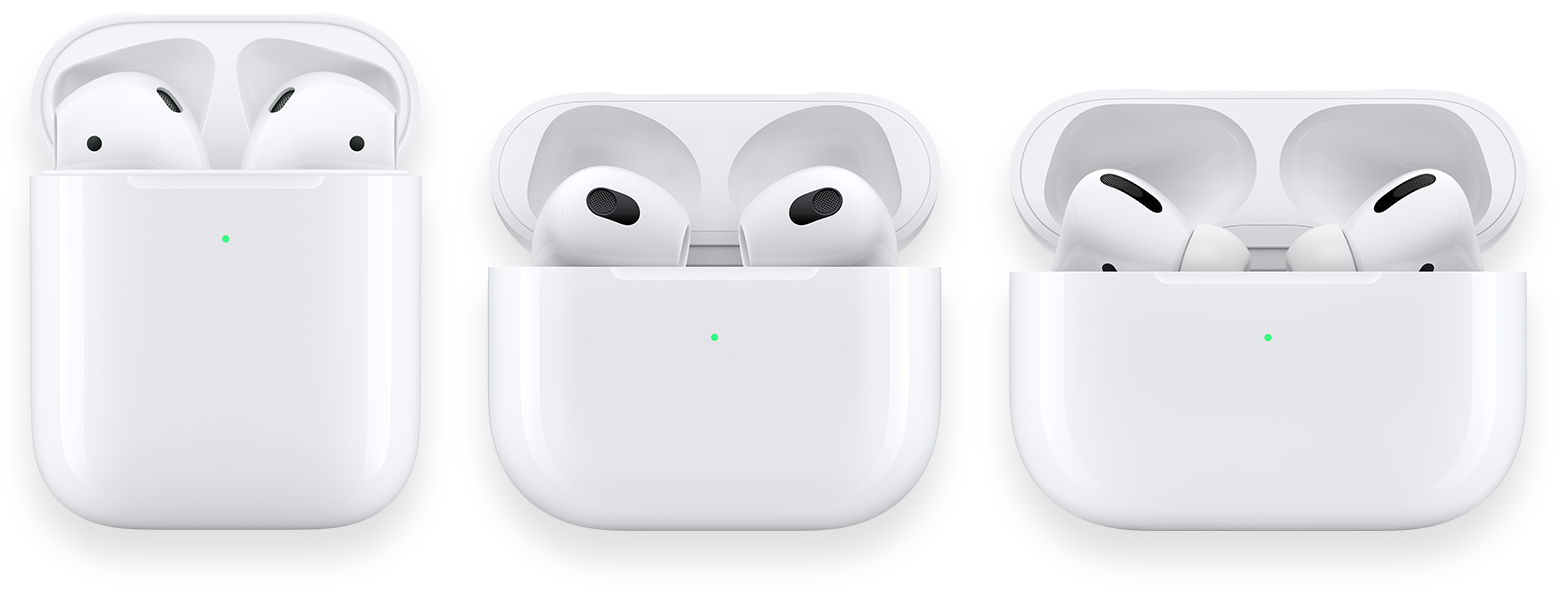
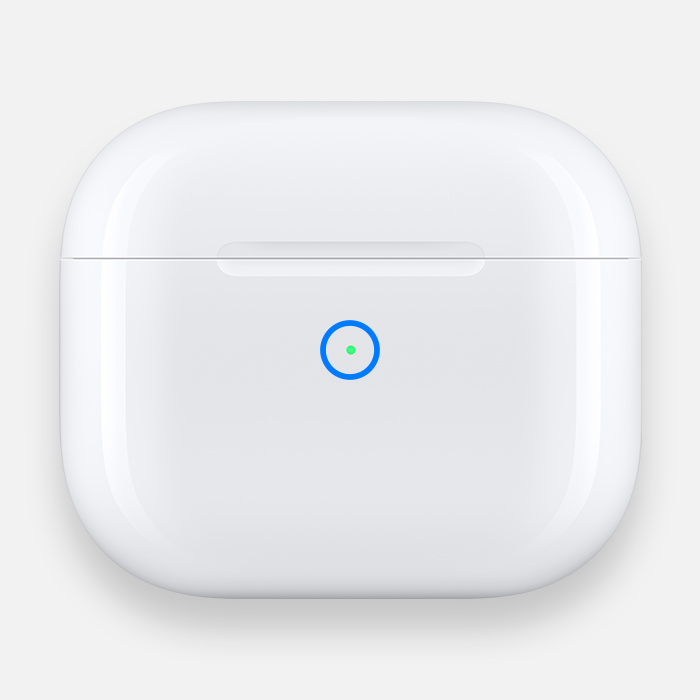
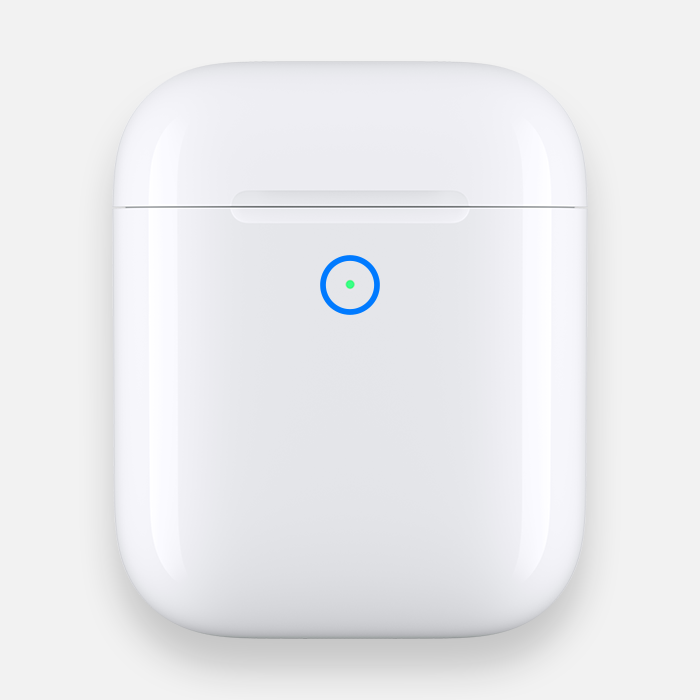
You can charge your MagSafe Charging Case or Wireless Charging Case with a Qi-certified charging mat. Be sure to place your case on the charger with the status light facing up and with the lid closed. The status light should show the current charge level for 8 seconds. If you have AirPods Pro or AirPods (3rd generation), you can tap the case when it’s on the charging mat to see whether your AirPods Pro or AirPods (3rd generation) are charging (amber light) or fully charged (green light).
Learn about the status light
MagSafe Charging Case: The status light is on the front of the case.
Wireless Charging Case: The status light is on the front of the case.
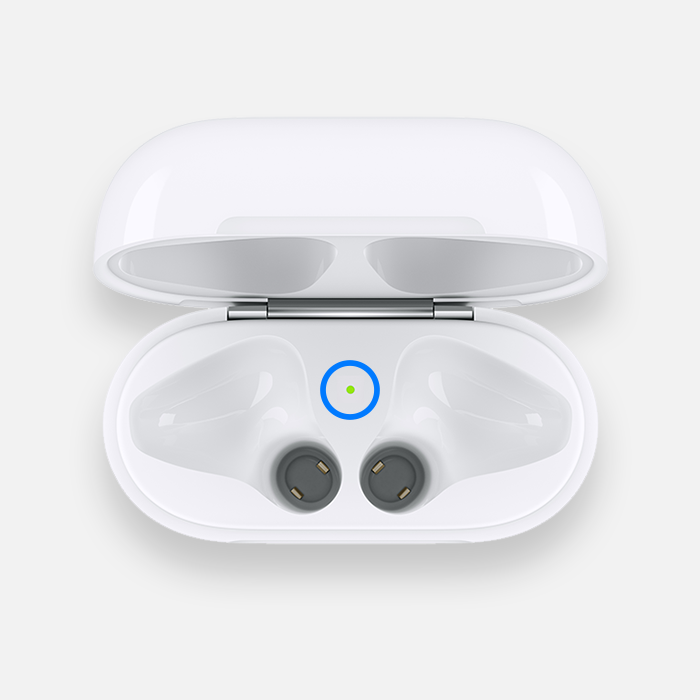
Charging Case: The status light in your charging case sits between the spaces for your AirPods.
If your AirPods are in your case and the lid is open, then the light shows the charge status of your AirPods. When your AirPods aren’t in your case, the light shows the status of your case. Green means fully charged, and amber means less than one full charge remains.
When you connect your MagSafe Charging Case or Wireless Charging Case to a charger, or place it on a Qi-certified charging mat, the status light will stay on for 8 seconds. If the light flashes white, your AirPods are ready to set up with one of your devices. If the light flashes amber, you might need to set up your AirPods again.
To charge your case via wired connection, plug the Lightning cable that came with your AirPods into the Lightning connector on your case. You can use a USB-C to Lightning Cable or a USB to Lightning Cable. Then plug the other end of the cable into a USB charger or port. You can charge your case with or without your AirPods inside. Charging is fastest when you use an iPhone or iPad USB charger or plug into your Mac.
To see the detailed charge status and charge level, see Check the charge status.
Check the battery percentage
You can check the battery percentage of your AirPods with your iPhone, iPad, iPod touch, or Mac.
On your iPhone, iPad, or iPod touch
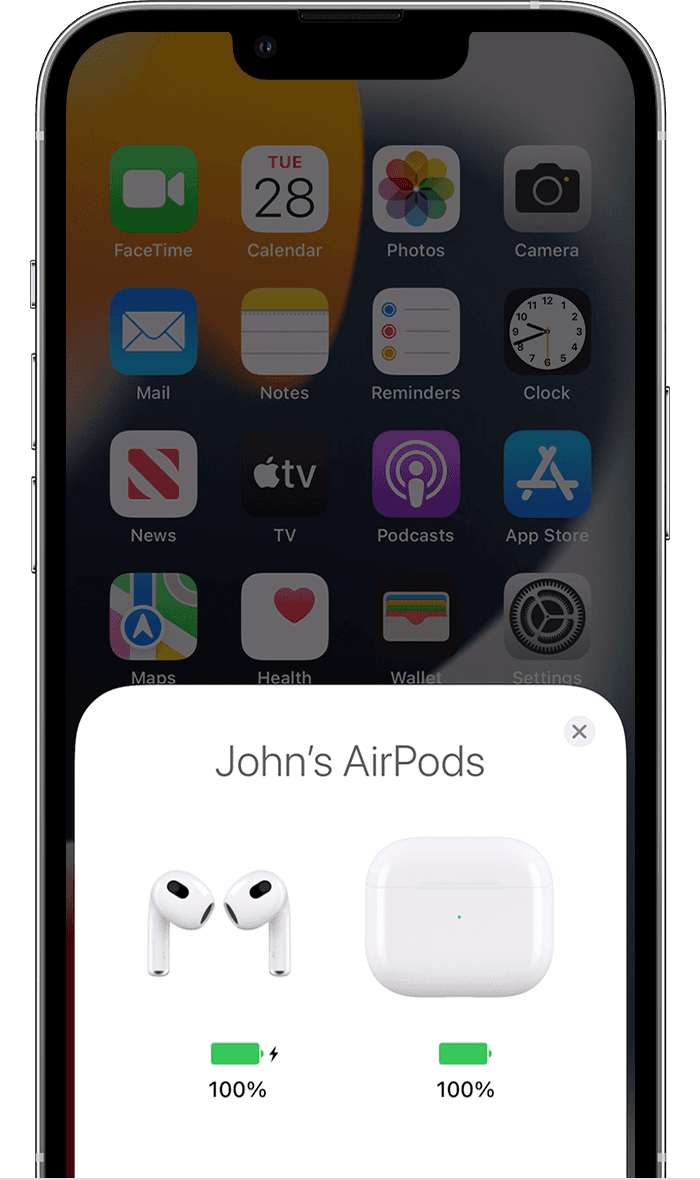
Open your case lid with your AirPods inside and hold your case close to your iPhone, iPad, or iPod touch. Wait a few seconds to see the charge status of your AirPods.
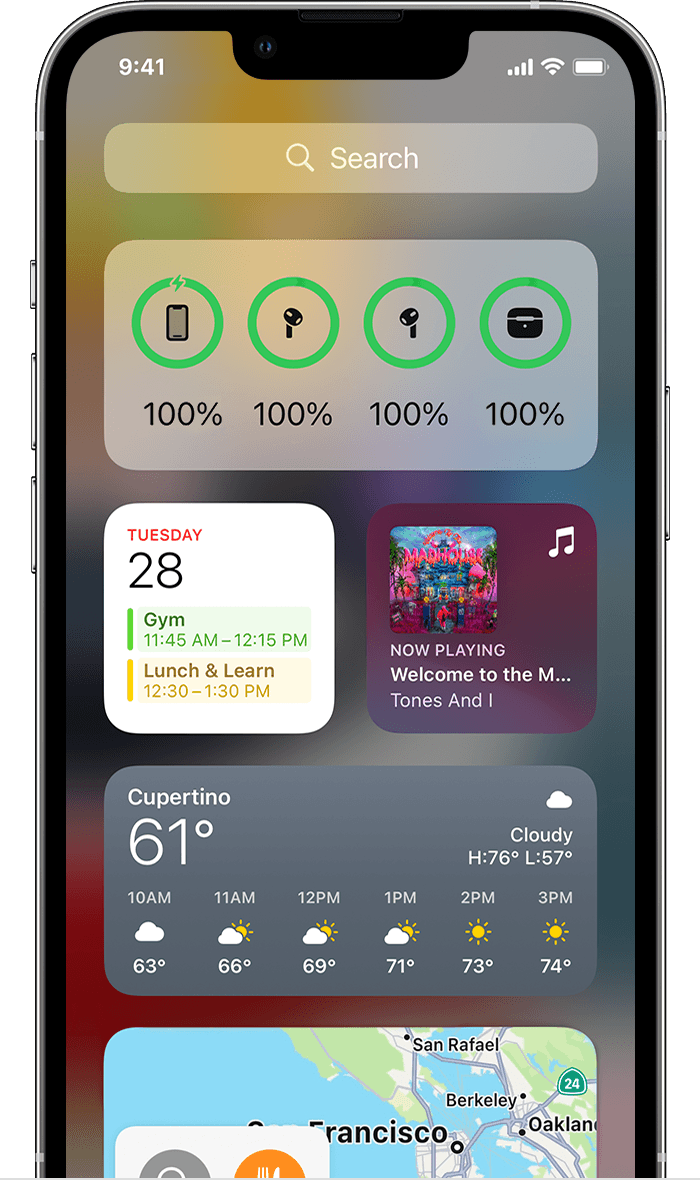
You can also check the charge status of your AirPods with the Batteries widget on your iPhone, iPad, or iPod touch. The charge for your case appears only when at least one AirPod is in the case.
On your Mac
- Open the lid or take your AirPods out of the case.
- Click the Bluetooth icon in the menu bar.
- Hover the pointer over your AirPods in the menu.
Learn about battery life
When the battery charge of your AirPods is low, you get a notification on the screen of your iPhone or iPad. You get notifications when the charge is at 20, 10, and 5 percent remaining.
You also hear a tone in one or both AirPods when the battery charge is low. You hear the tone one time when the battery charge is at 10 percent, and a second time right before the AirPods turn off.
If you think that your battery has an issue, learn about AirPods service and repair.
What you can expect with AirPods (3rd generation)
- With multiple charges in your case, you get up to 30 hours of listening time, 1 or up to 20 hours of talk time. 2
- Your AirPods (3rd generation) can get up to 6 hours of listening time (up to 5 hours with spatial audio enabled) 3 or up to 4 hours of talk time on a single charge. 4
- If you charge your AirPods (3rd generation) for 5 minutes in their case, you get around 1 hour of listening time 5 or around 1 hour of talk time. 6
What you can expect with AirPods Pro
- With multiple charges in your case, you get more than 24 hours of listening time, 7 or more than 18 hours of talk time. 8
- Your AirPods Pro can get up to 4.5 hours of listening time 9 or up to 3.5 hours of talk time on a single charge. 10
- If you charge your AirPods Pro for 5 minutes in their case, you get around 1 hour of listening time 11 or around 1 hour of talk time. 12
What you can expect with AirPods (2nd generation)
- With multiple charges in your case, you get more than 24 hours of listening time, 13 or up to 18 hours of talk time. 14
- Your AirPods can get up to 5 hours of listening time 15 or 3 hours of talk time on a single charge. 16
- If you charge your AirPods for 15 minutes in their case, you get up to 3 hours of listening time 17 or up to 2 hours of talk time. 18
Learn about Optimized Battery Charging on AirPods Pro and AirPods (3rd generation)
Optimized Battery Charging is designed to reduce the wear on your battery and improve its lifespan by reducing the time that your AirPods Pro and AirPods (3rd generation) spend fully charged. AirPods Pro, AirPods (3rd generation), and your iPhone, iPad, or iPod touch learn from your daily charging routine and will wait to charge your AirPods Pro or AirPods (3rd generation) past 80% until just before you need to use them.
Optimized Battery Charging for AirPods Pro and AirPods (3rd generation) requires an iPhone, iPod touch, or iPad and is on by default when you set up your device, or after you update it to iOS or iPadOS 15 or later. To turn off the feature, open the AirPods case, then go to Settings > Bluetooth on your iPhone, iPad, or iPod touch. Tap the More Info button next to your AirPods Pro or AirPods (3rd generation) in the list of devices. Turn off Optimized Battery Charging.
Источник
