- How to Format International Telephone Numbers?
- Country codes
- E.164 formatting
- Here’s how the E.164 numbering plan works:
- To use the previous example:
- International phone number validator
- Country specific rules and regulations
- 3 Ways to Format Your Android Phone or Tablet
- When should I format an Android phone?
- Part 1. Format Android Device with Factory Reset
- Part 2. You Can Also Format Android in Recovery Mode
- Android formatting also format the MicroSD?
- Part 3: Securely Format Android Device with Data Erasing Software
- Step 1 Download and Android Data Eraser and Install it on Computer
- Step 2 Turn on USB Debugging and Connect Android Device to Computer
- Step 3 Scan All Content and Start Wiping Android
- Step 4 Factory Reset Android (Important)
- Different Ways to Format Code in Android Studio
- Method 1: By using a shortcut key for formatting a code in any file in Android Studio
- Method 2: Formatting a code from MenuBar
- Method 3: By using different shortcut keys for formatting our code
- A Complete Guide to Format Your Android Phone
- Part 1: Backup data before formatting Android phone
- Dr.Fone — Phone Backup (Android)
How to Format International Telephone Numbers?
Sending SMS messages is easy, although there are some details that need attention. There is, for instance, quite some confusion in how to format telephone numbers correctly.

Country codes
The most important part to remember is to add the international country code. A mobile phone number in the United Kingdom always starts with the digits ’07’, for instance ‘07911 123456’. If you would not add an international country code, the computer might interpret that phone number otherwise. The country code for Russia is ‘+7’, and Russian mobile phone numbers start with ‘+79’, so ‘+7911 123456’ might be a Russian mobile phone as well.
Therefore you should add ‘+44’ UK’s country code to make the number unambiguous; ‘+44 7911 123456’ will always lead to a mobile phone in the UK.
I want to sign up for a demo account and Start sending SMS
E.164 formatting
It might be clever to format numbers using the E.164 recommendation. An international E.164 number is designed to include all of the necessary information to successfully route a call or SMS message to an individual subscriber on a nation’s public telephone network.
Here’s how the E.164 numbering plan works:
- A telephone number can have a maximum of 15 digits
- The first part of the telephone number is the country code (one to three digits)
- The second part is the national destination code (NDC)
- The last part is the subscriber number (SN)
- The NDC and SN together are collectively called the national (significant) number
To use the previous example:
- Country code: +44
- National destination code: 7911
- Subscriber number: 123456
- In total: +447911123456
Two important things to note: First of all, in the international E.164 notation a leading ‘0’ is removed. The UK mobile phone number ‘07911 123456’ in international format is ‘+44 7911 123456’, so without the first zero. Secondly in the E.164 notation all spaces, dashes [‘-‘] and parentheses [ ‘(‘ and ‘)’] are removed, besides the leading ‘+’ all characters should be numeric.
International phone number validator
A great way to check whether a phone number is correct or how it should look in E.164 formatting is using the Phone Number Parser demo. That is part of a piece of software that Google uses to check phone number formatting in Android phones.
The website ‘howstuffworks’ has more valuable background information on the origin of International Telecommunication Unit (ITU) and the numbering plan E.164.
Country specific rules and regulations
SMS is an easy and effective way to instantly reach people all over the world. But with this wide range of countries you can reach, comes a wide range of differences in national habits, restrictions and options. For further tips and guidelines, please read our article on country-specific rules, regulations and habits for sending international SMS.
Источник
3 Ways to Format Your Android Phone or Tablet
CaseВ A: In many cases, this procedure is done when we sell on the second hand or even give our device to a friend or family member so you can use, and do not want others to access our privacy information.
Case B: You may feel the performance of a Android device is slowing because of junk files that occupy the memory system, you Android phone often doesn’t work correct, poorly functioning.
No matter the reason, you should always format and reset the device. It’s necessary to let you understand that Android formatting means just deleting the user data i.e images, videos, songs, contact numbers, etc which you have saved in the phone memory. It will not touch the operating system. Formatting a Android brings the total loss of user information, not the system itself. Equivalent to formatting a PC, the system would remain intact, but completely clean customizations.
When should I format an Android phone?
As discussed earlier, there are several reasons to format your mobile Android…
1). When you go to sell your second-hand device or give your phone to someone else to use it.
2). When you return your device for service and do not want to reveal personal data
3). When you lose the stability of the system and want to start customizing from scratch.
4). Formatting a cell phone is required when it is infected by virus.
Note : IВ wouldВ stronglyВ suggestВ that you’d better back up android data to computer in advance before formatting an Android phone like Samsung Galaxy, HTC, LG, Sony, Nexus,etc.
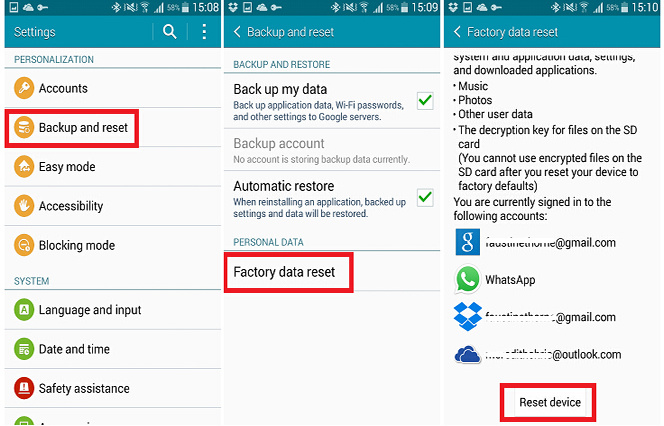
Part 1. Format Android Device with Factory Reset
As I said before, a factory reset will erase all of your phone’s data and restore it to the original settings, all of your data will gone forever and can’t be recovered. So, don’t forget to make a backup of your ipmortant data. This guide will walk you through formatting your device.
Open the menu and select Settings, then in the section, choose Personal Backup and restore. Once inside we choose Factory data reset. Tap «Reset device» to delete all data on your phone and restore original factory settings. By default, all your phone’s internal storage will be erased. After a few minutes you will have a whole new phone!
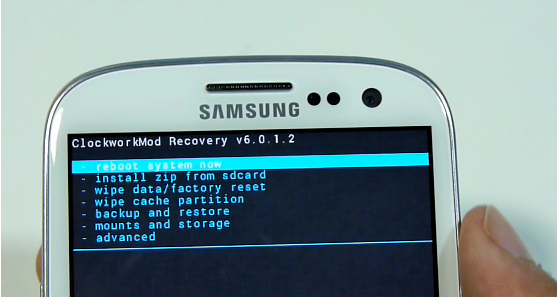
Part 2. You Can Also Format Android in Recovery Mode
Another method to formatting a android is a little more complicated because it requires you to enter recovery mode. Just follow the steps below.
1) Turn off your Android phone, press and hold the VOLUME UP button for some seconds
2) If you do OK you will get into recovery mode menu.
3) You can navigate the menu with the volume buttons and locate the factory reset mode, then confirm it.
Android formatting also format the MicroSD?
In the event that your phone has MicroSD, not all devices accept, as the range of Nexus One or HTC, the answer is no, the SD card can be formatted independently if desired, factory reset doesn’t clear the internal SD. If you need, you can try this steps: Go to Settings ->Storage -> Format SD card.
It will not replace the custom ROM if you perform factory reset on your phone, but it will reset the device to the way it was right after you installed the ROM on your device. I’ve formatted my Android tablet with the part 1 method.
Part 3: Securely Format Android Device with Data Erasing Software
The data that was deleted by factory reset can be recoverabled by professional Android data recovery software. So it is not a safe way to keep your privacy under protection. If you really cared about the information on Android device, then you should use Android data erasing tool to permanently wipe everything on Android phone or tablet.
In the following example, We are taking Androidphonesoft Android Eraser as a demo. We already tested the program on various devcies, including Samsung Galaxy S6, LG G5, Xperia Z3 and HTC One M8. It works well on all the devices. We also purchased commercial data recovery software and tried to get content after erasing. However, nothing was scanned.
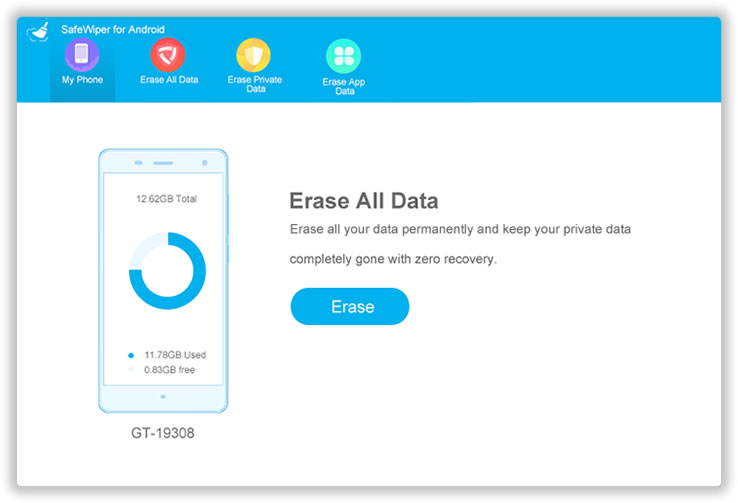
Step 1 Download and Android Data Eraser and Install it on Computer
The first step is to download Android Data Eraser and follow the instructions to successfully install it on a computer. After that, open the program and you will get 3 erasing options. In here, we need to choose ‘Erase All Data’ from the main window.
Step 2 Turn on USB Debugging and Connect Android Device to Computer
Please check whether USB debugging function is enabled on the phone. If not, you need to follow the steps in below picture to turn it on. Then connect the device to computer with USB cable. A few seconds later, you will find out the phone was detected by the program.
Note: If the program couldn’t detect the phone, please download and install the latest USB driver for the device.

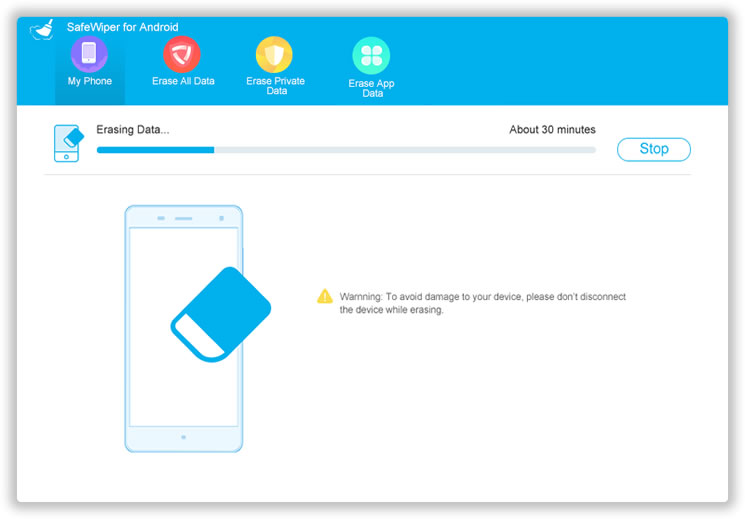
Step 3 Scan All Content and Start Wiping Android
Now click ‘Erase’ button to let the program fully scan all the content and settings on the device. This will take 7-10 minutes. After that, type ‘Erase’ in the input box to confimr the erasing operation. A few minutes later, all the personal data on the device will be removed cleanly.
Step 4 Factory Reset Android (Important)
To make the formatting more secure, it is highly recommended to factory reset the device again after erasing. After doing this, there is no way to get anything from the phone.
This article demostrates 3 methods to delete data from Android phone or tablet. You can take any of them as you like. Each one has its own pros and cons. Please carefully read them before action. My personal favorite is Method 3 because it is more safe to protect sensitive data being seen by others.
Источник
Different Ways to Format Code in Android Studio
Code formatting is very important when you are building an Android application. This will help you to organize your code properly and to maintain your code to make it easily readable. Below is a list of purposes of having a standard coding format.
Purposes of Having Coding Standards
- A coding standard gives a uniform appearance to the codes written by different engineers.
- It improves the readability, and maintainability of the code, and it reduces complexity also.
- It helps in code reuse and helps to detect errors easily.
- It promotes sound programming practices and increases the efficiency of the programmers.
In this article, we will take a look at different ways to format the code in Android Studio. We are going to discuss three different methods with the help of which we can format the code in our Android Studio.
- Method 1: By using a shortcut key for formatting a code in any file in Android Studio
- Method 2: Formatting a code from MenuBar
- Method 3: By using different shortcut keys for formatting our code
Method 1: By using a shortcut key for formatting a code in any file in Android Studio
In this method, we simply have to navigate to the file in which we have to format our code. After opening the file we have to simply press the shortcut key as Ctrl+Alt+L to reformat the code in your file. With this key, the code in your file will be rearranged according to the code standards. You can get to see below image 1 in which our code is not formatted properly and after pressing this shortcut key our code will be formatted as shown in the second image.
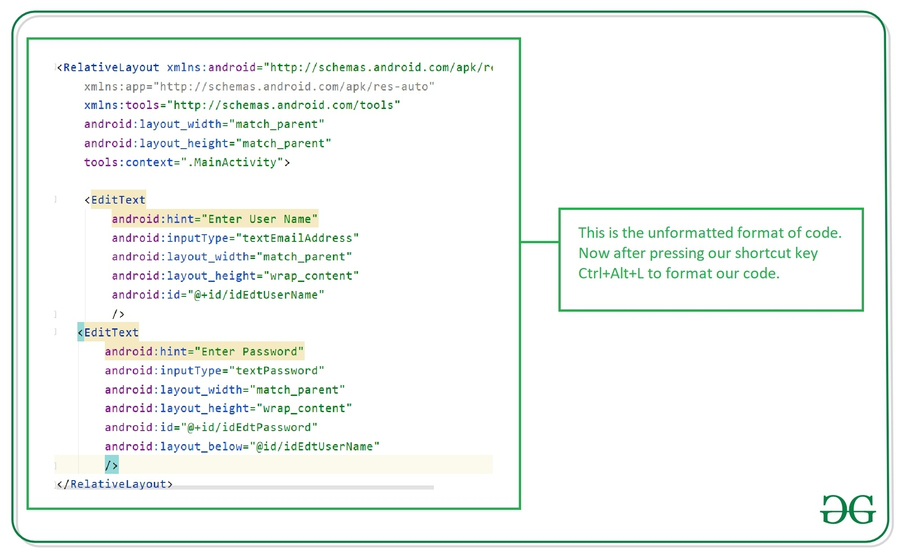
Unformatted code which we have written.

Formatted code which we get after pressing Ctrl+Alt+L
Shortcut keys for different Operating Systems
| Windows | Ctrl+Alt+L |
| Mac OS | Option+Cmd+L |
| Linux | Ctrl+Shift+Alt+L |
Method 2: Formatting a code from MenuBar
In this method, we will rearrange our code from the Menu Bar. To format our code navigate to the file in which we have to format our code and inside that file. Navigate to the top bar and click on the Code option and inside that option click on Reformat code option which is shown in the below screenshot.
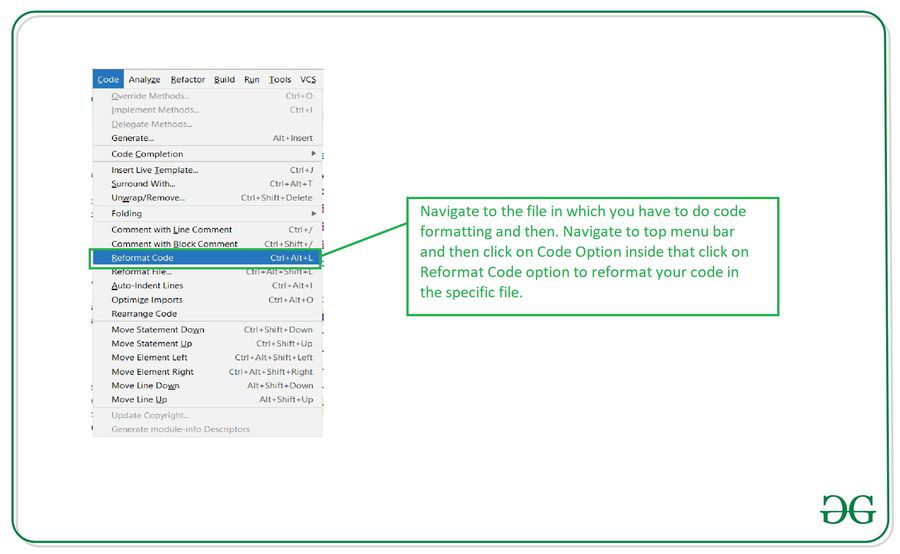
After clicking on this option your code will be formatted as shown in the above screenshot
Note: This method will be similar for all the operating systems
Method 3: By using different shortcut keys for formatting our code
Navigate to the file in which we have to format our code and then click on the shortcut key as Ctrl+Shift+Alt+L after clicking this key you will get to see the below dialog on your screen. Select the formatting options and your code will be formatted and rearranged according to selected options. The options present inside this dialog box is explained below.

After selecting the option on this dialog make sure to run it to format your code
Источник
A Complete Guide to Format Your Android Phone

James Davis
Nov 15, 2021 • Filed to: Fix Android Mobile Problems • Proven solutions
An Android phone is all fun due to the vast freedom we enjoy in it, unlike iOS. However, sometimes, users feel that they might want to sell their old device as they may be buying a new one, or probably exchanging a better one. Now before giving away your phone, it is a must that you remove all the accounts, passwords, and user data. The reason is that in today’s world of digital communication, our smartphones have become the secret keepers of our personal and professional life. Whether it be personal photos, videos, contacts, financial information, or business emails and files, you cannot risk losing any information to an outsider at any cost. Now performing a factory reset on the phone might be a good idea but not a foolproof one as information saved in your phone can still be traced if the buyer is technically sound.
Here comes formatting your phone, in the sense that deleting your accounts, passwords completely from the phone, so that no one can access any information that was stored even in the backup files. Now before you think of formatting your phone, the first and foremost thing to do would be backing up the data.
Let us get to know more about it in the next section.
Part 1: Backup data before formatting Android phone
Option 1: Using Google Account
PHOTOS & VIDEOS: Open the google photos app and at the bottom, tap Photos. All the photos that aren’t saved will have an icon of a struck out cloud.
Now to turn on backup and sync or off, open the google photos app and on the top left corner, you’ll find a menu, click it. Select Settings>Backup & Sync. And at the top, switch it on or off.
FILES: Upload the necessary files to Google Drive. Open the Google Drive App and tap on the “+” symbol to add and tap Upload. Choose from the list of files you need to create a backup for.
MUSIC: Download and install the Music Manager App. Open the application from the menu (PC). After signing in to your Google account select the location of where you keep your music files and follow the instruction on the screen.
BACKUP DATA WITH ANDROID BACKUP SERVICE: In the settings menu of your device tap on the вЂPersonal’ option and tap вЂBackup & Reset’. Click on вЂBackup My Data’ and switch it on.
To restore your backed up data, open your settings menu, and tap on Personal>Backup & Reset> Automatic Restore.
Option 2: Backup using the Dr.Fone — Phone Data:
Alternatively, there is another option available from Dr.Fone — Phone Data (Android) to give users a very easy experience to back up and restore Android data with one click.
After installing the software on your PC, you only need to connect your smartphone with Data Cable and the app automatically detects all your data. Then you would only have to select the data you want to take backup and click on “Back up”. This one-click process gives you a total backup option just in few minutes.
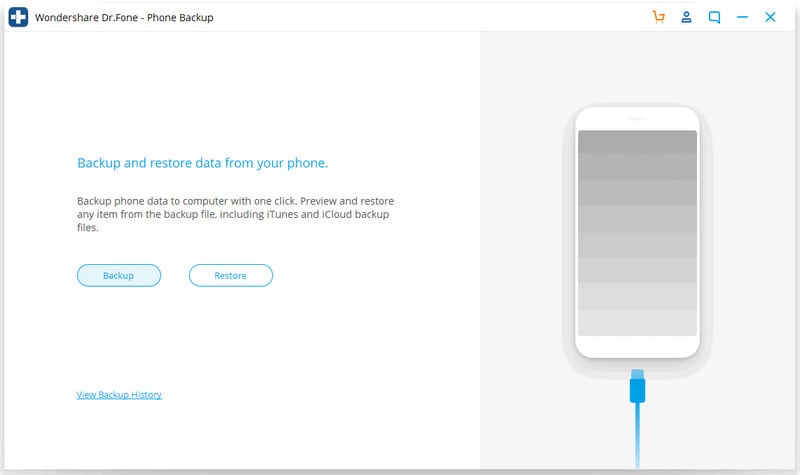
If you want to restore the data, just connect your device when the Toolkit is running and you can see an option to “Restore” from your Backup data. You can even select some of the files you require from the total backup.
![]()
Dr.Fone — Phone Backup (Android)
Flexibly Backup and Restore Android Data
- Selectively backup Android data to the computer with one click.
- Preview and restore a backup to any Android device.
- Supports 8000+ Android devices.
- There is no data lost during backup, export, or restore.
Источник


