- 4 Ways to Transfer Photos from Android to Android
- Part 1: How to transfer photos from Android to Android using MobileTrans?
- MobileTrans — Phone Transfer
- Part 2: How to transfer photos from Android to Android using Bluetooth?
- Part 3: How to transfer photos from Android to Android using Android Beam
- Part 4: How to transfer photos from Android to Android using dr.fone — Phone Manager (Android)?
- dr.fone — Phone Manager (Android)
- Easy Methods to Recover Deleted Android Photos
- Two Apps to Recover Deleted Android Photos
- DiskDigger
- Android Data Recovery
- FonePaw Android Data Recovery
4 Ways to Transfer Photos from Android to Android


“Is there an easy solution to help me? I change to a new android phone and need to transfer all photos from old to new phone.”
You want to share the pictures taken during trips with your friends or family members or you just got a brand new Android device and want to move all your loved photos from the old Android to the new Android device?
If you want to transfer photos from Android to Android, but you don’t know much about Android photo transfer then this is just the article for you. Keep on reading this to know everything related to how to transfer pictures from Android to Android.
Part 1: How to transfer photos from Android to Android using MobileTrans?
MobileTrans is a very handy data transfer software that can meet most of your Android needs. With MobileTrans — Phone Transfer, you will be able to transfer photos from Android to Android easily and efficiently.
Besides, you can easily do the data transfer between Android and iOS devices in one click when you need to upgrade to a new device.
Let’s check how to transfer photos from Android to Android with MobileTrans — Phone Transfer.
MobileTrans — Phone Transfer
1-Click Phone to Phone Transfer
- • Easy, fast and safe.
- • Transfer photos, text messages, contacts, notes, and many other file types.
- • Move data between devices with different operating systems, i.e iOS to Android.
- • Supports iOS devices that run the latest iOS 14

- • Supports over 8000+ Android devices. Works for all models of iPhone, iPad, and iPod.

- Download and install MobileTrans on your computer. Select the «Phone Transfer» module.
![]()
Then connect both your Android phones to the computer. Select Photos from the supported file type list and click on the «Start» button.
![]()
There you go! You have successfully transferred photos from one Android to another Android Device.
![]()
Here is the video tutorial for you:
Part 2: How to transfer photos from Android to Android using Bluetooth?
Another simple way for Android photo transfer is via Bluetooth, and probably this is the only way that works on almost every device presently in usage in this world. You just have to follow the two simple steps to know how to transfer pictures from Android to Android.
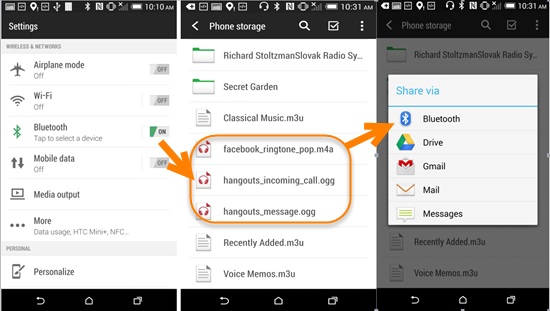
- Turn on the Bluetooth on both android devices and pair Bluetooth with those two devices. Select Bluetooth option that will be available in the settings then turn it вЂon’ on both android devices for file sharing. After that, establish a connection between the two phones to pair them successfully and exchange files.
- Now, share photos between those two android devices.
- When the two smartphones have been successfully paired and connected, open the “File Manager” option on the phone desktop, then select the music that you want to transfer and press it for 2 seconds to share to the destination phone via Bluetooth.
Part 3: How to transfer photos from Android to Android using Android Beam
Android Beam is a software that allows you to send content between devices just by pressing them back-to-back. Android Beam is very ideal for sharing content – web pages, maps, videos, photos, and more – with other people’s Android phones and tablets. Many latest Android phones have integrated NFC hardware under their panel and support Android Beam on them.
Here are the tips on how to transfer photos from Android to Android using Android Beam.
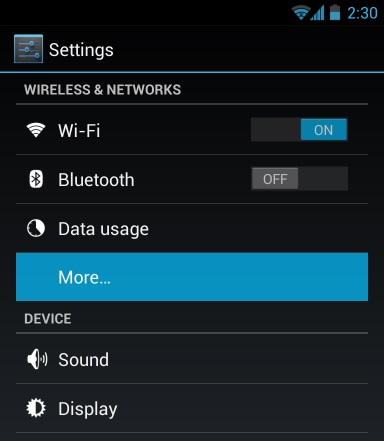
Step 1: Check for NFC Support
- Before you try to transfer photos between two Android devices using Android Beam, you will need to ensure that both your Android devices support NFC. Some Android smartphones support NFC, however, some don’t come with NFC support, so it is necessary to check before you launch this process.
- To check for NFC support, open your device’s Settings screen and tap on “More…” that will be located under Wireless & networks.

Step 2: Open the Content that You Want to Share
Once your device confirms that you have NFC support and you can use Android Beam, you need to navigate to the content that you want to share. For example, here’s how you would share various types of content using this toolkit:
- Web Page: Open it in Chrome (it is always advisable to use chrome for this purpose).
- YouTube Video: Open it in the default YouTube app, pre-download the app on both devices).
- Map Directions or a Location: Open the Google Maps app and pull up the directions or the location that you want to share.
- Contact Information: Open the contact card in the People app on the sender device.
- An App: Open its download page on Google Play Store.
- Photos: Open a photo in the gallery. You can also send multiple photos by opening the default gallery app, you just have to long-press a photo’s thumbnail, and then tap all the other photos you want to send to select them. With the photos selected, you can finally start the beaming process.
Step 3: Beam the Content
- Now, before you can send your content between two devices with Android Beam, they must both be powered on and completely unlocked. If either device screen is off, or if either device is at its lock screen (or is password-encrypted), Android Beam won’t work, and you can’t transfer photos.
- With both devices on and unlocked, press them back-to-back to transfer your music from one Android to Another.
Part 4: How to transfer photos from Android to Android using dr.fone — Phone Manager (Android)?
dr.fone — Phone Manager (Android)
Transfer Photos from Android to Android flexibly and easily.
- • Transfer files between Android and computer, including contacts, photos, music, SMS, and more.
- • Manage, export/import your music, photos, videos, contacts, SMS, Apps, etc.
- • Transfer iTunes to Android (vice versa). • Manage your Android device on the computer.
- • Fully compatible with Android 10.
- Download and install dr.fone — Phone Manager on your computer. Select the «Phone Manager» from all the models.

Connect both your Android phones to the computer. dr.fone will recognize them and display them like below. Select the Android phone which you would like to transfer photos from.
![]()
Go to the Photos tab on the top. It will display all the photos on your source Android phone. Select the photos you would like to transfer and click Export > Export to Device to transfer the selected photos to the target Android phone.
![]()
So, in this article, we discussed how to transfer photos from Android to Android. I would recommend everyone to use the Wondershare toolkit for this process as it is the safest, secure, and easy to use toolkit for Android photo transfer process. They are the best toolkit makers all over the globe. Lastly, I hope that you enjoyed reading this article on how to transfer pictures from Android to Android.
Источник
Easy Methods to Recover Deleted Android Photos

With the use of smartphones, you can take a snap of everything in just one tap, and they will be automatically saved on the photo gallery on your phone. Indeed, these smartphones have changed the way we take and keep photos. But there are many reasons behind accidental photo deletion. It can be a corrupted memory, phone reformat, buggy OS version, viruses, system crash, rooting error or syncing problems. Luckily, there are simple ways on how to recover deleted photos from Android phone. Check them out after the jump.
Two Apps to Recover Deleted Android Photos
DiskDigger
DiskDigger is a recovery tool that supports Android devices that are rooted and not rooted. Although it’s a free tool, still, it offers very helpful features. It has a basic scan function for not rooted phones and a full scan for rooted ones. This tool also allows the user to review and select the files before recovery. To recover deleted photos from Android phone, simply follow the steps given below.
- Install and open the program on your phone.
- Select between full scan and basic scan.
- Once done scanning, select the photos you wish to retrieve and a prompt message will be shown afterwards. Select if how would you like to recover the files.

Android Data Recovery
This application can help you retrieve deleted photos from Android phone and it’s fully compatible with almost all versions of Android whether rooted or not rooted. Unlike other recovery tools, this software allows you to preview the data first to ensure accurate recovery. Moreover, there are options to recover all or selected files while the existing data is kept intact. It can also recover files from both internal memory and SD card. Read on to learn how to recover deleted Android photos using Android Data Recovery.
- Download and launch the application on your computer.
![]()
Note: Do not disconnect the device during the recovery procedure to ensure the completion of scanning. After the process, you can get back the deleted photos on your computer and transfer them to your Android Phone.
FonePaw Android Data Recovery
Another tool that can recover deleted pictures from Android is FonePaw. This program can also retrieve contacts, messages, call logs, videos, audios and mobile documents. It supports multiple brands of Android phone from HTC, Sony, Google, Samsung, ZTE, Huawei, LG, Motorola and many more. Preview of data before actual recovery is likewise available so you could precisely restore what’s only needed.
This tool is risk-free. To recover deleted photos from Android phone using FonePaw, just follow the steps below.
- Install this program on your computer and open it. Link Android device with the computer via cable.
- On the home screen, there are several categories, choose “Gallery” for camera roll or “Picture Library” for photos from apps and browsers.
- Click “Next” and wait until the scanning process completes. From the result page, select the photos you wish to restore.
- Click “Recover” to save them back on your computer.
![]()
Additional Tip
Now that you know the tools that can efficiently retrieve deleted photos from Android. Always make sure to keep a backup copy of all your pictures. You can do this by periodically backing up your phone. But if you don’t have the time to do so, one app can save your time.
AirMore is a one-stop phone management application compatible with both Android and iOS smartphones. You can use it to effortlessly transfer files from your phone to PC and vice versa. After you recover deleted pictures from Android, you can use this tool to effectively manage them with ease. But what makes it wonderful is that it will not require you to install anything on your PC and you can use it to transfer all your files on your phone wirelessly.
Источник


