- Find Apple Customer Numbers, Reseller IDs, and Organization IDs
- Find your Apple Customer Number or Reseller ID
- If you purchased from Apple
- If you purchased from an Apple Authorized Reseller or wireless carrier
- Find your Organization ID
- How to use your number or ID with Apple Business Manager or with Apple School Manager
- Security and your Apple ID
- Use a strong password for your Apple ID
- Make the answers to your security questions hard to guess
- Protect your account with two-factor authentication
- Check for encryption and SSL
- Employee privacy and security policies
- Other tips for keeping your account secure
- Check your Apple ID device list to see where you’re signed in
- See where you’re signed in
- Use your iPhone, iPad, iPod touch or Apple Watch to see where you’re signed in
- Use your Mac to see where you’re signed in
- Use your PC to see where you’re signed in
- Use the web to see where you’re signed in
- Add a device to the list
- Remove a device from the list
- Use your iPhone, iPad or iPod touch to remove a device
- Use your Mac to remove a device
- Use your PC to remove a device
- Use the web to remove a device
- Permanently remove a device from your account page
Find Apple Customer Numbers, Reseller IDs, and Organization IDs
Learn how to find your number or ID and when to use it with Apple Business Manager or with Apple School Manager.
This article is for system administrators. If you need support, learn how to contact Apple.
When you add your Apple Customer Number or Reseller ID to Apple Business Manager or Apple School Manager, you can deploy your devices and purchase apps and books in volume.
Find your Apple Customer Number or Reseller ID
Whether you purchase your devices from Apple or from a participating Apple Authorized Reseller, learn how to find your number or ID.
If you purchased from Apple
When you purchase from Apple, we assign an Apple Customer Number to your organization. If you don’t know your Apple Customer Number, contact your finance department or Apple Sales.
If you buy Apple devices from an Apple Store, ask the Business Team for your Apple Customer Number.
If you purchased from an Apple Authorized Reseller or wireless carrier
- Contact your Apple Authorized Reseller or wireless carrier.
- Confirm that they support the Device Enrollment feature of Apple Business Manager or Apple School Manager.
- Ask for their Reseller ID.
If they don’t support these programs, ask them to contact their distributor or Apple account team. If they choose to participate, they’ll work with their distributor or Apple to start supporting Device Enrollment.
Find your Organization ID
If you purchase devices from an Apple Authorized Reseller or wireless carrier, you also need to provide your Organization ID to your reseller or carrier. Here’s how to find it:
- Log in to Apple Business Manager or Apple School Manager
- Click Settings, then click Enrollment Information.
- Look for your Organization ID in the Enrollment Information pane.
How to use your number or ID with Apple Business Manager or with Apple School Manager
After your organization is approved for Apple Business Manager or Apple School Manager, you can add device suppliers by entering your Apple Customer Number, or your reseller or carrier’s Reseller ID:*
- Log in to Apple Business Manager or Apple School Manager.
- Click Settings, then click Device Management Settings.
- Next to Customer Numbers, click Edit.
- Enter your number or ID.
- Click Apply.
If you enter a Reseller ID, you also need to provide your Organization ID to your reseller or carrier. You can find your Organization ID in the Enrollment Information pane.
* If you represent a large organization, like a school district, you might have more than one Apple Customer Number or Reseller ID. You can add multiple Apple Customer Numbers or Reseller IDs when you enroll, or any time after you enroll.
Источник
Security and your Apple ID
Learn more about security and your Apple ID.
Your Apple ID is the account you use to access Apple services like the App Store, Apple Music, iCloud, iMessage, FaceTime, and more. It includes the email address and password you use to sign in as well as the contact, payment, and security details you use across Apple services. Apple takes the privacy of your personal information very seriously and employs industry-standard practices to safeguard your Apple ID.
Here are some of the best practices you can follow to maximize the security of your account.
Use a strong password for your Apple ID
Apple policy requires you use strong passwords with your Apple ID. Your password must have eight or more characters and include upper and lowercase letters, and at least one number. You can also add extra characters and punctuation marks to make your password even stronger. Apple also uses other password rules to make sure your password isn’t easy to guess.
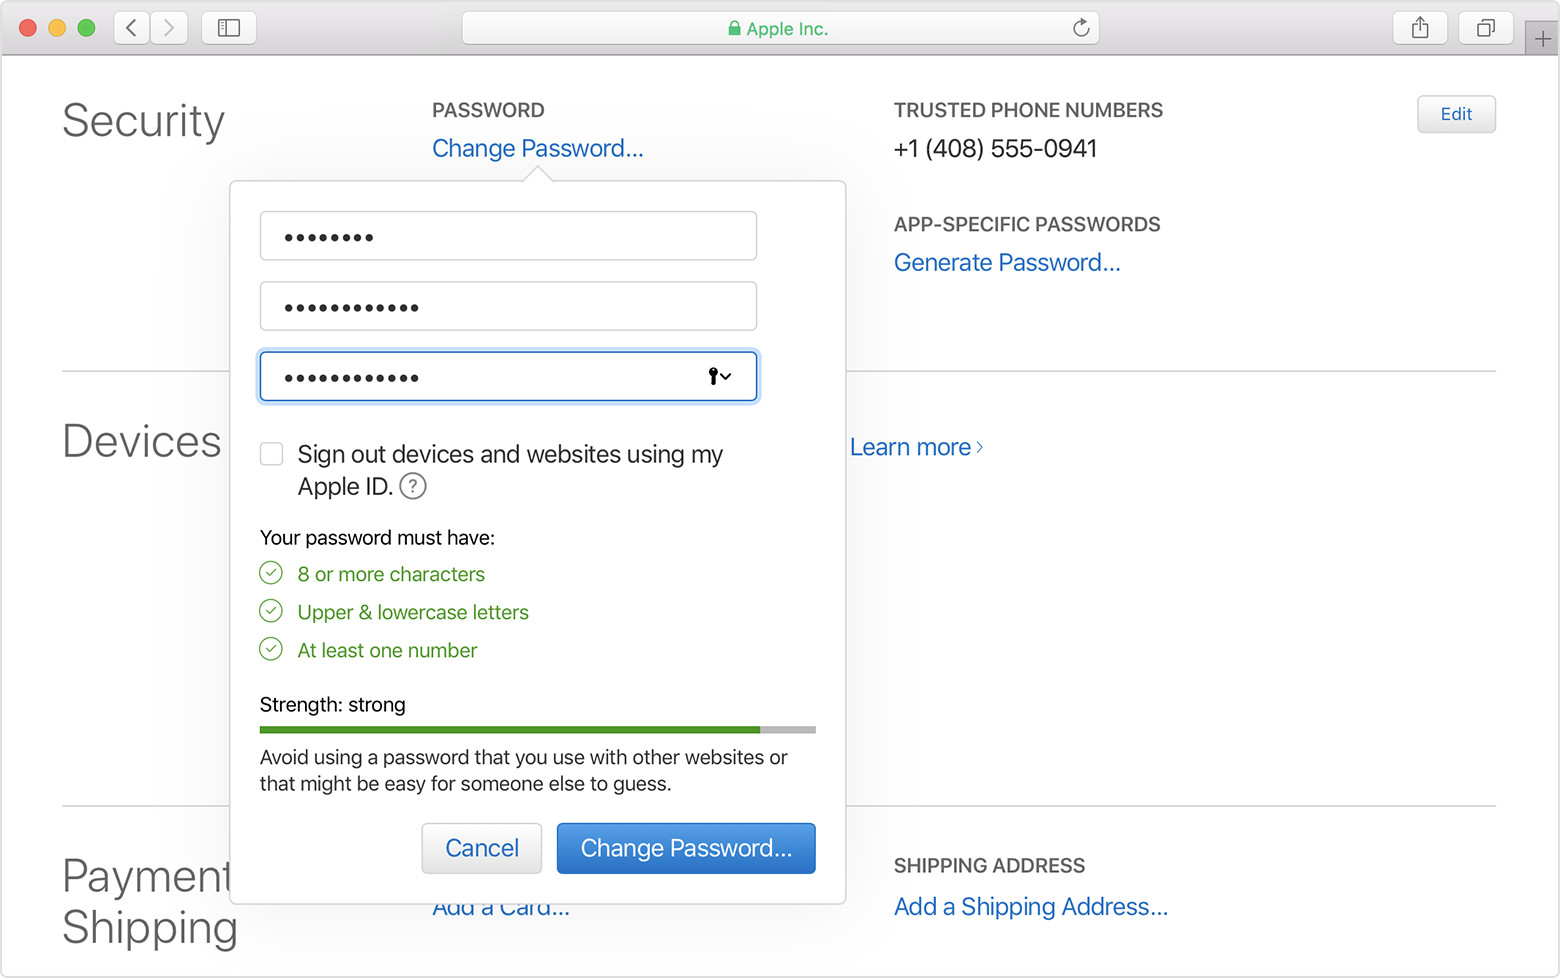
If you aren’t sure if you have a strong password, visit your Apple ID account page to reset your password as soon as possible.
Make the answers to your security questions hard to guess
Apple uses security questions to provide you with a secondary method to identify yourself online or when contacting Apple Support. Security questions are designed to be memorable to you but hard for anyone else to guess. When used in conjunction with other identifying information, they help Apple verify that you are the person who is requesting access to your account. If you haven’t selected your security questions, visit your Apple ID account page to set them up.
Protect your account with two-factor authentication
Apple offers an improved security method called two-factor authentication that’s designed to ensure that you’re the only person who can access your account, even if someone else knows your password. When you enter your Apple ID and password for the first time on a new device, we’ll ask you to verify your identity with a six-digit verification code. This code is displayed automatically on your other devices, or sent to a phone number you trust. Just enter the code to sign in and access your account on the new device. Never share your password or verification code with anyone else.
If you use iOS 11.3 or later on your iPhone, you might not need to enter a verification code. In some cases, your trusted phone number can be automatically verified in the background on your iPhone. It’s one less thing to do, and your account is still protected with two-factor authentication.
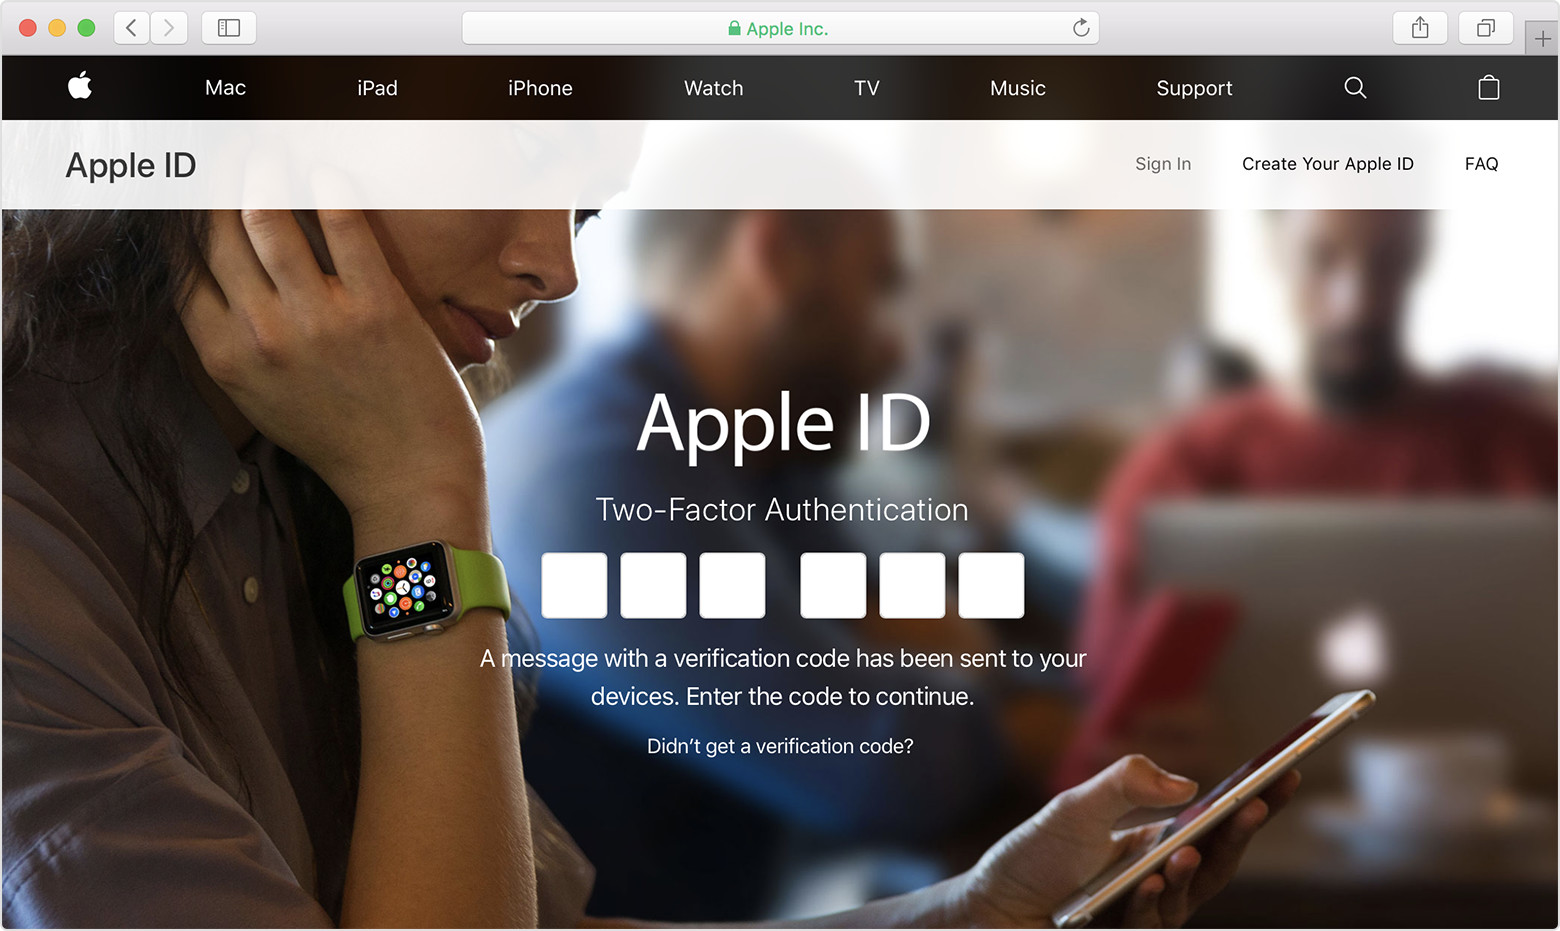
Two-factor authentication is built directly into iOS, macOS, tvOS, watchOS, and Apple’s websites. You can use two-factor authentication with your Apple ID if you have a device that’s using the latest iOS or macOS, or if you have access to a web browser and a phone number. Two-factor authentication is the default security method for some new Apple IDs created on iOS 10.3 or later and macOS 10.12.4 or later.
If you don’t have devices that can be updated to iOS 9 or later, or OS X El Capitan or later, you can set up two-step verification for your Apple ID instead.
You need two-factor authentication to use certain features that require improved security.
Check for encryption and SSL
All web pages where you can view or change your Apple ID use Secure Sockets Layer (SSL) to protect your privacy. In Safari, look for in your browser when accessing your account at your Apple ID account page to know your session is fully encrypted and secure.

Employee privacy and security policies
In addition to strong passwords, encryption, and other technology, Apple has strict policies and procedures in place to prevent unauthorized access to your account. Without proof of your identity via a temporary Support PIN and other carefully selected criteria, Apple Support can’t help you perform any actions on your account. These policies are audited and reviewed on a regular basis.

Other tips for keeping your account secure
Good online security requires a combination of practices by companies using Internet services and informed behavior by users. Below are some tips to follow to maximize your security when using your Apple ID and other online accounts.
- Always use a strong password.
- Never use your Apple ID password with other online accounts.
- Change your password regularly and avoid reusing old passwords.
- Choose security questions and answers that can’t be easily guessed. Your answers can even be nonsense as long as you can remember them. For example, Question: What is your favorite color? Answer: Mozart.
- If you abandon an email address or phone number associated with your Apple ID, be sure to update your Apple ID with current information as soon as possible.
- Set up two-factor authentication for your Apple ID to add an extra layer of security to your account and eliminate the need for security questions.
- Avoid phishing scams. Don’t click links in suspicious email or text messages and never provide personal information on any website you aren’t certain is legitimate. Learn how to identify phishing attempts.
- Don’t share your Apple ID with other people, even family members.
- When using a public computer, always sign out when your session is complete to prevent other people from accessing your account.
Never provide your password, security questions, verification codes, recovery key, or any other account security details to anyone else. Apple will never ask you for this information.
If Apple Support needs to verify your identity, we might ask you to generate a temporary Support PIN. We’ll only ask for this information over the phone after you contact Apple Support for help.
Источник
Check your Apple ID device list to see where you’re signed in
Find out which devices appear in your Apple ID device list, how to see your device’s details and how to remove a device.
See where you’re signed in
Follow the steps below to see the devices that you’re currently signed in to with your Apple ID.
Use your iPhone, iPad, iPod touch or Apple Watch to see where you’re signed in
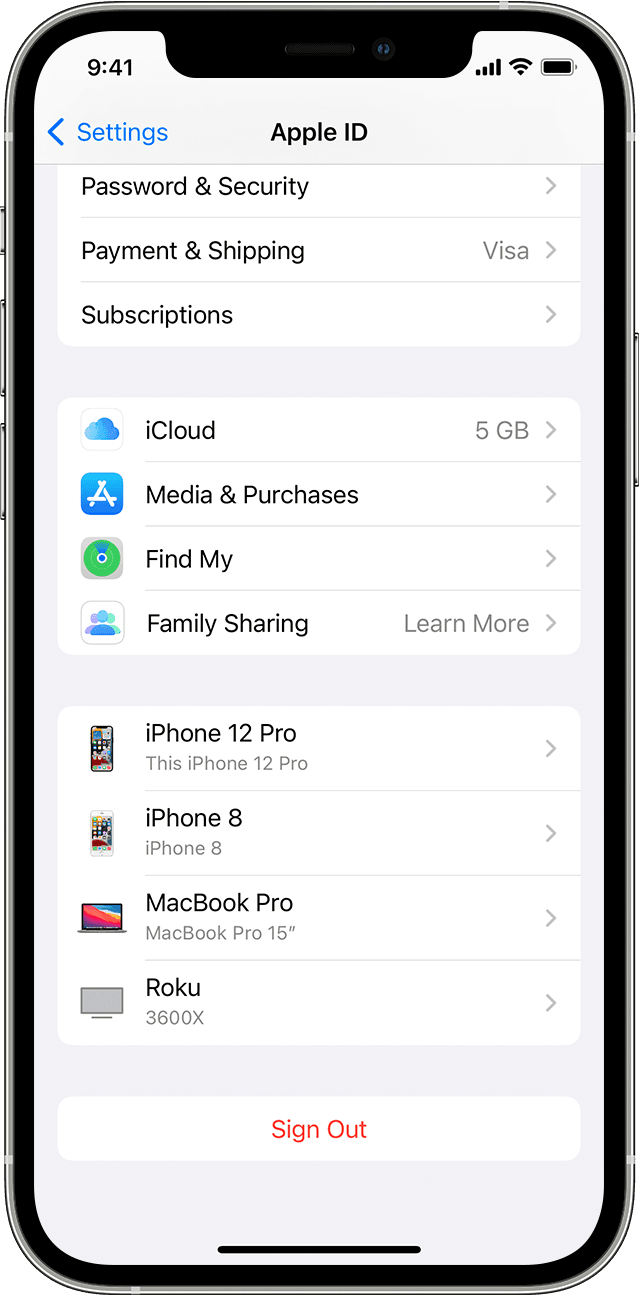
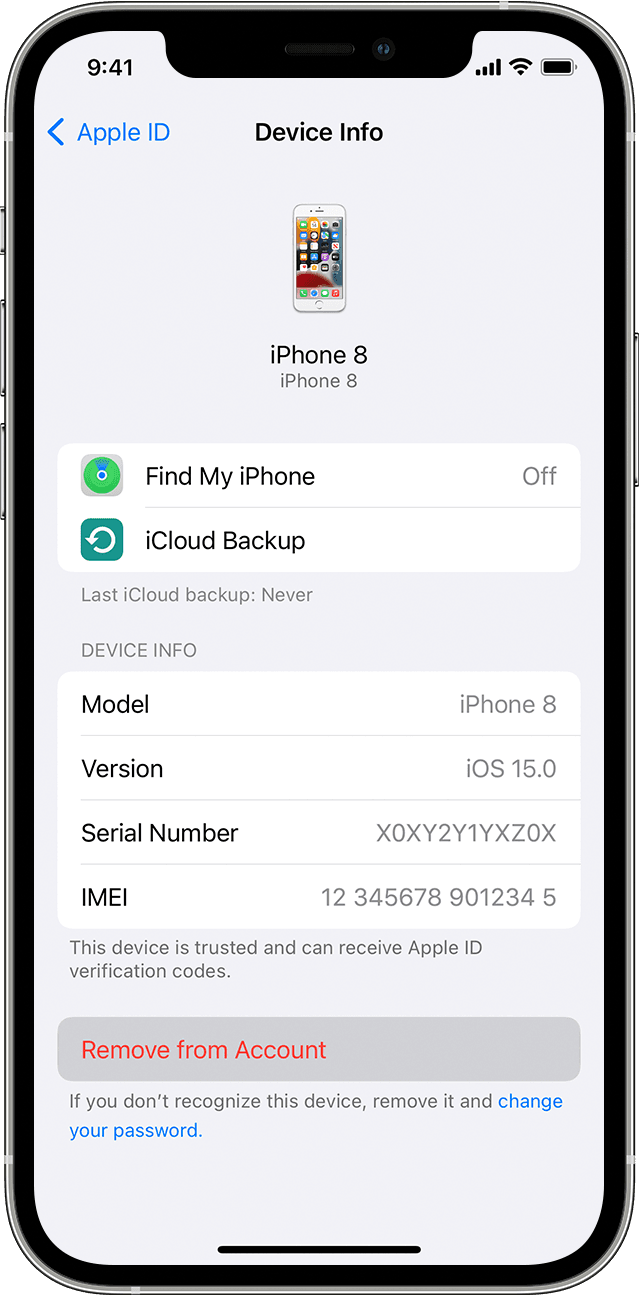
- Tap Settings > [your name], then scroll down.
- Tap any device name to view that device’s information, such as the device model, serial number, OS version and whether the device is trusted and can be used to receive Apple ID verification codes. The information may vary depending on the device type. You may need to answer your security questions to see device details.
![]()
Use your Mac to see where you’re signed in
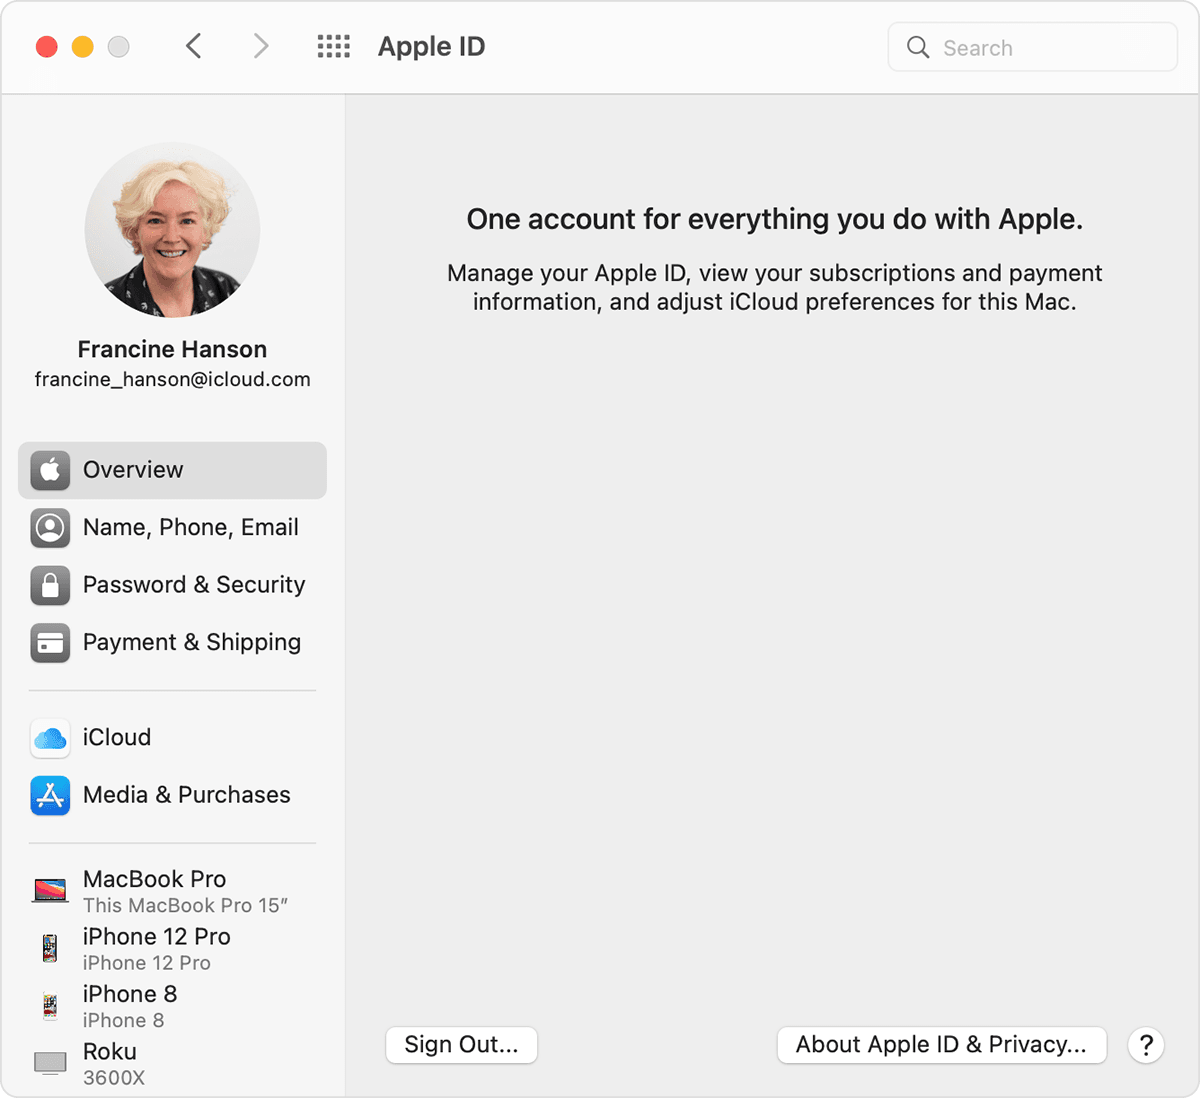
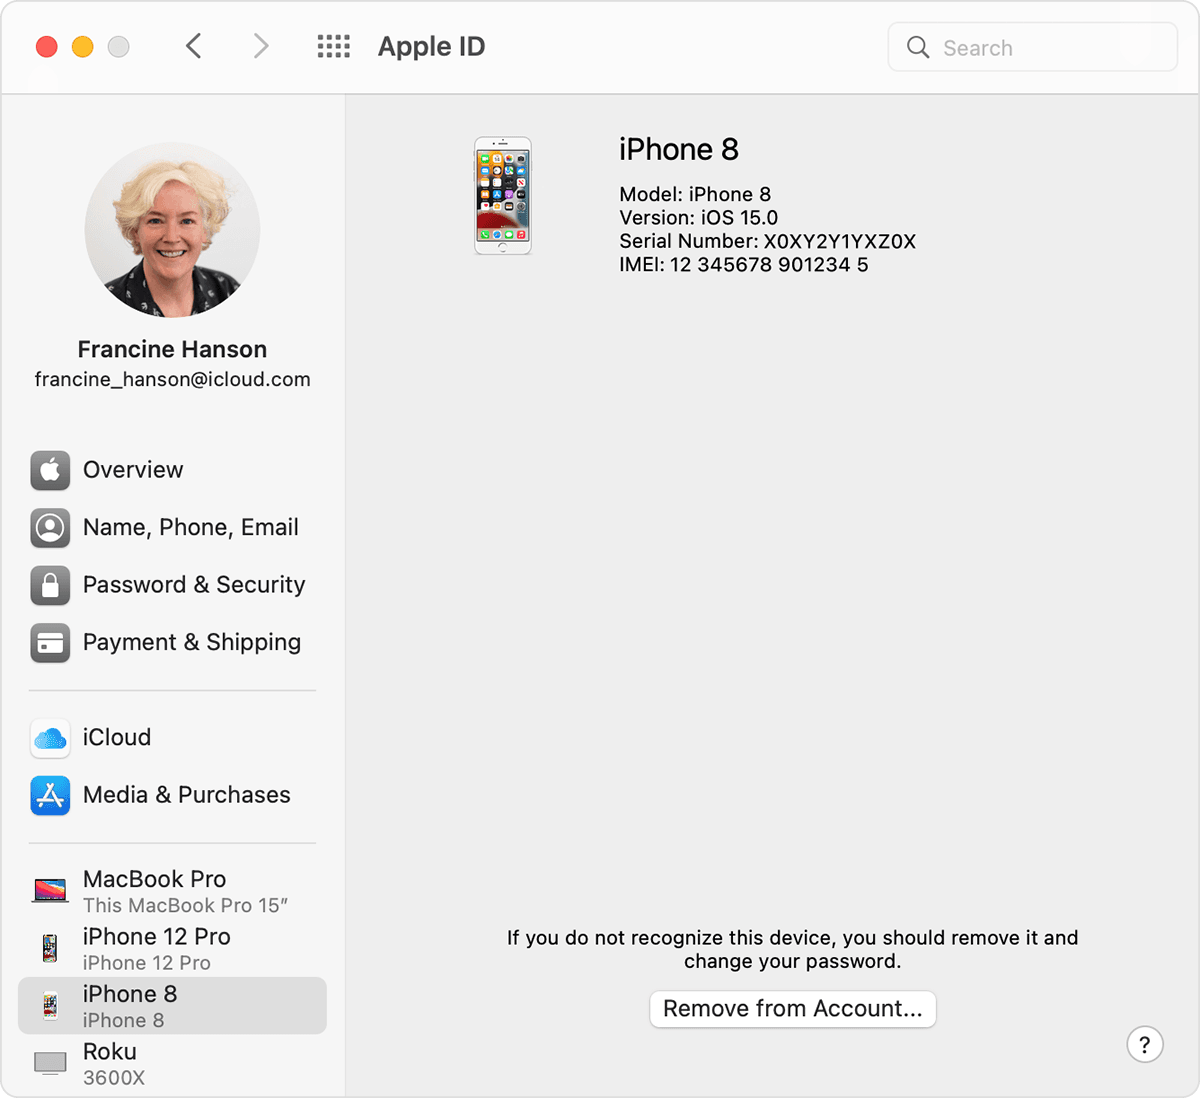
- Choose Apple menu > System Preferences.
- Click Apple ID.

- Click any device name to view that device’s information, such as the device model, serial number and OS version. The information may vary depending on the device type. You may need to answer your security questions to see device details.
Use your PC to see where you’re signed in
- Open iCloud for Windows.
- Click Account Details, then click Manage Apple ID.
- Click any device name to view that device’s information, such as the device model, serial number and OS version. The information may vary depending on the device type.
Use the web to see where you’re signed in
From the Devices section of your Apple ID account page, you can see all of the devices that you’re currently signed in to with your Apple ID, including Android devices, consoles and smart TVs:
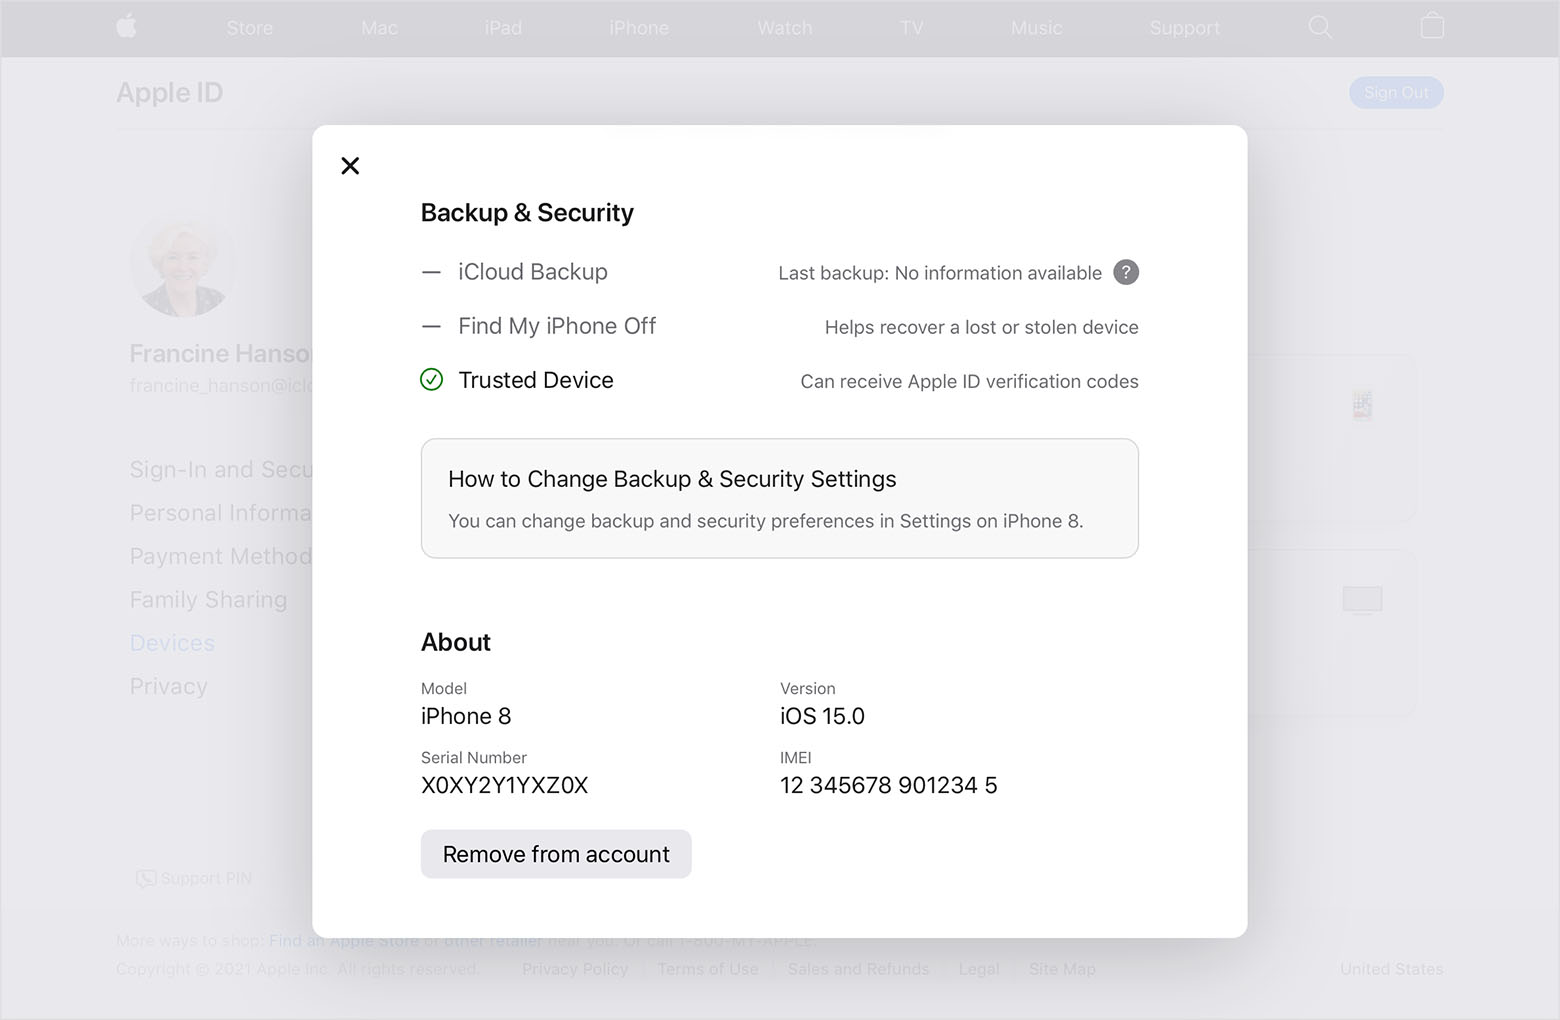
- Sign in to appleid.apple.com,* then select Devices.
- If you can’t see your devices straight away, click View Details and answer your security questions.
- Click any device name to view that device’s information, such as the device model, serial number and OS version. The information may vary depending on the device type.

* Depending on how you created your Apple ID, you may be required to provide additional information.
Add a device to the list
To add a device to the list, you need to sign in with your Apple ID. After you’ve signed in on a device with your Apple ID, that device will appear in the list. Here’s where you need to sign in:
- For iOS or iPadOS, sign in to iCloud, iMessage, FaceTime, iTunes and App Stores or Game Centre on the device. You can also see your paired Apple Watch.
- For macOS or Windows 10 and later, sign in to iCloud on the device.
- For Apple TV HD and later, sign in to the iTunes and App Stores on the device.
- For Apple TV (3rd generation) and earlier, sign in to the iTunes Store on the device.
Your AirPods will appear in the Find My app but they won’t appear in your Apple ID device list. You can remove your AirPods from your account using Find My. Devices running iOS 7 or earlier or OS X Mavericks or earlier won’t appear in your device list.
Remove a device from the list
If your device is missing, you can use Find My to find your device and take additional actions that can help you recover it and keep your data safe. If you’re no longer using a device or if you don’t recognise it, you may want to remove it from the list.
If you’ve set up two-factor authentication for your Apple ID, removing a device will ensure that it can no longer display verification codes. It also won’t have access to iCloud and other Apple services, including Find My, until you sign in again using two-factor authentication. The device won’t reappear in the list unless you sign in again.
Use your iPhone, iPad or iPod touch to remove a device
- Tap the device to see its details, then tap Remove from Account.
- Review the message that appears, then tap again to confirm you want to remove the device.
- Want to permanently remove the device from your account page?
![]()
Use your Mac to remove a device
- Choose Apple menu > System Preferences.
- Click Apple ID.
- Click the device to see its details, then click Remove from Account.
- Review the message that appears, then click again to confirm you want to remove the device.
- Want to permanently remove the device from your account page?
Use your PC to remove a device
- Open iCloud for Windows.
- Click Account Details, then click Manage Apple ID.
- Click the device to see its details, then click Remove from Account.
- Review the message that appears, then click again to confirm you want to remove the device.
- Want to permanently remove the device from your account page?
Use the web to remove a device
- Sign in to appleid.apple.com, then select Devices.
- Click the device to see its details, then click «Remove from account».
- Review the message that appears.
- Click again to confirm you want to remove the device.
- Want to permanently remove the device from your account page?
Permanently remove a device from your account page
If you’re still signed in with your Apple ID on the device, it may reappear on your account page next time your device connects to the Internet. To permanently remove the device from your account page, sign out of iCloud, iTunes and App Stores, iMessage, FaceTime and Game Centre on that device, or erase that device.
Источник


