- Guide to View Call Logs on Android Phone in All Situations
- Part 1. How to Check Call History Directly on Android Phone
- Part 2. How to Check Android Call Logs on Computer
- [Tutorial] Steps to Check Call Logs on PC or Mac
- Part 3. How to Check Deleted Call History on Android Phone
- [Tutorial] Steps to View Deleted Call History on Android
- Part 4. How to Check Call History on Broken Android Device
- [Tutorial] Steps to Check Call Logs on Broken Android Phone
- Sample VoIP Calling App in Android
- Key Components & Libraries Used
- Prerequisites
- PushNotificationService
- CallConnectionService
- CallConnection
- CallHandler
Guide to View Call Logs on Android Phone in All Situations
Summary: How to view call history on Android? Read this full guide, you will learn how to check existing call logs on Android directly, view Android call history on computer (either Windows PC or Mac), check deleted call logs on Android, view call logs on broken Android phone, etc.
Calling is one of the most frequent ways to contact with others, since mobile phone is the most common communication tool in life. Call logs records your incoming calls, outgoing calls, missed calls, rejected calls, crank calls along with the other information you want to know. However, how to view call history on Android in different situations? Don’t worry, you can totally rely on this full guide to check call logs on Android with ease.
Part 1. How to Check Call History Directly on Android Phone
To see call history on your Android phone, please follow the steps as below.
Step 1. Unlock your Android phone and open the Phone app from the Home screen. The Phone app may be called Dialer app in some Android phone.
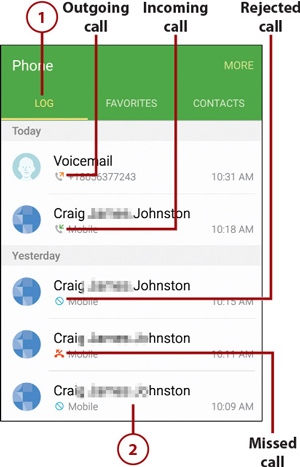
Step 2. Then you might see an option called «Log«, «Call Log«, «Call History«, «Recents» or «Call List«, which depends on your phone model. Just tap the option, you will see all the call log information on your phone, including the missed calls (with red icon), the calls you have answered (with blue icon), the outgoing calls (with green icon) and more.
Step 3. To view more details about a call in the call logs, please tap «Call» > «Call details» (In some Android phones, simply tap the specific call in the history). Then you will see details of each call made to that number, such as when it occurred, how long it lasted, and whether it was outgoing or incoming or missed, as well as the contact’s phone number.
Part 2. How to Check Android Call Logs on Computer
What to do if you want to check call history from your Android phone on a PC or Mac? Well, the multifunctional Android Assistant (Windows/Mac) can help you realize it with ease. With it, you can easily check all call logs with details on your Android phone, including call type (incoming calls, outgoing calls, missed calls, rejected calls), contact name, phone number, date & time of the calls, call duration and more.
If needed, you can also freely delete unwanted calls, back up Android call logs to computer and import call logs from computer to your Android phone. What’s more, it is fully compatible with almost all Android device (Android 8.0 is included), such as Samsung Galaxy, Huawei, HTC, ZTE, LG, Motorola, Sony, OPPO, Meizu and more.
Now, please download the free trail version of the Android Assistant on your computer to check Android call history on PC or Mac.


[Tutorial] Steps to Check Call Logs on PC or Mac
Step 1. Make your Android phone recognized by the program.
Open the Android Assistant on your computer after installation, and connect your Android phone to computer with a USB cable. If it is the first time you connect your Android phone to computer, you will be required to enable USB debugging on your Android phone. Simply turn on USB debugging on your Android phone with the onscreen prompt, thus your device will be automatically detected at once, and next time you don’t need to open it again.
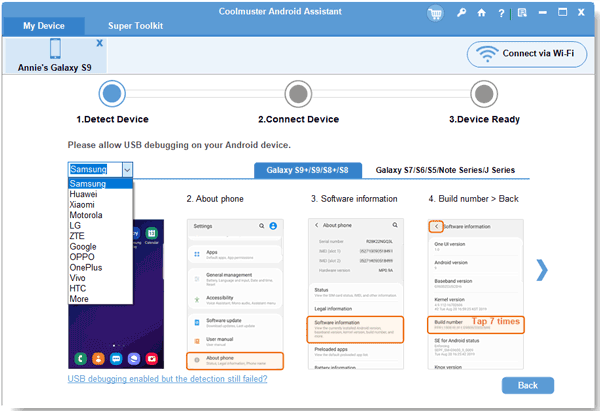
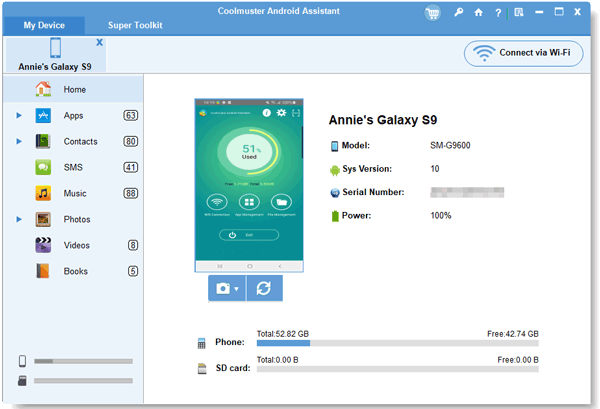
After recognizing your device, the program will automatically start to install USB driver on your computer for successfully access your phone data. When you see the main interface as follows, this means that you can start to manage your phone data with the Android Assistant now.
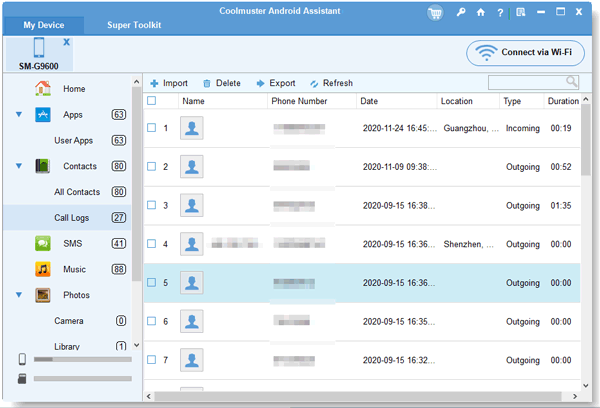
Step 2. View Android call logs on computer with details.
Please click «Contacts» > «Call Logs» tab on the left panel, which will load all the call history on your Android. Now, you can click and hold the slide button on the right to preview call logs one by one. Or you can also type the contact name of a call into the Search box in the top right corner so that you can see more details of a specific call.
Tips: To back up call history from Android to computer, please tick off the desired call logs from the list, then hit «Export» button and choose an output format to start transferring. Then you can store the Android call logs backup in any place of your computer.
To restore call logs from computer to Android phone, simply click «Import» button to browse call logs from computer and start to import them into Android.
Part 3. How to Check Deleted Call History on Android Phone
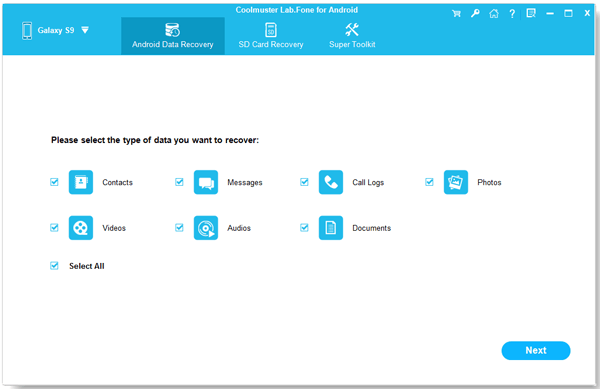
Have you ever accidentally deleted call logs from your Android and regretted for that? Don’t worry, if you need to check and recover deleted call history from Android phone, there is always a way for way. Using the Android Call Logs Assistant — Android Data Recovery (Windows/Mac), you can not only check the deleted call history with details on Android, but also recover deleted call logs from Android device and store recovered Android call logs on computer for backup with ease.
Free download the trail version of the program on your computer and start to check deleted or lost call history on Android with ease.
[Tutorial] Steps to View Deleted Call History on Android
Step 1. Have your Android phone recognized by the program.
Install and launch the Android Data Recovery on your computer, and connect your Android to computer with a USB cable, then enable USB debugging mode on your Android phone as prompted to have your Android device detected by the program.
Step 2. View deleted call logs of Android on computer.
Once the program successfully identify your Android phone, please click «Call Logs» tab on the left panel, which will load all the call logs from your Android phone, including the existing ones (in black font) and deleted ones (in red font). If you only need to check the deleted call logs, simply switch on the button of «Only display the deleted item(s)» on the top.
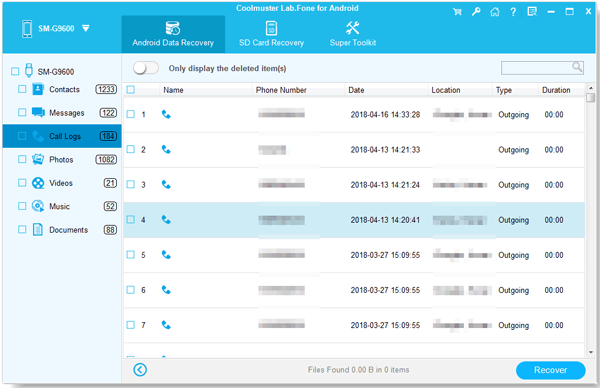
Tips: To recover deleted call logs from Android phone, please tick off the wanted call logs and click «Recover» button to restore them to computer at once. See more details on how to recover lost or deleted call logs from Android phone >>
You May be Interested in:
Part 4. How to Check Call History on Broken Android Device
Have your Android phone’s screen broken? Have your Android phone dropped into water? Your Android phone has a black screen or non-responsive screen? Forgot your password to unlock your Android phone? Or there is something wrong on your Android phone’s system? Please don’t worry, if you are in these situations, you can still check and extract call history on your broken Android phone with the Broken Android Data Extraction.

- Currently, this program only supports Samsung device in this mode of Broken Android Data Extraction, and it will be compatible with more Android phones soon.
- Supported Devices: Samsung Galaxy S6/S5/S4, Samsung Galaxy Note 5/Note 4/Note 3, Samsung Galaxy Tab Pro 10.1 and more device models.
Free download the trail version of the program and follow the instructions as below to view call history on broken Android phone with ease.
[Tutorial] Steps to Check Call Logs on Broken Android Phone
Step 1. Make your Android phone detected by the program.
Run the program on your computer after downloading and installing, then plug your Android phone to computer with a USB cord to have your device recognized by the program.
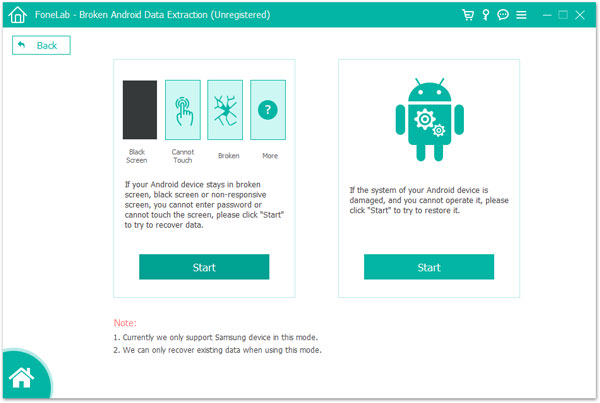
Step 2. Choose «Broken Android Data Extraction» mode.
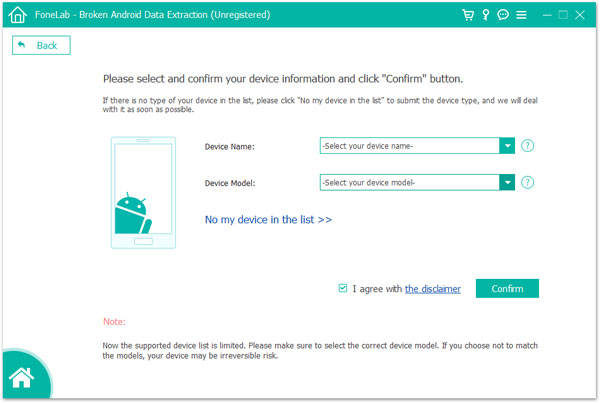
Once your device is detected successfully, please click «Broken Android Data Extraction» tab on the left panel, then choose your device name, device model and confirm it.
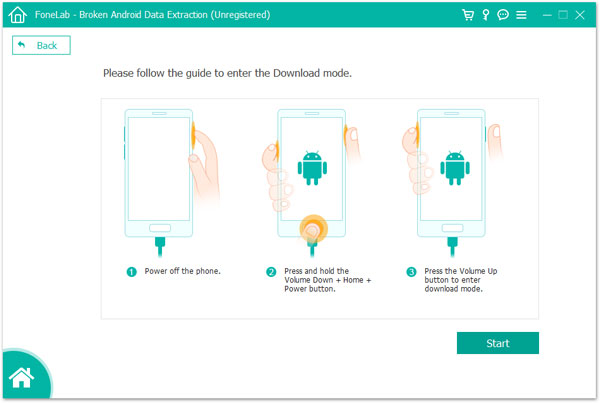
Step 3. Enter the Download mode.
Next, please follow the hints on the interface to put your Android phone into the Download mode and click «Start» button to continue.
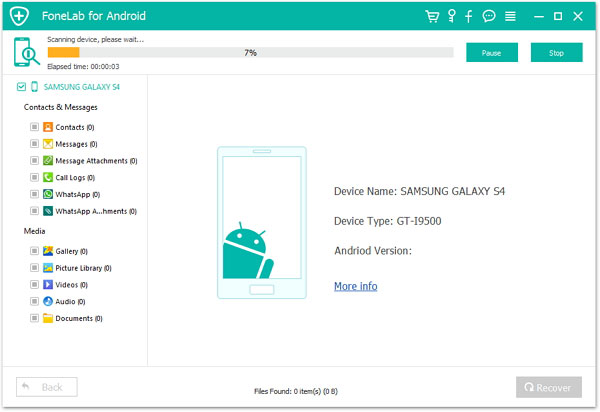
Step 4. View call logs on broken Android.
After quick scanning, all recoverable files on your Android phone will be categorized on the left panel. Please click «Call Logs» tab to load and show all the call history on your broken Android device. Now, you can see the call history on your broken Android with details you want to know.
Tips: To recover call logs from broken Android, please choose the call logs you want to restore, and click «Recover» button to save them on your computer for backup immediately.
Источник
Sample VoIP Calling App in Android

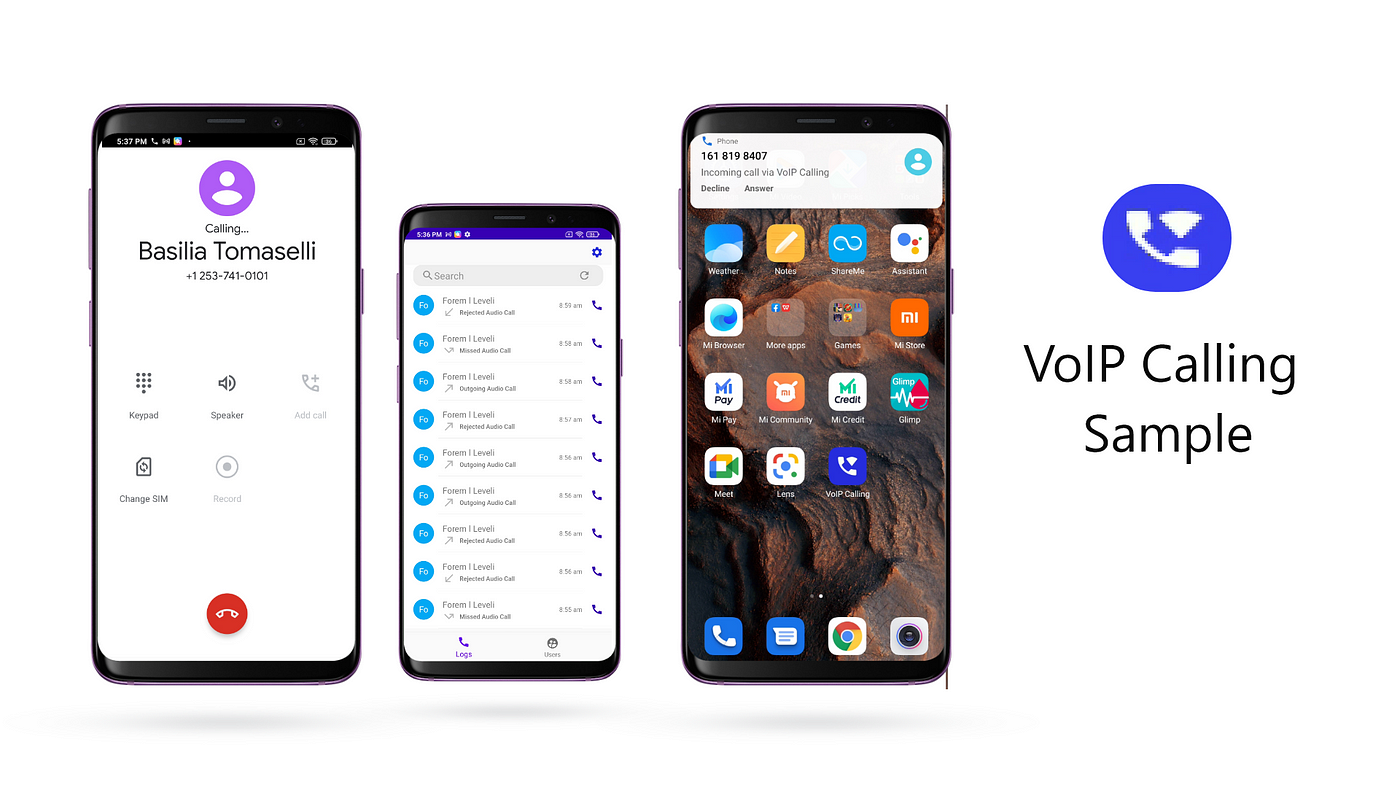
This article describes the designing & implementation of a sample VoIP calling app using CometChat Pro. CometChat Pro is Messaging & Call SDK that provides enormous features for developers to integrate chat. Using CometChat Pro UI Kit, developers can easily integrate real-time messaging & calling support in their app. By the end of this article, you will create a fully functioning Sample VoIP Calling App.
Key Components & Libraries Used
CometChat Android UI Kit — An ready to use UI Kit library which will help us to develop real-time messaging & call support in our sample app within a few minutes.
Firebase — To receive an event when the app is not in the foreground we will use Firebase Push Notification.
ConnectionService — An abstract class that will help you to build VoIP Calls in a sample app. It uses a built-in System UI to manage a call which is also called System Managed. If you wish to use your own UI to manage calls you can use Self-Managed Service.
Prerequisites
Before diving into more details please ensure that you have checked the below points.
— Android studio installed in your system.
— Android Device or Emulator to run your app.
- We will begin by fetching the code from GitHub.
You can clone the project from the Sample VoIP Calling repository.
- It’s necessary to have CometChat Account to run the app.
You can create your account in CometChat and replace the credentials with yours.

Also, please make sure to setup Push Notification Extension in CometChat.
Please click here to know How to setup Push Notification in CometChat.
- Next step is to setup Firebase Account and create a new project. Once the project is created, setup an Android App in the Firebase Project and add google-services.jsonfile in your “ app” folder
- Once the above mentioned configurations are done you can open the project in Android Studio. You will find the project contains two packages ‘ app’ which is our sample app and ‘ uiKit’ is a library provided by CometChat.
- In ‘ app’ you will find the ‘ utils’ package under which we have files to handle Push Notification and VoIP calls.
PushNotificationService
It extends FirebaseMessageService which is used to handle Push Notification received from Firebase. We are using it to notify the message sent to a user when they are not active. We are also handling incoming & outgoing calls through it.
onMessageReceived() : This method gets triggered whenever you receive a push notification from firebase.
CometChatHelper.processMessage() : This method is provided by CometChat SDK to get BaseMessage from “ data” received as JSON Object in Remote Message.
initiateCallService(call : Call) : This method is used to initiate a call through ConnectionService whenever a Call type message is received.
showMessageNotification(baseMessage: BaseMessage, title: String, alert: String) : This method is used to display and handle the notification for the message when is being received by the particular user.
CallConnectionService
CallConnectionService is custom connectionservice class which is binded with the app to handle incoming & outgoing calls. You will find onCreateIncomingConnection(), onCreateOutgoingConnection() methods in it.
onCreateIncomingConnection() : This method get triggered whenever telecomManager.addNewIncomingCall() get success on receiving a call.
onCreateIncomingConnectionFailed() : This method get triggered whenever telecomManager.addNewIncomingCall() fails to receive a call.
onCreateOutgoingConnection() : This method get triggered whenever telecomManager.placeCall() get successfully executed to place outgoing call.
onCreateOutgoingConnectionFailed() : This method get triggered whenever telecomManager.placeCall() get failed to place an outgoing call.
Currently, we are using CALL_PROVIDER as Capability of ConnectionService. So you can see your system’s native calling UI for incoming & outgoing calls.
You can change it SELF_MANAGED if you wan’t to show your own custom UI for incoming & outgoing calls.
CallConnection
It is a Connection class that is used to initiate a connection when a user receives an incoming or outgoing call. It usually helps the ConnectionService class to handle the connection requests and their callbacks. It includes certain methods like onAnswer(), onReject(), onHold(), onDestroy(),etc. Whenever the user receives an incoming call and if the user accepts the call then onAnswer() will be triggered. Similarly, if user rejects the call then onReject() is triggered.
onAnswer() : Whenever this method gets triggered, we use CometChat.acceptCall() which will start the CometChat Call Service and start the call session.
onReject() : Whenever this method gets triggered, we use CometChat.rejectCall() which will reject the CometChat Call Service and end the call session.
onDisconnect() : This method gets triggered whenever the initiator of a call ends the calls before the receiver accepts the call. This will ends the call session and make it a Missed Call.
CallHandler
It is a class that is used to handle and integrate ConnectionService in your app. Below are its methods that are used in your app.
Источник


