Драйверы QualcommDrv и пошаговая инструкция по их установке

Драйверы QualcommDrv и пошаговая инструкция по их установке.

1. Устанавливаем драйвера. Из архива QualcommDrv.zip
Распаковываем этот архив во временный каталог и получаем два каталога для 32-х битной и 64-х битной версий Windows.
Для 32-х битной версии Windows запускаем из каталога Allx86 файл dpinst32.exe. Для 64-х битной версии Windows запускаем из каталога Allx64 файл dpinst64.exe.
После запуска dpinstXX.exe получаем:

2. Подключаем включенный аппарат USB кабелем к компьютеру.
После обнаружения Windows новых USB устройств получаем. (Выберите устройство из списка устройств и по правой кнопке мыши выберите «Свойства» закладка «Сведения» из выпадающего меню «ИД Оборудования»)

Определилось одно устройство «Android ADB Interface» в сведениях о котором «ИД оборудования» указано на скриншоте выше.
3. Обновляем вручную драйвера для этого найденного устройства.
В свойствах этого устройства (Выберите устройство из списка и по правой кнопке мыши выберите «Свойства») на закладке «Драйвер» выбираем «Обновить» -> «Выполнить поиск драйверов на этом компьютере»

Выбираем «Выбрать драйвер из списка уже установленных драйверов».

Выбираем «Составное USB устройство»

После нажатия «Далее» Windows сменит драйвер и обнаружит новые устройства которые установятся автоматически. (Номера COM портов могут отличаться но наименования устройств будут такие как на скриншоте). Кроме того будут найдены драйверы для внешней SD карты, внутренней флеш памяти аппарата и виртуального CD диска с драйверами для аппарата.

В результате получите. (Номера COM портов могут быть другие)

4. В списке устройств Windows будет одно неопределенное устройство.
С идентификатором как на скриншоте. (Выберите устройство из списка устройств и по правой кнопке мыши выберите «Свойства», закладка «Сведения» из выпадающего меню «ИД Оборудования»).

Выберите его свойства и на закладке «Общие» выберите «Обновить драйвер. » в окне «Обновление драйверов» выберите «Выполнить поиск драйверов на этом компьютере»

Далее выберите «Выбрать драйвер из списка уже установленных драйверов» и кнопку «Далее»

В открывшемся списке типа устройств выберите «Переносные устройства»

Выберите изготовителя устройств «Microsoft» и модель устройства «Составное устройство WPD». Нажмите кнопку «Далее».

В возникшем окне предупреждения выберите «Да»

В результате последнее неопределенное устройство будет установлено нормально.

Состояние данного устройства (определено оно или нет) не влияет на работу компьютера с аппаратом.
Задача процедуры установки драйверов — установка драйвера для «Qualcomm HS-USB Diagnostics 9025» COM порта.
Если вы будете подключать аппарат к другому USB порту на компьютере — процедуру установки начиная с пункта 3 возможно будет необходимо повторить.
Если у вас процедуру установки не получается воспроизвести — попробуйте сменить USB порт к которому вы подключаете аппарат на компьютере или USB кабель который вы используете для подключения. Если вы устанавливали другие драйвера для аппарата возможен так же конфликт драйверов, попробуйте их удалить и повторить установку.
Драйвера из архива 100% обеспечивают нормальное подключение аппарата в любых режимах к компьютеру по USB и любые действия с аппаратом.
Список возможных режимов работы аппарата.
1) Нормальный режим (Normal mode).
Подключение к компьютеру включенного или выключенного аппарата.
2) Режим восстановления (Recovery mode).
Включение (кнопкой включения) предварительно выключенного аппарата при удержании нажатой кнопки увеличения громкости (Volume Up / Volume +).
3 ) Режим прошивки разделов через fastboot программу (Fastboot mode).
Включение предварительно выключенного аппарата при удержании нажатой кнопки уменьшения громкости (Volume Down / Volume -).
4) Режим прошивки утилитами прозводителя аппарата или QPST (Утилитами производителя платформы аппарата Qualcomm).
Выключенный аппарат подключается к компьютеру USB кабелем когда одновременно нажаты кнопки увеличения и уменьшения громкости (Volume Up + Volume Down).
Источник
Download Android USB Drivers for popular OEMs
So you’ve got an Android device and want to dive deep into the world of modding? Be it rooting or installing a custom ROM like LineageOS, most of the aftermarket modding requires you to connect your Android smartphone to a computer using a USB cable so you can use tools like the Android Debug Bridge (ADB) and Fastboot to interact with the device. For an Android power user, you may also want to reinstall the factory firmware on your phone, which means you have to deal with the OEM-specific flashing utilities.
However, none of these tinkering jobs are possible if your PC can’t see the target device in the first place. As in the case of Windows, the operating system may require an additional piece of software known as the “driver” in order to properly recognize all the different connection modes exposed by the Android device. Below you can find a list of official OEM-provided Android USB driver packages and a generic driver installation guide. If you don’t see the maker of your device listed or you see a misplaced link, send a message to Skanda HazarikaВ (SkandaHВ on the forums) with the device details.

Table of Contents:
Purpose of Android USB drivers
The USB interface of an Android device is a pretty complex object. Depending on the configuration, it may expose the standard Android USB debugging interface, the fastboot interface, and various other SoC-specific diagnostic interfaces to the computer. Simultaneously maintaining more than one interface is supported as well, e.g. you can interact with your device with ADB while configuring the internal modem parameters.
Keep in mind the aforementioned scenarios are a bit different from connecting the device through the plain old Media Transfer Protocol (MTP) or Picture Transfer Protocol (PTP) mode. MTP enables the end-user to browse the internal memory on the device from a PC as if it’s an external storage drive. Microsoft ships a generic MTP/PTP driver with every edition of Windows since Windows XP, so you don’t need an external driver for that.
Download Android USB drivers for popular OEMs
Most Android OEMs offer official driver packages for their devices. Besides the ADB and Fastboot interfaces, these drivers also support proprietary flashing protocols designed by the corresponding device maker. For example, if you want to flash a Samsung Galaxy device, you must install the Samsung USB driver package beforehand.
Note that Microsoft has been shipping a generic ADB driver with Windows for a while, so installing the OEM driver just for the sake of USB debugging might not sound worthwhile anymore. Windows can also check and install the missing drivers on the fly through Windows Update. However, Microsoft-recommended drivers are not always the best choice for complex USB interfaces, so do check out the official driver pack whenever possible.

The inbox Android USB debugging driver of Windows in action
Get the appropriate driver for your device from the index below:
| OEM | Android USB Driver |
|---|---|
| Acer | Download Link |
| Alcatel | Download Link |
| ASUS | Download Link |
| Blackberry | Download Link |
| Dell | Download Link |
| Fujitsu | Download Link |
| Download Link | |
| HTC | Download Link |
| Huawei | Download Link |
| Intel | Download Link |
| Kyocera | Download Link |
| Lenovo |
|
| LG | Download Link |
| Motorola | Download Link |
| MediaTek | Download Link |
| NVIDIA | Download Link |
| Samsung | Download Link |
| Sharp | Download Link |
| Sony | Download Link |
| Toshiba | Download Link |
| Vivo/iQOO | Download Link |
| Xiaomi | Download Link |
| ZTE | Download Link |
How to install Android USB drivers
Now that you’ve downloaded the suitable driver package for your device, it’s time for you to install it. Some OEMs offer standard installer executables, which means you can easily install the whole driver suite by double-clicking on the setup file and following the wizard.

However, Google and a few other vendors prefer to stick with the bare INF and associated binary files which are packed inside a zip or rar archive. Such packages need to be installed using Device Manager, but you have to extract the contents of the archive beforehand.
- Right-click on the Start button and select the Device Manager entry. You can also call the Microsoft Management Console snap-in named devmgmt.msc directly from Run to open Device Manager.

Device Manager under Windows 10
- Connect the Android device to your PC. Depending on the selected configuration, you may see one or more unknown devices popping up.

- (Optional) Right-click on the unknown device entry, select Properties, move to the Details tab, and finally select Hardware Ids from the dropdown menu. Now open your favorite search engine, paste the hardware identifier in the search box, and go through the search results. This is a crude way to determine the probable interface your device is currently exposing.

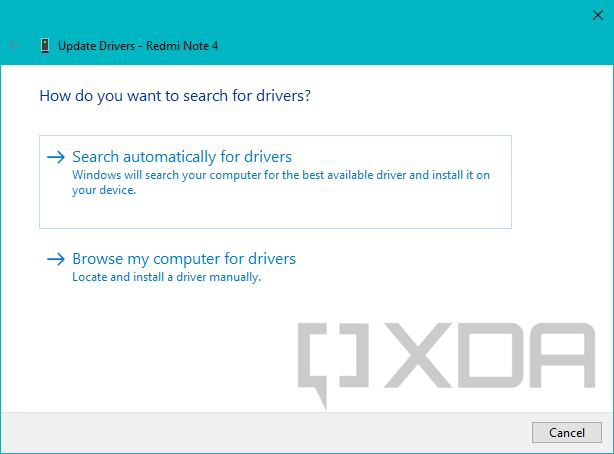
- Right-click on the unknown device entry and select Update drivers. Now select Browse my computer for drivers/driver software and point the wizard to the folder where you extracted the driver package.

- If everything goes right, you should see a confirmation page like the following.

Manually install the driver for an unsupported device
On some occasions, the OEM drivers aren’t enough. Perhaps you’ve stumbled upon a no-name generic tablet, or the flash mode interface of your shiny new phone has yet to get an official driver from its maker. In that case, you can forcibly install an existing driver package for a similar USB interface through Device Manager.
- Open Device Manager and locate the unknown device entry.
- Right-click on it and select Update drivers. Select Browse my computer for driver software and then choose the option named Let me pick from a list of available drivers on my computer.

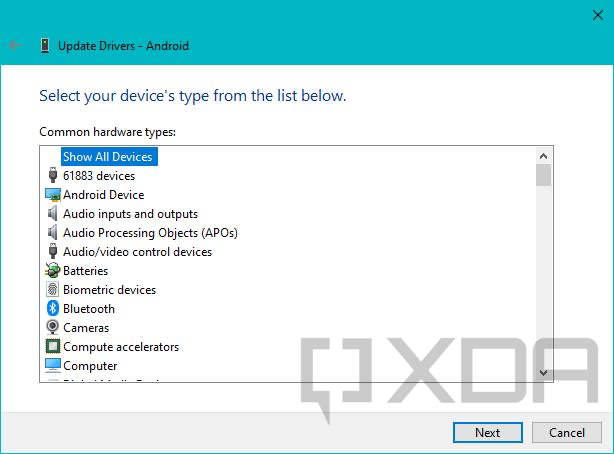
- Now select Show All Devices and click Next. On the next screen, click on the Have Disk… button.

- At this point, you need to browse to the location where the extracted driver for a similar device is located. Pick the INF file from the list of files and select Open.

- Now carefully choose the driver model. For example, if you’re trying to install the Fastboot mode driver for a device, select the Android Bootloader Interface from Google’s driver set. Windows might show a warning related to compatibility, but you can ignore it and continue the installation process anyway.


This method lets you force-install a signed driver without breaking its digital signature, so you don’t need to turn off driver signature enforcement on a 64-bit Windows instance.
You’ve now got the correct USB driver installed on your computer and your Android device is ready to receive instructions. Now it’s time to put it all together and run your first ADB command!
Источник


