Analyzer tasks tool android studio

Android application (performance and more) analysis tools — Tutorial

Analyzing Android performance issues. This tutorial describes the available tools in Android to perform a performance analysis of Android applications.

1. Overview

It is very important for Android applications to perform all operations as fast as possible. This description lists the available tools to trace and optimize your Android application.

2. Android Basics

The following assumes that you have already basic knowledge in Android development. Please check the https://www.vogella.com/tutorials/Android/article.html — Android development tutorial to learn the basics.

3. StrictMode

You should avoid performing long running operations on the UI thread. This includes file and network access.

To ensure this you can use StrictMode. StrictMode is available as of API 9 (Android 2.3.3) and allows to setup thread policies for your application.

Via StrictMode you can instruct the Android system to crash your application if it performs long running operations, e.g. I/O in the user interface thread.

The following code shows how to use StrictMode. As the activity violates these settings it will crash.

StrictMode should only be used during development and not in your live application.

4. Developer Settings

Developer Settings in your Setting application of your Android phone allow to set configurations which simplify the analysis of your application. For example you can enable that the touch area is highlighted.

If you have a phone with Android 4.2, try going to the About section in the Settings and tap the Build number entry 7 times.

If you phone does not have this option try using an emulator.

In some cases you need to restart the application to make the setting work.

5. Traceview

5.1. Introduction

Traceview is a graphical viewer to see logs created by an Android application. Via Traceview you can measure the performance of your application to identify performance problems.

Traceview is located as standalone tool in the tools folder of your Android SDK installation folder and it also integrated into Eclipse via the Android Developer Tools (ADT).

5.2. Using Traceview from Android Studio

Android Studio supports tracing via the Android Device Monitor. Use Tools Android Android Device Monitor to open it.

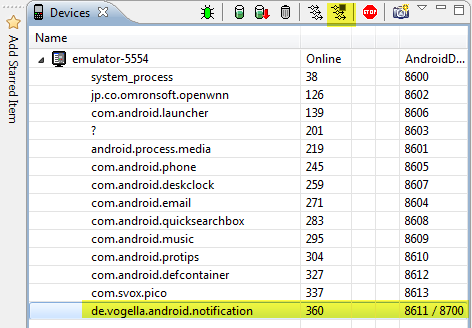
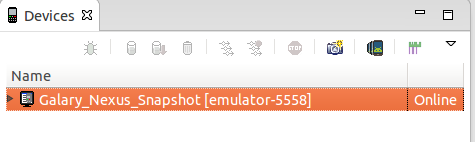
To start tracing an application select your application process in the Devices view and select the Start Method Profiling button as depicted in the following screenshot.

Use your application and re-press the same button to stop profiling. This will open a new editor which shows you the tracing results.

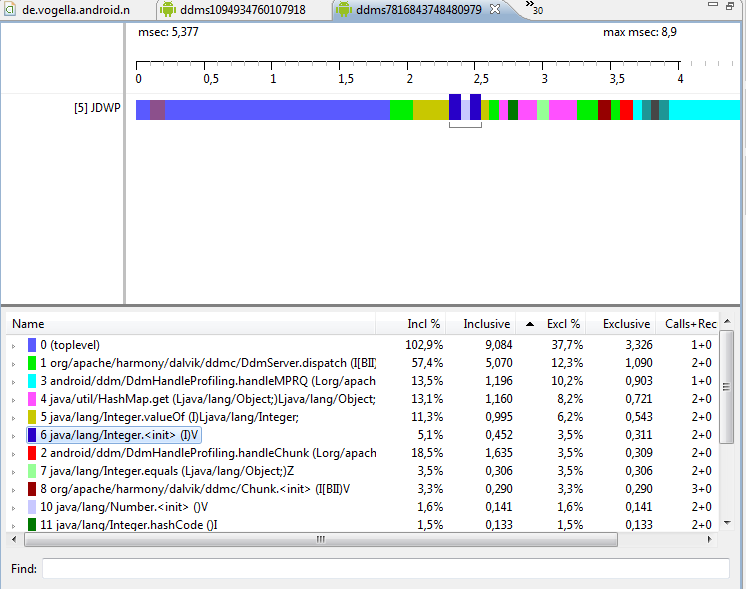
You can zoom into the graphic to get more details. To zoom out, double-click on the time line.

5.3. Using TraceView from the command line

To start tracing some code put the following code snippet around it.

The parameter «yourstring» tells the system that it should store the data under «/sdcard/yourstring.trace». To save data on the sdcard your application needs the WRITE_EXTERNAL_STORAGE permission. After running your application you can copy the results from the device via the adb command line tool.

This will start Traceview which allow you to analyze your performance data via a graphical way. The DDMS view has also a trace button available. This will trace the running application and does not require an additional authorization.

6. Exercise: Traceview

6.1. Create example project

Create an Android application with the top level package called com.vogella.android.traceview .

Add the following key to your values/strings.xml file.

Create the following layout file called rowlayout.xml.

Implement the following adapter for your ListView .

Implement a ListView in the activity which shows 1000 random generated strings.

Add the permission to write on external storage to your application.

6.2. Perform trace

Run your application. Afterwards connect to your device via adb and copy the resulting performance trace to your drive. Analyze the result.

6.3. Solve performance problems

Improve the performance based on the measurements of Traceview. Here are some pointers what to improve.

Replace the bold styling in the getView() method with the corresponding android:textStyle=»bold attribute in your layout to avoid the Html.fromHtml() call.

Move the sorting to another place

Reuse convertView in your Adapter, if not null

Avoid the findViewById() method call by using the HolderPattern in your ListView

The layout is also not optimized. We reuse this exercise in the exercise for the HierarchyView

7. Hierarchy Viewer

The Hierarchy View perspective allows you to visualize the View hierarchy of your Android application and helps you to identify unnecessary layers in this hierarchy.

You can open the Hierarchy View via Window Open Perspective Other…​ Hierarchy View

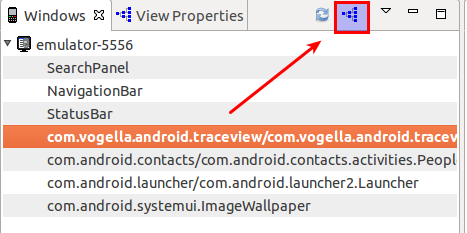
In the Windows view you can select the process for which you want to analyze the view hierarchy.

The currently active layout is analyzed and displayed.

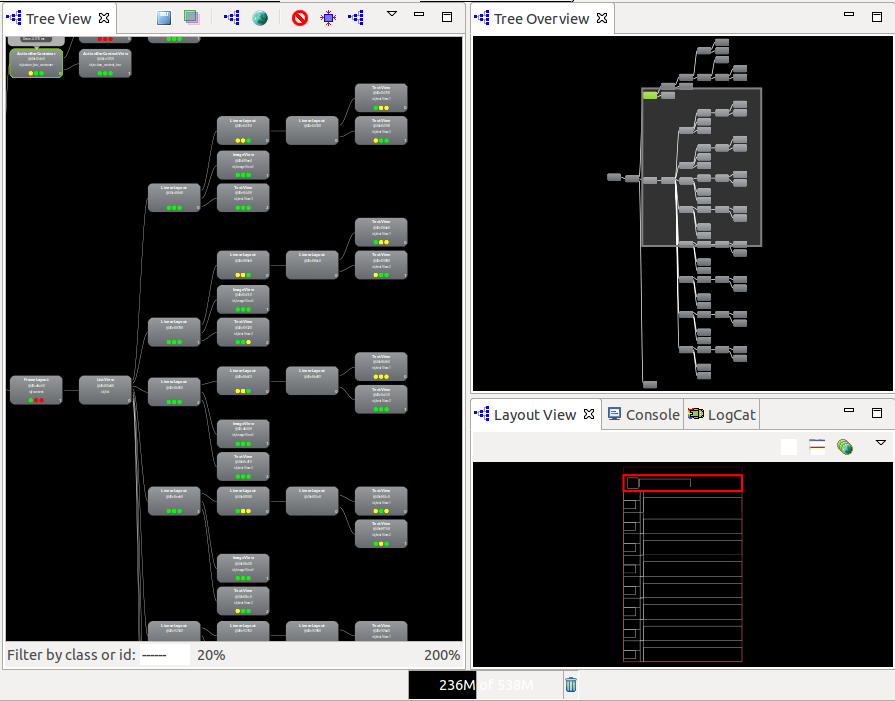
The Tree View view show three light bulbs for the views. The first one indicates the time for calculating the size of the view, the second one indicates the time for creating the layout and the third one for drawing the view. Performance intensive work is indicated with the yellow or red color.

Читайте также:  Android tv dongle airplay

8. Exercise: Hierarchy Viewer

Continue to use the same example as in the Traceview Excercise. Open the Hierarchy View perspective and analyze the view layer.

While none of these layout layers is very performance intensive it contains redundant layers and unnecessary views. Remove the unnecessary view layers.

9. Layout optimization

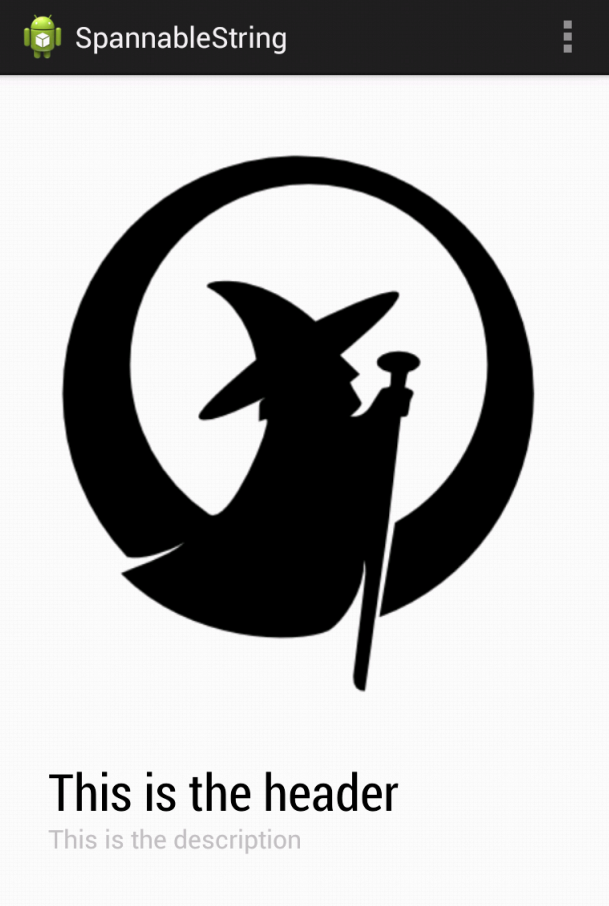
You should optimize your layout. The following gives an example how to use FrameLayout with an ImageView and one TextView to create result despicted in the next screenshot. It uses the possibility to position the TextView in the layout and to style parts of its text content differently.

Create a project called com.vogella.android.textview.spannablestring.

Add two news styles to your styles.xml file.

Create the following layout.

Style your text in the TextView via separate TextAppearanceSpan as demonstrated in the following code.

The resulting layout is much faster than a layout based on RelativeLayout . Also HTML styling was avoid as the HTML parser is relatively expensive.

10. Memory Dumps

You can create a memory snapshot and analyze it with the https://www.vogella.com/tutorials/EclipseMemoryAnalyzer/article.html — Eclipse Memory Analyzer.

11. Systrace

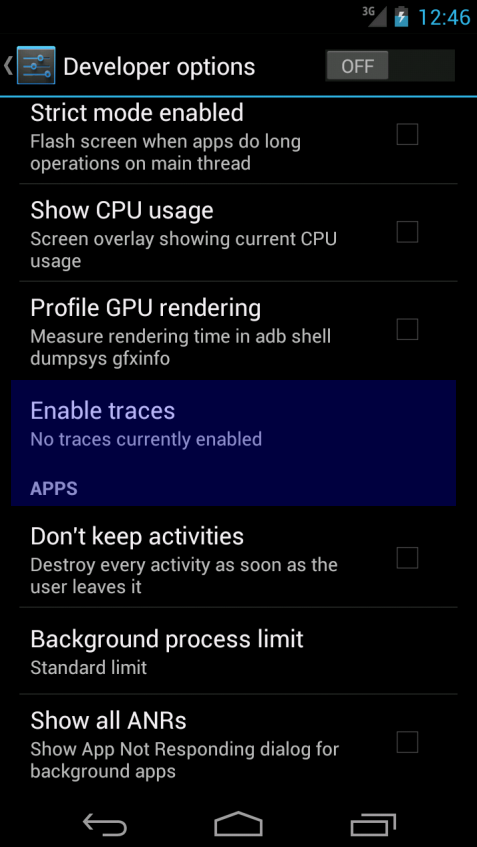
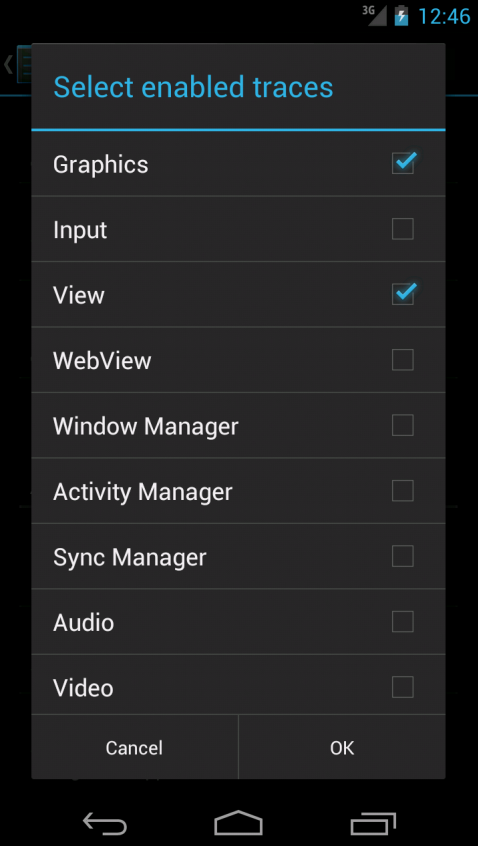
Systrace allows to measure the performance directly at kernel level. To enable systrace, select the Developer options and select the Enable traces entry. In the next dialog you can define what type of events should be profiled, e.g. Graphics and View.

To use systrace, open a terminal and run systrace.py from the android_sdk_installdir/tools/systrace directory. You may have to set it to executable (chmod a+x systrace.py on Linux).

You can also start Systrace directly from Eclipse via the DDMS perspective.

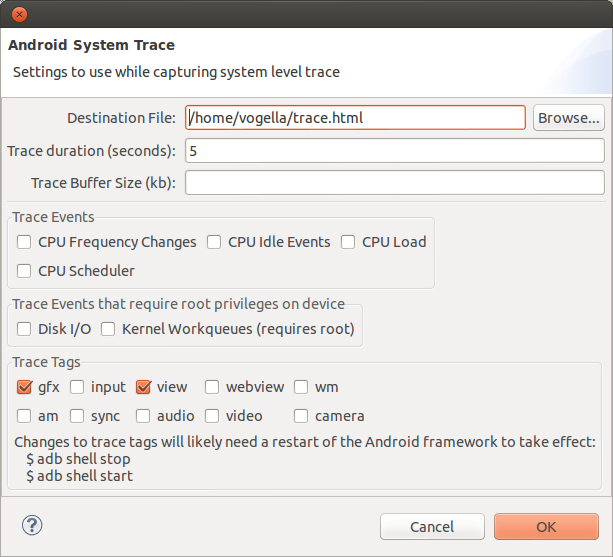
Systrace captures events for 5 seconds. As result Systrace creates a HTML file which allows you to analyze potential issues.

12. Simulating pixel density

You can use the command line to simulate different device densities and display resolutions.

This allows you to use a device with a high device density and resolution to simulate other devices.

13. Android templates

You can define your own templates for the Android project creation wizard. See the following links for more information.

14. Profile GPU rendering

In the Developer options in the Setting or your Android device you can activate Profile GPU rendering. With this option the system tracks the time it took to draw the last 128 frames.

After activating this and restarting your application you can get the information via the following command.

To measure the frame rate of your application, e.g. by scrolling on a list view. In most cases you need to interact with your application to trigger that it re-draws itself.

In the resulting log, look for a section called Profile data in ms.

15. Analyzing Overdraw

Overdraw happens if you draw something on top of something else. For example an activity has a Window as background. If a TextView it added to the application, the TextView is drawn on top of the Window .

Overdrawn is therefore intended to happen. But unnecessary overdraw should be avoid to have the best performance possible.

Unnecessary overdraw can be caused by complex view hierarchies. In general a 2x overdraw (a pixel gets drawn three times) is standard and expected but more should be avoided.

You can enable a visualization of overdraw via the Development Settings with the Show GPU overdraw setting. This section adds colors to your screen based on the number of overdraws. The following table explains the used color schema.

Table 1. Overdrawn colors

1x overdraw, pixel was painted twice

3x, might indicate a problem, small red areas are still ok

4x, pixel was pained 5 times or more, indicates a problem.

After visualization of potential problematic areas, you can analyze your View hierarchy with the Hierarchy Viewer .

16. Useful open source tools for application analysis

16.1. Using Leak Canary to find memory leaks

Leak Canary can be integrated into an Android application and can detect automatically leaks of activities and fragments. The usage is very simple, you add it as dependency to your Gradle build file and initialize the library in your application class. This registers a life cycle listener for your activities and traces if their destroy method is called in the right point in time.

As Leak Canary is an Open Source project it is likely to change very quickly. See https://github.com/square/leakcanary — Leak Canarys Github page for instructions how to use it.

16.2. Using AndroidDevMetrics to display performance data

AndroidDevMetrics you can see how fast the most common operations like object initialization (in Dagger 2 graph), or Activity lifecycle methods (onCreate(), onStart(), onResume()) are.

Источник

Ensure High-Quality Android Code With Static Analysis Tools

In today’s tutorial, we’ll learn about how to ensure high-quality Android code in our projects using some static code analysis tools for Java. We’ll look at Checkstyle, FindBugs, PMD, and Android Studio Lint—all of them free and open source!

What Are Static Code Analysis Tools?

These are tools that parse and analyse your source code without actually executing it. The goal is to find potential vulnerabilities such as bugs and security flaws. A popular free static code analyser such as FindBugs checks your code against a set of rules which your code should adhere to—if the code doesn’t follow these rules, it’s a sign that something may be wrong. Think of static code analysis tools as an additional compiler that is run before the final compilation into the system language.

Many software companies are requiring projects to pass static code analysis tests, in addition to doing code reviews and unit testing in the build process. Even maintainers of open-source projects often include one or more static code analysis steps in the build process. So learning about static analysis is an important step in writing quality code. Be aware that static code analysis—also known as «white-box» testing—should not be seen as a replacement for unit testing of your source code.

In this tutorial, we’re going to learn about some popular static analysis tools that are available for Android and Java. But first, let’s see some of the benefits of using static analysis.

Benefits

  • Helps detect potential bugs that even unit or manual testing might have missed.
  • Defines project-specific rules. For example, static analysis as part of the build chain helps newcomers get up to speed with the code standards of their new team.
  • Helps you improve your knowledge of a new language.
  • Scans your whole project, including files that you might not have ever read.

Setup

All the code analysis tools we’ll learn about in this tutorial are available as Gradle plugins, so we can create individual Gradle tasks for each of them. Let’s use a single Gradle file that will include them all. But before that, let’s create a folder that will contain all of our files for the static code analysis.

Open Android Studio and inside the app module (in Project view), create a new folder and name it code_quality_tools. This folder will contain the XML files for the code analysis tools, and it will also have a Gradle file, quality.gradle, which will run our static analysis tasks.

Finally, visit your build.gradle in the app module folder and include this line at the end of the file:

Here, our quality.gradle Gradle script is being applied with a reference to its local file location.

Checkstyle

Given rules you specify in an XML file to enforce a coding standard for your project, Checkstyle enforces those rules by analysing your source code and compares them against known coding standards or conventions.

Checkstyle is an open-source tool that is actively maintained by the community. This means you can create your own custom checks or modify existing ones to suit your needs. For example, Checkstyle can run a check on the constant names (final, static, or both) in your classes. If your constant names do not stick to a rule of being in uppercase with words separated by an underscore, the problem will be flagged in the final report.

Integrating Checkstyle

I’ll show you how to integrate Checkstyle into our Android Studio project and demonstrate a practical example.

First, we need to create our coding rules. Inside checkstyle.xml, we create some Checkstyle configuration rules that will be run against our code.

In the above code, we include the rules or checks we want Checkstyle to validate in our source code. One rule is AvoidStarImport which, as the name says, checks if your source code included an import statement like java.util.* . (Instead, you should explicitly specify the package to import, e.g. java.util.Observable .)

Some rules have properties, which we can set just like we did for ParameterNumber—this limits the number of parameters of a method or constructor. By default, the property max is 7, but we changed it to 6 instead. Take a look at some of the other checks on the Checkstyle website.

To run this check, we need to create a Gradle task. So visit the quality.gradle file and create a task called checkstyle:

Notice that in the code above, we first applied the Checkstyle Gradle plugin. We gave it a description and added it to an already predefined Gradle group called verification.

The key properties of the Checkstyle Gradle task we are concerned with are:

  • configFile: the Checkstyle configuration file to use.
  • IgnoreFailures: whether or not to allow the build to continue if there are warnings.
  • include: the set of include patterns.
  • exclude: the set of exclude patterns. In this case, we don’t scan generated classes.

Finally, you can run the Gradle script by visiting the Gradle tool window on Android Studio, opening the verification group, and then clicking on checkstyle to run the task.

Another way is to use the command line:

After the task has finished running, a report will be generated, which is available at app module > build > reports > checkstyle. You can open checkstyle.html to view the report.

A Checkstyle plugin is freely available for Android Studio or IntelliJ IDEA. It offers real-time scanning of your Java files.

PMD is another open-source code analysis tool that analyzes your source code. It finds common flaws like unused variables, empty catch blocks, unnecessary object creation and so on. PMD has many rule sets you can choose from. An example of a rule which is part of the Design Rules set is:

  • SimplifyBooleanExpressions : avoid unnecessary comparisons in boolean expressions which complicate simple code. An example:

PMD is configured with the pmd.xml file. Inside it, we’ll include some configuration rules such as the ones for Android, Naming, and Design.

As we did for Checkstyle, we also need to create a PMD Gradle task for the check to be executed inside the quality.gradle file.

PMD is also available as a Gradle plugin.

The key properties of the task we’ve created are:

  • ruleSetFiles: The custom rule set files to be used.
  • source: The source for this task.
  • reports: The reports to be generated by this task.

Finally, you can run the Gradle script by visiting the Gradle tool window, opening the verification group folder, and then clicking on pmd to run the task. Or you can run it via the command line:

A report will also be generated after the execution of the task which is available at app module > build > reports > pmd. There is also a PMD plugin available for IntelliJ or Android Studio for you to download and integrate if you want.

FindBugs

FindBugs is another free static analysis tool which analyses your class looking for potential problems by checking your bytecodes against a known list of bug patterns. Some of them are:

  • Class defines hashCode() but not equals(): A class implements the hashCode() method but not equals()—therefore two instances might be equal but not have the same hash codes. This falls under the bad practice category.
  • Bad comparison of int value with long constant: The code is comparing an int value with a long constant that is outside the range of values that can be represented as an int value. This comparison is vacuous and possibly will yield an unexpected result. This falls under the correctness category.
  • TestCase has no tests: class is a JUnit TestCase but has not implemented any test methods. This pattern is also under the correctness category.

FindBugs is an open-source project, so you can view, contribute or monitor the progress of the source code on GitHub.

In the findbugs-exclude.xml file, we want to prevent FindBugs from scanning some classes (using regular expressions) in our projects, such as auto-generated resource classes and auto-generated manifest classes. Also, if you use Dagger, we want FindBugs not to check the generated Dagger classes. We can also tell FindBugs to ignore some rules if we want.

And finally, we’ll include the findbugs task in quality.gradle:

In the first line above, we applied FindBugs as a Gradle Plugin and then created a task called findbugs . The key properties of the findbugs task we are really concerned with are:

  • classes : the classes to be analyzed.
  • effort : the analysis effort level. The value specified should be one of min , default , or max . Be aware that higher levels increase precision and find more bugs at the cost of running time and memory consumption.
  • reportLevel : the priority threshold for reporting bugs. If set to low, all bugs are reported. If set to medium (the default), medium and high priority bugs are reported. If set to high, only high priority bugs are reported.
  • excludeFilter : the filename of a filter specifying bugs to exclude from being reported, which we have created already.

You can then run the Gradle script by visiting the Gradle tool window, opening the verification group folder, and then clicking on findbugs to run the task. Or launch it from the command line:

A report will also be generated when the task has finished executing. This will be available at app module > build > reports > findbugs. The FindBugs plugin is another freely available plugin for download and integration with either IntelliJ IDEA or Android Studio.

Android Lint

Lint is another code analysis tool, but this one comes with Android Studio by default. It checks your Android project source files for potential bugs and optimizations for correctness, security, performance, usability, accessibility, and internationalization.

To configure Lint, you have to include the lintOptions <> block in your module-level build.gradle file:

The key Lint options we are concerned with are:

  • abortOnError : whether lint should set the exit code of the process if errors are found.
  • quiet : whether to turn off analysis progress reporting.
  • lintConfig : the default configuration file to use.

Your lint.xml file can include issues you want Lint to ignore or modify, such as the example below:

You can run Lint manually from Android Studio by clicking on the Analyze menu, choosing Inspect Code. (the inspection scope is the whole project), and then clicking on the OK button to proceed.

You can also run Lint by visiting the Gradle tool window, opening the verification group, and then clicking on lint. Finally, you can run it via the command line.

On Linux or Mac:

A report will also be generated when the task has finished executing, which is available at app module > build > outputs > lint-results.html.

Bonus: StrictMode

StrictMode is a developer tool that helps prevent developers of your project doing any accidental flash I/O or network I/O on the main thread, because this can lead to the app being sluggish or unresponsive. It also helps in preventing ANR (App Not Responding) dialogs from showing up. With StrictMode issues corrected, your app will become more responsive and the user will enjoy a smoother experience. StrictMode uses two sets of policies to enforce its rules:

  • VM Policies: guards against bad coding practices such as not closing SQLiteCursor objects or any Closeable object that was created.
  • ThreadPolicies: looks out for operations such as flash I/O and network I/O being performed on the main application thread instead of on a background thread.

The code above can be either in your Application, Activity, or other application component’s onCreate() method.

You can learn more about StrictMode here on Envato Tuts+.

A sample Android project implementing all of the above including rule sets of the tools for a typical Android project can be found in this post’s GitHub repo.

Conclusion

In this tutorial, you learned about how to ensure high-quality Android code using static code analysis tools: what they are, benefits of using them, and how to use Checkstyle, FindBugs, Lint, PMD, and StrictMode in your application. Go ahead and give these tools a try—you might discover some problems in your code that you never expected.

In the meantime, check out some of our other courses and tutorials on Android app development!

Источник

Читайте также:  Восстановить только что удаленную смс андроид
Оцените статью
Color Meaning