- MemoryInfo — Swapfile Check
- Инструкция к MemoryInfo Swapfile Check
- And memory для android
- Анализ памяти для Android приложений
- Инструменты
- Пример: Отладка утечки памяти
- Исследование кучи с помощью DDMS
- Создание дампа кучи
- Анализ дампа кучи при помощи MAT
- Сравнение дампов кучи с помощью MAT
- Memory Leaks in details in Android
- Avoid memory leaks and make a super-high-quality, memory-efficient Android app.
- How memory works in android?
- # Stack memory
- # Heap Memory
- So What is memory Leaks?
- Why we should care about memory leak?
- How you will detect memory leak?
- Common memory leak scenarios in android and how to fix them
- # Contexts
- Example 01: Singleton Class Reference
- Static Activity or View Reference:
- # Unregistered listeners
- Example 01: LocationManager Reference
- Example 02: Broadcast receiver Reference
- # Inner classes
- Example 01: AsyncTask Reference
- # Anonymous classes
- Example 01: Handler Reference
- Example 02: Retrofit Reference
- Request Large Heap for your app
- Attention !
- So basically to summarize to avoid memory leaks:
- Conclusion
MemoryInfo — Swapfile Check
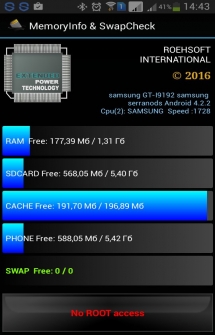

Программа MemoryInfo — Swapfile Check предназначена для проверки совместимости и стабильной работы устройства (и ядра устройства) с программой Roehsoft Swapit Ram Expander они могут использовать его в качестве хранения информации. Программу не продолжать использовать, если проверка совместимости предложит не использовать для вашего устройства, иначе устройство выйдет из строя. Примечание для теста: менеджер памяти не должен быть включен.
К сожалению, некоторые Android устройства не имеют привилегии суперпользователя (нужно делать root), некоторым программам и играм нужно больше виртуальной памяти, некоторые производители заблокировали или отключили эту функцию ядра (нужна тогда прошивать ядро). Чтобы узнать, что ваше устройство совместимо с Roehsoft SWAPit RAM EXPANDER при тестировании программа требует права администратора, согласно кнопке Test получает ее 100Mb и тестирует устройство, представленную большой файл подкачки, теперь у вас есть 5 минут, чтобы проверить устройство, если ваше устройство является неустойчивым, как некоторые телефоны к сожалению так, причина этого кроется в модулях, составленных без поддержки подкачки от производителя. Старайтесь активно протестить свои программы на протяжении 5 минут, и на экране появляется сообщение с удачливым тестом или нет, потом можно и установить по запросу непосредственно Swapit Ram Expander , затем можно получить до 2,5 ГБ виртуальной памяти.
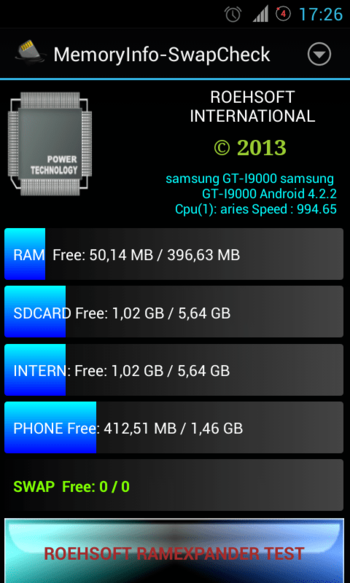
Инструкция к MemoryInfo Swapfile Check
Запустите программу и выберите «ROEHSOFT RAMEXPANDER TEST
Дайте права суперпользователя программе
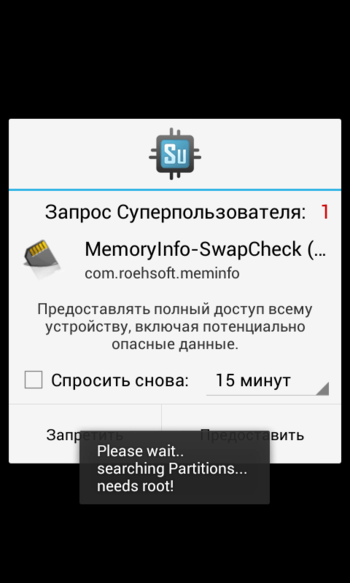
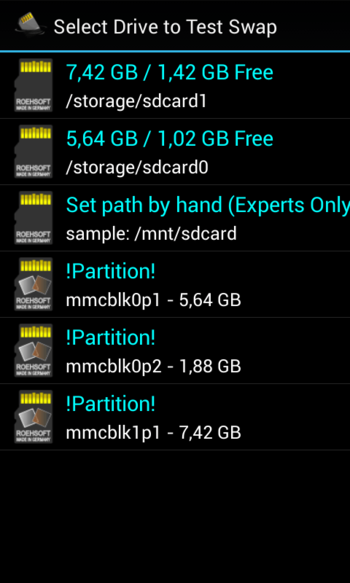
Выберите место для проверки
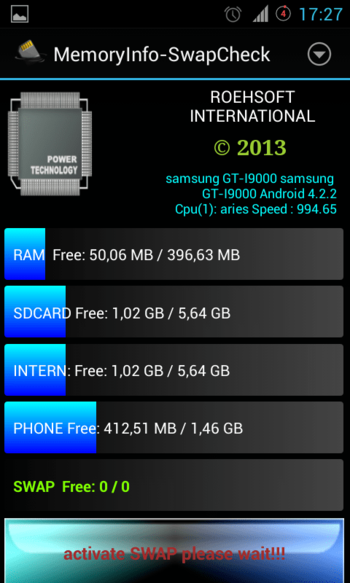
Теперь немного подождите
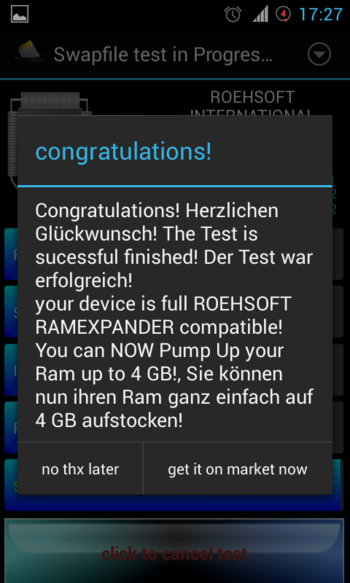
Если вы видите такое сообщение, значит swap поддерживается. Если нет, значит не поддерживается
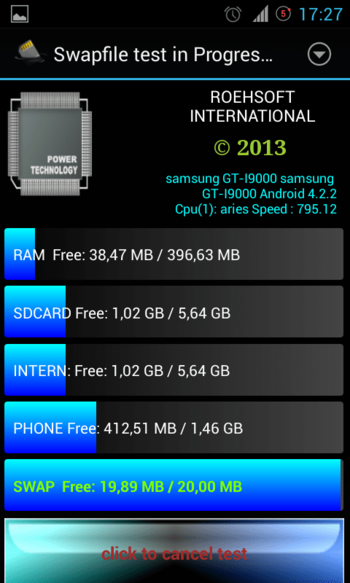
Теперь нажмите «click to cancel test
Скачать приложение MemoryInfo — Swapfile Check для Андроид вы можете по ссылке ниже
Разработчик: ROEHSOFT
Платформа: Android 1.6.x и выше
Язык интерфейса: Английский
Состояние: Free (Бесплатно)
Root: Нужен
Источник
And memory для android

Краткое описание:
Типо FarCry на Андроид с китайского разработчика
Описание:
Bright Memory ставит вас в роли главной героини по имени Селия, которая является агентом супернациональной организации научных исследований. Существует террористическая группировка, известная как SCI, возглавляемая человеком по имени Картер в поисках мощных артефактов. Вы должны остановить их, используя все, что у вас есть. Вы получаете много, пока у вас есть доступ только к трем ружьям: пистолет-пулемет и пистолет.
Графически игра является самой привлекательной игрой на Android, которая построена с использованием Unreal Engine 4, Вы будете удивлены, узнав, что эта игра сделана только одним разработчиком.

Google Play: https://play.google.com/store/apps/details?id=com.FYQD.BrightMemory
Русский интерфейс: Нет
Системные требования:
System: Android 9.0 or above
— Minimum CPU : Snapdragon 820
— Recommend CPU : Snapdragon 855 / Kirin 980
Скачать:
Версия: 1.01 Только arm64 (Макс.hackdog)
Версия: 1.0 Google Play (Мироха)
Версия: 1.3 — beta Bright Memory Mobile (Макс.hackdog)
версия: 1.3 — beta Bright Memory v1.3.apk ( 36.43 МБ )
С запросами на обновление игры обращайтесь в тему Обновите игру!
Перед установкой просьба ознакомиться с темой Установка игр с кэшем [FAQ]
sdcard/Android/obb
Goolge Drive
версия: 1.0Bright Memory Mobile v1.0.apk ( 37.14 МБ )
Источник
Анализ памяти для Android приложений
В Dalvik есть сборщик мусора, но это не значит, что можно игнорировать управление памятью. Даже наоборот — нужно быть особенно внимательным при использовании памяти, которая, как известно, на мобильных устройствах ограничена. В этой статье будут рассмотрены инструменты, которые значительно помогают следить за тем, как приложение использует память.
Некоторые проблемы от чрезмерного использования памяти вполне очевидны. Например, в вашем приложении постоянно происходит утечка памяти, когда пользователь прикасается к экрану, тогда это в конечном итоге, возможно, вызовет OutOfMemoryError, и произойдет сбой и закрытие приложения. Другие проблемы, более тонкие, чем эта могут приводить к общему спаду производительности приложения и системы в целом (потому что сборщик мусора будет вызываться более часто и на более продолжительное время).
Инструменты
Android SDK обеспечивает два основных устройства для профилирования использования памяти приложением: вкладка Allocation Tracker в DDMS и дампы кучи (heap dumps). Allocation Tracker может быть полезен в том случае, когда вы хотите узнать об использовании памяти в конкретный период времени, так как он не дает информации о полном состояния кучи, которая выделяется под приложение. За более подробной информацией об Allocation Tracker можно обратиться к статье Tracking Memory Allocations. Остальная часть этой статьи будет посвящена исследования дампов кучи, так как это более мощный инструмент.
Дамп кучи — это снимок состояния всей кучи приложения, который хранится в бинарном файле, формата HPROF. Dalvik использует формат, который похож на тот, который используется инструментом HPROF в Java, но не является точно таким же.
Есть несколько способов создать дамп кучи выполняющегося Android приложения. Первый — использовать кнопку Dump HPROF file в DDMS. Если вам нужно выбрать момент создания дампа более точно, то можно создать его программно, при помощи метода android.os.Debug.dumpHprofData().
Для анализа можно использовать стандартный инструмент jhat или Eclipse Memory Analyzer (MAT). Однако, сначала нужно конвертировать .hprof файл из Dalvik формата в J2SE HPROF формат. Для этого используется утилита hprof-conv, которая поставляется с Android SDK:
Пример: Отладка утечки памяти
В Dalvik программист не размещает что-либо явно в свободную память, поэтому могут возникать утечки, как в языках C и C++. Под «утечкой памяти» обычно понимают ситуацию, при которой вы продолжаете ссылаться на объект, который больше не нужен. Иногда, одна единственная ссылка может предотвратить вызов сборщика мусора для удаления большого набора объектов.
Давайте рассмотрим приложение Honeycomb Gallery sample app из Android SDK. Это простая фотогалерея, которая демонстрирует использование неких методов нового API в Honeycomb. Сейчас мы преднамеренно создадим утечку памяти, чтобы затем продемонстрировать метод отладки.

Представим себе, что мы хотим, чтобы приложение получало изображения по сети. Чтобы сделать его более отзывчивым к пользователю, возможно, стоит реализовать кэш для хранения недавно просмотренных изображений. Мы можем это сделать, внеся некоторые изменения в ContentFragment.java. В начале класса объявим и инициализируем новую переменную:
В этом отображении мы будем кэшировать загруженные Bitmap’ы. Теперь можно изменить метод updateContentAndRecycleBitmap() для проверки кэша перед загрузкой и добавления Bitmap’ов в кэш после загрузки:
Здесь я преднамеренно создал утечку памяти: Bitmap’ы добавляются в кэш, но не удаляются из него. В реальном приложении очевидно, что размер кэша нужно ограничивать.
Исследование кучи с помощью DDMS
Dalvik Debug Monitor Server (DDMS) — это один из главных инструментов для отладки в Android. Он является частью плагина ADT к среде разработки Eclipse, его также можно найти в папке tools/ вашего Android SDK. Для более подробной информации можно прочесть Using DDMS.
Давайте используем DDMS для анализа использования кучи нашим приложением. Вы можете запустить DDMS двумя способами:
- Из Eclipse: Window -> Open Perspective -> Other… > DDMS
- Из командной строки: запустите ddms (или ./ddms на Mac/Linux) в папке tools/
Выберите процесс com.example.android.hcgallery в левой панели и кликните на кнопку Show heap updates на панели инструментов. Затем переключитесь на вкладку VM Heap в DDMS. Вы увидите некоторую базовую информацию об использовании кучи, которая будет обновляться при каждом вызове сборщика мусора. Чтобы увидеть первое обновление, кликните на кнопку Cause GC.
Можно заметить, что «живые» объекты занимают в памяти чуть меньше 8Мб (см. на колонку Allocated ). Теперь пролистаем фотографии, и можно будет увидеть, как это число увеличивается. Так как в приложении всего 13 фотографий, то утечка памяти ограничена. В некотором смысле, это наихудший случай, который может получиться, поэтому здесь никогда не будет OutOfMemoryError.
Создание дампа кучи
Кликните по кнопке Dump HPROF file в панели инструментов DDMS, выберите место сохранения файла, и сконвертируйте его, используя утилиту hprof-conv. В этом примере, мы будем использовать отдельную версию MAT (1.0.1), её можно скачать здесь.
Если вы используете Eclipse, с установленным MAT, то после нажатия на кнопку «dump HPROF», файл автоматически конвертируется и откроется в окне Ecilpse.
Анализ дампа кучи при помощи MAT
Запустите MAT и загрузите HPROF-файл, который был только что создан. MAT — мощная утилита, и разъяснение всех её особенностей вне этого топика, поэтому я объясню только один из методов как можно определить утечку — при помощи вида «Гистограмма» (Histogram view). В этом виде можно увидеть список классов, отсортированных по числу экземпляров, shallow heap (общий размер памяти, занимаемый экземплярами), или retained heap (общая память, занимаемая экземплярами и объектами, на которые они ссылаются).
Если отсортировать по shallow heap, то можно увидеть, что вверху окажется число экземпляров byte[]. В Android 3.0 Bitmap’ы представляются в виде массивов из байтов, размер которых зависит от размера Bitmap’a. То есть понятно, что они представляют память, которая занимается нашими Bitmap’ами. Щелкните правой кнопкой на классе byte[] и выберите List Objects > with incoming references. Вы увидите список всех массивов из байтов, размещенных в куче.
Выберите один из больших объектов и раскройте его. В итоге вы увидите всю цепочку ссылок, которая образуется из-за этого объекта. Вот он — наш кэш для Bitmap’ов!
MAT не может дать точную информацию является ли это утечкой, так как он не знает, нужны ли эти объекты. Ответ знает только программист. В нашем случае, кэш очень большой, сравнительно со всем приложением, поэтому логично было бы ограничить его размер.
Сравнение дампов кучи с помощью MAT
При отладке утечек памяти, бывает полезно сравнить состояние кучи в разные моменты времени. Чтобы сделать это, создайте два HPROF файла (не забывайте их конвертировать утилитой hprof-conv).
Вот как вы можете сравнить эти два файла:
- Откройте первый файл (File > Open Heap Dump).
- Откройте гистограммный вид.
- В виде истории навигации (Window > Navigation History), щелкните правой кнопкой на histogram и выберите Add to Compare Basket.
- Откройте второй файл и повторите шаги 2 и 3.
- Переключитесь в вид Compare Basket, и кликните Compare the Results (красная иконка восклицательного знака в правом верхнем углу)
Источник
Memory Leaks in details in Android
Avoid memory leaks and make a super-high-quality, memory-efficient Android app.


Most of the time, we get very little time for our project. That’s why we focus in building features, functionalities and the UI components of our apps. We forget to focus on the core issue like performance and quality of the app which is the major part of an application. In this article, we will focus on one of the most important optimization techniques in android: Memory leaks.
The concept of memory leaks is quite daunting for a lot of developers out there. Most of the developers find it is difficult, time-consuming, boring and unnecessary but fortunately, none of these are actually true. Once you start getting into it, you will certainly fall in love with it.
There are a lot of articles on memory leaks and how to fix them. But when I was learning myself, I found that none of them were in one place and it was hard to keep track of it all. So I thought I would collectively post an article on it so that it might help people in the future.
How memory works in android?
Most apps on Android run on top of Android Runtime (ART), which replaced the deprecated Dalvik Virtual Machine(DVM). ART and Dalvik are similar to Java Virtual Machine (JVM) and both of them use two separate memory spaces to store running application and their data — Stack and Heap. Stack and Heap are two major parts of RAM ( RAM stands for Random Access Memory is the memory in android devices/computers). Let’s discuss details about Stack & Heap.

# Stack memory
- The Stack is used for static memory allocation. It is used to store local variables (primitive types and references to objects).
- Stack memory is always referenced in a LIFO (last in, first out) fashion.
- Stack memory is relatively small compared to heap memory.
- The Java stack size on Dalvik is usually 32 KB for Java code and 1 MB for native (C++/JNI) code. ART introduced a unified stack for both Java and C++ that is around 1 MB.
- When an app hits the stack memory limit, StackOverflowError is emitted.
- Whenever a method call is made, a new block (stack frame) with the method’s local variables is pushed to the stack. When the method completes, its stack frame is popped from the stack and any possible result value is pushed back onto the stack.
# Heap Memory
- The Heap is used for dynamic memory allocation.
- To provide a smooth user experience, Android sets a hard limit on the heap size for each running application . The heap size limit varies among devices and is based on how much RAM a device has.
- On Android has a maximum heap size limit (varies for each device) marked as ‘largeHeap’ for every application. You can check the maximum heap size available for your application by calling getMemoryClass() API of ActivityManager service. Most devices running Android 2.3 or later will return this size as 24MB or higher but is limited to 36 MB (depending on the specific device configuration).
- If your app hits this heap limit and tries to allocate more memory, it will receive an OutOfMemoryError and will terminate.
- Heap memory is used to allocate objects. Whenever you create an object, it’s always created in the heap.
- The heap is different from the stack, so the objects will not be reclaimed automatically when the function is done.
- Virtual machines, like JVM (Java Virtual Machine), DVM (Dalvik Virtual Machine) or ART (Android Runtime) has a superhero we called it Garbage Collector who gonna care about detect and reclaimed those unused objects to get more space in the memory.
- The garbage collector is looking for the unreachable objects, in other words, if there is an object in the heap that doesn’t contain any reference to it, it will be released.

So What is memory Leaks?
failure of releasing unused objects from the Heap memory
Why we should care about memory leak?
A memory leak happens when memory is allocated but never freed. This means the garbage collector is not able to take out the trash.
So, when the user keeps on using our app, the heap memory keeps on increasing, a short GC will kick off and try to clear up immediate dead objects. Now, these short GCs run concurrently (on a separate thread), and they don’t slow down your app significantly (2ms to 5ms pause). But remember, the less the garbage collector has to run, the better your app’s performance will be.
If your app has some serious memory leaks hidden under the hood, these short GCs will not be able to reclaim the memory, and the heap will keep on increasing, which will force a larger GC to kick off. This larger GC, called a “stop-the-world” GC, pauses the entire application main thread for around 50ms to 100ms. At this point, your app seriously lags and becomes almost unusable.
If this doesn’t fix the problem, then the heap memory of your app will constantly increase until it reaches a point of death where no more memory can be allocated to your app, leading to the dreaded OutOfMemoryError, which crashes your app.
When you know the impact memory leaks can have on your app, you understand why you need to address them immediately.
How you will detect memory leak?
Now that you know that you need to fix memory leaks hidden inside your app, how will you actually detect them?
- The good thing is that Android Studio has a very useful and powerful tool for this, Android Profiler which replaces the previous Android Monitor tools and comes with Android Studio 3.0 and later. There are monitors not only for memory usage, but for network, CPU, and GPU usage as well.
- Also there is an awesome library called LeakyCanary that is great for finding out the leaks in our app along with the stack trace.
Common memory leak scenarios in android and how to fix them
In my experience, these are some of the most common scenarios that can lead to memory leaks.
# Contexts
Common reason for memory leaks in Android is the misuse of the Context instances. It is very important to understand the difference between the activity-level Context and the application-level Context and which one should be used under what circumstances.
Using the activity Context in the wrong place can keep a reference to the entire activity and cause a potential memory leak.
Example 01: Singleton Class Reference
When you initialize the singleton from an activity, you pass a long-lived context-activity reference to a singleton like below
Then the singleton will hold the activity until the end of the application.
Solution 01: Pass application-context instead of activity-context.
Solution 02: Update singleton class to use the application context when creating the object instead of using getting context from outside.
Solution 03: If you really have to use activity context, then when the activity is destroyed, ensure that the context you passed to the singleton class is set to null.
Static Activity or View Reference:
Consider the below example — You are declaring a TextView as static (for whatever reason). If you reference an activity or view directly or indirectly from a static reference, the activity would not be garbage collected after it is destroyed.
Solution: Always remember to NEVER use static variables for views or activities or contexts.
# Unregistered listeners
There are many situations where you register a listener in your Activity (or Fragment) but forget to unregister it. This can easily lead to a huge memory leak.
Example 01: LocationManager Reference
Suppose you want to receive location updates in your app. So we need to get the LocationManager system service and register a listener for location updates.
Here we implement the location interface in the activity itself, meaning that the LocationManager will hold a strong reference to our activity. Now when it’s time for your Activity to die, the Android framework will call onDestroy() on it, but the garbage collector will not be able to remove the instance from memory, resulting in memory being leaked.
Solution: Just unregister the listener in the onDestroy() method and you are good to go.
Example 02: Broadcast receiver Reference
Suppose we need to register a local broadcast receiver in your activity. But if we don’t unregister the broadcast receiver, then it still holds a reference to the activity, even if you close the activity.
Solution: Always remember to call unregister receiver in onStop() of the activity.
# Inner classes
Inner classes are very common in Java and are used by many Android developers for various tasks because of their simplicity. But with improper usage, these inner classes can also lead to potential memory leaks.
Example 01: AsyncTask Reference
It is a very simple Activity which starts a long running task in a background thread (maybe a complex database query or a slow network call). After the task is finished, the result is shown in a TextView. Seems all good?
But this will generate a leak if you leave the activity and the task didn’t finish as the non-static inner class holds an implicit reference to the outer enclosing class (that is, the Activity itself).
- Transformed the non-static inner class to a static inner class as static inner classes don’t hold any implicit reference to its enclosing outer class.
- Pass required objects references to the inner class through its constructor as static class can’t accept the non-static variables (like the TextView) of the outer class.
- Cancel the async task in onDestory() .
- Need one more step. Don’t forget to wrap these object references in a WeakReference to prevent further memory leaks as our reference to the t extView is still strong and has the ability to keep the instance alive preventing garbage collection.
So the solution is:
Notice that in onPostExecute we have to check for null to verify, if an instance has been reclaimed or not.
# Anonymous classes
Anonymous classes are a favorite tool among developers. In android, every developer uses Anonymous Class (Runnable) at least once in a project. But anonymous classes are nothing but non-static inner classes which can cause potential memory leaks just because of the same reason we talked about before.
Example 01: Handler Reference
Uses handler and Anonymous Runnable class. The memory will be leak when we quit the activity before the Runnable is finished as Any Anonymous Class has a reference to its parent (activity).
Example 02: Retrofit Reference
Here, we are using a very popular library called Retrofit, which is used for making a network call and displaying the result in a TextView. It is quite evident that the Callable object keeps a reference to the enclosing Activity class. Now if this network call runs on a very slow connection and the Activity is rotated or destroyed somehow before the call ends, then the entire Activity instance will be leaked.
- Don’t do any long operating with Anonymous Class or we need a Static class for it and pass WeakReference into it (such as activity, view. ). Thread is the same with Anonymous Class .
- Cancel the Handler , Timer , Network Call when activity is destroyed.
Request Large Heap for your app
You can’t increase the heap size dynamically. But one immediate solution for dealing with large memory requirements is to request a large Dalvik heap for your app. You can do this by adding android:largeHeap=»true» to your tag in AndroidManifest.xml . But this will not work on any pre Honeycomb devices and there is no guarantee how large the large heap will be.
Attention !
It is strongly advised that you don’t use a large heap just to allow higher memory usage. You should always optimize your memory usage, because —
F irstly, a large heap on low-memory, low-end devices can still be too small for your application.
Secondly, using this may adversely affect your app performance. Because you are telling system to increase the maximum heap limit. When this happens it will take more time for garbage collection. If you check the log you can see that GC Pause time will be greater. Ideally it should be between 2–5ms.In this case it can vary even up-to 30–45ms. So don’t set large heap property to true just because you are getting out of memory. Use it as the very last step.Otherwise it will be a performance hit.
So basically to summarize to avoid memory leaks:
- Use applicationContext() instead of activity context when possible. If you really have to use activity context, then when the activity is destroyed, ensure that the context you passed to the class is set to null.
- Always use applicationContext() to create a singleton object and toast message for your application.
- Also you can use applicationContext() for starting any service.
- Make sure to unregister broadcast receivers once their job it’s finished. A good practice is to register inside onResume() method and unregister inside onPause() method
- Cancel any asyncTasks, Timer or Threads inside onDestroy().
- Avoid non-static inner classes in an activity. If really need use static inner class and make a weak reference to the activity inside.
- Never use static variables to declare views or activity context.
- Be careful with the usage of static variables, remember to set them to null once are no longer useful to the application, that way they would be eligible to be garbage collected.
- Always use a weakReference of the activity or view when needed.(There is no need for explicit nulling when using WeakReference)
- Use Android Profiler and LeakCanary to detect memory leaks.
Conclusion
Now we know how memory works in android, what the memory leaks, why we need to avoid them and how we will detect and avoid them.
So let’s start building good quality, high-performance Android apps from now on. Detecting and fixing memory leaks will not only make your app’s user experience better but will slowly turn you into a better developer as well.
Источник


