- How to Create User Interface Login & Register with Android Studio
- Adjustment of several layouts :
- Connect fragments with viewpager
- Регистрируем аккаунт Google на Андроиде
- Как создать аккаунт google на андроиде?
- Краткие итоги
- How to create a new user account on Android
- Creating Your First Account
- Name & Username
- Password, Phone & Privacy
- Google Services & Payment
- Rinse and Repeat
- How to Create User Interface Login & Register with Android Studio
- Adjustment of several layouts :
- Connect fragments with viewpager
How to Create User Interface Login & Register with Android Studio
ok, this is my first article in Medium. In this section, I want to share with you about the User Interface on Android and we will create a Login page and a Register page. Some components that I will use:
1. Viewpager
2. Fragment
3. Edittext
4. Button
5. Textview
6. Imageview
What about the results? let’s coding (follow step by step)
- Of course we must already have an Android Studio. if not, you can download it first on the official Android Studio website. If you already have one, please open your Android studio.
2. We create a new project by clicking “Start a new Android Studio project”. Fill in the application name column with “LoginApp”, then click next.

3. Select the minimum SDK you need or want, then click next.


4. Select “Empty Activity” and click next. After that, the “Activity Name” and “Layout Name” columns will appear, in this section just leave it like that, then click finish.

After you click finish, Android Studio will make you an Application with the name “LoginApp”.
After the application is successfully built, you can simply make adjustments to the following sections:
Open the colors.xml file in app/res/values/colors.xml, and change it like this:
Create a folder with the name “font” in the res folder, by right clicking on the res directory, select new / directory and name it “font”. After that, copy this font into font directory. (download the font 1 and font 2).
Create some Drawable Resource File in the drawable directory, by right-clicking on the drawable directory, select new / Drawable Resource File.
After that open file styles.xml and change like this :
Add the theme property in the Main Activity in the manifest, in the app / manifests / AndroidManifest.xml folder
So the AndroidManifest.xml file will be as follows:
After all the steps above are done, then make 2 fragments with the name fragment_login and fragment_register in the layout directory, by right-clicking on the layout directory, New/Fragment/Fragment (Blank)

Uncheck:
include fragment factory methods? and include interface methods?

Adjustment of several layouts :
change the activity_main.xml layout, fragment_login.xml and fragment_register.xml so that it will be as below
Open the strings.xml file in the res / values / strings.xml directory and change it to something like the following :
So that the overall structure of the project will be as follows :

Connect fragments with viewpager
Create an inner class in the MainActivity.java class with the name AuthenticationPapterAdapter. This class is a derivative of the FragmentPagerAdapter class and serves to connect Fragments with ViewPager,
Then call the class in the onCreate() method in MainActivity.java and connect with viewpager
So the MainActivity.java class will be like this
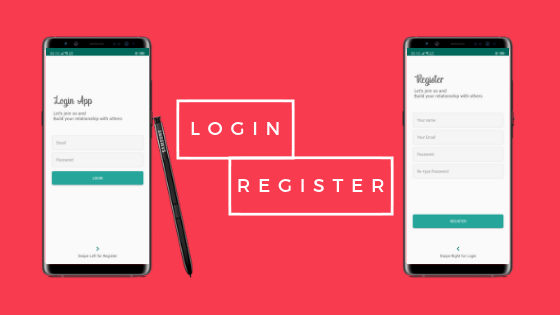
The display of the final application will be like this
Источник
Регистрируем аккаунт Google на Андроиде

Хотя у многих слово «google» ассоциируется лишь с поисковой системой, на самом деле это далеко не так.

Кроме того, что Вы можете использовать продвинутую поисковую систему, вам также доступны множество других полезных сервисов, таких как почта, облачное хранилище, социальная сеть Google+, карты и много других полезных решений.
Именно поэтому в наше время, любой успешный человек просто обязан иметь аккаунт в google. А как именно его создать на вашем android-устройстве, я сегодня и расскажу.
Как создать аккаунт google на андроиде?
Здесь нет ничего сверх нового. Кроме того, в системе android есть продуманное устройство создания и добавления любых аккаунтов. Итак, для того чтобы у вас появился новый аккаунт в Google, вам стоит:
1. Перейти в настройки вашего android-устройства, выбрать раздел Аккаунты. После, пролистайте все имеющийся учетные записи вниз и нажмите на ссылку «Добавить аккаунт». Тип нового аккаунта, который вам нужно выбрать — «Google».

Примечание: способом, подобным ниже описанному, вы можете создать любой аккаунт, просто выбрав в этом пункте нужный.
2. Далее перейдите по ссылке «Или создайте новый аккаунт». Кроме этого, вы также можете просто войти в уже имеющийся аккаунт или же найти имеющийся аккаунт по своему имени и фамилий (нужно еще будет подтвердить, что он Ваш с помощью телефона или почты).

3. Но вернемся к созданию нового аккаунта. Вам нужно ввести ваши имя и фамилию и другие персональные данные. Все, как на картинке ниже.

4. Теперь укажите, какой у вас будет ник в адресе электронной почты. И только после всего этого вам будет предложено ввести еще и пароль для входа (будьте внимательны).

5. Далее, для того чтобы иметь возможность влиять на все внештатные ситуации (такие как, например, утеря пароля), вам нужно прикрепить к аккаунту свой телефон. Выберите в выпадающем списке анаграмму вашей страны и введите свой номер телефона. Подтвердите свой выбор.
SMS придет моментально, а код будет автоматически вбит в поле. Теперь осталось принять условия конфиденциальности: пролистайте вниз и нажмите «Принимаю».

Примечание: вы также можете пропустить этот пункт, просто перейдя к следующему — нажмите «Пропустить».
6. Теперь просто войдите в свой аккаунт, нажав «Далее». Если хотите использовать аккаунт для совершения платежных операций, обязательно добавьте реквизиты платежной карты, как показано на рисунке ниже.

7. Также вы можете создать аккаунт исключительно через браузер. Перейдите по этой ссылке. Затем выполните действия, подобные описанным выше (только в другом интерфейсе). Мне даже показалось, что здесь это сделать более удобно — можете сами убедится.

Краткие итоги
Судя по моему опыту скажу, что сервис Google очень удобен и нужен. Не важно кто вы и чем занимаетесь, у Вас должна быть почта в данном сервисе. В данный момент, наличие электронного ящика именно этого сервиса, считается первой и немаловажной характеристикой серьезного и успешного человека или компании.
Также если Вы решите по какой то причине удалить Ваш аккаунт google рекомендую прочитать данную статью.
Источник
How to create a new user account on Android

Everything you need to know to create a new user account on your Android device.
Signing in with a Google Android account gives you access to loads of great features and services. You can buy and download games, movies and music from the Google Play Store, access Gmail, sign in to YouTube, backup files to Google Drive and much more.
If you’ve just bought a new Android smartphone or tablet and don’t have a Google account – or you want to add a new user account to your device – here’s how you do it.
Creating Your First Account
First, it’s probably worth mentioning Google and Android accounts are one in the same thing. Depending on which Android device you have, during the initial set up process you may be asked if you want to copy your Google account from another android device, sign in, or create a new account.
Related: Best Android phones
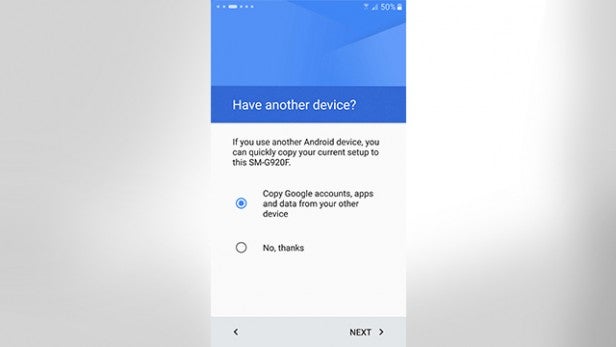
If you don’t have an Android account on your old phone that you can copy across – select ‘No, thanks’ and continue to the next menu where you’ll be prompted to sign in or create a new Google account.
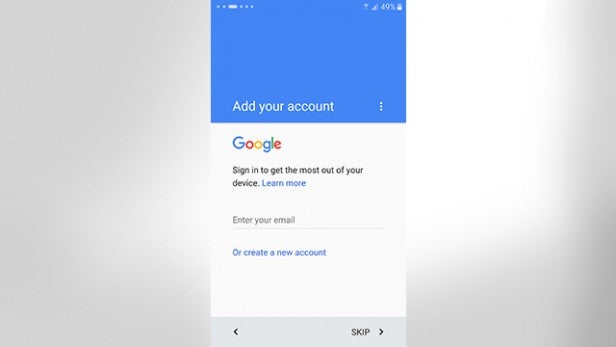
If your phone is already set up and you want to add a Google account, open the Settings app and scroll down to Accounts. At the bottom of the list, tap Add account and then select Google.
If you already have a Google account, you can enter your email and sign in or, if you want to create a new one, tap create a new account.
Name & Username
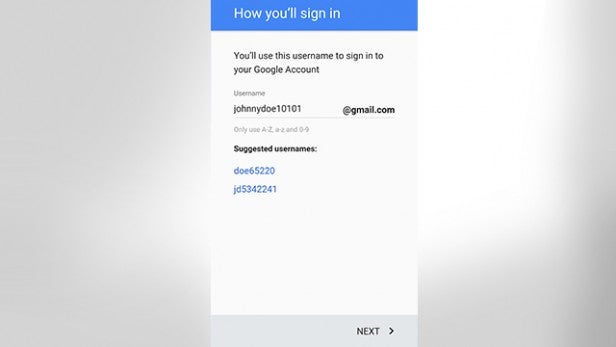
Creating a Google account only takes a couple of minutes. Start by entering your first and last name, tap next, then add a username. This will be used to create a @gmail.com email address you can sign in with. If your chosen username has already been used, Google will helpfully suggest a few alternatives. When you’re happy with your username, tap Next to continue.
Related: Best Android apps
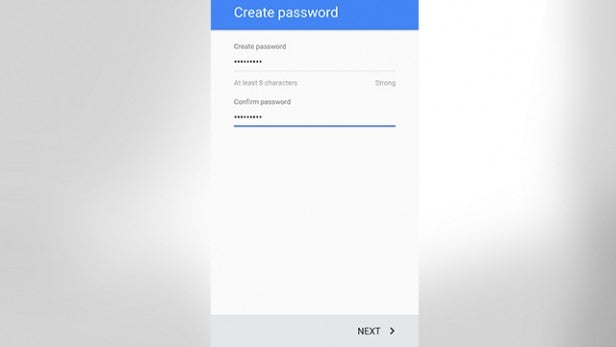
Password, Phone & Privacy
The next job is to enter a password. Google requires a minimum of 8 characters but the longer and more complex you make it, the more secure it will be.
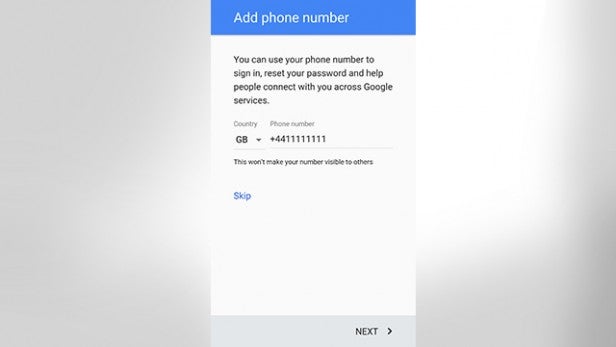
The next menu asks if you would like to add a phone number which can be used to sign in, reset and help others connect with you through Google. If you don’t fancy giving Google your phone number, you can choose to skip this part.
One thing you can’t skip if you want a Google account is their privacy and terms. Have a ‘read’ through the terms and when you reach the end, tap I Agree to continue.
Google Services & Payment
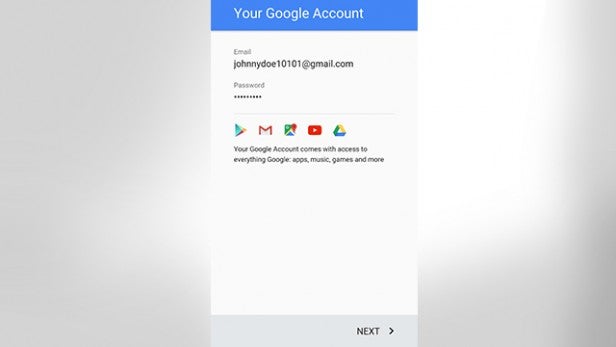
We’re nearly there! You should now see a summary of your Google account details (email and password) and a list of app icons you can use your account with.
The following menu asks if you’d like to be kept up to date with news and offers from the Google Play Store. It’s basically just a newsletter email so feel free to opt out.
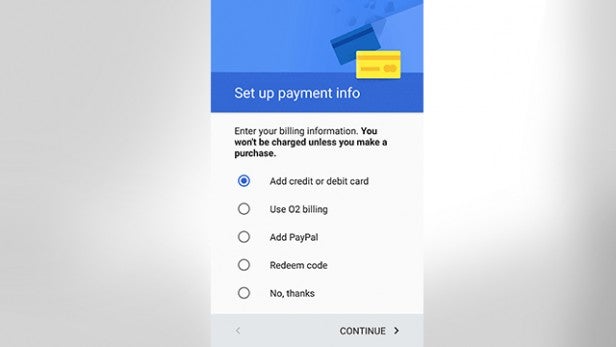
Finally, would you like to enter payment information? It’s up to you, but if you want to rent movies or buy games from the Play Store, you’ll need to have a method of payment set up. You can use a debit or credit card, PayPal, redeem a code, or add any charges to your network/carrier’s bill.
Rinse and Repeat
You can add multiple Google Android accounts to a device, so just repeat this process if you want to add friends or family members’ accounts to the phone or tablet.
Источник
How to Create User Interface Login & Register with Android Studio
ok, this is my first article in Medium. In this section, I want to share with you about the User Interface on Android and we will create a Login page and a Register page. Some components that I will use:
1. Viewpager
2. Fragment
3. Edittext
4. Button
5. Textview
6. Imageview
What about the results? let’s coding (follow step by step)
- Of course we must already have an Android Studio. if not, you can download it first on the official Android Studio website. If you already have one, please open your Android studio.
2. We create a new project by clicking “Start a new Android Studio project”. Fill in the application name column with “LoginApp”, then click next.
3. Select the minimum SDK you need or want, then click next.
4. Select “Empty Activity” and click next. After that, the “Activity Name” and “Layout Name” columns will appear, in this section just leave it like that, then click finish.
After you click finish, Android Studio will make you an Application with the name “LoginApp”.
After the application is successfully built, you can simply make adjustments to the following sections:
Open the colors.xml file in app/res/values/colors.xml, and change it like this:
Create a folder with the name “font” in the res folder, by right clicking on the res directory, select new / directory and name it “font”. After that, copy this font into font directory. (download the font 1 and font 2).
Create some Drawable Resource File in the drawable directory, by right-clicking on the drawable directory, select new / Drawable Resource File.
After that open file styles.xml and change like this :
Add the theme property in the Main Activity in the manifest, in the app / manifests / AndroidManifest.xml folder
So the AndroidManifest.xml file will be as follows:
After all the steps above are done, then make 2 fragments with the name fragment_login and fragment_register in the layout directory, by right-clicking on the layout directory, New/Fragment/Fragment (Blank)
Uncheck:
include fragment factory methods? and include interface methods?
Adjustment of several layouts :
change the activity_main.xml layout, fragment_login.xml and fragment_register.xml so that it will be as below
Open the strings.xml file in the res / values / strings.xml directory and change it to something like the following :
So that the overall structure of the project will be as follows :
Connect fragments with viewpager
Create an inner class in the MainActivity.java class with the name AuthenticationPapterAdapter. This class is a derivative of the FragmentPagerAdapter class and serves to connect Fragments with ViewPager,
Then call the class in the onCreate() method in MainActivity.java and connect with viewpager
So the MainActivity.java class will be like this
The display of the final application will be like this
Источник


