- Android action ringtone picker
- About
- Create an Android Ringtone Picker Using the Ringtonemanager Class
- An introduction to the RingtoneManager class:
- Launching the default ringtone picker using an implicit intent:
- Why do you need a custom ringtone picker?
- Building a ringtone picker activity:
- Preparing our activity to respond to implicit intents:
- Creating the layout of the activity:
- File activity_ringtonepicker :
- File activity_ringtonepicker_scrollview :
- The .java file:
- Declaring global variables:
- How to get the list of tones using RingtoneManager:
- Initialising the mediaPlayer :
- Complete code of the onCreate(. ) method of our activity:
- Populate the RadioGroup using the tones:
- Returning the result when the back button is pressed:
- Handle up button click events:
- Final words:
Android action ringtone picker
Android Ringtone Picker

![]()

![]()
Simple Ringtone Picker dialog which allows you to pick different sounds from ringtone, alarm tone, notification tone and music from external storage.
- Add below dependency into your build.gradle file.
- User RingtonePicker.Builder to build the ringtone picker dialog.
- Pass all the parameters and call RingtonePicker.Builder#show() to display ringtone picker dialog.

- You can download the sample apk from here.
- Any pull request is most welcome. Simple 3 step to contribute into this repo:
- Fork the project.
- Make required changes and commit.
- Generate pull request. Mention all the required description regarding changes you made.
Ringtone picker logo is created by zularizal.
Hit me on twitter ![]()
Copyright 2018 Keval Patel
Licensed under the Apache License, Version 2.0 (the «License»); you may not use this file except in compliance with the License. You may obtain a copy of the License at
Unless required by applicable law or agreed to in writing, software distributed under the License is distributed on an «AS IS» BASIS, WITHOUT WARRANTIES OR CONDITIONS OF ANY KIND, either express or implied. See the License for the specific language governing permissions and limitations under the License.
About
Simple Ringtone Picker dialog which allows you to pick different sounds from ringtone, alarm tone, notification tone and music from external storage.
Источник
Create an Android Ringtone Picker Using the Ringtonemanager Class
In this article, I will show you how to create a ringtone picker using the RingtoneManager class in Android. You will be able to get the list of tones, display them as RadioButton and let the user pick one tone from the list.
I expect you to have a basic knowledge of programming in Android. You should already have set up Android Studio and all the essential components required to build an Android app.
All code in this article will be in Java and not Kotlin.
An introduction to the RingtoneManager class:
Let’s say you are designing an alarm clock app, and you want the user to choose the alarm tone. Android comes with a set of tones that you can display to the user for this purpose. Tones in Android can be classified into a ringtone, alarm tone, and notification tone categories. Android comes with the RingtoneManager class so that you can access these tones.
In order to show the list of tones under one or more categories, you have to send an implicit intent to launch a ringtone picker. The Intent action will be RingtoneManager.ACTION_RINGTONE_PICKER . By default, an Android device comes with an activity that will respond to this intent. You can send the following extras with the intent:
- EXTRA_RINGTONE_DEFAULT_URI
- EXTRA_RINGTONE_EXISTING_URI
- EXTRA_RINGTONE_SHOW_DEFAULT
- EXTRA_RINGTONE_SHOW_SILENT
- EXTRA_RINGTONE_TITLE
- EXTRA_RINGTONE_TYPE
For details on what data these extras should carry, please read the documentation of RingtoneManager class.
When the user has chosen a tone, the ringtone picker will be destroyed and you will get a callback in the onActivityResult(. ) method of the caller activity. The ringtone picker will return RingtoneManager. EXTRA_RINGTONE_PICKED_URI through which you can get the Uri of the tone chosen by the user.
Launching the default ringtone picker using an implicit intent:
The following is a small code snippet showing to invoke the default ringtone picker from an activity using an implicit intent:
In the above snippet, you can see that I have specified the tone type to be alarm by passing TYPE_ALARM with EXTRA_RINGTONE_TYPE . RingtoneManager class allows three types of tones: TYPE_ALARM , TYPE_NOTIFICATION and TYPE_RINGTONE . You can combine these to direct the picker to list tones under more than one category:
Alternatively, you can use TYPE_ALL to list all the available tones.
You can handle the activity result in the following way:
Why do you need a custom ringtone picker?
The default ringtone picker will serve your purpose in most cases. However, sometimes you might want to build a custom ringtone picker. Four reasons why I decided to build a custom ringtone picker:
- I wanted to allow the user to pick a file from storage and use it as a tone. This is not possible in the default picker. One can do this easily from regular activity, but I wanted to add this option at the end of the list of tones.
- If I pass the Uri of a file as EXTRA_RINGTONE_EXISTING_URI that is not among the default tones, I would like the ringtone picker to include it in the list of tones if the file exists.
- The default ringtone picker can be a dialog or an activity. If the user cancels the dialog, you might get a RESULT_CANCELLED in onActivityResult(. ) . As per the requirements of my app, I strictly needed the picker to return a Uri even if the user did not choose any Uri/canceled the picker.
- Let’s say the user selects a file from the device storage as the tone. When the user launches the ringtone picker next time, it should display all such files chosen previously along with the default tones, provided the files still exist.
Note that I will not cover any of the above features in this article. It will not only make the article very lengthy but may also bore you if you have come to learn the basics only.
Building a ringtone picker activity:
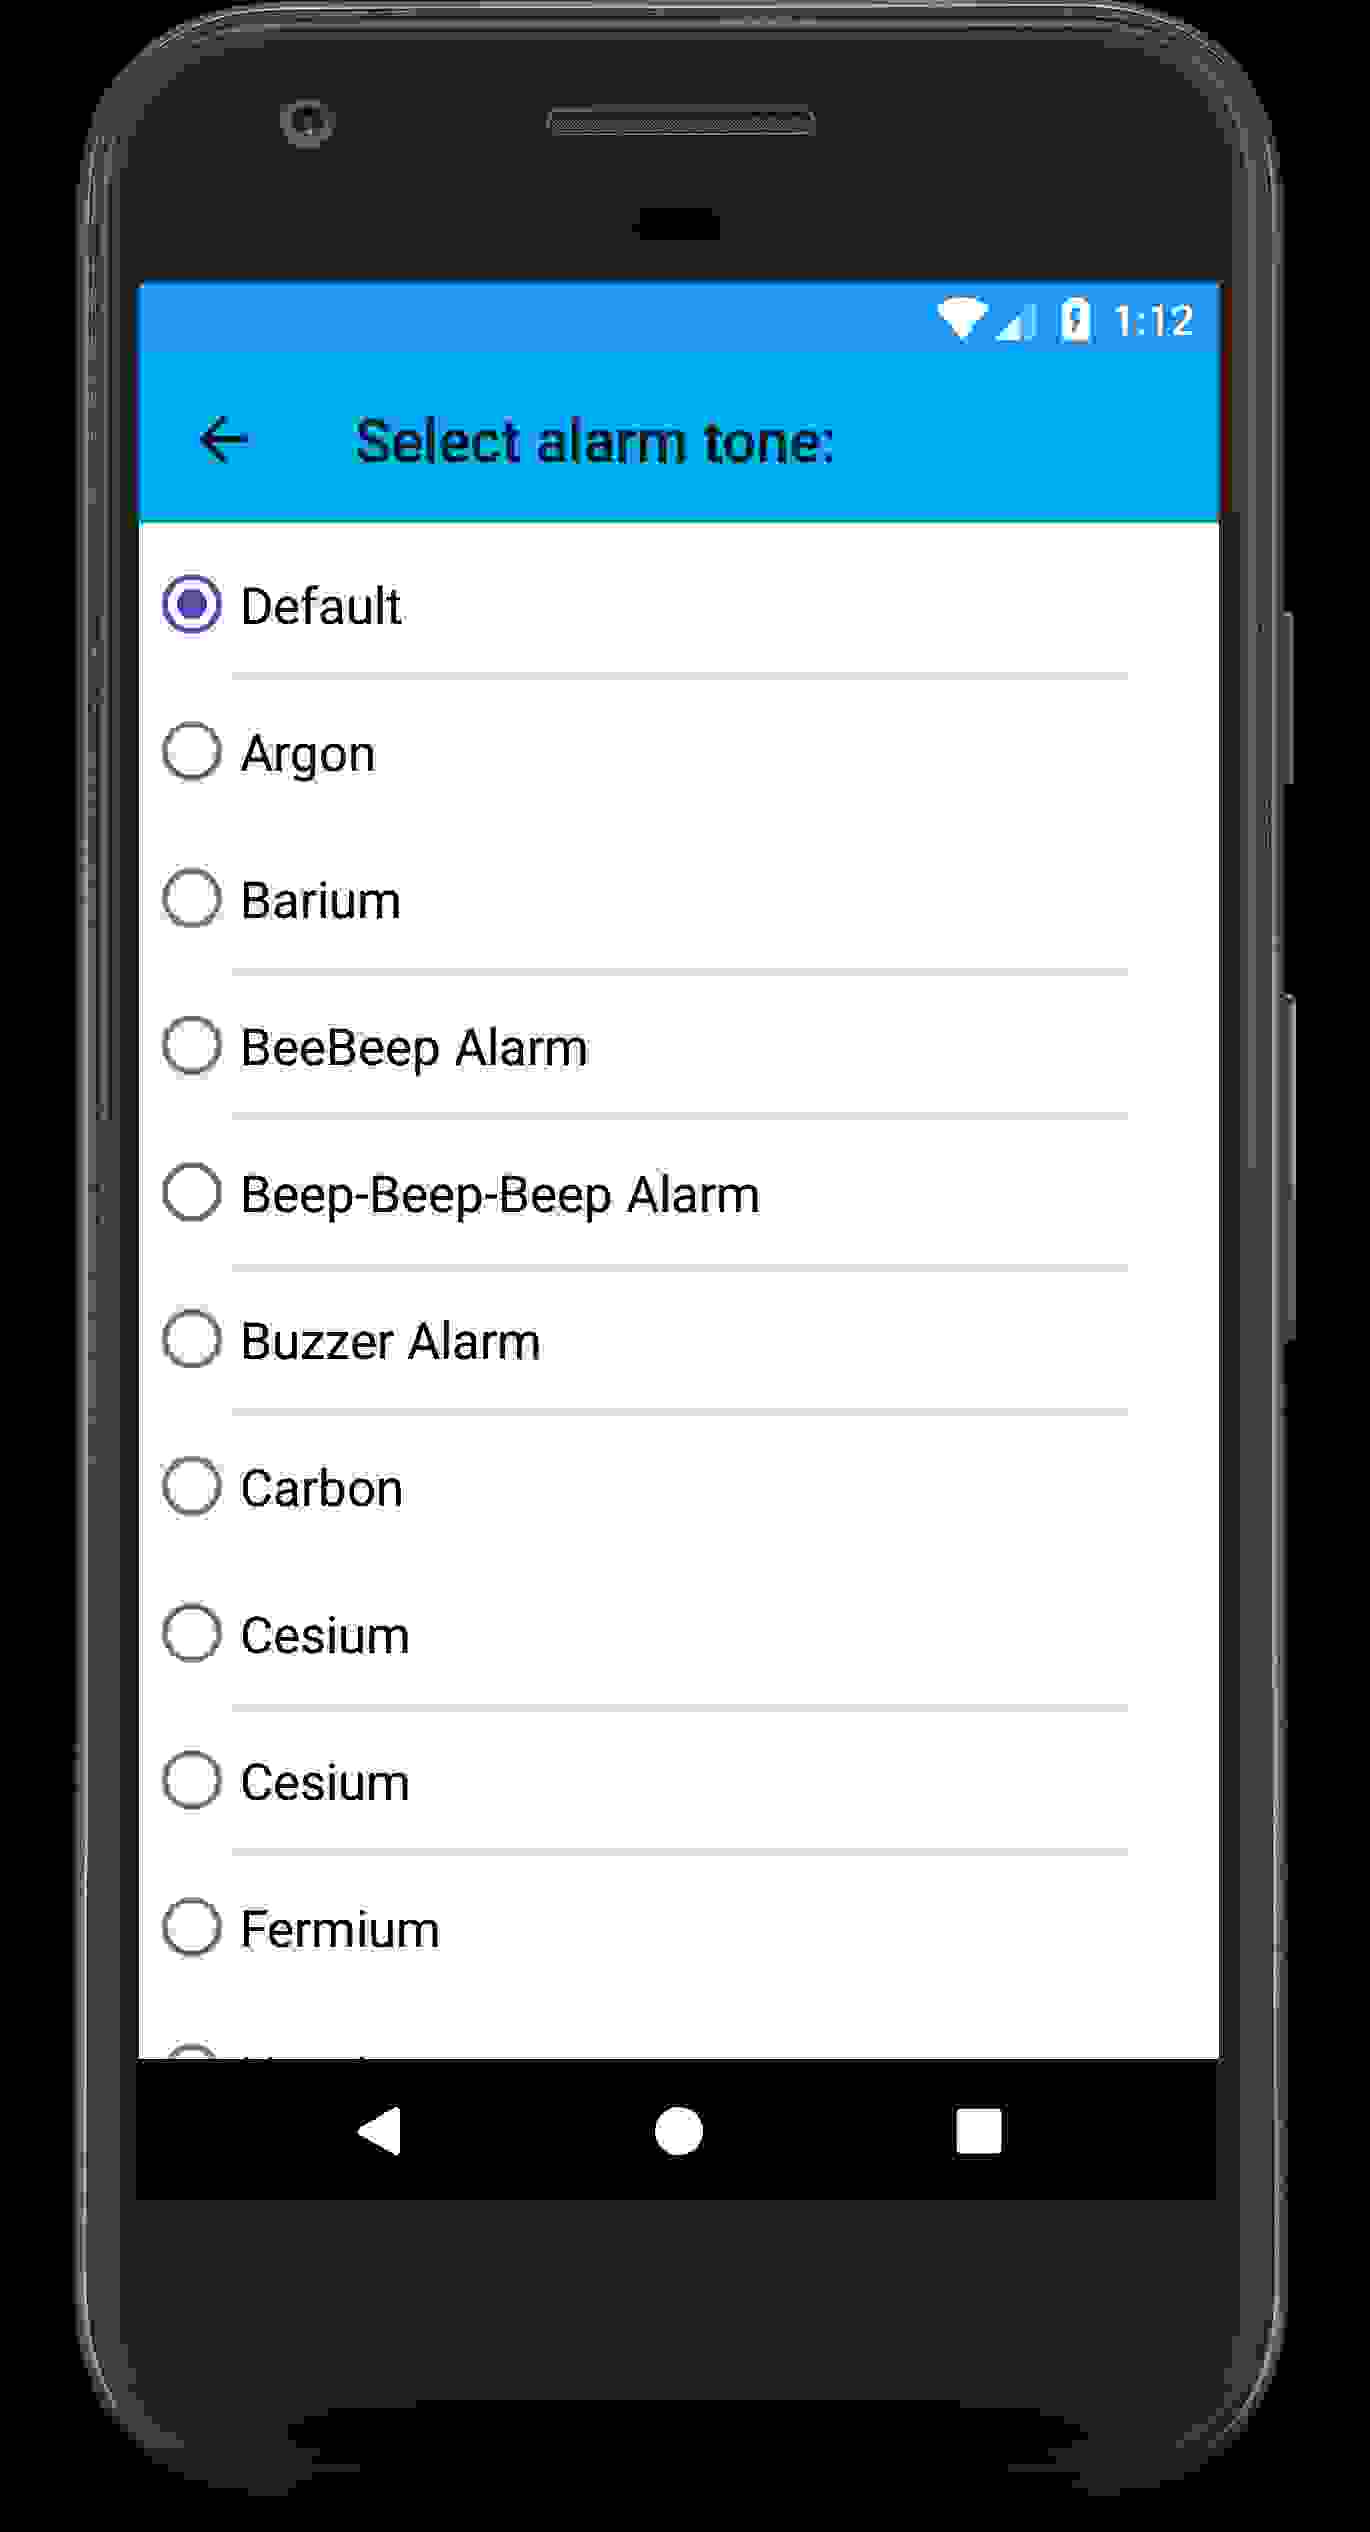
Now, we shall design a simple ringtone picker activity. The activity will have a RadioButton for each tone. When the user presses the back key or the up button, the activity will return the picked Uri and finish itself. For simplicity, I will not list any import statements and assume that imports are managed by your IDE. I shall also assume that all the static members of RingtoneManager class have been imported using:
Therefore, from now on, I will address all the static members of this class without using the class name.
At the end, the ringtone picker would look something like this:
Without further ado, let’s start!
Preparing our activity to respond to implicit intents:
Our activity will be called RingtonePickerActivity , and will be a subclass of androidx.appcompat.app.AppCompatActivity .
View.OnClickListener will help us to listen to click events. We shall see later where to use it.
We want this activity to respond to any implicit intent that comes with ACTION_RINGTONE_PICKER , as well as any explicit intent. For the latter, we don’t need to do anything, but for the former, we modify the AndroidManifest.xml file as follows:
- When an implicit intent is sent by some app, the IntentFilter will respond to it if the action string matches.
- android:exported=»true» is required if we want other apps to launch this activity.
- We have set the theme to be Theme.AppCompat.DayNight.NoActionBar . This will have two advantages:
- The activity will support dark (or night) mode.
- There will be no ActionBar . We do not want the default ActionBar because we will be creating a custom one.
If the theme of your app is the same as this, you need not set the android:theme attribute separately.
Creating the layout of the activity:
In the layout file of our activity, we will have a Toolbar that will serve as the ActionBar of the activity, and a ScrollView (with vertical scrolling) inside which we will place a RadioGroup . A ScrollView can have only one child. So we make that child a ConstraintLayout inside which we can place the RadioGroup . Note that we are not putting any RadioButton inside the RadioGroup , because we will populate the latter dynamically at runtime.
I always find it convenient to put the child of the ScrollView in a separate xml file, and then include it in the ScrollView . It will not be quite clear how this is helpful in this simple activity, but in a complex layout, where you have multiple views inside the child of the ScrollView , it definitely helps if you separately design the views and include them in the ScrollView .
Therefore, we will have two xml files:
File activity_ringtonepicker :
A piece of advice: If this is the first time you are working with ScrollView , let me draw your attention to android:fitsSystemWindows attribute in the above code. If this is not set to false , the scrolling won’t work (by default, it is true ). Also, make sure you mention the type of scrolling using the android:scrollbars attribute.
File activity_ringtonepicker_scrollview :
Make a note of the android:divider , android:showDividers and android:dividerPadding attributes in the above xml file. Without these, the dividers between the RadioButtons that you see in the above picture won’t appear. Also, make sure you specify android:orientation to be vertical .
The .java file:
We have created the activity layout file and edited the manifest file to suit our needs. Now we can dive into to the real programming part.
Declaring global variables:
I am in no mood to increase the length of this article indefinitely, but I cannot proceed further before giving a list of the global variables that we will be using later.
A few words about the global variables (you may skip this if you are not interested):
- Variables defaultUri , existingUri , showDefault , showSilent , title and type will be read from EXTRA_RINGTONE_DEFAULT_URI , EXTRA_RINGTONE_EXISTING_URI , EXTRA_RINGTONE_SHOW_DEFAULT , EXTRA_RINGTONE_SHOW_SILENT , EXTRA_RINGTONE_TITLE and EXTRA_RINGTONE_TYPE respectively, or assigned default values if any of these extras are missing.
- Variable pickedUri will contain the Uri of the tone picked by the user.
- toneUriList is an ArrayList of the unique Uri of the tone files returned by RingtoneManager . toneNameList contains the corresponding names of the tones that can be displayed to the user in the form of RadioButtons. toneIdList is an ArrayList of ids that will be used for setting the id of RadioButtons.
- DEFAULT_RADIO_BTN_ID and SILENT_RADIO_BTN_ID are the ids for the “Default” and the “Silent” RadioButton respectively in radioGroup .
- wasExistingUriGiven will help us determine whether our activity had received EXTRA_RINGTONE_EXISTING_URI . This variable will be particularly helpful if the Uri passed is null or if the extra is not sent.
- When the user chooses a tone, we will play the tone using mediaPlayer . The audioAttributes will be required to set the stream of the mediaPlayer .
How to get the list of tones using RingtoneManager:
All the codes in this section will be in the onCreate(. ) method of our activity, unless otherwise noted.
We use the constructor of RingtoneManager class that takes an Activity as the argument, and thereby initialise the ringtoneManager :
Next, we need to set the type of tone we want. Generally, we will get this using EXTRA_RINGTONE_TYPE :
Now we can extract the list of tones using the getCursor() method of RingtoneManager class:
In Android, the Cursor interface is used to access the result set returned by a database query. You can think of it as a table with several columns. Each column has a unique index (an integer), and the data of that column can be accessed using the column index.
The Cursor returned by RingtoneManager (variable tonesCursor in our case) has three columns with indices RingtoneManager.TITLE_COLUMN_INDEX , RingtoneManager.URI_COLUMN_INDEX and RingtoneManager.ID_COLUMN_INDEX . The first index will return the displayable name of the tone, the second will give the media provider’s Uri, and the third will give the row ID. We will fill up the variables toneNameList , toneUriList and toneIdList in the following way:
Note that URI_COLUMN_INDEX will give you the media provider’s Uri, not the unique Uri to a tone file. You have to append it with ID_COLUMN_INDEX to get the complete Uri of the file, as shown above.
Half of our work is done once we have got the tones. We still have to display the tones as RadioButtons, play the tone when the user chooses one, handle their click events and return the result to the caller activity when the user presses the back/up button.
Initialising the mediaPlayer :
We will initialise the media player in the onCreate(. ) of our activity.
Complete code of the onCreate(. ) method of our activity:
Populate the RadioGroup using the tones:
Now that we have the tones, we can start populating radioGroup .
How to add a RadioButton to a RadioGroup dynamically?
We will use the addView(View view) method in RadioGroup class to add RadioButtons. Each RadioButton must have an ID; using this ID we can later find out which button was clicked. To simplify our task, we will be using the values in toneIdList as the id of the RadioButtons. The “Default” and “Silent” buttons, if present, will have the ids DEFAULT_RADIO_BTN_ID and SILENT_RADIO_BTN_ID respectively.
We shall use the following method to create a RadioButton with a given text and id , add it to radioGroup and set the OnClickListener :
Populate radioGroup :
Now it’s pretty straightforward: For each tone in our list, we call the above method. If showDefault and showSlient are both set to true , we add the “Default” and “Silent” RadioButtons:
Check the appropriate RadioButton if the user has passed an existingUri :
If an existingUri has been passed to our activity, we need to check the appropriate RadioButton . We can do this as follows:
We face a problem if existingUri is null , because it can be null for two reasons:
- The calling activity has deliberately passed null .
- The calling activity has not passed the EXTRA_EXISTING_URI .
We can distinguish between the first and the second cases using the variable wasExistingUriGiven . As explained earlier, if this yields true , it means that we have received EXTRA_EXISTING_URI , and we have to check whether showSilent is true or not. If it is true , we should check the “Silent” RadioButton. Otherwise, we will just ignore this.
Handling RadioButton click events:
Each of the RadioButtons in radioGroup has an OnClickListener . We have to handle their click events inside the onClick(View view) method, which we override from the View.OnClickListener interface.
Play the tone chosen by the user:
In the above section, you can see that we are calling a method playChosenTone() . This method is used to play the tone chosen by the user.
The above code will play the chosen tone. However, remember that if the user exits the activity (by pressing back button, up button or home key), we need to stop the media player immediately. Therefore, in the onPause() of our activity, we put the following code:
In some cases, the above may not work. You can try using mediaPlayer.pause() instead of stop() .
When the activity finishes, we destroy the media player and release its resources:
Returning the result when the back button is pressed:
We can listen to click events of the back button by overriding the onBackPressed() method in an activity. In this method, we shall set the result. The pickedUri will be returned using EXTRA_RINGTONE_PICKED_URI . If pickedUri is null, we check whether showSilent is true or not. If it is false , it means that the calling activity does not expect a null value, so we return RESULT_CANCELLED . In all other cases, we return RESULT_OK along with pickedUri .
Handle up button click events:
In the onCreate(. ) method above, we have the following code:
We need to listen to up button click events. Normally we expect the up button to do the same job as the back button, so we just call onBackPressed() :
That’s it! Our simple ringtone picker activity is complete.
Final words:
I hope I have been able to help you build a ringtone picker activity in this article. The activity, in the above form, does the same job as the default ringtone picker. Now you can add as many features to it as you want.
Note that this code is not safe from configuration changes. This means that the activity will malfunction if the screen orientation or night mode changes. You will have to handle configuration changes yourself by making the necessary alterations in the above code. You can have a look at the Android developer guide on how to handle config changes.
I would like to thank Greg Bernhardt, the owner, and admin of Physics Forums, for creating and maintaining the Insights Blog and for constantly motivating us to share our knowledge by writing articles in his blog.
Questions, comments, suggestions for improvements, and bug reports are always welcome.

Studying physics at a college in Kolkata, India. Interested in beam instrumentation and diagnostics, and particle physics detector design. Also passionate in electronics and programming in Java, Android, MATLAB and Python.
Источник


