- How to Add Back Arrow in Android Activity
- Set/Display back arrow button in Actionbar in Android Activity
- How to Set/Display back arrow button in Actionbar in Android Activity.
- Click here to download Set/Display back arrow button in Actionbar in Android Activity project with source code.
- Отобразить стрелку назад на панели инструментов
- 25 ответов
- В Котлине это было бы
- Android Toolbar Back Button Tutorial
- Android Toolbar Back Button Tutorial
How to Add Back Arrow in Android Activity
Here is a simple method to add a back arrow to other Activity to come back to MainActivity. To enter a new activity we create an Intent then start a new Activity using that intent instance using the startActivity method.
After we enter the new activity we add a listener on action bar instance to finish other activity to come back to MainActivity.
Let’s Start Coding…
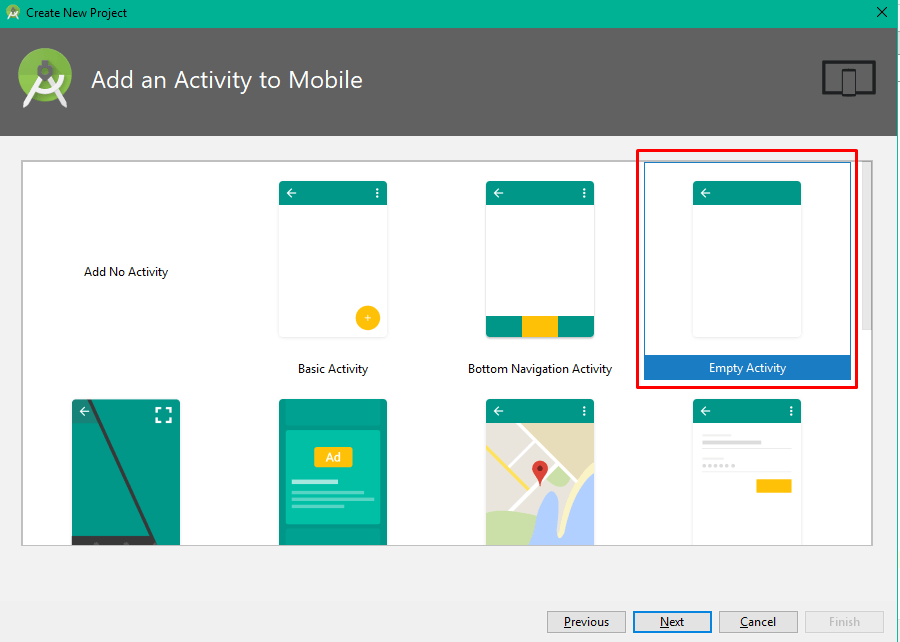
Step 1) Here I will give an example of simple Empty Activity new project. I which we will create a new Activity.
Step 2) In res >> layout >> activity_main.xml we will add a button which will open a new other activity.
activity_main.xml
Here 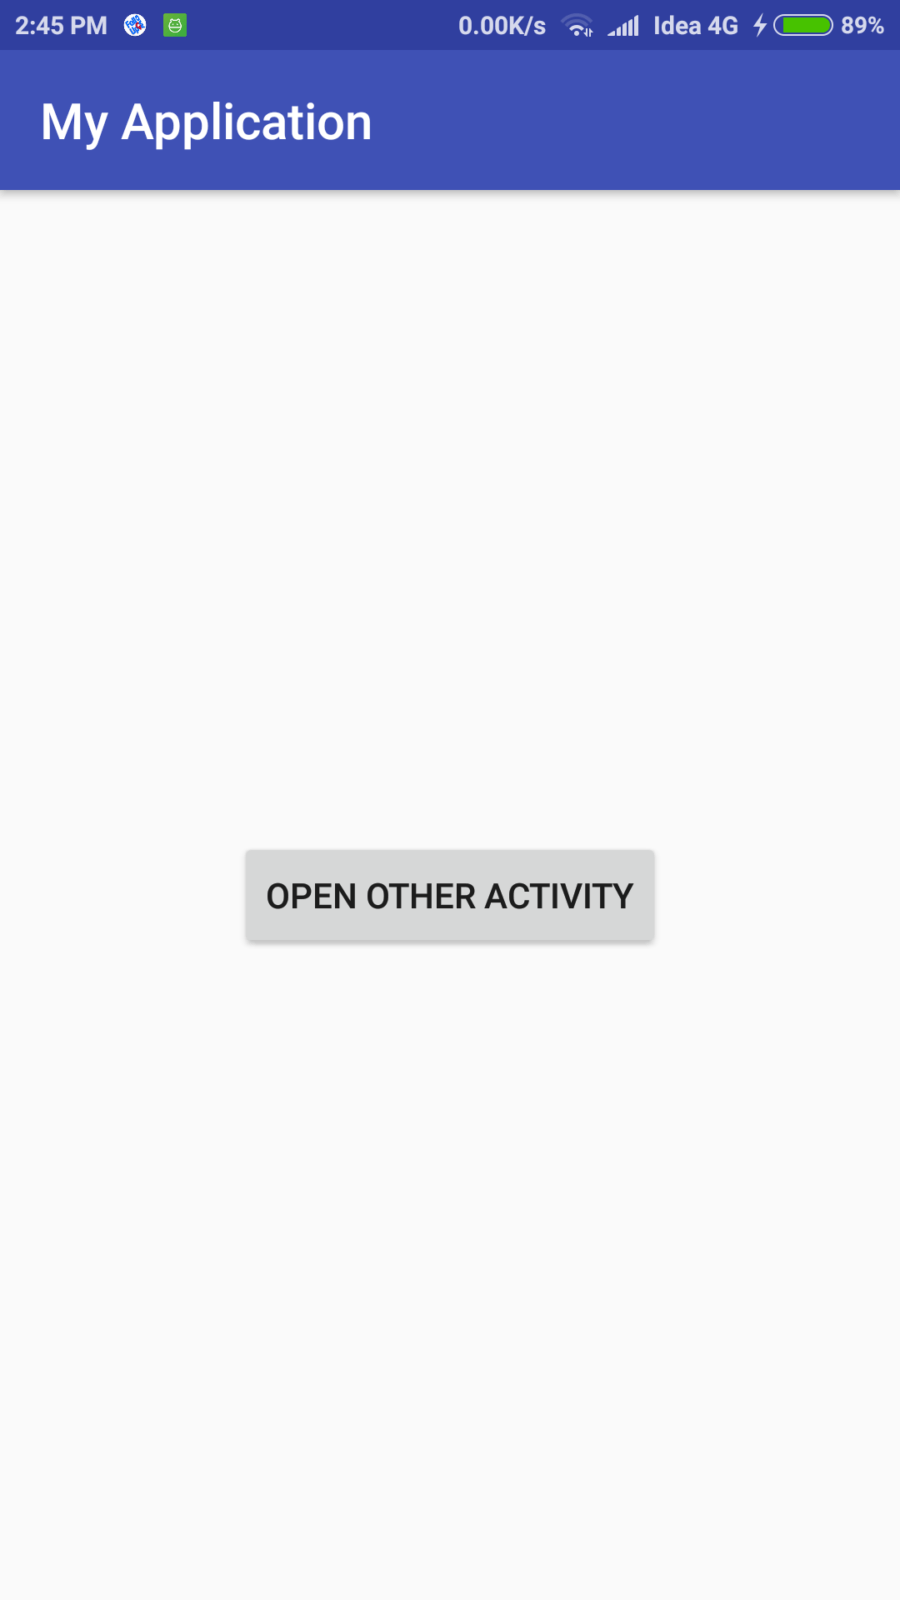
we added a button “OPEN OTHER ACTIVITY” with onClick even “openActivity”
MainActivity.class
In “openActivity” event we will open OtherActivity using Intent
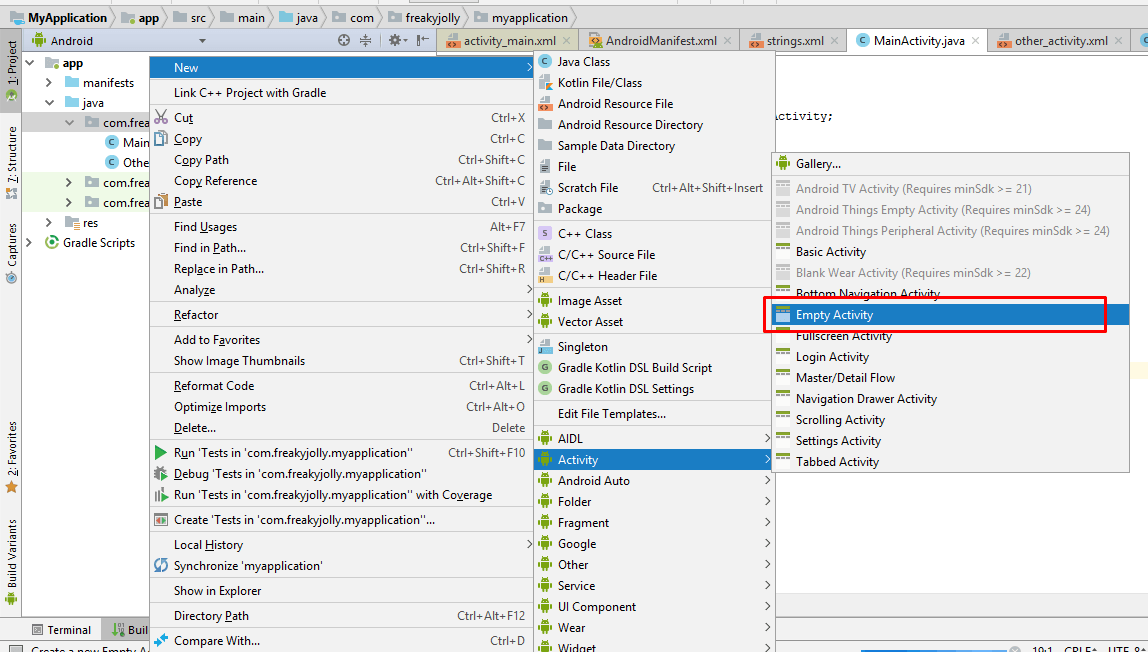
Step 3) Now right click on the main package and create a new activity named “OtherActivity”
Step 4) Now we add back button and handle event listener in OtherActivity
other_activity.xml

OtherActivity.class
When the user selects an item from the options menu (including action items in the app bar), the system calls your activity’s onOptionsItemSelected() method.
Here we are finishing current Activity which is Other Activity to go back to main Activity.
Источник
Set/Display back arrow button in Actionbar in Android Activity
Simple back arrow button also known as UP button are on of the most useful part of every android application because this icon will provide direct back button navigation to application user and by clicking on it the user will redirect to back activity. So in this tutorial we are creating two activity first one is MainActivity.java file and second is NextActivity.java file now we are creating a button on MainActivity including click event and by clicking on that button user will goto NextActivity . Inside NextActivity we will writing the back arrow button code which redirect us again on MainActivity . So here is the complete step by step tutorial for Set/Display back arrow button in Actionbar in Android Activity.
Note: If you are facing any type of NullPointerException error then ready my this post to solve this error.
How to Set/Display back arrow button in Actionbar in Android Activity.
Code for MainActivity.java file.
Code for activity_main.xml layout file.
Code for NextActivity.java file.
Code for activity_main.xml layout file.
Screenshots:

Click here to download Set/Display back arrow button in Actionbar in Android Activity project with source code.
Источник
Отобразить стрелку назад на панели инструментов
Я перехожу с ActionBar на Toolbar в своем приложении. Но я не знаю, как отображать и настраивать событие щелчка на стрелке назад на Toolbar , как я это делал на Actionbar .

С ActionBar я звоню mActionbar.setDisplayHomeAsUpEnabled(true) . Но подобного метода нет.
Кто-нибудь когда-нибудь сталкивался с такой ситуацией и как-то находил способ ее решить?
25 ответов
Если вы используете ActionBarActivity , вы можете указать Android использовать Toolbar в качестве ActionBar следующим образом:
Будет работать. Вы также можете использовать это во Фрагментах, которые прикреплены к ActionBarActivities , вы можете использовать его следующим образом:
Если вы не используете ActionBarActivities или хотите получить стрелку назад на Toolbar , который не установлен в качестве вашего SupportActionBar , вы можете использовать следующее:
Если вы используете android.support.v7.widget.Toolbar , вам следует добавить следующий код в свой AppCompatActivity :
Возможно, это кому-то поможет, я не нашел в ответах того, что сделал к концу: с ActionBarDrawerToggle mDrawerToggle; для отображения стрелки назад в наборе панели инструментов: mDrawerToggle.setDrawerIndicatorEnabled (false);
И если вы хотите, чтобы гамбургер отображался на панели инструментов:
Если вы используете JetPack Navigation.
Вот макет для MainActivity
Настройте панель инструментов в своей деятельности, как показано ниже, в onCreate () вашего класса Activity.
SetupActionBarWithNavController (navController) При необходимости создаст кнопку возврата на панели инструментов и обрабатывает функциональность backButton. Если вам нужно написать функциональность CustomBack, создайте callBack, как показано ниже, в методе onCreate () фрагмента.
С Kotlin это стало:
В вашей деятельности: —
Вы всегда можете добавить Relative layout или Linear Layout в свой Toolbar и разместить значок просмотра изображения для значка «Назад» или значка закрытия в любом месте панели инструментов по своему усмотрению
Например, я использовал относительный макет на своей панели инструментов.
А это выглядит так:

Вы можете добавить прослушиватель кликов в это представление изображения из Activity или фрагмента, подобного этому.
Если вы используете DrawerLayout с ActionBarDrawerToggle , чтобы отображать кнопку Назад вместо кнопки Меню (и наоборот), вам нужно добавить этот код в свою деятельность:
Поэтому, когда вам нужно показать кнопку Назад вместо кнопки Меню , вызовите showBackInToolbar (true) , а если вам нужно Меню , вызовите showBackInToolbar (false) .
Вы можете создать стрелку назад (ic_arrow_back_white_32dp) здесь, выполните поиск arrow_back в Раздел Clipart (используйте 32dp по умолчанию с заполнением 8dp). Просто выберите нужный цвет.
Возможно, более надежный способ получить значок вверх из вашей темы (если вы не используете панель инструментов в качестве панели действий):
Чтобы превратить атрибут темы в чертеж, я использовал функцию расширения:
Добавьте это в xml активности в папке макета:
Сделайте панель инструментов интерактивной, добавьте их в метод onCreate:
Во-первых, вам нужно инициализировать панель инструментов:
Затем вызовите кнопку возврата на панели действий:
Если вы хотите получить стрелку назад на панели инструментов, которая не установлена в качестве SupportActionBar:
Чтобы получить res из атрибутов:
Это сработало отлично
В вашем файле манифеста для действия, в котором вы хотите добавляем кнопку возврата, мы будем использовать свойство android: parentActivityName
P.S. Этот атрибут был представлен в API уровня 16.
Например, в AppCompatActivity вы можете сделать
Вы легко можете это сделать.
В Котлине это было бы
Простой и легкий способ показать кнопку возврата на панели инструментов
Вставьте этот код в метод onCreate
Вставьте этот метод переопределения вне метода onCreate
Если вы используете androidx.appcompat.app.AppCompatActivity , просто используйте:
Затем просто определите в Manifest.xml родительскую Activity.
Вместо этого, если вы используете Toolbar и хотите изменить поведение, просто используйте:
И в вашей деятельности:
Если вы использовали AppCompatActivity и пошли по пути отказа от него, потому что вы не хотели получать автоматический ActionBar , который он предоставляет, потому что вы хотите отделить Toolbar в соответствии с вашими требованиями к материальному дизайну и CoordinatorLayout или AppBarLayout , тогда примите во внимание следующее:
Вы все еще можете использовать AppCompatActivity , вам не нужно прекращать его использование только для того, чтобы вы могли использовать в своем xml. Просто отключите стиль панели действий следующим образом:
Сначала создайте стиль из одной из тем NoActionBar, которые вам нравятся в вашем styles.xml , я использовал Theme.AppCompat.Light.NoActionBar вот так:
В манифесте вашего приложения выберите тему дочернего стиля, которую вы только что определили, например:
В вашем Activity Xml, если панель инструментов определена так:
Затем, и это важная часть, вы устанавливаете для панели действий поддержки значение AppCompatActivity, которое вы расширяете, так что панель инструментов в вашем xml становится панелью действий . Я считаю, что это лучший способ, потому что вы можете просто делать многие вещи, которые позволяет ActionBar, например, меню, автоматическое название активности, обработка выбора элементов и т. Д., Не прибегая к добавлению пользовательских обработчиков кликов и т. Д.
В переопределении onCreate вашей Activity сделайте следующее:
Если вы получите исключение с нулевым указателем, это может зависеть от темы. Попробуйте использовать другую тему в манифесте или используйте ее в качестве альтернативы:
Затем в манифесте, где я установил родительскую активность для текущей активности:
Источник
Android Toolbar Back Button Tutorial
Hi and welcome to another tutorial from codingdemos, today you will learn how to create android toolbar back button for your app.
You can use the android toolbar back button to navigate from one screen to another without having to tap on the actual device back button. Let’s get started 🙂
In this tutorial we will be using the following:
- Android studio version 2.3.3
- Android emulator Nexus 5X with API 24
- Minimum SDK API 16
- Open up Android Studio and create a new project and give it a name, in our case we’ve named it (ToolbarButtonTutorial), choose API 16 as the minimum SDK, then choose a blank activity and click on finish and wait for Android Studio to build your project.
- Open (styles.xml) file and change the parent theme from (Theme.AppCompat.Light.DarkActionBar) to (Theme.AppCompat.Light.NoActionBar) like this:
- Next let’s add android toolbar, open (activity_main.xml) file and make the following code changes
- Now let’s add the back arrow icon inside android toolbar by using Android asset studio. Click on res and then right click on drawable=>New=>Vector Asset.
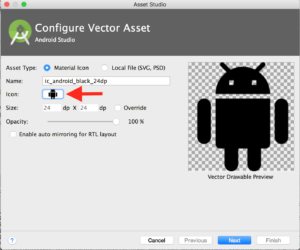
Android studio asset studio (Large preview)
- Click on icon where the red arrow is pointing and choose the back arrow icon from the icons list and then click on finish
- When you open (ic_arrow_back_white_24dp.xml) file you will see the following code:
- Change the color of the back arrow icon from black to white by adding white color code inside (android:fillColor) like this:
- Open (MainActivity.java) file and let’s define the toolbar, set the app name to be shown in the toolbar as well as the back arrow icon like this:
- Run the app, and you will be able to see the toolbar with app name and the back arrow icon.
Android Toolbar Back Button (Large preview)
- Now let’s make the back arrow icon clickable so that when you tap on the icon, you will exit the app like this:
In this tutorial we’ve built a simple android app that uses android toolbar back button, to allow the user to navigate between the screen(s) without using the actual device back button. The source code for android toolbar button is available on Github, and if you have a question(s), please let me know in the comment section, and I’ll do my best to answer them.
Источник
Android Toolbar Back Button Tutorial
Hi and welcome to another tutorial from codingdemos, today you will learn how to create android toolbar back button for your app.
You can use the android toolbar back button to navigate from one screen to another without having to tap on the actual device back button. Let’s get started 🙂
In this tutorial we will be using the following:
- Android studio version 2.3.3
- Android emulator Nexus 5X with API 24
- Minimum SDK API 16
- Open up Android Studio and create a new project and give it a name, in our case we’ve named it (ToolbarButtonTutorial), choose API 16 as the minimum SDK, then choose a blank activity and click on finish and wait for Android Studio to build your project.
- Open (styles.xml) file and change the parent theme from (Theme.AppCompat.Light.DarkActionBar) to (Theme.AppCompat.Light.NoActionBar) like this:
- Next let’s add android toolbar, open (activity_main.xml) file and make the following code changes
- Now let’s add the back arrow icon inside android toolbar by using Android asset studio. Click on res and then right click on drawable=>New=>Vector Asset.
Android studio asset studio (Large preview)
- Click on icon where the red arrow is pointing and choose the back arrow icon from the icons list and then click on finish
- When you open (ic_arrow_back_white_24dp.xml) file you will see the following code:
- Change the color of the back arrow icon from black to white by adding white color code inside (android:fillColor) like this:
- Open (MainActivity.java) file and let’s define the toolbar, set the app name to be shown in the toolbar as well as the back arrow icon like this:
- Run the app, and you will be able to see the toolbar with app name and the back arrow icon.
Android Toolbar Back Button (Large preview)
- Now let’s make the back arrow icon clickable so that when you tap on the icon, you will exit the app like this:
In this tutorial we’ve built a simple android app that uses android toolbar back button, to allow the user to navigate between the screen(s) without using the actual device back button. The source code for android toolbar button is available on Github, and if you have a question(s), please let me know in the comment section, and I’ll do my best to answer them.
Источник


