- Tek Eye
- Determining the Size of an Android View or Screen at Run Time
- Finding the Size of an Android View in Code
- Finding the Size of an Android Layout in Code
- Finding the Size of an Android View During Screen Construction
- See Also
- Archived Comments
- Do you have a question or comment about this article?
- Анимируем изменения размеров компонента в Android
- Пишем ViewGroup
- Добавляем аниматор
- Готовимся к рисованию
- Рисуем!
- Заключение
- Android activity change size
Tek Eye
For efficient bitmap handling or dynamic View creation in an app, the area that a screen item or layout is using needs to be known. If no fixed sizes are allocated at design time the size of a View may not be known until an app is executed. This is because of the wide range of display sizes that Android supports. Just look on GSMArena to see the huge range of Android devices produced over the years, and to see the wide variation in screen sizes and pixel densities. The example code in this article shows how to read the screen size and the size of Views as the app runs.
(Note: All Android screen items are derived from Views. A screen component, e.g. a TextView , is derived from the View class. Such screen components are also known as widgets. Layouts are ViewGroups and are also derived from Views.)
Determining the Size of an Android View or Screen at Run Time
To run the example code in this article first create a new Android project. Those new to Android programming can read the article Your First Android Hello World Java Program to see how. For this article the app is called View Size.
Use a simple layout for activity_main.xml (the layout file may have another name). Add a TextView with id labXY and set the Text attribute to X,Y. Next to it add another TextView called textXY with Text set to ? (actually \? to make it valid in the XML). Here is the layout used for this example:
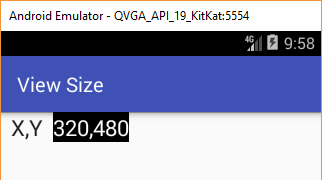
Add this code to the bottom of the onCreate method in MainActivity.java (or whatever the class was called). Add the required an imports for TextView and DisplayMetrics when prompted with the Alt-Enter:
This is the code running on an Android Virtual Device (AVD) with a 320×480 screen:
Finding the Size of an Android View in Code
Drop an ImageView onto the layout, here using the ic_launcher.png icon file, or other images can be used. The size of a View can be retrieved using the getWidth and getHeight methods. Change the code in the onCreate to set the TextView to the ImageView’s width and height (an import for View is required, again usually prompted for and added with Alt-Enter):
Mmmmm! The code is showing 0,0 for the ImageView size, even though we can see that it is not 0,0:
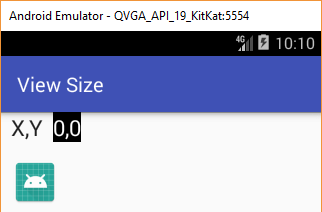
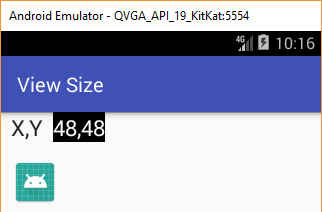
This is because in onCreate the screen has not yet been laid out so the size of the ImageView has not been determined hence the getWidth() and getHeight() methods are returning zero. In fact they will likely return zero in onStart() and onResume(). What is needed is to override onWindowFocusChanged() to get the ImageView sizes:
Finding the Size of an Android Layout in Code
The same code can be used to get the size of the View (the layout, i.e. ViewGroup) in which the screen components sit. Notice that in the screen XML the RelativeLayout was given an id (@+id/screen), which means the base View’s width and height can be grabbed (change R.id.imageView to R.id.screen in the code):
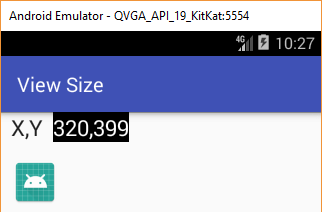
Notice that the layout height is less than the screen height because of the notification bar.
Finding the Size of an Android View During Screen Construction
To get the the size of a View as soon as it is known (rather than waiting for the onWindowFocusChanged event) attach a listener to its ViewTreeObserver . Do this by writing a class that implements ViewTreeObserver.OnGlobalLayoutListener in the Activity’s class. This new class will have an onGlobalLayout method that gets the View dimensions that can then be stored for later use (here they are displayed as before). Here is the example source code for the entire MainActivity.java file to show this way of getting the ImageView’s width and height:
Download some example code in view-size.zip from this article, ready for importing into Android Studio. See the instructions in the zip file, alternatively the code can also be accessed via the Android Example Projects page.
See Also
- Using Immersive Full-Screen Mode on Android Developers
- See the Android Example Projects page for lots of Android sample projects with source code.
- For a full list of all the articles in Tek Eye see the full site alphabetical Index.
Archived Comments
Kestrel on December 15, 2014 at 4:20 am said: Hey fantastic article, can you also talk about the fitSystemWindows and how things are affected when its set or not set by default. Thanks in advance.
Author: Daniel S. Fowler Published: 2013-06-19 Updated: 2017-12-17


Do you have a question or comment about this article?
(Alternatively, use the email address at the bottom of the web page.)
↓markdown↓ CMS is fast and simple. Build websites quickly and publish easily. For beginner to expert.
Free Android Projects and Samples:
Источник
Анимируем изменения размеров компонента в Android
 Привет, %username%! Сегодня я хотел бы поделиться с тобой способом
 без лишних усилий реализовать анимированное изменение размеров компонента в приложении для Android.
Я много читал про анимацию, а вот использовать в своих интерфейсах до сих пор не довелось. Хотелось опробовать наконец всякие Layout Transitions, Animators, Layout Animations и написать по этому поводу статейку, чтобы и самому лучше запомнить, и другим разжевать. Закончилось, однако, всё гораздо прозаичней — кастомным ViewGroup и ObjectAnimator’ом.
Итак, мне захотелось сделать разворачивающийся при получении фокуса EditText, как в Chrome для Android, вот такой:
Быстро прошерстив StackOverflow для определения примерного направления движения нашёл 2 варианта реализации:
- Использовать ScaleAnimation.
- Так или иначе пошагово менять размер EditText’а и запрашивать requestLayout() на каждом шаге.
Первый вариант я сразу отмёл, как минимум, потому что буквы тоже растянутся. Второй вариант звучит куда логичней, за исключением того, что каждый шаг будет полностью отрабатывать цикл onMeasure/onLayout/onDraw для всей ViewGroup, хотя необходимо изменить отображение только EditText’а. К тому-же я подозревал, что такая анимация вовсе не будет смотреться плавной.
Берём за основу второй способ и начинаем думать как уйти от вызова requestLayout() на каждом шаге. Но начнём, как положено, с малого.
Пишем ViewGroup
Начнём с того, что создадим кастомный ViewGroup для размещения наших компонентов:
Разметка содержит 3 элемента:
- Кнопка «Добавить таб», имеет фиксированный размер, находится слева.
- Кнопка «Выбрать таб», имеет фиксированный размер, находится справа.
- Поле для ввода URL (UrlBar, наследник от EditText’а), заполняет собой оставшееся свободное пространство.
Методы onMeasure и onLayout не представляют из себя ничего сложного — сначала меряем/располагаем кнопки, потом текстовое поле между ними.
Я делал всё это поверх другого примера, так что можно заметить присутствие лишнего кода. Например, кнопка «Добавить таб». Она отображается только при переключении в режим выбора таба, в нашем же случае она просто скрыта.
Добавляем аниматор
Сначала добавим параметр, который будет меняться во время анимации. Не будем напрямую изменять размер UrlBar’а из Animator’а, а введём переменную, которая будет отображать текущий прогресс анимации в процентах.
Мы собираемся использовать ObjectAnimator, так что нужно добавить getter и setter для нашего параметра, однако, если minSdkVersion >= 14, то, чтобы избежать рефлексии, лучше создать поле класса Property для этого.
Теперь добавим 2 inner-класса и 2 поля для старта анимации.
Не забудем зарегистрировать наш OnFocusChangeListener в initializeViews!
На этом шаге логика работы непосредственно механизма анимации закончена, осталась визуальная составляющая, но сначала зазберёмся что, зачем и почему.
- При изменении фокуса мы создаём ObjectAnimator, который пошагово изменяет переменную, обозначающую процент получения фокуса полем.
- На каждом шаге вызывается invalidate() для ViewGroup. Данный метод не приводит к переразметке, он только перерисовывает компонент.
Процесс получения фокуса UrlBar’ом будет происходить следующим образом:
- Скрываем все остальные элементы чтобы они не мешали отрисовке анимации (в нашем случае это кнопка переключения табов).
- Вызываем requestLayout() чтобы после завершения анимации реальные границы UrlBar’а совпадали с наблюдаемыми (помните, что после вызова requestLayout() методы onMeasure+onLayout могут быть вызваны с задержкой!).
- Начинаем пошагово менять процент выполнения анимации, вызывая на каждом шаге invalidate().
- Вручную на каждом шаге высчитываем границы UrlBar’а для текущего процента и перерисовываем его.
При потере фокуса UrlBar’ом скрывать элементы и вызывать requestLayout() нужно наоборот, в конце работы анимации. Также, введём переменную для отключения этапа разметки, и не забудем добавить изменения в методы onMeasure и onLayout:
Готовимся к рисованию
Чтобы посчитать размер UrlBar’а на каждом шаге нам нужно знать его начальный и конечный размер. Добавим 2 переменные, в которые будем запоминать этот размер и в очередной раз немного поменяем onLayout:
Рисуем!
Помните, непосредственно во время анимации реальный размер UrlBar’а не меняется, это происходит либо в начале, либо в конце анимации, а по-умолчанию отрисовывает он себя в соответствии с границами, полученными на этапе разметки. Таким образом, во время анимации реальный размер компонента больше наблюдаемого. Чтобы уменьшить в этой ситуации наблюдаемый размер при отрисовке UrlBar’а воспользуемся хитростью — будем делать clipRect на canvas’е.
Ещё одна хитрость заключается в том, чтобы убрать фон у UrlBar’а и отрисовывать его вручную.
Немножечко меняем разметку.
Вводим переменную для отрисовки фона.
И, наконец, отрисовка! Добавим в метод drawChild(Canvas, View, long) условие для UrlBar’а:
Всё готово, можно запускать и смотреть:
Заключение
Принимаясь за работу, я ожидал, что задача окажется пустяковой и я справлюсь с ней буквально за один вечер. В который раз я натыкаюсь на эти грабли. Если у вас есть другие варианты реализации или замечания к текущей — обязательно поделитесь ими в комментариях.
Я же искренне надеюсь, что данный пример окажется для кого-то полезным. Удачи и да прибудет с вами плавная анимация!
Источник
Android activity change size
The default value of this attribute is false . android:allowTaskReparenting Whether or not the activity can move from the task that started it to the task it has an affinity for when that task is next brought to the front — » true » if it can move, and » false » if it must remain with the task where it started.
If this attribute is not set, the value set by the corresponding allowTaskReparenting attribute of the element applies to the activity. The default value is » false «.
Normally when an activity is started, it’s associated with the task of the activity that started it and it stays there for its entire lifetime. You can use this attribute to force it to be re-parented to the task it has an affinity for when its current task is no longer displayed. Typically, it’s used to cause the activities of an application to move to the main task associated with that application.
For example, if an e-mail message contains a link to a web page, clicking the link brings up an activity that can display the page. That activity is defined by the browser application, but is launched as part of the e-mail task. If it’s reparented to the browser task, it will be shown when the browser next comes to the front, and will be absent when the e-mail task again comes forward.
The affinity of an activity is defined by the taskAffinity attribute. The affinity of a task is determined by reading the affinity of its root activity. Therefore, by definition, a root activity is always in a task with the same affinity. Since activities with » singleTask » or » singleInstance » launch modes can only be at the root of a task, re-parenting is limited to the » standard » and » singleTop » modes. (See also the launchMode attribute.)
android:alwaysRetainTaskState Whether or not the state of the task that the activity is in will always be maintained by the system — » true » if it will be, and » false » if the system is allowed to reset the task to its initial state in certain situations. The default value is » false «. This attribute is meaningful only for the root activity of a task; it’s ignored for all other activities.
Normally, the system clears a task (removes all activities from the stack above the root activity) in certain situations when the user re-selects that task from the home screen. Typically, this is done if the user hasn’t visited the task for a certain amount of time, such as 30 minutes.
However, when this attribute is » true «, users will always return to the task in its last state, regardless of how they get there. This is useful, for example, in an application like the web browser where there is a lot of state (such as multiple open tabs) that users would not like to lose.
android:autoRemoveFromRecents Whether or not tasks launched by activities with this attribute remains in the overview screen until the last activity in the task is completed. If true , the task is automatically removed from the overview screen. This overrides the caller’s use of FLAG_ACTIVITY_RETAIN_IN_RECENTS . It must be a boolean value, either » true » or » false «. android:banner A drawable resource providing an extended graphical banner for its associated item. Use with the tag to supply a default banner for a specific activity, or with the tag to supply a banner for all application activities.
The system uses the banner to represent an app in the Android TV home screen. Since the banner is displayed only in the home screen, it should only be specified by applications with an activity that handles the CATEGORY_LEANBACK_LAUNCHER intent.
This attribute must be set as a reference to a drawable resource containing the image (for example «@drawable/banner» ). There is no default banner.
See Provide a home screen banner in Get Started with TV Apps for more information.
android:clearTaskOnLaunch Whether or not all activities will be removed from the task, except for the root activity, whenever it is re-launched from the home screen — » true » if the task is always stripped down to its root activity, and » false » if not. The default value is » false «. This attribute is meaningful only for activities that start a new task (the root activity); it’s ignored for all other activities in the task.
When the value is » true «, every time users start the task again, they are brought to its root activity regardless of what they were last doing in the task and regardless of whether they used the Back or Home button to leave it. When the value is » false «, the task may be cleared of activities in some situations (see the alwaysRetainTaskState attribute), but not always.
Suppose, for example, that someone launches activity P from the home screen, and from there goes to activity Q. The user next presses Home, and then returns to activity P. Normally, the user would see activity Q, since that is what they were last doing in P’s task. However, if P set this flag to » true «, all of the activities on top of it (Q in this case) would be removed when the user launched activity P from the home screen. So the user would see only P when returning to the task.
If this attribute and allowTaskReparenting are both » true «, any activities that can be re-parented are moved to the task they share an affinity with; the remaining activities are then dropped, as described above.
This attribute is ignored if FLAG_ACTIVITY_RESET_TASK_IF_NEEDED is not set.
Requests the activity to be displayed in wide color gamut mode on compatible devices. In wide color gamut mode, a window can render outside of the SRGB gamut to display more vibrant colors. If the device doesn’t support wide color gamut rendering, this attribute has no effect. For more information about rendering in wide color mode, see Enhancing Graphics with Wide Color Content.
android:configChanges Lists configuration changes that the activity will handle itself. When a configuration change occurs at runtime, the activity is shut down and restarted by default, but declaring a configuration with this attribute will prevent the activity from being restarted. Instead, the activity remains running and its onConfigurationChanged() method is called.
Note: Using this attribute should be avoided and used only as a last resort. Please read Handling Runtime Changes for more information about how to properly handle a restart due to a configuration change.
Any or all of the following strings are valid values for this attribute. Multiple values are separated by ‘ | ‘ — for example, » locale|navigation|orientation «.
| Value | Description | ||||||||||||||||||||||||||||||||||||||||||||||||||||||||||||||||||||||||||||||||||||||||||||||||||
|---|---|---|---|---|---|---|---|---|---|---|---|---|---|---|---|---|---|---|---|---|---|---|---|---|---|---|---|---|---|---|---|---|---|---|---|---|---|---|---|---|---|---|---|---|---|---|---|---|---|---|---|---|---|---|---|---|---|---|---|---|---|---|---|---|---|---|---|---|---|---|---|---|---|---|---|---|---|---|---|---|---|---|---|---|---|---|---|---|---|---|---|---|---|---|---|---|---|---|---|
| » density « | The display density has changed — the user might have specified a different display scale, or a different display might now be active. Added in API level 24. | ||||||||||||||||||||||||||||||||||||||||||||||||||||||||||||||||||||||||||||||||||||||||||||||||||
| » fontScale « | The font scaling factor has changed — the user has selected a new global font size. | ||||||||||||||||||||||||||||||||||||||||||||||||||||||||||||||||||||||||||||||||||||||||||||||||||
| » keyboard « | The keyboard type has changed — for example, the user has plugged in an external keyboard. | ||||||||||||||||||||||||||||||||||||||||||||||||||||||||||||||||||||||||||||||||||||||||||||||||||
| » keyboardHidden « | The keyboard accessibility has changed — for example, the user has revealed the hardware keyboard. | ||||||||||||||||||||||||||||||||||||||||||||||||||||||||||||||||||||||||||||||||||||||||||||||||||
| » layoutDirection « | The layout direction has changed — for example, changing from left-to-right (LTR) to right-to-left (RTL). Added in API level 17. | ||||||||||||||||||||||||||||||||||||||||||||||||||||||||||||||||||||||||||||||||||||||||||||||||||
| » locale « | The locale has changed — the user has selected a new language that text should be displayed in. | ||||||||||||||||||||||||||||||||||||||||||||||||||||||||||||||||||||||||||||||||||||||||||||||||||
| » mcc « | The IMSI mobile country code (MCC) has changed — a SIM has been detected and updated the MCC. | ||||||||||||||||||||||||||||||||||||||||||||||||||||||||||||||||||||||||||||||||||||||||||||||||||
| » mnc « | The IMSI mobile network code (MNC) has changed — a SIM has been detected and updated the MNC. | ||||||||||||||||||||||||||||||||||||||||||||||||||||||||||||||||||||||||||||||||||||||||||||||||||
| » navigation « | The navigation type (trackball/dpad) has changed. (This should never normally happen.) | ||||||||||||||||||||||||||||||||||||||||||||||||||||||||||||||||||||||||||||||||||||||||||||||||||
| » orientation « | The screen orientation has changed — the user has rotated the device. Note: If your application targets Android 3.2 (API level 13) or higher, then you should also declare the «screenSize» and «screenLayout» configurations, because they might also change when a device switches between portrait and landscape orientations. | ||||||||||||||||||||||||||||||||||||||||||||||||||||||||||||||||||||||||||||||||||||||||||||||||||
| » screenLayout « | The screen layout has changed — a different display might now be active. | ||||||||||||||||||||||||||||||||||||||||||||||||||||||||||||||||||||||||||||||||||||||||||||||||||
| » screenSize « | The current available screen size has changed. This represents a change in the currently available size, relative to the current aspect ratio, so will change when the user switches between landscape and portrait. Added in API level 13. | ||||||||||||||||||||||||||||||||||||||||||||||||||||||||||||||||||||||||||||||||||||||||||||||||||
| » smallestScreenSize « | The physical screen size has changed. This represents a change in size regardless of orientation, so will only change when the actual physical screen size has changed such as switching to an external display. A change to this configuration corresponds to a change in the smallestWidth configuration. Added in API level 13. | ||||||||||||||||||||||||||||||||||||||||||||||||||||||||||||||||||||||||||||||||||||||||||||||||||
| » touchscreen « | The touchscreen has changed. (This should never normally happen.) | ||||||||||||||||||||||||||||||||||||||||||||||||||||||||||||||||||||||||||||||||||||||||||||||||||
| » uiMode « | The user interface mode has changed — the user has placed the device into a desk or car dock, or the night mode has changed. For more information about the different UI modes, see UiModeManager . Added in API level 8. All of these configuration changes can impact the resource values seen by the application. Therefore, when onConfigurationChanged() is called, it will generally be necessary to again retrieve all resources (including view layouts, drawables, and so on) to correctly handle the change. Note: To handle all Multi-Window related configuration changes use both «screenLayout» and «smallestScreenSize» . Multi-Window is supported in Android 7.0 (API level 24) or higher. Whether or not the activity is direct-boot aware; that is, whether or not it can run before the user unlocks the device. Note: During Direct Boot, an activity in your application can only access the data that is stored in device protected storage. The default value is «false» . android:documentLaunchMode Specifies how a new instance of an activity should be added to a task each time it is launched. This attribute permits the user to have multiple documents from the same application appear in the overview screen. This attribute has four values which produce the following effects when the user opens a document with the application:
Note: For values other than » none » and » never » the activity must be defined with launchMode=»standard» . If this attribute is not specified, documentLaunchMode=»none» is used. android:enabled Whether or not the activity can be instantiated by the system — «true» if it can be, and » false » if not. The default value is » true «. android:excludeFromRecents Whether or not the task initiated by this activity should be excluded from the list of recently used applications, the overview screen. That is, when this activity is the root activity of a new task, this attribute determines whether the task should not appear in the list of recent apps. Set » true » if the task should be excluded from the list; set » false » if it should be included. The default value is » false «. android:exported This element sets whether the activity can be launched by components of other applications:
If an activity in your app includes intent filters, set this element to » true » to allow other apps to start it. For example, if the activity is the main activity of the app and includes the category » android.intent.category.LAUNCHER «. If this element is set to » false » and an app tries to start the activity, the system throws an ActivityNotFoundException . This attribute is not the only way to limit an activity’s exposure to other applications. Permissions can also be used to limit the external entities that can invoke the activity (see the permission attribute). android:finishOnTaskLaunch Whether or not an existing instance of the activity should be shut down (finished), except for the root activity, whenever the user again launches its task (chooses the task on the home screen) — » true » if it should be shut down, and » false » if not. The default value is » false «. If this attribute and allowTaskReparenting are both » true «, this attribute trumps the other. The affinity of the activity is ignored. The activity is not re-parented, but destroyed. This attribute is ignored if FLAG_ACTIVITY_RESET_TASK_IF_NEEDED isn’t set. android:hardwareAccelerated Whether or not hardware-accelerated rendering should be enabled for this Activity — » true » if it should be enabled, and » false » if not. The default value is » false «. Starting from Android 3.0, a hardware-accelerated OpenGL renderer is available to applications, to improve performance for many common 2D graphics operations. When the hardware-accelerated renderer is enabled, most operations in Canvas, Paint, Xfermode, ColorFilter, Shader, and Camera are accelerated. This results in smoother animations, smoother scrolling, and improved responsiveness overall, even for applications that do not explicitly make use the framework’s OpenGL libraries. Because of the increased resources required to enable hardware acceleration, your app will consume more RAM. Note that not all of the OpenGL 2D operations are accelerated. If you enable the hardware-accelerated renderer, test your application to ensure that it can make use of the renderer without errors. android:icon An icon representing the activity. The icon is displayed to users when a representation of the activity is required on-screen. For example, icons for activities that initiate tasks are displayed in the launcher window. The icon is often accompanied by a label (see the android:label attribute). This attribute must be set as a reference to a drawable resource containing the image definition. If it is not set, the icon specified for the application as a whole is used instead (see the element’s icon attribute). android:immersive Sets the immersive mode setting for the current activity. If the android:immersive attribute is set to true in the app’s manifest entry for this activity, the ActivityInfo.flags member always has its FLAG_IMMERSIVE bit set, even if the immersive mode is changed at runtime using the setImmersive() method. android:label A user-readable label for the activity. The label is displayed on-screen when the activity must be represented to the user. It’s often displayed along with the activity icon. If this attribute is not set, the label set for the application as a whole is used instead (see the element’s label attribute). The label should be set as a reference to a string resource, so that it can be localized like other strings in the user interface. However, as a convenience while you’re developing the application, it can also be set as a raw string. android:launchMode An instruction on how the activity should be launched. There are four modes that work in conjunction with activity flags ( FLAG_ACTIVITY_* constants) in Intent objects to determine what should happen when the activity is called upon to handle an intent. They are: » standard » The default mode is » standard «. As shown in the table below, the modes fall into two main groups, with » standard » and » singleTop » activities on one side, and » singleTask » and » singleInstance » activities on the other. An activity with the » standard » or » singleTop » launch mode can be instantiated multiple times. The instances can belong to any task and can be located anywhere in the activity stack. Typically, they’re launched into the task that called startActivity() (unless the Intent object contains a FLAG_ACTIVITY_NEW_TASK instruction, in which case a different task is chosen — see the taskAffinity attribute). In contrast, » singleTask » and » singleInstance » activities can only begin a task. They are always at the root of the activity stack. Moreover, the device can hold only one instance of the activity at a time — only one such task. The » standard » and » singleTop » modes differ from each other in just one respect: Every time there’s a new intent for a » standard » activity, a new instance of the class is created to respond to that intent. Each instance handles a single intent. Similarly, a new instance of a » singleTop » activity may also be created to handle a new intent. However, if the target task already has an existing instance of the activity at the top of its stack, that instance will receive the new intent (in an onNewIntent() call); a new instance is not created. In other circumstances — for example, if an existing instance of the » singleTop » activity is in the target task, but not at the top of the stack, or if it’s at the top of a stack, but not in the target task — a new instance would be created and pushed on the stack. Similarly, if you navigate up to an activity on the current stack, the behavior is determined by the parent activity’s launch mode. If the parent activity has launch mode singleTop (or the up intent contains FLAG_ACTIVITY_CLEAR_TOP ), the parent is brought to the top of the stack, and its state is preserved. The navigation intent is received by the parent activity’s onNewIntent() method. If the parent activity has launch mode standard (and the up intent does not contain FLAG_ACTIVITY_CLEAR_TOP ), the current activity and its parent are both popped off the stack, and a new instance of the parent activity is created to receive the navigation intent. The » singleTask » and » singleInstance » modes also differ from each other in only one respect: A » singleTask » activity allows other activities to be part of its task. It’s always at the root of its task, but other activities (necessarily » standard » and » singleTop » activities) can be launched into that task. A » singleInstance » activity, on the other hand, permits no other activities to be part of its task. It’s the only activity in the task. If it starts another activity, that activity is assigned to a different task — as if FLAG_ACTIVITY_NEW_TASK was in the intent.
As shown in the table above, standard is the default mode and is appropriate for most types of activities. SingleTop is also a common and useful launch mode for many types of activities. The other modes — singleTask and singleInstance — are not appropriate for most applications , since they result in an interaction model that is likely to be unfamiliar to users and is very different from most other applications. Regardless of the launch mode that you choose, make sure to test the usability of the activity during launch and when navigating back to it from other activities and tasks using the Back button. For more information on launch modes and their interaction with Intent flags, see the Tasks and Back Stack document. android:lockTaskMode Determines how the system presents this activity when the device is running in lock task mode. Android can run tasks in an immersive, kiosk-like fashion called lock task mode. When the system runs in lock task mode, device users typically can’t see notifications, access non-allowlisted apps, or return to the home screen (unless the Home app is allowlisted). Only apps that have been allowlisted by a device policy controller (DPC) can run when the system is in lock task mode. System and privileged apps, however, can run in lock task mode without being allowlisted. The value can be any one of the following R.attr.lockTaskMode string values:
|


