- Полный список
- Что такое Activity и его жизненный цикл в Android
- Жизненный цикл Activity
- Методы жизненного цикла
- Запуск Activity
- Запуск Activity без ожидаемого результата
- Запуск Activity на результат
- Пример запуска Activity
- Прерывание Activity
- Стадия экземпляра Activity
- Заключение
- Getting Started: WebView-based Applications for Web Developers
- # Install Android Studio
- # Create a New Android Project
- # Add the WebView
- # Enable JavaScript
- # Load a Remote URL
- # Handling Navigation
- # Handling the Android Back Button
- # Loading HTML files from the file system
Полный список
В этом уроке мы:
— создадим и вызовем второе Activity в приложении
Урок был обновлен 12.06.2017
Мы подобрались к очень интересной теме. На всех предыдущих уроках мы создавали приложения, которые содержали только один экран (Activity). Но если вы пользуетесь смартфоном с Android, то вы замечали, что экранов в приложении обычно больше. Если рассмотреть, например, почтовое приложение, то в нем есть следующие экраны: список аккаунтов, список писем, просмотр письма, создание письма, настройки и т.д. Пришла и нам пора научиться создавать многоэкранные приложения.
Application/Library name: TwoActivity
Module name: p0211twoactivity
Package name: ru.startandroid.p0211twoactivity
Откроем activity_main.xml и создадим такой экран:
На экране одна кнопка, по нажатию которой будем вызывать второй экран.
Открываем MainActivity.java и пишем код:
Мы определили кнопку btnActTwo и присвоили ей Activity в качестве обработчика. Реализация метода onClick для кнопки пока заполнена частично — определяем, какая кнопка была нажата. Чуть позже здесь мы будем вызывать второй экран. Но сначала этот второй экран надо создать.
Если помните, при создании проекта у нас по умолчанию создается Activity.
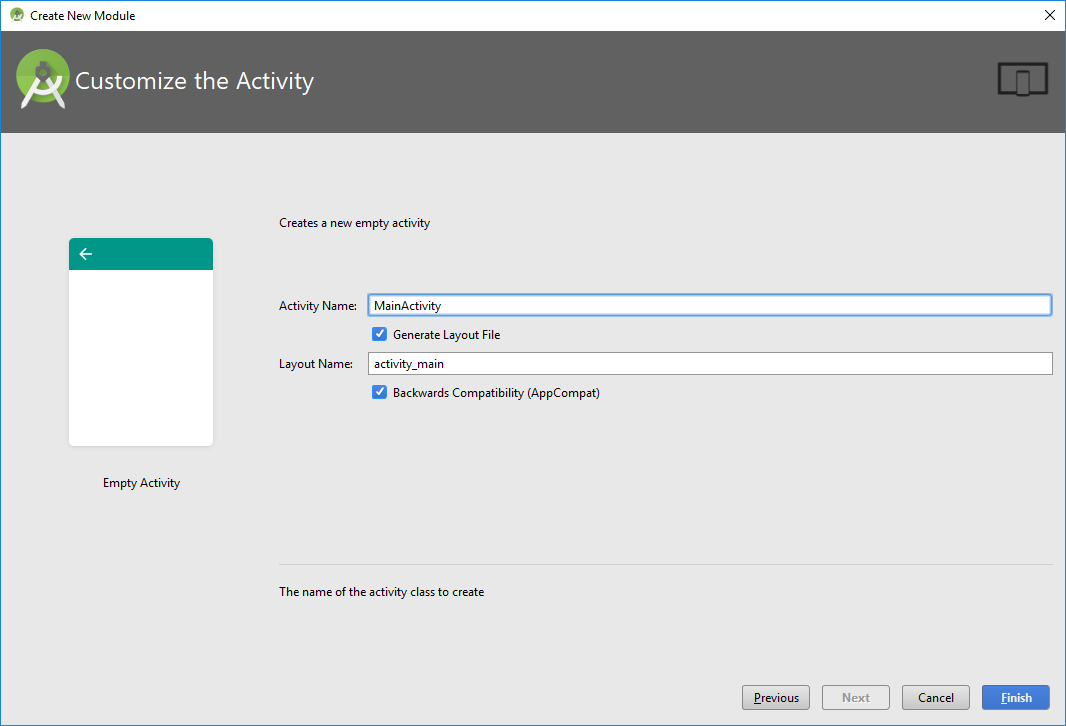
От нас требуется только указать имя этого Activity – обычно мы пишем здесь MainActivity. Давайте разбираться, что при этом происходит.
Мы уже знаем, что создается одноименный класс MainActivity.java – который отвечает за поведение Activity. Но, кроме этого, Activity «регистрируется» в системе с помощью манифест-файла — AndroidManifest.xml.

Давайте откроем этот файл:
Нас интересует тег application. В нем мы видим тег activity с атрибутом name = MainActivity. В activity находится тег intent-filter с определенными параметрами. Пока мы не знаем что это и зачем, сейчас нам это не нужно. Забегая вперед, скажу, что android.intent.action.MAIN показывает системе, что Activity является основной и будет первой отображаться при запуске приложения. А android.intent.category.LAUNCHER означает, что приложение будет отображено в общем списке приложений Android.
Т.е. этот манифест-файл — это что-то типа конфигурации. В нем мы можем указать различные параметры отображения и запуска Activity или целого приложения. Если в этом файле не будет информации об Activity, которое вы хотите запустить в приложении, то вы получите ошибку.
Android Studio при создании модуля создала MainActivity и поместила в манифест данные о нем. Если мы надумаем сами создать новое Activity, то студия также предоставит нам визард, который автоматически добавит создаваемое Activity в манифест.
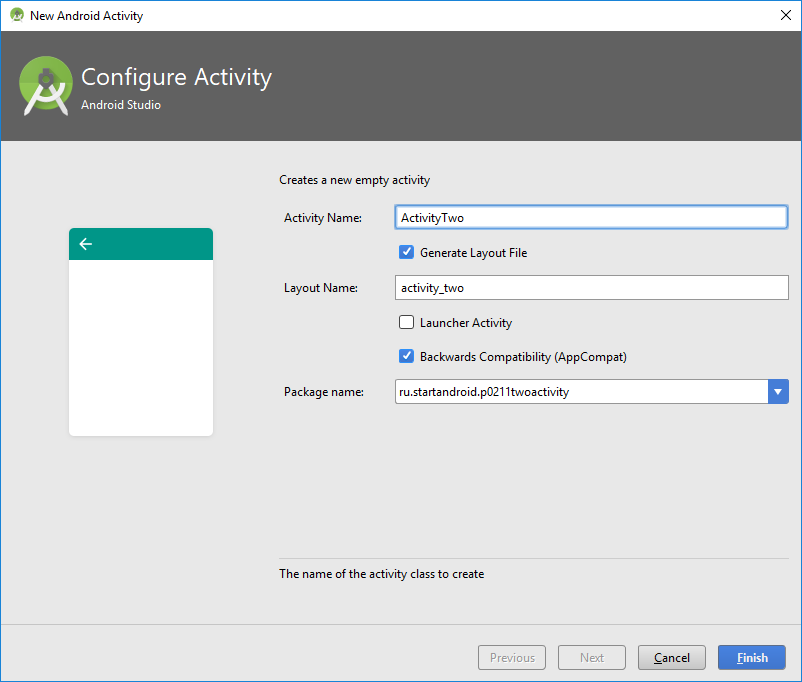
Давайте создадим новое Activity
Жмем правой кнопкой на package ru.startandroid.p0211twoactivity в папке проекта и выбираем New -> Activity -> Empty Activity

В появившемся окне вводим имя класса – ActivityTwo, и layout – activity_two.
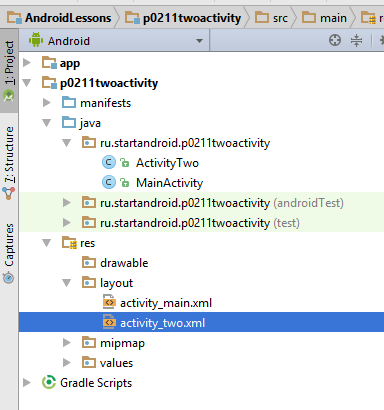
Класс ActivityTwo создан.
В setContentView сразу указан layout-файл activty_two.
Он был создан визардом
Откройте activty_two.xml и заполните следующим кодом:
Экран будет отображать TextView с текстом «This is Activity Two».
Сохраните все. Класс ActivityTwo готов, при отображении он выведет на экран то, что мы настроили в layout-файле two.xml.
Давайте снова заглянем в файл манифеста
Появился тег activity с атрибутом name = .ActivityTwo. Этот тег совершенно пустой, без каких либо параметров и настроек. Но даже пустой, он необходим здесь.
Нам осталось вернуться в MainActivity.java и довершить реализацию метода onClick (нажатие кнопки), а именно — прописать вызов ActivityTwo. Открываем MainActivity.java и добавляем строки:
(добавляете только строки 2 и 3)
Обновите импорт, сохраните все и можем всю эту конструкцию запускать. При запуске появляется MainActivity
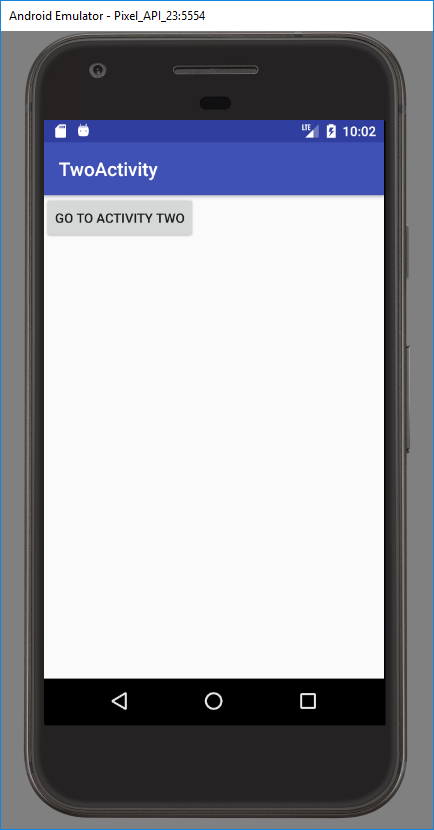
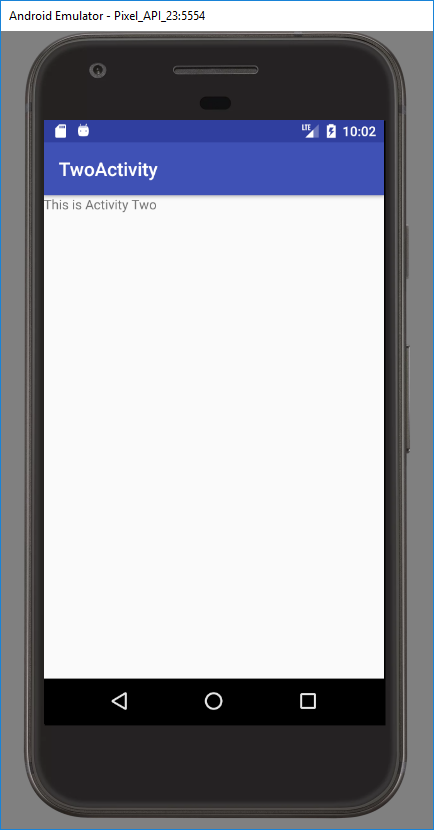
Нажимаем на кнопку и переходим на ActivityTwo
Код вызова Activity пока не объясняю и теорией не гружу, урок и так получился сложным. Получилось много текста и скриншотов, но на самом деле процедура минутная. Поначалу, возможно, будет непонятно, но постепенно втянемся. Создадим штук 5-6 новых Activity в разных проектах и тема уляжется в голове.
Пока попробуйте несколько раз пройти мысленно эту цепочку действий и усвоить, что для создания Activity необходимо создать класс (который наследует android.app.Activity) и создать соответствующую запись в манифест-файле.
На следующем уроке:
— разбираемся в коде урока 21
— теория по Intent и Intent Filter (не пропустите, тема очень важная)
— немного о Context
Присоединяйтесь к нам в Telegram:
— в канале StartAndroid публикуются ссылки на новые статьи с сайта startandroid.ru и интересные материалы с хабра, medium.com и т.п.
— в чатах решаем возникающие вопросы и проблемы по различным темам: Android, Kotlin, RxJava, Dagger, Тестирование
— ну и если просто хочется поговорить с коллегами по разработке, то есть чат Флудильня
— новый чат Performance для обсуждения проблем производительности и для ваших пожеланий по содержанию курса по этой теме
Источник
Что такое Activity и его жизненный цикл в Android
Russian (Pусский) translation by Ellen Nelson (you can also view the original English article)
Из моей предыдущей статьи вы узнали, что Intents позволяют отправлять сообщения с одного компонента Android на другой. А очень важным компонентом является Activity.
Activities являются основной частью разработки приложений для Android. И невозможно понять Activity, не понимая их жизненных циклов. В этом материале вы узнаете всё о жизненном цикле Activity.


Жизненный цикл Activity
Activity — это отдельный экран в Android. Это как окно в приложении для рабочего стола, или фрейм в программе на Java. Activity позволяет вам разместить все ваши компоненты пользовательского интерфейса или виджеты на этом экране.
Важно понимать, что у Activity есть жизненный цикл, проще говоря, это означает, что она может быть в одном из различных стадий, в зависимости от того, что происходит с приложением при действиях пользователя.
Методы жизненного цикла
Давайте поближе рассмотрим жизненный цикл Android Activity. Каждый раз, когда Activity меняет стадию, вызывается один из следующих методов жизненного цикла для класса Activity.
onCreate() : вызывается при первой инициализации Activity. Вам нужно выполнить этот метод для выполнения любой инициализации в вашей Activity.
onStart() : это вызывается, когда Activity готова и отображается пользователю в первый раз, так как Activity готовится стать интерактивной и выйти на передний план. После завершения вызова этого метода, будет вызван метод onResume() .
onResume() : когда Activity переходит в это состояние, оно начинает взаимодействовать с пользователем. Activity продолжает работать в этом состоянии, пока что-либо не уведёт фокус от приложения или Activity (например, входящий звонок). Если это произойдет, будет вызван метод onPause() .
onPause() : этот метод используется для приостановки действий, которые не должны происходить, пока Activity в стадии паузы. Вызов этого метода указывает на то, что пользователь покинул приложение. К примеру, входящий звонок может перевести, проигрыватель музыки в состояние паузы. Это должно заглушить или остановить воспроизводящуюся музыку. Когда пользователь возвращается в приложение, вызывается метод onResume() .
onStop() : этот метод вызывается, если Activity больше не видна в приложении. Такое может случится, если подгружена другая Activity и она занимает весь экран устройства. Когда вызывает этот метод, Activity сообщается перейти в состояние прекращения работы. В этом состоянии, система либо вызывает onRestart() для возврата взаимодействия с Activity, либо вызывает метод onDestroy() , чтобу убрать Activity.
onDestroy() : этот метод вызывается перед тем, как Activity будет завершена. Система вызывает этот метод, когда пользователь завершает Activity, или если система временно убирает процесс, содержащий Activity, для высвобождения места. С этом методом, обязательно освободите любые ресурсы, созданные вашей Activity, иначе ваше приложение будет иметь утечку памяти.
onRestart() : это вызывается, если Activity перезапускается, после того, как было остановлено.
Запуск Activity
Большинство пользовательских взаимодействий приводит к изменению действующей Activity. Поэтому приложение моно раз переключается между Activity за свой жизненный цикл.
Необходимо связывать Activity друг с другом, если требуется чтобы одна Activity запускала другую. Для запуска Activity используйте либо startActivity() , либо startActivityForResult() . В обоих случаях вы должны передать Intent.
Запуск Activity без ожидаемого результата
startActivity() используется, если недавно запущенная Activity не должна возвращать результат.
Следующий фрагмент кода показывает как начать другую Activity, используя этот метод:
Можно также выполнять действия по передачи данных от одной Activity к другой. В этом случае, ваша текущая Activity (вызывающая Activity) хочет передать данные целевой Activity. Вот когда полезны Intents. Чтобы узнать больше об использовании Intents для запуска Activity, смотрите мой предыдущий урок.
Запуск Activity на результат
startActivityForResult() используется для запуска другой Activity и ожидает получение данных в эту свежезапущенную Activity. Другими словами, используйте это если хотите получить результат от целевой Activity в вызывающую Activity, т.е. если целевая Activity собирает некую пользовательскую информацию в модальном диалоговом окне.
Вы получите результат от Activity в методе onActivityResult(int requestCode, int resultCode, Intent data) . Результат будет возвращен в качестве Intent.
Пример запуска Activity
Вот пример, который показывает как работает запуск Activity
Во-первых создайте MainActivity с вашим методом onCreate() , файл макета и кодом запроса.
В методе onCreate() вы создадите новый экземпляр намерения (intent) чтобы запустить вторую Activity.
Когда будете готовы к запуску Activity, скажем в ответ на нажатие кнопки, вы вызовете startActivityForResult() , которая передаст свеже-созданное намерение и код запроса.
В вашей MainActivity , вам всё же нужно обработать результат событий Activity. Это выполняется путём реализации метода onActivityResult() . Вот так вы и получите результат от другой Activity.
Вот как это должно выглядеть:
Теперь создайте вашу SecondActivity . Это должно быть похоже на код ниже.
Прерывание Activity
Перед завершением Activity, будут вызваны соответствующие методы жизненного цикла.
Метод onPause() должен остановить все «слушания» и обновления интерфейса. Метод onStop() должен сохранять данные приложения. И наконец, метод onDestroy() высвободит любые ресурсы, выделенные для Activity.
Когда пользователь переключается обратно на приложение, которое было прервано системным событием, вызывается метод onResume() . На основе сохраненных данных, могут перерегистрироваться «слушатели» и переключиться обновления интерфейса.
Стадия экземпляра Activity
Activity нужен способ сохранить полезное состояние и пользовательские данные, которые она получила. Эти данные могут быть получены от пользователя или созданы, пока Activity не отображалась на экране.
Например, изменение ориентации устройства могут вызвать крушение Activity и её повторное создание. В этом случае, нужно убедиться, что сохранены все состояния Activity, прежде чем она распадётся и снова перезапустится. В противном случае, любые данные, которые были у вашей Activity в это время будут полностью утеряны.
Чтобы сохранить состояние Activity, можно переопределить метод onSaveInstanceState(). Этот метод передаёт объект Bundle , в качестве параметра. Пакет (bundle) может содержать строки, простые типы данных или объекты. В этом методе, просто добавьте любые данные о важном состоянии в пакет (bundle). Позже этот пакет вернется Activity, так что вы сможете восстановить состояние Activity.
Чтобы извлечь сохраненное состояние из пакета и восстановить его (состояние), примените метод onRestoreInstanceState() . Этот callback вызывается между методами жизненного цикла onStart() и onResume() .
Мы получше рассмотрим состояние экземпляра Activity в будущих статьях.
Заключение
После просмотра этого материла, вы хорошо поймете, как работает жизненный цикл Activity. И вы узнали, что есть два способа запуска Activity, а также получение указателей на то, как обрабатывается состояние экземпляра в жизненном цикле Activity.
Спасибо за чтение, и пока вы здесь, ознакомьтесь с некоторыми другими нашими материалами о кодировании приложений для Android.
Источник
Getting Started: WebView-based Applications for Web Developers
Published on Friday, February 28, 2014
Getting started with the Android WebView is fairly simple, whether you want load a remote URL or display pages stored in your app.
This tutorial walks you through creating a new Android Project, adding a WebView, loading a remote URL, and then loading a local HTML page.
Note: This tutorial assumes you’re a developer with limited or no experience with the Android development environment, but have some experience with Java. If you’re already familiar with programming for Android, you may want to refer to to Building Web Apps in WebView on the Android developer site instead.
# Install Android Studio
This tutorial uses Android Studio, the new design-and-build IDE for Android. So you’ll need start off by installing Android Studio, as described here:
# Create a New Android Project
When the installation completes, Android Studio launches and displays the welcome screen.

To create a new project:
Click New Project.
On the next page, enter your application name, package name and target SDKs, and click Next.

Note: If you only intend to support the Chromium WebView (rather than the old WebKit WebView) set Minimum required SDK to API 19: Android 4.4 (KitKat).
On the next page, you’re prompted to enter an application icon. (You can change the icon later, so don’t worry if you don’t have one right now.) When you’re done, click Next.

The next page lets you select the main Android activity for your application. For the purposes of this guide, select Blank Activity and click Next.

Note: An Android Activity can be viewed as a screen of an app. In this case, the application’s main activity will hold the web view. If you’re planning to venture further into native Android development, you can find more information in the Android Activities API guide
The next page lets you change the names for the default Activity and layout. Click Finish to accept the defaults and create the project.

You now have a new Android project. Next, to add the WebView!

Note: After you have your project created, make sure you have the KitKat SDK installed. Go to Tools > Android > SDK Manager and make sure you have Android 4.4 (API 19) installed.
# Add the WebView
Android Studio will give you some boilerplate code to set up your application. Your project’s structure should look something like this:

A few of the more import folders are identified in the picture:
- src/main/java . Android Java source code.
- src/main/res . Resources used by the native application.
- src/main/res/drawable-_type_ . Image resources used by the native application.
- src/main/res/layout . XML layout files that define the structure of UI components.
- src/main/res/values . Dimensions, strings, and other values that you might not want to hard-code in your application.
- src/main/AndroidManifest.xml . The manifest file defines what’s included in the application: activities, permissions, themes, and so on.
You need to add a WebView to the main activity’s layout.
Open the activity_main.xml file in the src/main/res/layout directory if it is not already open. (You may also see a fragment_main.xml file. You can ignore this, as it’s not required for this tutorial.)
Select the Text tab at the bottom of the of the activity_main.xml editor to see the XML markup.

This file defines the layout for your main activity, and the Preview panes show the a preview of the activity. The Blank Activity layout doesn’t include any children. You’ll need to add the WebView.
In the XML pane, remove the self-closing slash from the end of the FrameLayout element, and add the element and a new closing tag, as shown:
To use the WebView you need to reference it in the Activity. Open the Java source file for the main activity, MainActivity.java in the src/main/java/
Add the lines shown in bold.
The existing code in the onCreate method does the work of hooking up the Activity with the layout. The added lines create a new member variable, mWebView , to refer to the web view.
Remove the following code:
The WebView is identified by the resource ID, which is specified by this line in the layout file:
After adding the code, you’ll see some warning messages in the margin of the editor. This is because you haven’t imported the right classes for WebView. Luckily Android Studio can help you fill in the missing classes. The easiest way to do this is click and hover over an unknown class name and wait for a popup showing a «quick fix» — in this case, adding an import statment for the WebView class.

Press Alt + Enter (Option + Enter on Mac) to accept the quick fix.
WebView in hand you can move on to setting it up and and loading some juicy web content.
# Enable JavaScript
WebViews don’t allow JavaScript by default. To run a web application in the web view, you need to explicitly enable JavaScript by adding the following lines to the onCreate method:
# Load a Remote URL
If you’re going to load data from a remote URL, your application needs permission to access the internet. This permission needs to be added in the application’s manifest file.
Open the AndroidManifest.xml file in the src/res directory. Add the line in bold before the closing tag.
The next step is to call the loadUrl method on the webview. Add the following line to the end of the onCreate method.
Now try running the project. If you don’t have a device handy, you can create an emulator (AVD or Android Virtual Device) by going to Tools > Android > AVD Manager.

Note: To detect when a URL has started and finished loading, use WebViewClient.onPageStarted and WebViewClient.onPageFinished .
# Handling Navigation
Now try changing the URL you’re loading to http://www.html5rocks.com/ and rerun your application. You’ll notice something strange.
If you run the application now with a site that has a redirect like html5rocks.com , your app ends up opening the site in a browser on the device, not in your WebView — probably not what you expected. This is because of the way the WebView handles navigation events.
Here’s the sequence of events:
- The WebView tries to load the original URL from the remote server, and gets a redirect to a new URL.
- The WebView checks if the system can handle a view intent for the URL, if so the system handles the URL navigation, otherwise the WebView will navigate internally (i.e. the user has no browser installed on their device).
- The system picks the user’s preferred application for handling an http:// URL scheme — that is, the user’s default browser. If you have more than one browser installed, you may see a dialog at this point.

If you’re using a WebView inside an Android application to display some simple web content (for example, a help page), this may be exactly what you want to do. However, for more sophisticated applications, you may want to handle the navigation links yourself.
To handle navigation inside the WebView you need to override the WebView’s WebViewClient , which handles various events generated by the WebView. You can use it to control how the WebView handles link clicks and page redirects.
The default implementation of WebViewClient makes any URL open in the WebView:
This is a good step forward, but what if you want to handle links for your site only, while opening other URLs in a browser?
To achieve this you need to extend the WebViewClient class and implement the shouldOverrideUrlLoading method. This method is called whenever the WebView tries to navigate to a different URL. If it returns false, the WebView opens the URL itself. (The default implementation always returns false, which is why it works in the previous example.)
Create a new class:
Right-click the package name of your app and select New > Java Class

Enter MyAppWebViewClient as the class name and click OK
In the new MyAppWebViewClient.java file, add the following code (changes shown in bold):
The new code defines MyAppWebViewClient as a subclass of WebViewClient and implements the shouldOverrideUrlLoading method.
The shouldOverrideUrlLoading method is called whenever the WebView is about to load a URL. This implementation checks for the String «html5rocks.com» at the end of the host name of the URL. If the string exists, the method returns false, which tells the platform not to override the URL, but to load it in the WebView.
For any other hostname, the method makes a request to the system to open the URL. It does this by creating a new Android Intent and using it to launch a new activity. Returning true at the end of the method prevents the URL from being loaded into the WebView.
To use your new custom WebViewClient, add the following lines to your MainActivity class:
Now, a user can click any of the HTML5Rocks links and stay within the app, but links to external sites are opened in a browser.
# Handling the Android Back Button
As you start playing around and navigating the awesome HTML5Rocks articles, hitting the back button on Android exits the application, even though you’ve explored a few pages of the site.
WebView has a method canGoBack which tells you if there is anything on the page stack that can be popped. All you need to do is detect a back button press and determine if you should step back through the WebView’s history or allow the platform to determine the correct behaviour. Inside your MainActivity class, add the following method (in bold):
# Loading HTML files from the file system
A big advantage of using a WebView inside an installable application is that you can store assets inside the app. This lets your app work offline and improves load times, since the WebView can retrieve assets directly from the local file system.
To store files such as HTML, JavaScript, and CSS locally, put them in the assets directory. This is a reserved directory that Android uses for raw files that your app may need access to (i.e. files it knows it should minimise or compress).
In your project, create the assets directory in main ( src/main/assets ).
Generally it’s good practice to keep your web files in a subdirectory, so create a www directory and put all your web content in it.
Note: Absolute paths do not work in the WebView when referring to other files, such as CSS and JavaScript. So make sure you make all references relative, instead of absolute (for example, instead of «/pages/somelink.html», use «./pages/somelink.html»).
Once you have everything in your assets directory, it’s as simple as loading in the appropriate file:
You’ll want to tweak the shouldOverrideUrlLoading method so it opens a browser for non-local pages:
Now you are set to build a great WebView app!
For tips on getting the visuals just right, see Pixel-Perfect UI in the WebView.
If you run into trouble, the Chrome DevTools are your friends. See Remote Debugging on Android to get started.
Last updated: Friday, February 28, 2014 • Improve article
Источник


