- Activity Lifecycle in Android Applications
- Learn about different stages of activity lifecycle
- Activity Lifecycle
- onCreate
- onStart
- onPostCreate
- onResume
- onPause
- onStop
- onDestroy
- Conclusion
- ActivityLifecycleCallbacks — слепое пятно в публичном API
- Что такое ActivityLifecycleCallbacks?
- Как заставить ActivityLifecycleCallbacks работать?
- Что с этим можно сделать?
- Android Activity Lifecycle
- Android Activity Lifecycle
- Android Activity Lifecycle Callback Methods
- onCreate()
- onStart()
- onResume()
- onPause()
- onStop()
- onRestart()
- onDestroy()
- Android Activity Lifecycle Diagram
- Android Activity Lifecycle Example
- MainActivity.java File Code
- Output of Android Activity Lifecycle Example
Activity Lifecycle in Android Applications
Learn about different stages of activity lifecycle

If you have experience creating a multi-paged application on Sketchware, you’re probably already familiar with the concept of Intent and Activity. If you haven’t, I recommend you to read this tutorial on creating a Memo application before reading this article.
Lifecycle events were added to Sketchware in version 1.2 to help users to have more control and create more complicated applications. By implementing these new features, users are now able to manipulate how the application would behave at different stages of the lifecycle.
Activity Lifecycle
Every screen on Android applications has a lifecycle. When you open any application, some kind of screen will welcome you. Behind the scenes, this welcome screen had to be created before it could deliver its contents to your eyes. Without you even realizing, the screen or activity went through few stages in its lifecycle. Pretty interesting, huh? Today, we’ll talk about what Lifecycle means in Android programming.
Here is a broad definition of Lifecycle from Android Documentation.
As a user navigates through, out of, and back to your app, the Activity instances in your app transition through different states in their lifecycle. The Activity class provides a number of callbacks that allow the activity to know that a state has changed: that the system is creating, stopping, or resuming an activity, or destroying the process in which the activity resides.
The scene or the screen you’re currently on is known as an Activity. Below is a common way to transition to another screen using Intent in Sketchware:

Each Activity provides a core set of six callbacks or functions: onCreate() , onStart() , onResume() , onPause() , onStop() , and onDestroy() . The system invokes each of these callbacks as an activity enters a new state.
After we started adding more features into Sketchware, we realized users would need more lifecycle events to fully have control over the application. For example, when you play a music through MediaPlayer in Sketchware, the music continues to play even after you exit the application by pressing the home button. Stopping the music was impossible unless you force closed the app, since only one lifecycle event onCreate() was available at the time.
To resolve this issue, we added few more lifecycle events. Note that we didn’t add every lifecycle events. We believed these would be enough to suffice the need for now.

onCreate
Simply put, this event gets fired only once when the activity is started. This is a good place to initialize any data such as variables or lists. In Sketchware, this event is provided by default. You’re probably already very familiar with this event since this event has been here since Sketchware was created.

onStart
Once the activity enters the “started” state, the activity becomes visible and interactive. Behind the scenes, this is where the application maintains any code related to the User Interface.
onPostCreate
This event is called when activity start-up or onStart is complete.
onResume
This event is called whenever the user returns to the activity after leaving the activity — such as receiving a call, pressing the home button, turning off the screen, or transitioning to another activity.
onPause
The activity calls this method as the first indication that the user is leaving your activity.
onStop
When your activity is no longer visible to the user. This is usually a good point to pause any ongoing process, such as MediaPlayer or SoundPool.
onDestroy
Called before the activity is destroyed. This is the final call that the activity receives.
Here is a more detailed flow chart provided from the documentation:

Conclusion
We learned about different stages of lifecycle in Android applications. These may not come in handy yet, but as Sketchware progresses and adds more blocks and features, these events will be very important to utilize.
If you enjoyed this post, please press the 💚 below so others can find this article too!
Источник
ActivityLifecycleCallbacks — слепое пятно в публичном API

С детства я люблю читать инструкции. Я вырос, но меня до сих пор удивляет то, как взрослые люди безалаберно относятся к инструкциям: многие из них считают, что все знают, и при этом пользуются одной-двумя функциями, в то время как их намного больше! Кто из вас пользовался функцией поддержания температуры в микроволновке? А она есть почти в каждой.
Однажды я решил почитать документацию к различным классам Android framework. Пробежался по основным классам: View, Activity, Fragment, Application, — и меня очень заинтересовал метод Application.registerActivityLifecycleCallbacks() и интерфейс ActivityLifecycleCallbacks. Из примеров его использования в интернете не нашлось ничего лучше, чем логирование жизненного цикла Activity. Тогда я начал сам экспериментировать с ним, и теперь мы в Яндекс.Деньгах активно используем его при решении целого спектра задач, связанных с воздействием на объекты Activity снаружи.
Что такое ActivityLifecycleCallbacks?
Посмотрите на этот интерфейс, вот как он выглядел, когда появился в API 14:
Возможно, этому интерфейсу уделяют так мало внимания, потому что он появился только в Android 4.0 ICS. А зря, ведь он позволяет нативно делать очень интересную вещь: воздействовать на все объекты Activity снаружи. Но об этом позже, а сначала внимательнее посмотрим на методы.
Каждый метод отображает аналогичный метод жизненного цикла Activity и вызывается в тот момент, когда метод срабатывает на какой-либо Activity в приложении. То есть если приложение запускается с MainActivity, то первым мы получим вызов ActivityLifecycleCallback.onActivityCreated(MainActivity, null).
Отлично, но как это работает? Тут никакой магии: Activity сами сообщают о том, в каком они состоянии. Вот кусочек кода из Activity.onCreate():
Это выглядит так, как если бы мы сами сделали BaseActivity. Только коллеги из Android сделали это за нас, еще и обязали всех этим пользоваться. И это очень даже хорошо!
В API 29 эти методы работают почти так же, но их Pre- и Post-копии честно вызываются до и после конкретных методов. Вероятно, теперь этим управляет ActivityManager, но это только мои догадки, потому что я не углублялся в исходники достаточно, чтобы это выяснить.
Как заставить ActivityLifecycleCallbacks работать?
Как и все callback, сначала их надо зарегистрировать. Мы регистрируем все ActivityLifecycleCallbacks в Application.onCreate(), таким образом получаем информацию обо всех Activity и возможность ими управлять.
Небольшое отступление: начиная с API 29 ActivityLifecycleCallbacks можно зарегистрировать еще и изнутри Activity. Это будет локальный callback, который работает только для этого Activity.
Вот и все. Но это вы можете найти, просто введя название ActivityLifecycleCallbacks в строку поисковика. Там будет много примеров про логирование жизненного цикла Activity, но разве это интересно? У Activity много публичных методов (около 400), и все это можно использовать для того, чтобы делать много интересных и полезных вещей.
Что с этим можно сделать?
А что вы хотите? Хотите динамически менять тему во всех Activity в приложении? Пожалуйста: метод setTheme() — публичный, а значит, его можно вызывать из ActivityLifecycleCallback:
Повторяйте этот трюк ТОЛЬКО дома
Какие-то Activity из подключенных библиотек могут использовать свои кастомные темы. Поэтому проверьте пакет или любой другой признак, по которому можно определить, что тему этой Activity можно безопасно менять. Например, проверяем пакет так (по-котлиновски =)):
Пример не работает? Возможно, вы забыли зарегистрировать ThemeCallback в Application или Application в AndroidManifest.
Хотите еще интересный пример? Можно показывать диалоги на любой Activity в приложении.
Повторяйте этот трюк ТОЛЬКО дома
Конечно же, не стоит показывать диалог на каждом экране — наши пользователи не будут нас любить за такое. Но иногда может быть полезно показать что-то такое на каких-то конкретных экранах.
А вот еще кейс: что, если нам надо запустить Activity Тут все просто: Activity.startActivity() — и погнали. Но что делать, если нам надо дождаться результата после вызова Activity.startActivityForResult()? У меня есть один рецепт:
В примере мы просто закидываем Fragment, который запускает Activity и получает результат, а потом делегирует его обработку нам. Будьте осторожны: тут мы проверяем, что наша Activity является AppCompatActivity, что может привести бесконечному циклу. Используйте другие условия.
Усложним примеры. До этого момента мы использовали только те методы, которые уже есть в Activity. Как насчет того, чтобы добавить свои? Допустим, мы хотим отправлять аналитику об открытии экрана. При этом у наших экранов свои имена. Как решить эту задачу? Очень просто. Создадим интерфейс Screen, который сможет отдавать имя экрана:
Теперь имплементируем его в нужных Activity:
После этого натравим на такие Activity специальные ActivityLifecycleCallback’и:
Видите? Мы просто проверяем интерфейс и, если он реализован, отправляем аналитику.
Повторим для закрепления. Что делать, если надо прокидывать еще и какие-то параметры? Расширим интерфейс:
Но это все еще легко. Все это было только ради того, чтобы подвести вас к по-настоящему интересной теме: нативное внедрение зависимостей. Да, у нас есть Dagger, Koin, Guice, Kodein и прочее. Но на небольших проектах они избыточны. Но у меня есть решение… Угадайте какое?
Допустим, у нас есть некоторый инструмент, вроде такого:
Закроем его интерфейсом, как взрослые программисты:
А теперь немного уличной магии от ActivityLifecycleCallbacks: мы создадим интерфейс для внедрения этой зависимости, реализуем его в нужных Activity, а с помощью ActivityLifecycleCallbacks найдем его и внедрим реализацию CoolToolImpl.
Не забудьте зарегистрировать InjectingLifecycleCallbacks в вашем Application, запускайте — и все работает.
И не забудьте протестировать:
Но на больших проектах такой подход будет плохо масштабироваться, поэтому я не собираюсь отбирать ни у кого DI-фреймворки. Куда лучше объединить усилия и достигнуть синергии. Покажу на примере Dagger2. Если у вас в проекте есть какая-то базовая Activity, которая делает что-то вроде AndroidInjection.inject(this), то пора ее выкинуть. Вместо этого сделаем следующее:
- по инструкции внедряем DispatchingAndroidInjector в Application;
- создаем ActivityLifecycleCallbacks, который вызывает DispatchingAndroidInjector.maybeInject() на каждой Activity;
- регистрируем ActivityLifecycleCallbacks в Application.
И такого же эффекта можно добиться с другими DI-фреймворками. Попробуйте и напишите в комментариях, что получилось.
Источник
Android Activity Lifecycle
In android, Activity represents a single screen with a user interface (UI) of an application and it will acts an entry point for users to interact with an app.
Generally, the android apps will contain multiple screens and each screen of our application will be an extension of Activity class. By using activities, we can place all our android application UI components in a single screen.
From the multiple activities in android app, one activity can be marked as a main activity and that is the first screen to appear when we launch the application. In android app each activity can start another activity to perform different actions based on our requirements.
For example, a contacts app which is having multiple activities, in that the main activity screen will show a list of contacts and from the main activity screen we can launch other activities that provide screens to perform tasks like add a new contact and search for the contacts. All these activities in the contact app are loosely bound to other activities but will work together to provide a better user experience.
Generally, in android there is a minimal dependency between the activities in an app. To use activities in application we need to register those activities information in our app’s manifest file (AndroidMainfest.xml) and need to manage activity life cycle properly.
To use activities in our application we need to define an activities with required attributes in manifest file (AndroidMainfest.xml) like as shown below
xml version= «1.0» encoding= «utf-8» ?>
manifest ….. >
application ….. >
activity android:name= «.MainActivity» >
…….
The activity attribute android:name will represent the name of class and we can also add multiple attributes like icon, label, theme, permissions, etc. to an activity element based on our requirements.
In android application, activities can be implemented as a subclass of Activity class like as shown below.
public class MainActivity extends Activity <
This is how we can activities in android application based on our requirements.
Android Activity Lifecycle
Generally, the activities in our android application will go through a different stages in their life cycle. In android, Activity class have 7 callback methods like onCreate() , onStart() , onPause() , onRestart() , onResume() , onStop() and onDestroy() to describe how the activity will behave at different stages.
By using activity cal-back methods we can define how our activity can behave when the user enter or leaves our application.
Android Activity Lifecycle Callback Methods
In android, an activity goes through a series of states during its lifetime. By using callback methods we can get the activity transitions between the states.
Android system initiates its program within an Activity starting with a call on onCreate() callback method. There is a sequence of callback methods that start up an activity and a sequence of callback methods that tear down an activity.
This section will give you detailed information about callback methods to handle activity transitions between states during the lifecycle.
onCreate()
This is the first callback method and it fires when the system creates an activity for the first time. During the activity creation, activity entered into a Created state.
If we have an application start-up logic that needs to perform only once during the life cycle of an activity, then we can write that logic in onCreate() method.
Following is the example of defining a onCreate() method in android activity.
@Override
protected void onCreate(Bundle savedInstanceState) <
super .onCreate(savedInstanceState);
setContentView(R.layout. activity_main );
>
Once onCreate() method execution is finished, the activity will enter into Started state and the system calls the onStart() method.
onStart()
The onStart() callback method will invoke when an activity entered into Started State by completing onCreate() method. The onStart() method will make an activity visible to the user and this method execution will finish very quickly.
Following is the example of defining a onStart() method in android activity.
@Override
protected void onStart()
<
super .onStart()
>
After completion of onStart() method execution, the activity enters into Resumed state and system invoke the onResume() method.
onResume()
When an activity entered into Resumed state, the system invokes onResume() call back method. In this state activity start interacting with the user that means user can see the functionality and designing part of an application on the single screen.
Mostly the core functionality of an app is implemented in onResume() method.
The app will stay in this Resumed state until an another activity happens to take focus away from the app like getting a phone call or screen turned off, etc.
In case if any interruption events happen in Resumed state, the activity will enter into Paused state and the system will invoke onPause() method.
After an activity returned from Paused state to Resumed state, the system again will call onResume() method due to this we need to implement onResume() method to initialize the components that we release during onPause() method
Following is the example of defining a onResume() method in android activity.
@Override
public void onResume() <
super .onResume();
if (mCamera == null ) <
initializeCamera();
>
>
If any interruption happens in Resumed state, the activity will enter into Paused state and the system will invoke onPause() method.
onPause()
Whenever the user leaves an activity or the current activity is being Paused then the system invokes onPause() method. The onPause() method is used to pause operations like stop playing the music when the activity is in a paused state or pass an activity while switching from one app to another app because every time only one app can be focused.
Following is the example of defining a onPause() method in android activity.
@Override
public void onPause() <
super .onPause();
if (mCamera != null ) <
mCamera.release();
mCamera = null ;
>
>
After completion of onPause() method execution, the next method is either onStop() or onResume() depending on what happens after an activity entered into a Paused state.
onStop()
The system will invoke onStop() callback method when an activity no longer visible to the user, the activity will enter into Stopped state. This happens due to current activity entered into Resumed state or newly launched activity covers complete screen or it’s been destroyed.
The onStop() method is useful to release all the app resources which are no longer needed to the user.
Following is the example of defining a onStop() method in android activity.
@Override
protected void onStop()
<
super .onStop();
>
The next callback method which raised by the system is either onRestart() , in case if the activity coming back to interact with the user or onDestroy() , in case if the activity finished running.
onRestart()
The system will invoke onRestart() method when an activity restarting itself after stopping it. The onRestart() method will restore the state of activity from the time that is being stopped.
The onRestart() callback method in android activity will always be followed by onStart() method.
onDestroy()
The system will invoke onDestroy() method before an activity is destroyed and this is the final callback method received by the android activity.
The system will invoke this onDestory() callback method either the activity is finishing or system destroying the activity to save space.
Following is the example of defining a onDestroy() method in android activity.
@Override
public void onDestroy()
<
super .onDestroy();
>
The onDestroy() method will release all the resources which are not released by previous callback onStop() method.
Android Activity Lifecycle Diagram
Generally, in android activity class uses different callback methods like onCreate() , onStart() , onPause() , onRestart() , onResume() , onStop() and onDestroy() to go through a different stages of activity life cycle.
Following is the pictorial representation of the Android Activity Life cycle which shows how Activity will behave in different stages using callback methods.

Whenever the user trying to leave an activity like switching from one app to another app, the system will use callback methods to dismantle the activity completely or partially to resume the activity from where the user left off.
Based on our requirements we can implement the activity in the android app using the callback method and it’s not necessary to use all callback methods in each android application.
Android Activity Lifecycle Example
Now we will see, how the android activity lifecycle will work with an example. Following is the example of invoking activity callback methods to see the life cycle process of activity in android application.
Here we are going to use previously created Android Hello World App example and making some modifications to MainActivity.java file like as shown below to capture Android Activity Life Cycle process.
MainActivity.java File Code
The following are the code modifications which made to include all life cycle callback methods in MainActivity.java file which is in \java\com.tutlane.helloworld directory.
package com.tutlane.helloworld;
import android.support.v7.app.AppCompatActivity;
import android.os.Bundle;
import android.util.Log;
public class MainActivity extends AppCompatActivity <
@Override
protected void onCreate(Bundle savedInstanceState) <
super .onCreate(savedInstanceState);
setContentView(R.layout. activity_main );
Log.d( «Activity Lifecycle» , «onCreate invoked» );
>
@Override
protected void onStart() <
super .onStart();
Log.d( «Activity Lifecycle» , «onStart invoked» );
>
@Override
protected void onResume() <
super .onResume();
Log.d( «Activity Lifecycle» , «onResume invoked» );
>
@Override
protected void onPause() <
super .onPause();
Log.d( «Activity Lifecycle» , «onPause invoked» );
>
@Override
protected void onStop() <
super .onStop();
Log.d( «Activity Lifecycle» , «onStop invoked» );
>
@Override
protected void onRestart() <
super .onRestart();
Log.d( «Activity Lifecycle» , «onRestart invoked» );
>
@Override
protected void onDestroy() <
super .onDestroy();
Log.d( «Activity Lifecycle» , «onDestroy invoked» );
>
>
If you observe above code we defined a statement like “setContentView(R.layout.activity_main);” which will help to load all UI components defined in activity_main.xml file and used Log.d() method to generate log messages.
In our application we can have more than one activity file and we need to declare all the activities in the AndroidManifest.xml file. In the manifest XML file, by using MAIN action and LAUNCHER category attributes in intent filters ( ) we can mention the main activity that opens when the user initially launches our app with the launcher icon. In case if we didn’t mention the MAIN action, then the system will decide which activity needs to start and if we didn’t add the LAUNCHER category for the main activity, our app icon will not appear in the home screen’s list of apps.
The code of AndroidManifest.xml file will be like as shown below.
xml version= «1.0» encoding= «utf-8» ?>
manifest xmlns: android = «http://schemas.android.com/apk/res/android»
package= «com.tutlane.helloworld» >
application
android :allowBackup= «true»
android :icon= «@mipmap/ic_launcher»
android :label= «@string/app_name»
android :roundIcon= «@mipmap/ic_launcher_round»
android :supportsRtl= «true»
android :theme= «@style/AppTheme» >
activity android :name= «.MainActivity» >
intent-filter >
action android :name= «android.intent.action.MAIN»/>
category android :name= «android.intent.category.LAUNCHER»/>
intent-filter >
activity >
application >
manifest >
Output of Android Activity Lifecycle Example
Now run your application using Android Virtual Device (AVD) in android studio by clicking on Play icon in toolbar or press Shift + F10 . Our application result will be like as shown below.

Now open Android Device Monitor (Tools à Android à Android Device Monitor) to see our log messages in the LogCat window in android studio like as shown below.
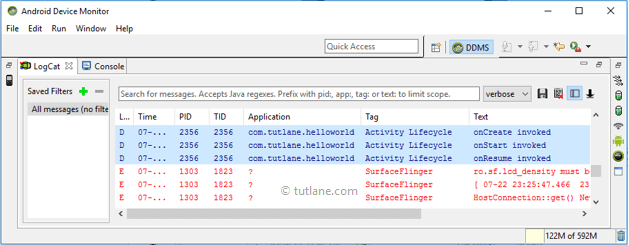
If you observe log messages in LogCat window onCreate, onStart and onResume methods are invoked by system.
Now click on Home button in Android Emulator, immediately activity entered into Paused state and system will invoke onPause() method like as shown below.

After a while, the activity will enter into Stopped state and system will invoke onStop() method like as shown below.

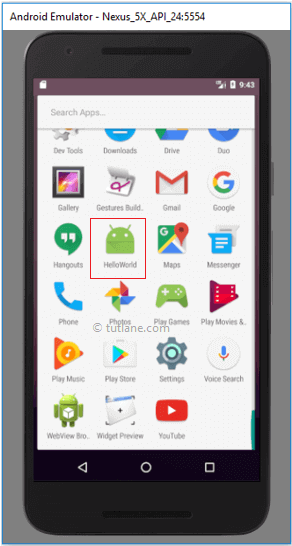
Now again launch our app from the Home screen list of apps like as shown below.
If you observe log messages in the LogCat window again onRestart, onStart and onResume methods are invoked by system like as shown below.

Now click on Back button in the android emulator, the system will invoke the onPause method and after a while onStop, onDestroy methods will be invoked like as shown below.

Here we need to remember that onCreate and onDestroy methods will invoke only once throughout the activity life cycle.
This is how android activity life cycle process will invoke different methods while transition from one stage to another stage.
Источник


