- Adding Padding in Tabs in Android
- Live Code Templates in Android Studio
- May 2, 2018
- Sealed Classes in Kotlin
- April 30, 2018
- Margin vs. Padding Attributes
- Margin and Padding with a View
- Margin → android:layout_margin
- Padding → android:padding
- Margin and Padding with Layout
- Margin
- Padding
- Android add padding programmatically
- Android setPadding(int, int, int, int) method
- Android setPaddingRelative(int, int, int, int) method
- Example
- Creating Dynamic Layouts in Android
- What are Dynamic Layouts?
- Why do we need them?
- Where do Dynamic Layouts excel?
Adding Padding in Tabs in Android
In the app, which I am making at my job, I had a situation where I needed a huge number of tabs with the Fragment View Pager . I used a typical TabLayout and ViewPager with a custom FragmentPagerAdapter class as the adapter for ViewPager .
This is TabLayout and ViewPager in XML layout.
But, as I run it, this is how it looked like:
But, in Android Support library, there are two attributes for TabLayout which can fix this issue very easily. Just add these two lines in TabLayout and you’re done!
Now, when you run, app will show like this:
If you liked this article, you can read my new articles below:
Live Code Templates in Android Studio
Code completion can improve your productivity by reducing how much you have to type, but there are situations when a more powerful tool is needed. Thanks to Android Studio and IntelliJ, live templates make it much easier to focus on just the things you care about.
May 2, 2018
Sealed Classes in Kotlin
Often times, we have a situation where we usually need to manage multiple states of something. For example, our app calls a web service to fetch data from server, then we get any response from server.
April 30, 2018


7 years experience. 💻 Creator of various Open Source libraries on Android . 📝 Author of two technical books and 100+ articles on Android. 🎤 A passionate Public Speaker giving talks all over the world.
Источник
Margin vs. Padding Attributes
There is always a confusion between the padding and margin attribute when you just start designing User interfaces. Be it web development or Android development, margin and padding is standard parameters to position and style User interface elements.
Both provides extra space/gap inside or outside the container. Then what’s the exact difference? Let’s get it cleared. In simple words, margin means to push outside, whereas padding means to push inside.
Now, lets understand what happens when we use these attributes for a View in Android.
Margin and Padding with a View
Let’s see how we can use these attributes with a View in android and how it affects the View’s position and styling.
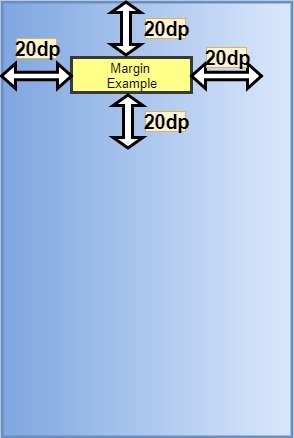
Margin → android:layout_margin
When we say push outside, the view i.e the rectangle pushes its surrounding contents from itself by the dimension specified in the margin attribute. Here, the surrounding contents can be other Views. The following diagram will make it more clear.
Here is how we secify this is our layout XML:
Hence, the other views will be separated from this view by at least 20dp.
We can also different margin values for all the sides, like:
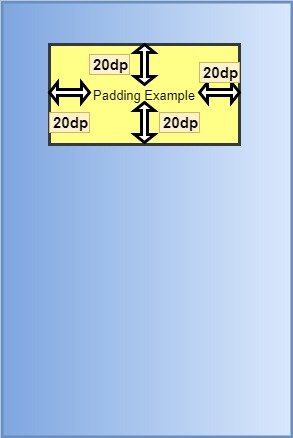
Padding → android:padding
When we say push inside, the view i.e the rectangle pushes its contents from itself by the dimension specified in the padding attribute towards its center. Padding can be considered as margin but inside the View. The following diagram will make it more clear.
Here is how we secify this is our layout XML:
Hence, its content (here text) will be pushed inside of the rectangle by 20dp.
We can also different padding values for all the sides, like:
Margin and Padding with Layout
Now, lets understand what happens when we write these attributes for a Layout.
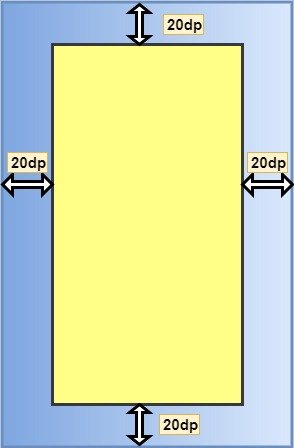
Margin
When we say push outside, the root layout i.e the rectangle pushes its surrounding contents from itself by the dimension specified in the margin attribute. Here, the surrounding content will be the screen of the mobile. Hence, the layout(rectangle) pushes itself from the screen of the mobile. The following diagram will make it more clear.
The syntax to apply margin to a layout is similar to that for a view.
Padding
When we say push inside, the root layout i.e the rectangle pushes its contents from itself by the dimension specified in the padding attribute. Here, its content will be the different views that it holds like TextView, ImageView etc. The following diagram will make it more clear.

Note: In Android, padding attribute applied to the parent(root layout) looks the same as margin attribute applied to the child(views inside the layout).
Источник
Android add padding programmatically
In the previous lesson, we learned how to work with Margin in Android Layouts. In this lesson, we will learn how to work with Padding in Android Layout. Padding is within the view and expressed in Android in pixels for the left, top, right and bottom parts of the view.
Here, we will learn what is padding and how it can be worked easily on Android layout. Demo app will be shown to make it easy for a Beginner to understand.
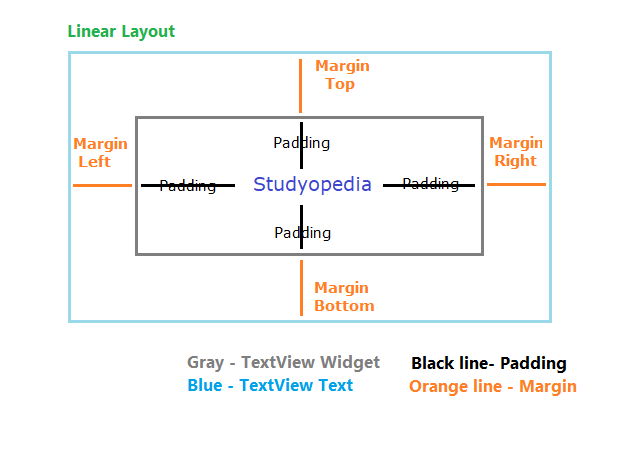
Let’s start with the following illustration, explaining the concept of Padding in Linear Layout. Here the text Studyopedia, is our TextView text. Whereas, the Gray rectangular Box is the space for our View TextView.
A widget in Android occupies a rectangular space. Black line shows padding,
For example, a right padding of 2 will push the view’s content by 2 pixels to the left of the right edge.
The following methods are used to set padding,
setPadding(int, int, int, int): Sets Padding
setPaddingRelative(int, int, int, int): Sets relative padding
Let’s learn about the above two methods,
Android setPadding(int, int, int, int) method
It sets the padding. Here’s the syntax for setPadding() method,
left: left padding in pixels
top: top padding in pixels
right: right padding in pixels
bottom: bottom padding in pixels
Android setPaddingRelative(int, int, int, int) method
It sets the relative padding. Here’s the syntax for setPaddingRelative() method,
start: start padding in pixels
top: end padding in pixels
end: end padding in pixels
bottom: bottom padding in pixels
Padding can be queried by calling the following methods. The methods return the padding value of this view,
| Method | Description |
|---|---|
| getPaddingLeft() | It returns the left padding. |
| getPaddingTop() | It returns the top padding. |
| getPaddingRight() | It returns the right padding. |
| getPaddingBottom() | It returns the bottom padding. |
| getPaddingStart() | It returns the start padding depending on its resolved layout direction. |
| getPaddingEnd() | It returns the end padding depending on its resolved layout direction. |
Example
Time for some examples of the usage of padding in Android, with the emulator output.
Note:
If the minSdkVersion is 17 or higher, then
Use paddingStart instead of paddingLeft attribute, &
Use paddingEnd instead of paddingRight attribute.
If the minSdkVersion is 16 or less, then
Use both older paddingLeft and paddingStart attribute, &
paddingRight and paddingEnd attribute.
Let’s say, you have the following code for TextView, without padding,
Источник
Creating Dynamic Layouts in Android
What are Dynamic Layouts?

Generally, we develop the layout for an Android application by creating the XML file. These are called static layouts.
Static you ask? Yes, because you can not add/delete any View Type in XML on runtime.
Dynamic layouts are developed using Java and can be used to create layouts that you would normally create using an XML file.
Why do we need them?
Let’s say we are fetching some data from our server and we want to create n number of fields/buttons/options in our layout. How do we do that using the only XML? That’s right!
But we can use Java to replicate the exact layout that we would normally create using XML.
It can be used to create LinearLayout, ScrollView, etc.which can further add TextView, EditText, RadioButtons, Checkbox inside it.
Where do Dynamic Layouts excel?
Let’s say we want to show some items in our layout that were frequently bought together(all items are of the same View Type).
There are quite a few ways to show them in our layout:
1. Adding static views in our XML(if we know the exact amount of items).
2. Using Recycler View to inflate the items in our layout.
3. Creating Dynamic Views using Java.
What if we do not know the exact number of items to be displayed and our
layout require different View Types( like 3 TextViews, 2 CheckBoxes, etc.)?
Possible solutions to tackle this problem:
1. Adding static views in our XML won’t work this time because we do not . know the exact number of views we need.
2. Using Recycler View could work but the same View Types should be grouped together in a list. There is not much flexibility in this case.
3. However, this is where Dynamic Layouts take the lead! They are flexible and can add multiple View Types to our layout in any order.
Источник


