How to Add Share Button in Toolbar in Android?
In this article, we are going to create a simple Share Button in the Toolbar in Android. The Share Button is used to share information on mail, Bluetooth, Facebook, Twitter, WhatsApp, etc to an individual person or a group on any social media. We can share any type of message like text, images, videos, links, etc. Note that we are using Java as the programming language. A sample video is given below to get an idea about what we are going to do in this project.
Step by Step Implementation
Step 1: Create a New Project
Attention reader! Don’t stop learning now. Get hold of all the important Java Foundation and Collections concepts with the Fundamentals of Java and Java Collections Course at a student-friendly price and become industry ready. To complete your preparation from learning a language to DS Algo and many more, please refer Complete Interview Preparation Course.
To create a new project in Android Studio please refer to How to Create/Start a New Project in Android Studio. Note that select Java as the programming language.
Step 2: Create a New Android Resource Directory
Go to the res folder, right-click on it and follow the steps shown in the below image to create a new Android Resource Directory.
Now Right-click on Android Resource Directory, a new tab is opened. Do as shown below:
Give a name to your directory and click ok. A new Android Resource Directory is created.
Step 3: Create a Menu Resource File
Go to the menu directory, right-click on it and follow the images given below:
Now right-click on Menu Resource Directory and do as shown in the image below:
Give a name to your file and then click ok. A new Menu Resource File has been created.
Step 4: Create an icon
Navigate to res > drawable. Now, right-click on the drawable folder and follow the images given below:
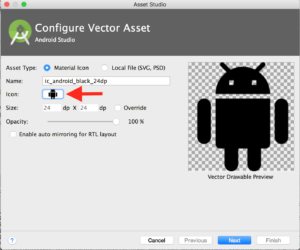
Now right-click on Vector Asset and do as shown below:
i) choose the icon by clicking on clip-art and then search for icon share.
if you want to give some to your icon then write it in Name, otherwise, the default name is generated.
ii) choose a color for your icon by clicking on the color option
Click on choose then next and finish, your icon has been created. Here ic_baseline_share_24 is given by default.
Источник
Material Design. Динамический Toolbar на живом примере
Уверен, что те, кто следят за изменениями в мире Android, заметили, что Toolbar начинает играть в приложениях всё более значимую роль. Например в последней версии Gmail клиента в Toolbar вынесен почти весь функционал по работе с почтой, а в новом Google Chrome Toolbar отвечает за работу с текстом страниц.
В данной статье я постараюсь рассказать о создании динамического Toolbar, который позволит пользователю работать с контентом четырьмя различными способами в рамках одного Activity. Мы рассмотрим весь процесс разработки Toolbar-a начиная с xml файлов стилей и заканчивая анимацией иконок, а в конце статьи я оставлю ссылку на GitHub репозиторий с примером полностью рабочего приложения.
Начнём с постановки задачи
Мы будем разрабатывать Toolbar для приложения, которое позволит пользователю следить за изменениями цен на акции. На главном экране будет расположен список всех акций, за которыми следит пользователь, мы также должны реализовать базовый функционал: удаление, поиск и сортировку акций. Вот так я реализовал этот функционал с помощью динамического Toolbar-a:
| Стандартный режим | Режим поиска | Режим удаления | Режим сортировки |
|---|---|---|---|
 | | | |
Создаём xml файлы конфигураций
Итак, в первую очередь нам нужно создать xml файл самого Toolbar-a. Я советую сделать это в отдельном файле, так как в будущем мы скорее всего захотим использовать один и тот же (или похожий) Toolbar во всех Activity нашего приложения.
Теперь мы можем добавить toolbar.xml в xml Activity следующим образом:
res/layout/activity_main.xml
Поскольку в нашем Toolbar будет располагаться виджет поиска, мы можем настроить его внешний в вид в файле styles.xml нашего приложения. В 21 версии Android SDK появилось гораздо больше возможностей для кастомизации виджета поиска (SearchView Widget), вы можете посмотреть полный список атрибутов по этой ссылке: AppCompat v21 — Material Design for Pre-Lollipop Devices! В этом же файле мы зададим цвет нашего Toolbar.
И наконец создадим файл со списком всех элементов нашего Toolbar-а. Тут у нас есть несколько вариантов:
- В начале создать только те элементы, которые будут видны в стандартном режиме, а затем в коде добавлять или удалять элементы при переходе между режимами.
- Сразу создать все существующие элементы в xml файле, а в коде просто управлять их видимостью.
Я выбрал второй вариант так как у нас не так много элементов внутри Toolbar и нам нет смысла экономить память храня в ней только видимые элементы.
Также существует два способа создания элементов Toolbar:
- Создавать элементы внутри меню (Menu), как экземпляры класса MenuItem. Этот способ использовался в предыдущих версиях Анрдроид (API Level
Источник
Android Toolbar Back Button Tutorial
Hi and welcome to another tutorial from codingdemos, today you will learn how to create android toolbar back button for your app.
You can use the android toolbar back button to navigate from one screen to another without having to tap on the actual device back button. Let’s get started 🙂
In this tutorial we will be using the following:
- Android studio version 2.3.3
- Android emulator Nexus 5X with API 24
- Minimum SDK API 16
- Open up Android Studio and create a new project and give it a name, in our case we’ve named it (ToolbarButtonTutorial), choose API 16 as the minimum SDK, then choose a blank activity and click on finish and wait for Android Studio to build your project.
- Open (styles.xml) file and change the parent theme from (Theme.AppCompat.Light.DarkActionBar) to (Theme.AppCompat.Light.NoActionBar) like this:
- Next let’s add android toolbar, open (activity_main.xml) file and make the following code changes
- Now let’s add the back arrow icon inside android toolbar by using Android asset studio. Click on res and then right click on drawable=>New=>Vector Asset.
Android studio asset studio (Large preview)
- Click on icon where the red arrow is pointing and choose the back arrow icon from the icons list and then click on finish
- When you open (ic_arrow_back_white_24dp.xml) file you will see the following code:
- Change the color of the back arrow icon from black to white by adding white color code inside (android:fillColor) like this:
- Open (MainActivity.java) file and let’s define the toolbar, set the app name to be shown in the toolbar as well as the back arrow icon like this:
- Run the app, and you will be able to see the toolbar with app name and the back arrow icon.
Android Toolbar Back Button (Large preview)
- Now let’s make the back arrow icon clickable so that when you tap on the icon, you will exit the app like this:
In this tutorial we’ve built a simple android app that uses android toolbar back button, to allow the user to navigate between the screen(s) without using the actual device back button. The source code for android toolbar button is available on Github, and if you have a question(s), please let me know in the comment section, and I’ll do my best to answer them.
Источник


