- How to Add a New Google Account on Your Android
- Via the Email App
- Via the Gmail App
- Integrating Google Sign-In into Your Android App
- Before you begin
- Configure Google Sign-in and the GoogleSignInClient object
- Check for an existing signed-in user
- Add the Google Sign-in button to your app
- Start the sign-in flow
- How to Add Google Account on Android Device
- Related Articles
- Top 5 Ways to Add Google Account in Android Without Syncing
- Mehvish
- What’s the Problem with Google Sync
- 1. Quickly Disable Sync
- 2. Disable Apps
How to Add a New Google Account on Your Android
For people who have an Android phone or tablet, it is an option to add a Google account into the device. If you add Google account, you can take advantage of the convenience it can offer. Not only will you be able to answer text messages and calls immediately, you can send replies to important emails without having to open your computer too.
Why is it necessary to learn how to add a Google account? If you add an account to Google, you can enjoy a plethora of benefits. Here are some of the benefits to enjoy if you add new account with Google:
• Availability for receiving emails on the Android smart phone once you set up Google account on Android.
• Easy synchronization of data such as contacts and calendar to the Android smart phone where you set up new Google account.
If you didn’t add account to Google beforehand, know that it is not yet too late to create new Google account. You just need to learn how to set up a new Google account. You might even benefit from other Google-related tutorials such as how to get a Google play account. You can take full advantage of the Google services such as Google Drive, Google Calendar, and Gmail better if you sign in to Google account Android.
It should not be that difficult to add new Google account to your smart phone. The steps are pretty easy to follow. Here is a simple tutorial on how to set up a Google account on your Android smart phone.
Step 1 From the home screen, go to the “Settings” menu.
Step 2 Scroll and look for “Account”. Tap it.
Step 3 Look for the “Add Account” option. You will be adding Google account to Android right here.
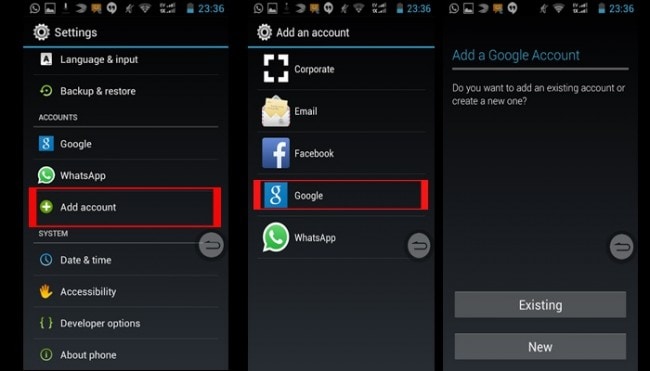
Step 4 Since you want to add account to Google on your phone, you will have to choose “Google” on my phone.
Step 5 If you have already created a Google new account, then you simply need to select the option “Existing” among the options found on the screen.
a: Since you have selected “Existing” as your option, then that means you just need to set up Google account on Android. With this step, you will have to sign into your Google phone account with the right password.
b: Once you have signed in, you will be greeted with the Google Terms of Service. Tap on the “OK” button to signify that you agree to that.
Step 6 If you have not yet made a new Google account, then you will have to open Google account for Android. For this, instead of selecting “Existing”, you will need to choose the option “New”. You will need to follow through the steps to make your own Gmail account.
The next thing that you have to do is to learn how to setup a Google account. Do not just stop after you add account to Google. So, how do I setup a Google account?
Via the Email App
Step 1 You can set up the Android Gmail using the Email app. You just need to download and install Gmail into your Android phone.
Step 2 Go to your App drawer and look for the Email app. Start this application.
Step 3 Select “Others”.
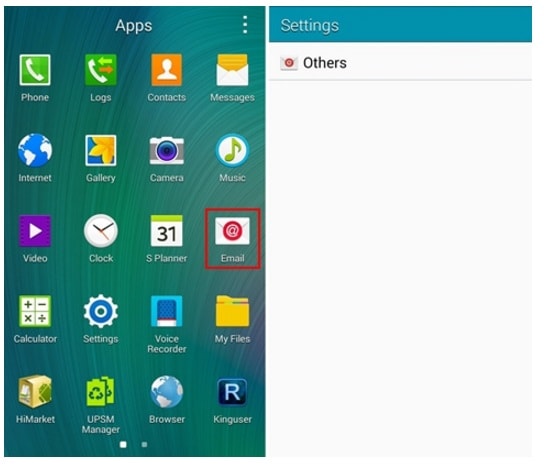
Step 4 You will need to enter your Gmail address and password. This way, you can successfully add Google account Android.
Step 5 Just click on “Next” and “Next” when you see the said buttons appear on the screen.
Step 6 You have now successfully added the account! Tap “Done” for that.
Via the Gmail App
Step 1 It is possible to use the Gmail app for this. Just select the Gmail icon in your app drawer.
Step 2 As soon as it launches, you will be asked what Google account you want to add. Choose “Existing”.
Step 3 Sign in using our Google account and password. Tap on the “next” icon.
Step 4 Tap “OK”.
With your Android smart phone, you are not limited to adding one account. If you know how to make another Google account, then you will most likely be tempted to make another one. You can also add this new account beside your main one. If you want to add another account, then here are the steps to take:
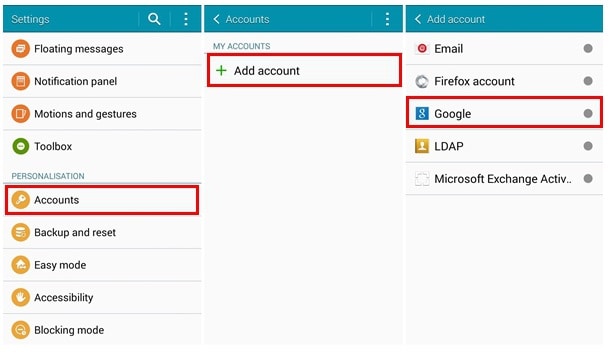
Step 1 Go to “Settings”. This is usually the gear button that is located at the upper right corner of your screen after you have swiped down the home screen’s top panel.
Step 2 Once on the “Settings” screen, you can then scroll down and search for “Accounts”. Tap on it.
Step 3 Look for the option of “Add Account”. This is what you will need to tap to Android add Google account.
Step 4 The “Add Account” screen should display. There will be green dots located at the right side to indicate all those successful Android add account. You will need to scroll down to find and tap on “Google”.
Step 5 And you are done! Basically, it is just the same with how you added the first Google account you have.
As a bonus tip for those who are adding phone to Google account, here is a tutorial on how to make a Google Play account. Usually, you need Google Play to be able to download apps or even when downloading the Gmail app. Google Play usually activates when you already add Google account to Android.
Step 1 From the Home screen, go to the Apps drawer and look for the “Play Store” icon. You will need to tap on this.
Step 2 Since this is the first time you are setting up the Play Store, you will be directed to the “Add a Google Account” screen. You have to tap the “Existing” option for this.
Step 3 Sign in using your Google credentials.
Step 4 You will most likely be asked to set up your payment information. You can choose to skip on this step if you do not plan to make purchases off of Google Play.
Step 5 You can now start using the Play Store!
Источник
Integrating Google Sign-In into Your Android App
To integrate Google Sign-In into your Android app, configure Google Sign-In and add a button to your app’s layout that starts the sign-in flow.
Before you begin
Configure Google Sign-in and the GoogleSignInClient object
In your sign-in activity’s onCreate method, configure Google Sign-In to request the user data required by your app. For example, to configure Google Sign-In to request users’ ID and basic profile information, create a GoogleSignInOptions object with the DEFAULT_SIGN_IN parameter. To request users’ email addresses as well, create the GoogleSignInOptions object with the requestEmail option.
If you need to request additional scopes to access Google APIs, specify them with requestScopes . For the best user experience, on sign-in, only request the scopes that are required for your app to minimally function. Request any additional scopes only when you need them, so that your users see the consent screen in the context of an action they performed. See Requesting Additional Scopes.
Then, also in your sign-in activity’s onCreate method, create a GoogleSignInClient object with the options you specified.
Check for an existing signed-in user
In your activity’s onStart method, check if a user has already signed in to your app with Google.
If GoogleSignIn.getLastSignedInAccount returns a GoogleSignInAccount object (rather than null ), the user has already signed in to your app with Google. Update your UI accordingly—that is, hide the sign-in button, launch your main activity, or whatever is appropriate for your app.
If GoogleSignIn.getLastSignedInAccount returns null , the user has not yet signed in to your app with Google. Update your UI to display the Google Sign-in button.
Add the Google Sign-in button to your app
 Add the SignInButton in your application’s layout:
Optional: If you are using the default sign-in button graphic instead of providing your own sign-in button assets, you can customize the button’s size with the setSize method.
In the Android activity (for example, in the onCreate method), register your button’s OnClickListener to sign in the user when clicked:
Start the sign-in flow
 In the activity’s onClick method, handle sign-in button taps by creating a sign-in intent with the getSignInIntent method, and starting the intent with startActivityForResult .
Starting the intent prompts the user to select a Google account to sign in with. If you requested scopes beyond profile , email , and openid , the user is also prompted to grant access to the requested resources.
After the user signs in, you can get a GoogleSignInAccount object for the user in the activity’s onActivityResult method.
The GoogleSignInAccount object contains information about the signed-in user, such as the user’s name.
You can also get the user’s email address with getEmail , the user’s Google ID (for client-side use) with getId , and an ID token for the user with getIdToken . If you need to pass the currently signed-in user to a backend server, send the ID token to your backend server and validate the token on the server.
Except as otherwise noted, the content of this page is licensed under the Creative Commons Attribution 4.0 License, and code samples are licensed under the Apache 2.0 License. For details, see the Google Developers Site Policies. Java is a registered trademark of Oracle and/or its affiliates.
Источник
How to Add Google Account on Android Device
After buying a new Android device, you might be excited and can’t wait to set it up. The language, ringtone, default browser, and other settings, and so on. There will pop up a new prompt asking you to set up your Google Account. Don’t ignore this pop-up, just sign up a Google account, it will help you a lot.
Why we need a Google Account?
By signing up a Google account, you will benefit from it later:
1. It is available to receive emails on your Android handset with your Google account signed in.
2. Easy to sync data like calendar and contacts to your Android phone.
If you didn’t sign up a Google account before, it’s never too late to add a Google account on your Android phone as an old saying goes: Better late than never. Come on, let’s see how to add a new Google account on your Android smartphone, take Samsung Galaxy for example.
Step 1 Go to «Settings» > «Account» > «Add Account«.

Step 2 If you have a Google account, select «Existing«. Or you need to choose «New» to sign up. Here we will choose «Existing» to sign in with the existing account.

Step 3 Sign in with your Google account and the password.

Step 4 Tap «OK» and agree to the Google Terms of Service.

That’s it. With just several simple taps, you can register or add your Google account on your Android phone/tablet. Fantastic, isn’t it? And after that, all the contacts, calendar, settings, and so on, that you’ve saved with your Google account. It helps a lot for those who purchase a new Android and get freak out of the tedious set up.
Related Articles
 Ivy Bruce
Ivy Bruce is the Founder and Editorial Director at Recovery-Android Studio. You can also find her on Google+ and Twitter.

How to Transfer Videos from Computer to iPhone
![]()
User Guide of Phone to Phone Transfer Software

How to Recover Deleted File from Motorola Atrix

How to Transfer Music from Computer to Nexus
Источник
Top 5 Ways to Add Google Account in Android Without Syncing
Mehvish
21 Dec 2019
Did you notice that your contacts are appearing on another Android phone? That might be highly confusing at first. The answer to that question is simple. If you had logged into another Android phone using your Google account, then all contacts from that account will appear on that phone. In this post, we shall tell you how to add a Google account without syncing data.

Even when you add someone else’s account in your Android phone, their contacts will start showing up on your phone. The problem is — even though Google lets you stop syncing the contacts, the option appears after the contacts sync takes place. That makes the process useless. In short, you cannot choose what you want to sync from your Google account.
However, here we will tell you various ways to avoid syncing data on Android while adding a Google account. Before that, let’s understand the issue properly first.
What’s the Problem with Google Sync
When you add a Google account on your Android phone — be it a primary or secondary, it starts syncing everything related to that account. For instance, emails, contacts, images in Google Photos, Calendar, Drive, and more. Google doesn’t give you a choice. Now, most users use different Google accounts to keep things separate. Syncing everything to the Android phone defeats the purpose.

There could be many reasons for people to stop syncing their Google data to an Android phone. For instance, I don’t want contacts from all of my Google accounts to show up on my Android phone.
Similarly, when some people buy paid apps from their account, they want to share that with someone else, especially their kids. They do that by adding the Google account on the second device. But by doing so, all their personal data such as emails, contacts, and more show up on the kids’ device. Now that’s bad, in terms of both privacy and safety.
To avoid that, one needs to add a Google account without syncing everything. Let’s check how to do that.
Also on Guiding Tech
![]()
5 Best Apps to Transfer Music Between Android Phones
1. Quickly Disable Sync
As mentioned above, Google doesn’t let you choose what you want to sync and what you don’t when you add a Google account. You can disable it after the content has synced. That’s quite stupid.
To avoid syncing things from Google such as contacts before adding a Google account, you need to disable sync quickly.
Here’s how to go about it.
Step 1: Start the process of adding a Google account from Android settings as you would normally do. However, when you reach the last step after entering your password, quickly enable Airplane mode on your phone from quick settings. I recommend that you should do it within seconds.

Step 2: Once enabled, return to the newly added Google Accounts page — Settings > Accounts.

Step 3: Tap on your Google account. Then, tap on Account sync or Sync account.


Step 4: Turn off the toggle or uncheck the box next to the items that you don’t want to sync to your phone. For instance, if you only want to sync Gmail, keep it enabled and turn off the rest.

Step 5: Then, turn off Airplane mode from quick settings. Doing that will bring back the internet services on your phone and resume sync but only for the options that you selected.
2. Disable Apps
The problem with Google data is that even if you disable the sync in the settings, as shown above, the apps still have access to your Google account. Take the case of Gmail.
If you turn off sync for Gmail, the only thing that will stop are the notifications. Meaning, you won’t be notified about new mails. But if the person opens the Gmail app, then they can still see your Google account there. And the new emails will automatically populate by opening the app.
If you don’t want the app to have access to your personal data, you can disable it. Disabling the app will stop it from showing up on your home screen or in the app drawer. Of course, that would mean parting away with other Google accounts too. If you are okay with that, you can disable it in the following way.
Step 1: Open Settings on your Android phone and go to Apps & notifications or Apps.

Step 2: Under All apps, tap on Gmail or any other app that you want to disable.
Источник


