- Get Started
- Before you begin
- App prerequisites
- Set up your app in your AdMob account
- Configure your app
- Initialize the Google Mobile Ads SDK
- Example MainActivity (excerpt)
- Kotlin
- Select an ad format
- Banner
- Interstitial
- Native
- Rewarded
- Additional resources
- How to reset your Advertising ID on Android devices
- Resetting Advertising ID on Android
- Critical Information About Tracking IDs on Android
- Rewarded ads (legacy API)
- Prerequisites
- Create a rewarded ad object
- Kotlin
- Always test with test ads
- Load an ad
- Kotlin
- Show the ad
- Kotlin
- Receive ad event notifications
- Using RewardedAdCallback to preload the next rewarded ad
- Kotlin
- Loading multiple rewarded ads
- Kotlin
Get Started
Integrating the Google Mobile Ads SDK into an app is the first step toward displaying ads and earning revenue. Once you’ve integrated the SDK, you can choose an ad format (such as native or rewarded video) and follow the steps to implement it.
Before you begin
To prepare your app, complete the steps in the following sections.
App prerequisites
- Use Android Studio 3.2 or higher
Make sure that your app’s build file uses the following values:
- A minSdkVersion of 16 or higher
- A compileSdkVersion of 28 or higher
Set up your app in your AdMob account
Register your app as an AdMob app by completing the following steps:
Register your app with AdMob. This step creates an AdMob app with a unique AdMob App ID that is needed later in this guide.
Configure your app
In your project-level build.gradle file, include Google’s Maven repository and Maven central repository in both your buildscript and allprojects sections:
Add the dependencies for the Google Mobile Ads SDK to your module’s app-level Gradle file, normally app/build.gradle :
Add your AdMob app ID (identified in the AdMob UI) to your app’s AndroidManifest.xml file. To do so, add a tag with android:name=»com.google.android.gms.ads.APPLICATION_ID» . You can find your app ID in the AdMob UI. For android:value , insert your own AdMob app ID, surrounded by quotation marks.
In a real app, use your actual AdMob app ID, not the one listed above. If you’re just looking to experiment with the SDK in a Hello World app, you can use the sample app ID shown above.
Note also that failure to add the tag as shown above results in a crash with the message:
(Optional) Declare AD_ID permission for previous versions to work with Android S.
If your app uses the Google Mobile Ads SDK version 20.4.0 or higher, you can skip this step since the SDK automatically declares the com.google.android.gms.permission.AD_ID permission and is able to access the Advertising ID whenever it’s available.
For apps that use the Google Mobile Ads SDK version 20.3.0 or lower and are targeting Android S, you must add the com.google.android.gms.permission.AD_ID permission in the AndroidManifest.xml file in order to target Android S:
To learn more about the com.google.android.gms.permission.AD_ID permission declaration, including how to disable it, please refer to this Play Console article.
Initialize the Google Mobile Ads SDK
Before loading ads, have your app initialize the Google Mobile Ads SDK by calling MobileAds.initialize() which initializes the SDK and calls back a completion listener once initialization is complete (or after a 30-second timeout). This needs to be done only once, ideally at app launch.
Ads may be preloaded by the Google Mobile Ads SDK or mediation partner SDKs upon calling MobileAds.initialize() . If you need to obtain consent from users in the European Economic Area (EEA), set any request-specific flags (such as tagForChildDirectedTreatment or tag_for_under_age_of_consent ), or otherwise take action before loading ads, ensure you do so before initializing the Google Mobile Ads SDK.
Here’s an example of how to call the initialize() method in an Activity:
Example MainActivity (excerpt)
Kotlin
If you’re using mediation, wait until the completion handler is called before loading ads, as this will ensure that all mediation adapters are initialized.
Select an ad format
The Google Mobile Ads SDK is now imported and you’re ready to implement an ad. AdMob offers a number of different ad formats, so you can choose the one that best fits your app’s user experience.
Banner
Rectangular ads that appear at the top or bottom of the device screen. Banner ads stay on screen while users are interacting with the app, and can refresh automatically after a certain period of time. If you’re new to mobile advertising, they’re a great place to start.
Interstitial

Full-screen ads that cover the interface of an app until closed by the user. They’re best used at natural pauses in the flow of an app’s execution, such as between levels of a game or just after a task is completed.
Native

Customizable ads that match the look and feel of your app. You decide how and where they’re placed, so the layout is more consistent with your app’s design.
Rewarded

Ads that reward users for watching short videos and interacting with playable ads and surveys. Used for monetizing free-to-play apps.
Additional resources
The Google Mobile Ads repository on GitHub demonstrates how to use the different ad formats that this API offers.
Except as otherwise noted, the content of this page is licensed under the Creative Commons Attribution 4.0 License, and code samples are licensed under the Apache 2.0 License. For details, see the Google Developers Site Policies. Java is a registered trademark of Oracle and/or its affiliates.
Источник
How to reset your Advertising ID on Android devices
The advertising identifier (ID) is a unique anonymous identifier on Android devices that is used for advertising purposes. While there is no option to turn it off, the option to safely reset the advertising ID exists. I do this often to create a different user profile and avoid targeted marketing on my Samsung phone.
App developers (and Google) can use the advertising identifier API to access the ID on user devices; for instance, to identify users and devices for targeted advertising.
It is only used by applications offered on Google Play and is the only allowed persistent identifier for all advertising purposes.
Resetting Advertising ID on Android
Simply follow the steps below to change your Android advertising ID:
1. Open Google Settings on your smartphone by tapping on Menu and then on Google Settings once all apps are displayed on the screen.
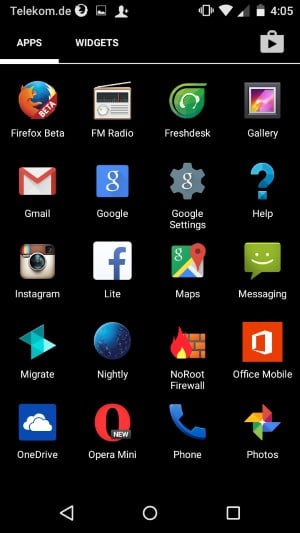
Android OS Settings icon can be found on the apps home screen
2. Locate and tap on the Ads menu under Services.
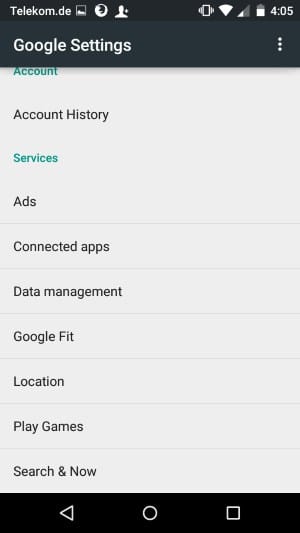
Locate the Ads menu to reset your Android ads identifier
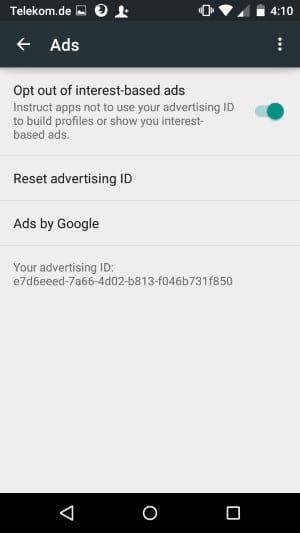
3. Tap on Reset advertising ID in the Ads menu.
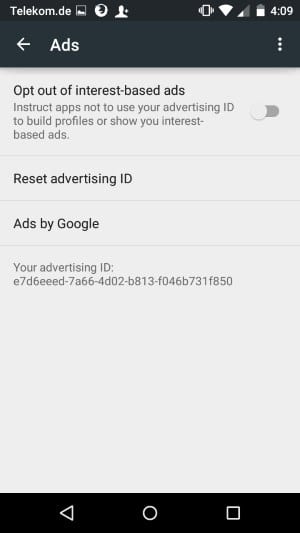
Your old (current) advertising ID will be displayed at the bottom
4. Confirm the replacement when the confirmation prompt is displayed. Your Android ads identifier will be changed.
Once you reset the advertising ID, a new ID is displayed immediately on the same page. Since a new identifier is assigned now, advertisers cannot link past actions anymore to the device.
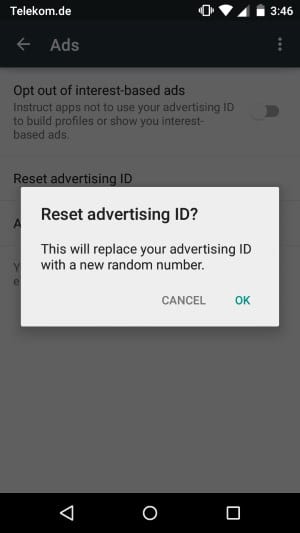
Confirm setting a new ad ID
5. Bonus: Opt-out of interest-based ads as well on the same page.
This tells apps not to use the advertising ID for tracking purposes and to only show regular advertisements but not interest-based ads on the device.
It needs to be noted that older OS versions may not support the advertising ID. App developers may fall back to using other methods such as using the Android ID to track users anonymously.
Limit ad tracking by opting out of interest-based ads
Critical Information About Tracking IDs on Android
According to Google, apps must check the settings of the Android device and respect them. If interest-based ads are disabled on the device, apps must honor that. Failure to do so is a policy violation.
The content policy page offers additional information on how the advertising ID may be used by companies or developers. It states that companies may not link the advertising identifier to personal identifiable information or persistent device identifiers such as the IMEI or MAC address of the device without explicit consent.
Companies who use the advertising identifier need to disclose this in public privacy notifications.
Источник
Rewarded ads (legacy API)
Prerequisites
- Google Mobile Ads SDK 17.2.0 or higher.
- Follow the Get Started guide to import the Google Mobile Ads SDK and update your Android manifest.
Create a rewarded ad object
Rewarded ads are requested and shown by RewardedAd objects. The first step is instantiating a RewardedAd . This is done in the onCreate() method of an Activity in the following code snippet:
Kotlin
The constructor requires the following arguments:
- An Activity context
- The ad unit ID to be used to load the rewarded ad
Always test with test ads
When building and testing your apps, make sure you use test ads rather than live, production ads. Failure to do so can lead to suspension of your account.
The easiest way to load test ads is to use our dedicated test ad unit ID for Android rewarded ads:
It’s been specially configured to return test ads for every request, and you’re free to use it in your own apps while coding, testing, and debugging. Just make sure you replace it with your own ad unit ID before publishing your app.
For more information about how the Mobile Ads SDK’s test ads work, see Test Ads.
Load an ad
To load a rewarded ad, call the RewardedAd object’s loadAd() method. This method requires instances of AdRequest and RewardedAdLoadCallback as arguments.
Kotlin
The onRewardedAdLoaded() and onRewardedAdFailedToLoad() methods of the RewardedAdLoadCallback provide the result of the ad load operation.
| Overridable methods | |
|---|---|
| onRewardedAdLoaded() | This method is executed when an ad has finished loading. |
| onRewardedAdFailedToLoad() | This method is invoked when an ad fails to load. It includes an error parameter of type LoadAdError that indicates what type of failure occurred. For more information, refer to the Debugging Ad Load Errors documentation. |
Warning: Attempting to load a new ad from the onRewardedAdFailedToLoad() method is strongly discouraged. If you must load an ad from onRewardedAdFailedToLoad() , limit ad load retries to avoid continuous failed ad requests in situations such as limited network connectivity.
Show the ad
Before displaying a rewarded ad to users, you must present the user with an explicit choice to view rewarded ad content in exchange for a reward. Rewarded ads must always be an opt-in experience.
To show a RewardedAd , use the isLoaded() method to verify that it’s finished loading, then call show() . The show() method requires Activity and RewardedAdCallback instances as arguments. The Activity instance should be the activity from which the rewarded ad is presented.
The rewarded ad from the previous code example could be shown in a button’s OnClickListener like this:
Kotlin
Receive ad event notifications
The RewardedAdCallback provided to the show() method gets notifications of rewarded ad events. Each of the overridable methods in RewardedAdCallback corresponds to an event in the lifecycle of a rewarded ad. For example, the onUserEarnedReward() method is the perfect place to provide the user with their reward. Additional details on each ad event method is provided below.
| Overridable methods | |
|---|---|
| onRewardedAdOpened() | This method is invoked when the ad is displayed, covering the device’s screen. |
| onRewardedAdClosed() | This method is invoked when the rewarded ad is closed due to the user tapping on the close icon or using the back button. If your app paused its audio output or game loop, this is a great place to resume it. |
| onUserEarnedReward() | The method is invoked when the user should be rewarded for interacting with the ad. Reward details that were configured for your ad unit can be accessed through the getType() and getAmount() methods of the RewardItem parameter. |
| onRewardedAdFailedToShow() | This method is invoked when an ad fails to display. It includes an adError parameter that indicates what type of failure occurred. The possible values of the error code ( adError.getCode() ) are defined as constants in the RewardedAdCallback class. |
Using RewardedAdCallback to preload the next rewarded ad
RewardedAd is a one-time-use object. This means that once a rewarded ad is shown, the object can’t be used to load another ad. To request another rewarded ad, you’ll need to create a new RewardedAd object.
A best practice is to load another rewarded ad in the onRewardedAdClosed() method on RewardedAdCallback so that the next rewarded ad starts loading as soon as the previous one is dismissed:
Kotlin
Loading multiple rewarded ads
To load multiple rewarded ads, follow the steps outlined in the create a rewarded ad object and load an ad sections for each ad you intend to load. The code snippet below demonstrates how to load two rewarded ads for two distinct ad placements.
Kotlin
It is a best practice to load an ad inside the callback of the OnInitializationCompleteListener . Even if a mediation network is not ready, the Google Mobile Ads SDK will still ask that network for an ad. So if a mediation network finishes initializing after the timeout, it can still service future ad requests in that session.
You can continue to poll the initialization status of all adapters throughout your app session by calling MobileAds.getInitializationStatus() .
How do I find out why a particular mediation network isn’t ready?
AdapterStatus.getDescription() describes why an adapter is not ready to service ad requests.
Except as otherwise noted, the content of this page is licensed under the Creative Commons Attribution 4.0 License, and code samples are licensed under the Apache 2.0 License. For details, see the Google Developers Site Policies. Java is a registered trademark of Oracle and/or its affiliates.
Источник


