- Программируем будильник или использование AlarmManager в Android
- Несколько слов о классе AlarmManager
- Программируем приложение-будильник для Android
- Android Alarm Clock Tutorial to Schedule and Cancel | AlarmManager, PendingIntent and WakefulBroadcastReceiver Example
- AlarmManager : Schedule Alarm
- Android Alarm Clock Tutorial
- Android Alarm Clock Application
- 1. Android Manifest
- AndroidManifest.xml
- 2. Android Activity
- activity_my.xml
- AlarmActivity.java
- 3. Alarm Receiver
- AlarmReceiver.java
- 4. Alarm Notification Message
- AlarmService.java
- Popular Articles
- Comments on «Android Alarm Clock Tutorial»
- Kotlin Android Alarm Examples
- Example 1: Kotlin Android Build an Alarm Clock
- Step 1: Create Kotlin Project
- Step 2: Dependencies
- Step 3: Permissions
- Step 4: Design Layout
- Step 5: Create model class
- Step 5: Create an Alarm Receiver
- Step 6: Create main Activity
- Step 7: Run
- Reference
- Example 2: How to Start an Alarm
- What do we build?
- Project Structure
- Step 1 – Create Android Project
- Step 2. – Let’s modify our build.gradle.
- Step 3. Let’s prepare our resources.
- Step 4. Let’s create our BroadcastReceiver class.
- Step 5. Let’s come to our MainActivity class.
- Step 6. Let’s check on the Androidmanifest
- Example: Android AlarmManager – Schedule Showing of Toast
- Common Questions this example explores
- Tools Used
- Source Code
- Build.Gradle
- MyReceiver.java»
- MainActivity.java
- ActivityMain.xml
- ContentMain.xml
- More Resources:
- How To Run
- Conclusion.
- Example: Android Schedule Repeating/Recurring Alarms
- Screenshot
- Common Questions this example explores
- Tools Used
- Libaries Used
- Source Code
- Build.Gradle
- MyReceiver.java
- MainActivity.java
- ActivityMain.xml
- ContentMain.xml
- Video/Preview
- Download
- Oclemy
Программируем будильник или использование AlarmManager в Android
 При разработке приложения порой бывает необходимо выполнять какие-то действия в будущем. Например, вы хотите создать будильник или периодически отправлять данные на свой сайт в строго определенное время. Для решения подобных задач в Android используется классAlarmManager, который позволяет выполнять код в требуемый момент времени, даже если ваше приложение не запущено. То-есть AlarmManager — аналог corn в Linux или планировщика задач Windows. Вы говорите, что такой-то кусок кода должен выполниться тогда-то и AlarmManager обеспечивает запуск кода. В англоязычный литературе таймер, который выполняет код в требуемый момент времени обозначается терминомalarm. Давайте в рамках данной статьи называть этот таймербудильником, чтобы отделить это понятие от таймера.
Несколько слов о классе AlarmManager
Фактически класс AlarmManager обеспечивает доступ к сервису планировки задач Android. Для получения объекта этого класса нужно вызвать методContext.getSystemService(Context.ALARM_SERVICE).AlarmManagerрегистрирует в системе интент и когда наступает обозначенное время, AlarmManager запускает этот интент. Если момент вызова приложение закрыто, то оно будет вновь запущено. AlarmManager нужно использовать только в случае, если код должен быть выполнен даже при закрытом приложении, во всех других случаях рекомендуется использовать классHandler.
Класс AlarmManager довольно прост. В нашем распоряжении шесть методов:
- void cancel(PendingIntent operation) — отменяет установленный таймер для переданного в качестве параметра интента.
- void set (int type, long triggerAtMillis, PendingIntent operation) — устанавливает будильник, который сработает один раз.
- void setInexactRepeating (int type, long triggerAtMillis, long intervalMillis, PendingIntent operation) — установка будильника с неточным повторением.
- setRepeating(int type, long triggerAtMillis, long intervalMillis, PendingIntent operation)— установка будильника с точным повторением.
- setTime(long millis) — установка системного времени.
- setTimeZone(String timeZone) — установка временной зоны, выбранной по-умолчанию.
ЗдесьPendingIntent— класс, который представляет интент и связанное с его выполнением действие. Передавая PendingIntent другому приложению Вы тем самым даете ему право запускать кусок кода из своей программы.
В качестве типа будильника (параметрtype) может быть передано одно из значений ELAPSED_REALTIME, ELAPSED_REALTIME_WAKEUP, RTC и RTC_WAKEUP. ELAPSED_REALTIME и ELAPSED_REALTIME_WAKEUP — время задается с момента загрузки устройства, а RTC и RTC_WAKEUP — системное время в UTC. Для ELAPSED_REALTIME и RTC если устройство находится в спящем режиме в момент срабатывания будильника, то связанный с ним интент будет вызван позже, когда пользователь выведет устройство из спящего режима. Для ELAPSED_REALTIME_WAKEUP и RTC_WAKEUP если устройство находится в спящем режиме, оно немедленно пробуждается и вызывается интент.
Программируем приложение-будильник для Android
Давайте в качестве примера разработаем приложение — будильник. При запуске программы пользователю будет показано окно с тремя кнопками. С их помощью пользователь сможет: установить будильник, который срабатывает один раз; будильник, который будет срабатывать периодически; а также удалить ранее установленные будильники.
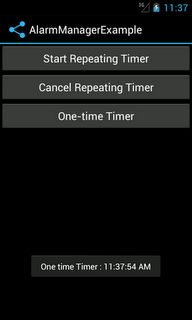
Создадим новый проект в макет шаблона добавим три кнопки
КнопкаbtStartустанавливает повторяющийся будильник, кнопкаbtCancel— отменяет его. КнопкаbtOneTime— создает не повторяющийся будильник. Прямо в шаблоне мы указали методы, которые будут вызываться при нажатии на кнопки: startRepeatingTimer, cancelRepeatingTimer и onetimeTimer соответственно. Код этих методов будут приведен в классе Activity.
Для работы сAlarmManagerнапишем отдельный класс. В качестве базового класса используем BroadcastReciever. Наш класс будет управлять зарегистрированным с помощью AlarmManager интентом. Мы переопределим методonReceive(), который будет вызываться после получения интента. Внутри метод onReceive() мы должны попытаться получить связанные с интентом параметры. В своей программе мы будем использовать один параметр ONE_TIME, который позволяет определить, относится ли интент к однократно срабатывающему будильнику или нет. После того, как значение ONE_TIME получено, пользователю показывается соответствующее сообщение.
Также в этом классе определим методы setAlarm(), cancelAlarm() и onetimeTimer(). Конечно эти методы можно было определить и в другом месте, мы включили их в данный класс из соображения простоты примера.
- Метод setAlarm() устанавливает повторяющийся будильник с помощью метода setRepeating(). Этому методу требуется четыре параметра: тип будильника, время запуска (устанавливаем текущий момент), интервал в миллисекундах, интент, который будет вызываться при срабатывании будильника.
- Метод cancelAlarm() отменяет зарегистрированный ранее будильник с помощью вызова метода cancel(), которому перезается в качестве параметра интент. При совпадении этого параметра с зарегистрированным ранее интентом, произойдет удаление будильника.
- Метод onetimeTimer() создает будильник, который срабатывает один раз. Делается с помощью метода set(), которому передается три параметра: тип будильника, время запуска, вызываемый интент.
Ниже приводится файл манифеста. Обратите внимание, для корректной работы программе необходимо дать разрешениеWAKE_LOCK, поскольку мы используем блокировку потока в методе onReceive(). Также тут мы регистрируем AlarmManagerBroadcastReceiver, как получатель широковещательных сообщений
Теперь давайте напишем класс, в котором реализуем обработчики кнопок. Здесь мы создадим экземпляр описанного выше класса AlarmManagerBroadcastReciever и будем вызывать методы setAlarm(), cancelAlarm() и setOnetime().
При надатии на кнопки будут установлен будильник. Исходный код проекта можно скачатьздесь.
Источник
Android Alarm Clock Tutorial to Schedule and Cancel | AlarmManager, PendingIntent and WakefulBroadcastReceiver Example
AlarmManager : Schedule Alarm
Find the description of some constants of AlarmManager . Pending intent is fired with different scenario.
ELAPSED_REALTIME : It considers the amount of time since the phone is booted and it does not wake the device.
ELAPSED_REALTIME_WAKEUP : Same as ELAPSED_REALTIME, but phone wakes up.
RTC : It is used to fire pending intent at specified time but phone does not wake up.
RTC_WAKEUP : Same as RTC but phone wakes up.
Find some methods which are used to schedule alarms. These methods are based on exact, inexact time of execution and repeating or single execution.
set(int type, long triggerAtMillis, PendingIntent operation) : Schedules the alarm and if there is already an alarm by the intent then previous one will be canceled. It allows executing only one time.
setExact(int type, long triggerAtMillis, PendingIntent operation) : It behaves same as set() but it does not allow OS to adjust time. The alarm will fire on exact time.
setRepeating(int type, long triggerAtMillis, long intervalMillis, PendingIntent operation) : It behaves same as set() but repeats for the given interval of time.
setInexactRepeating(int type, long triggerAtMillis, long intervalMillis, PendingIntent operation) : Same as setRepeating() but the executing time will not be exact.
setWindow(int type, long windowStartMillis, long windowLengthMillis, PendingIntent operation) : Executes within a given window of time and works same as set() . It can be used for strict ordering of execution in case of multiple alarms.
Now find some constants which gives time in milliseconds and are used for repeating alarm interval. These are INTERVAL_DAY , INTERVAL_FIFTEEN_MINUTES, INTERVAL_HALF_DAY , INTERVAL_HALF_HOUR , INTERVAL_HOUR .
Find some sample of alarm execution. The below alarm will execute after 15 minutes and repeat after every 15 minutes.
Источник
Android Alarm Clock Tutorial
This Android tutorial will walk you through to create an alarm clock Android application. This alarm app is planned to be minimalistic and usable. It can set alarm for one occurrence for the coming day. You will get alarm ring sound, a notification message and a message in the app UI. This application and device can be idle or sleeping when the alarm triggers.

We will be using the AlarmManager API to set and ring the alarm notification. We will have a TimePicker component and a toggle switch in the UI to set the alarm time.
Android Alarm Clock Application
Application is planned to be simple as possible and you can use this as a base framework and enhance it by adding fancy features.
1. Android Manifest
AndroidManifest.xml
We need to give uses-permission for WAKE_LOCK , other than that the AndroidManifest.xml is pretty standard one. Just need to include the service and receiver.
2. Android Activity
activity_my.xml
The Android Activity is designed to be simple. We have a TimePicker component followed by a ToggleButton . That’s it. Choose the time to set the alarm and toggle the switch to on. The alarm will work.
AlarmActivity.java
AlarmActivity uses the AlarmManager to set the alarm and send notification on alarm trigger.
3. Alarm Receiver
AlarmReceiver.java
AlarmReceiver is a WakefulBroadcasReceiver , this is the one that receives the alarm trigger on set time. From here we initiate different actions to notify the user as per our choice. I have given three type of notifications, first show a message to user in the activity UI, second play the alarm ringtone and third send an Android notification message. So this is the place to add enhancement for different types of user notifications.
4. Alarm Notification Message
AlarmService.java
The receiver will start the following IntentService to send a standard notification to the user.


Popular Articles
Comments on «Android Alarm Clock Tutorial»
Sorry 4 double-posting 🙁
I forgot to add the service in the manifest
now it works, but when the receiver recieve the event it throws a exception:
Unable to start receiver de.it2do.effektivlernen.AlarmReceiver: java.lang.SecurityException: Neither user 10043 nor current process has android.permission.WAKE_LOCK.
My Manifest.xml has the permission:
Can you help me? >. Roman says:
I keep getting a ‘noclassdeffound’ error. The exact line is on:
Intent myIntent = new Intent(AlarmActivity.this, AlarmReceiver.class);
AlarmReceiver.class is the one not found. Any fix for this?
how to make 5 alarm with 1 timepicker??
Once the alarm starts it never gets stopped. Switching the toggle button doesn’t cancel the sound, rather it turns into a loop and the ring repeats faster.
Why so?
This app contains lots of bugs. I don’t recommend people to follow this tutorial.
Can you show the use of media player to set the alarm tone in continuous loop.
I am having the same problem as Naif. This code does not include anything to turn off the alarm.
My code is Completely done..without error..But when I set the time the alarm does not work..The music also not sound
Источник
Kotlin Android Alarm Examples
AlarmManager is a class that allows us create alarms. Alarms allow our apps to schedule specific codes to be executed at certain times in the future.
It’s better and more efficient to use AlarmManager class to create alarms for scheduling than using something like a timer.
AlarmManager provides to us the access to system alarm services, so it’s not like we are going to invent our scheduling algorithms.
AlarmManager is mostly used together with BroadcastReceivers. Here’s how it works:
- First Alarm goes off or rings.
- The system broadcasts an intent. This is the intent which had been registered for it.
- This automatically starts the target application in case it’s not already running.
- If the device sleeps, the alarms that are already registered get retained.
- If the alarm goes off while the device is sleeping, then the device is woken up. This is optional.
- If the user turns the device off or reboots it, then the alarms are cleared.
You are guaranteed that the phone will not sleep till you have finished handling your broadcast. Broadcast are handled by the onReceive() method of the android.content.BroadcastReceiver . This is a method you override after deriving this class.
As long as the The onReceive() method is still executing, the AlarmManager will hold a CPU wake lock. So the device won’t sleep.
Then the AlarmManager releases the wake lock when the onReceive() finishes executing and returns.
But sometimes just as the onReceive() method finishes, it’s possible that the phone can sleep immediately. Because the device has slept quickly, if you had requested a service using the Context.startService() it won’t be started. This is because the device has slept before it’s called. However, the initial wake lock is no longer in place. It had been released the moment the onReceive() had returned. So what’s the solution? Well you implement a separate wake lock on your BroadcastReceiver and Service. This wake lock will ensure the device runs until the service becomes available.
So when should you use alarm manager and when should you not? Well use alarm manager for scheduling operations. Don’t use it for timing and ticking operations. And don’t use timers for scheduling operations. Scheduled code using alarmmanager do not require teh application to be running all the time. If you used a timer then it would have to run throughout. This wastes memory and processing time.
The Android Operating System shifts alarms so us minimize wakeups and battery use. This is starting from Android API 19(KitKat). This the alarms may not be strictly exact. If you need to be strictly exact, then you can use the setExact() method.
AlarmManager is not directly instantiated. Instead you use the static getSystemService() of the Context class. You pass the Context.ALARM_SERVICE flag.
Example 1: Kotlin Android Build an Alarm Clock
This is an example to teach you usage of Alarms and Broadcastreceiver. In the process you build a simple alarm clock. This example allows you learn these technologies in a practical manner.
Step 1: Create Kotlin Project
Start by creating an empty Kotlin Project in Android Studio.
Step 2: Dependencies
No special dependencies are needed. However because Coroutines are used, be sure to use Kotlin.
Step 3: Permissions
No permissions are needed for this project. However in your in AndroidManifest.xml , be sure to register the receiver since BroadcastReceiver is used in this alarm clock.
Step 4: Design Layout
You only need one layout, the main activity layout. Simply add TextViews and buttons and constraint them using the ConstraintLayout as follows:
activity_main.xml
Step 5: Create model class
Create a model class, Kotlin data class that receives the two integers and a boolean via the constructor. The integers are the hour and the minute while the boolean is an on-off swicth. These will be used to construct a timer view to be rendered in the alarm clock:
AlarmDisplayModel.kt
Step 5: Create an Alarm Receiver
You do this by extending the broadcast receiver and overriding the onReceive() method. Inside the onReceive() you will create a notification channel as well as build a notification.
Here is the full code:
AlarmReceiver.kt
Step 6: Create main Activity
Finally create your main activity as below:
MainActivity.kt
Step 7: Run
Finally run the project.
Reference
Here are the code reference links:
| Number | Link |
|---|---|
| 1. | Download code |
| 2. | Follow code author |
Example 2: How to Start an Alarm
One of those mobile-like software applications is the Alarm. Or any app that can schedule something to happen in the future. This is even more important in mobile devices than in desktop applications.
Because we never leave or power off our mobile devices. They are our personal assistants. So we use them in more personal ways than we would ever do with desktop applications.
So Android provides us a rich class called AlarmManager. A class that allows us access system services. The class is obviously public and derives from java.lang.Object .
Here’s its definition:
What do we build?
Well let’s see a simple android alarm manager example. We see how to start and cancel an alarm in android. We have a basic edittext. The user enters the time in miliseconds for the alarm to ring. The alarm rings by displaying a simple toast message.
Project Structure
Here’s the project structure:
Step 1 – Create Android Project
- In your android studio go to File — New — New Project.
- Type Project Name.
- Choose minimum sdk.
- From templates choose empty activity or bla.
Step 2. – Let’s modify our build.gradle.
This is our second step. Android projets created in android studio have two buil.gradle files. We are interested in the app level build.gradle.
Add the followng code under the dependencies section:
We’ve added two dependencies from support library: AppCompat and design .
Step 3. Let’s prepare our resources.
The only resource we need to prepare in this case is the layouts. I chose the basic activity as my template. So I have two layouts:
- _activitymain.xm : template layout
- _contentmain.xml : this what we modify.
All I need is add one edittext and one button. The edittext where the user will enter the time in seconds and the start button to start the alarm.
Step 4. Let’s create our BroadcastReceiver class.
A BroadcastReceiver is one of the android components. Others include Activity, Service and ContentProvider.
A BroadcastReceiver listens to System events.
It’s actually an abstract class that’s obviously public. It derives form java.lang.Object :
Intents sent by the sendBroadcast() will be received by this base class.
It’s an abstract class so we will override the onReceive() method.
First create a java class :
Add the folowing imports:
Make it derive from android.content.BroadcastReceiver:
This will force us to ovveride the onReceive() method:
Step 5. Let’s come to our MainActivity class.
Activities are android components that represent a user interface. We create activities by deriving from an activity. To support more devices we use AppCompatActivity .
So let’s create an activity:
Add the following imports on top of the activity:
Our activity will have three methods and two fields:
First we define our two fields: basically a button an edittext. Add them inside the MainActivity class:
Then we create a method go() . This method will be responsible for initializing our alarmmanager and starting the alarm:
Then we come create another method to initialize our button and edittext and handle the onclick listener of the button:
Step 6. Let’s check on the Androidmanifest
Go over the androidmanifest.xml. We want to ensure our BroadcastReceiver class is registered inside our manifest.
You can see that our broadcastreceiver class is registered:
Here’s what I have:
Example: Android AlarmManager – Schedule Showing of Toast
Android Engineers added AlarmManager class in API level 1, so it’s been around since the beginning of android. This class allows for scheduling of operations to be done sometime in the future. With AlarmManager, you can set some code that will be executed in the future.
This is cool given that it’s not necessary for your app to be running for that code to be run. Of course your app will be started, but only at the registered time. Alarm Maanager belongs to android.app package and inherits from java.lang.Object.
Even while the device is asleep, alarms are retained as long as they were registered. You can find more details about AlarmManager here.
Screenshot
- Here’s the screenshot of the project.
![]()
Common Questions this example explores
- How to use android alarmmanager.
- What is AlarmManager?
- How do I schedule work to be done in future in android?
- Easy alarm manager example with a toast.
Tools Used
This example was written with the following tools:
- Windows 8
- AndroidStudio IDE
- Genymotion Emulator
Source Code
Lets jump directly to the source code.
Build.Gradle
- Normally in android projects, there are two build.gradle files. One is the app level build.gradle, the other is project level build.gradle. The app level belongs inside the app folder and its where we normally add our dependencies and specify the compile and target sdks.
- Also Add dependencies for AppCompat and Design support libraries.
- Our MainActivity shall derive from AppCompatActivity while we shall also use Floating action button from design support libraries.
MyReceiver.java»
- Our Broadcast Receiver class.
- Make it extend android.app.content.BroadCastReceiver.
- We then override the OnReceive() method. This is where we write the code to be executed when alarm rings.
- In this case we simply display a toast message.
MainActivity.java
- Launcher activity.
- ActivityMain.xml inflated as the contentview for this activity.
- We initialize views and widgets inside this activity.
- We also initialize and start our alarm inside here using the alarmmanager object.
ActivityMain.xml
- Template layout.
- Contains our ContentMain.xml.
- Also defines the appbarlayout, toolbar as well as floatingaction buttton.
ContentMain.xml
- Content Layout.
- Defines the views and widgets to be displayed inside the MainActivity.
More Resources:
How To Run
- Download the project above.
- You’ll get a zipped file,extract it.
- Open the Android Studio.
- Now close, already open project.
- From the Menu bar click on File >New> Import Project.
- Now Choose a Destination Folder, from where you want to import project.
- Choose an Android Project.
- Now Click on “OK“.
- Done, your done importing the project,now edit it.
Conclusion.
We saw a simple android alarm manager example.
Example: Android Schedule Repeating/Recurring Alarms
AlarmManager has existed since the beginning of Android. It enables us schedule tasks to be done sometime in the future.
With AlarmManager, you can set some code that will be executed in the future.
Alarm Maanager belongs to android.app package and inherits from java.lang.Object. Even while the device is asleep, alarms are retained as long as they were registered. In this example we will see how to work with a Recurring/repeating alarms.
We will schedule showing of toast messages after a given number of seconds. For example, the user enters 5 in the edittexts and clicks start button, after every 5 seconds the toast message gets shown until the user clicks the cancel button to cancell the alarms. So we see how to start repeating alarms and cancel them. You can find more details about AlarmManager here.
Screenshot
- Here’s the screenshot of the project.
Android Recurring Alarms Example
Common Questions this example explores
- How to use android alarmmanager.
- How to set repeating/recurring alarms in android and cancel them.
- Starting and canceling alarms in android.
- How do I schedule work to be done in future in android?
- Easy recurring alarm manager example with a toast.
Tools Used
This example was written with the following tools:
- Windows 8
- AndroidStudio IDE
- Genymotion Emulator
- Language : Java
- Topic : Android Recurring Alarms, AlarmManager, Start Cancel Repeating alarms
Libaries Used
- We don’t use any third part library.
Source Code
Lets jump directly to the source code.
Build.Gradle
- Normally in android projects, there are two build.gradle files. One is the app level build.gradle, the other is project level build.gradle. The app level belongs inside the app folder and its where we normally add our dependencies and specify the compile and target sdks.
- Also Add dependencies for AppCompat and Design support libraries.
- Our MainActivity shall derive from AppCompatActivity while we shall also use Floating action button from design support libraries.
MyReceiver.java
- Our MyReceiver class.
- Derives from android.content.BroadcastReceiver.
- We override onReceive() method and perform task to be done when alarm rings here.
MainActivity.java
- Our MainActivity class.
- Derives from AppCompatActivity which is a Base class for activities that use the support library action bar features.
- Methods: onCreate(),initializeViews(),initializeAlarmManager(),go().
- Inflated From activity_main.xml using the setContentView() method.
- The views we use are EditTexts and buttons.
- Reference them from our layout specification using findViewById().
- Initialize alarm manager.
- Start alarm using the setInExactRepeating().
ActivityMain.xml
- ActivityMain.xml.
- This is a template layout for our MainActivity.
- Root layout tag is CoordinatorLayout from design support library.
- CordinatorLayout is viewgroup that is a superpowered on framelayout.
- CoordinatorLayout is intended for two primary use cases: As a top-level application decor or chrome layout As a container for a specific interaction with one or more child views
- Inside our CordinatorLayout we add : AppBarLayout,FloatingActionButton and include content_main.xml.
- AppBarLayout is vertical LinearLayout that implements scrolling features of material design concept.
- It should be a direct child of CordinatorLayout, otherwise alot of features won’t work.
- Inside the AppBarLayout we add our toolbar,which we give a blue color.
- We will add our widgets in our content_main.xml, not here as this is a template layout.
- Finally we have a FloatingActionButton, a class that derives from android.support.design.widget.VisibilityAwareImageButton. Its the round button you see in our user interface.
ContentMain.xml
- Our ContentMain.xml file.
- Shall get inflated to MainActivity.
- Root tag is ConstraintLayout.
- Contains EditTexts and two buttons.
- User will enter the number of seconds after which alarm rings in edittext.
- Then click start button to start alarm.
- And Cancel button to cancel alarm.
Video/Preview
- We have a YouTube channel with almost a thousand tutorials, this one below being one of them.
Download
- You can Download the full Project below. Source code is well commented.
 report this ad
Oclemy
Thanks for stopping by. My name is Oclemy(Clement Ochieng) and we have selected you as a recipient of a GIFT you may like ! Together with Skillshare we are offering you PROJECTS and 1000s of PREMIUM COURSES at Skillshare for FREE for 1 MONTH. To be eligible all you need is by sign up right now using my profile .
Источник


