- AlertDialog и стили
- Material Design — Custom Alert Dialog
- Prerequisites
- Examples
- Example 1:
- Example 2:
- Conclusion
- Android Alert Dialog using Kotlin
- Android Tutorial
- Alert Dialogs
- Alert Dialog Methods
- Alert Dialog Kotlin Code
- Simple Alert Dialog Kotlin code
- Android Studio Project Structure
- 1. XML Layout Code
- 2. Kotlin Main Activity Code
- 3. Alert Dialog With Icons and Customisation
- 4. Alert Dialog With Items
- 5. Alert Dialog With MultiChoice List
- 6. Alert Dialog With Style
- 7. Alert Dialog With Custom Style
- 8. Alert Dialog With Button Centered
- 9. Alert Dialog With Edit Text
- Dialogs
- In this document
- Key classes
- See also
- Avoid ProgressDialog
- Creating a Dialog Fragment
- Building an Alert Dialog
- Adding buttons
- Adding a list
- Adding a persistent multiple-choice or single-choice list
- Creating a Custom Layout
- Passing Events Back to the Dialog’s Host
- Showing a Dialog
- Showing a Dialog Fullscreen or as an Embedded Fragment
- Showing an activity as a dialog on large screens
- Dismissing a Dialog
AlertDialog и стили

Пользуетесь ли вы AlertDialog’ами в своем проекте?
Что до меня, то я не большой фанат диалогов, но без них не обойтись практически в любом проекте. Повернуть свое к ним отношение можно довольно просто: если отойти от стандартных черно-белых окон, то можно обыграть их поведение в приложении. К тому же гайдлайны Material Design 2.0 довольно четко на это намекают https://material.io/design/components/dialogs.html#theming
Например, в разделе Material Studies можно найти примеры того, как Google предлагает кастомизировать стили диалогов для ваших приложений.
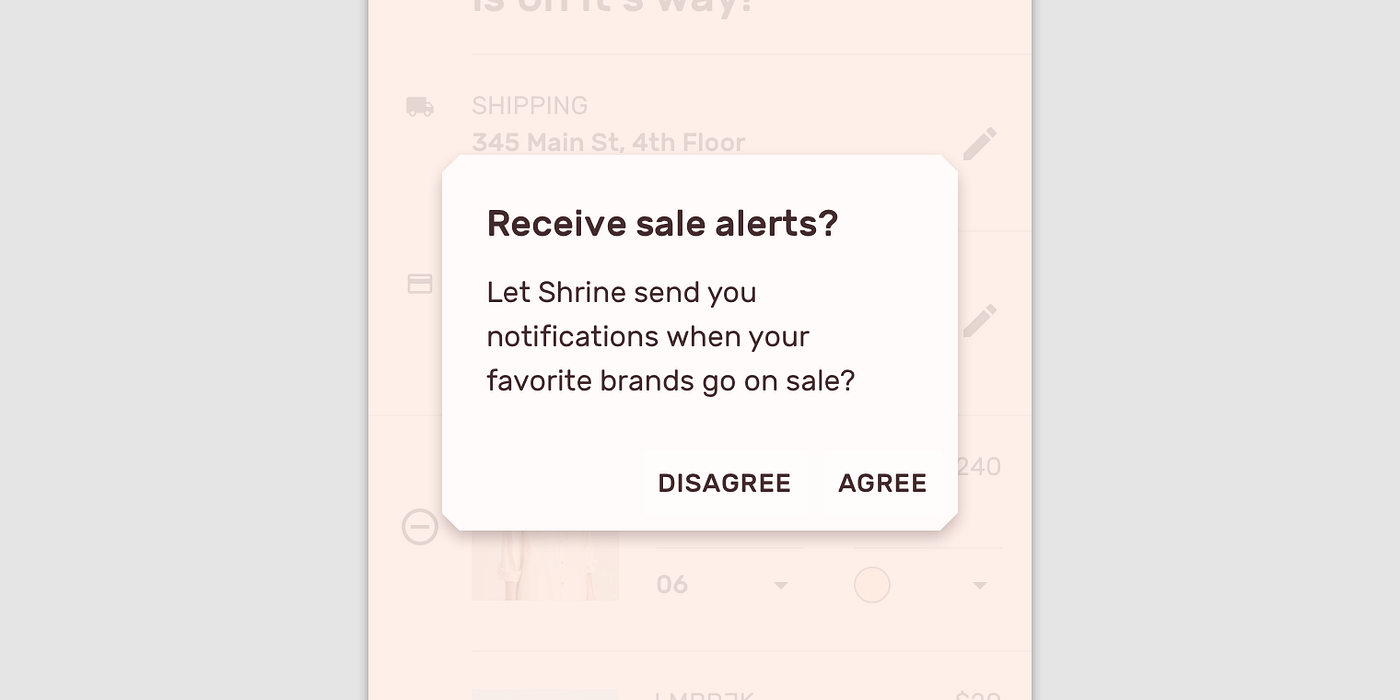
Проблема в том, что несколько сложно действительно грамотно использовать темы приложения для стилизации алертов. Честно говоря, ответов на все мои вопросы я не смог найти в мануалах, да и вообще в гуглах. Поэтому предлагаю вашему вниманию свои изыскания.
По ходу повествования нужно сделать пару уточнений. Как правило, я использую в приложениях AndroidX (это будущая смена support библиотек… ну, для кого-то, может быть, будущая, а для кого-то это суровые будни). Поэтому первой проблемой, с которой я столкнулся создавая диалоговые окна — это стиль кнопок.

Что же хотелось бы поменять:
- цвет фона окна и его форма
- размеры и цвета текста и заголовка
- выделение какой-то кнопки (например, Positive Button)
Не будем ходить вокруг да около, ниже — файл общего стиля диалоговых окон в проекте.
Drawable файл с описанием формы и цвета фона диалогового окна
Источник
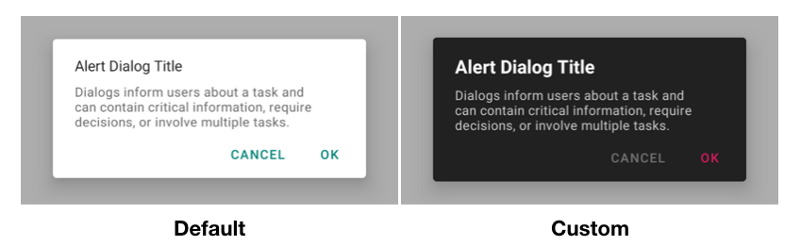
Material Design — Custom Alert Dialog
Jun 19, 2019 · 2 min read
Prerequisites
Make sure your AppTheme inherited from a material theme like:
Then you can then customize the style of the title, body, button, or other elements by overriding the corresponding item in the alert dialog theme.
For example, customize the text color and font size of the title by creating a materialAlertDialogTitleTextStyle that inherited from MaterialAlertDialog.MaterialComponents.Title.Text :
Examples
Example 1:

Change the background color and define the style for title text, body text, positive and negative button:
To apply th e custom theme to the dialog you need to use the MaterialAlertDialogBuilder and pass the theme id to it:
If you want to let every dialog use the same theme, then override the materialAlertDialogTheme attribute it in your AppTheme :
Now the context will provide custom dialog theme instead of the default one. You can initialize the dialog builder without the theme parameter:
Example 2:

Let the title and icon center and set different colors to title pane and button bar:
Conclusion
MaterialAlertDialog provides a beautiful base style and you can easily customize the style with writing some XML.
Источник
Android Alert Dialog using Kotlin
Android Tutorial
In this tutorial, we’ll be discussing Alert Dialogs and implement them in our Android Application using Kotlin.
Alert Dialogs
Alert Dialog is a window that pops up on the screen. They generally show some information and ask for a user action.
There are three core components that build an Alert Dialog.
- Title Text
- Message Text
- Buttons – There are three types of buttons: Positive, Negative, and Neutral
To create an AlertDialog we use the AlertDialog.Builder inner class.
We pass the context inside the constructor. Optionally, we can pass another parameter, the alert dialog style.
Alert Dialog Methods
Some of the methods that can be used on an AlertDialog.
- setTitle
- setMessage
- setIcon
- setCustomTitle – Here you can pass a custom view that’ll be put in place of the title part in the alert dialog.
- setPositiveButton – We pass the string name, as well as Button, clicked callback method here.
- setView – used to add a custom view inside the alert dialog.
- setList – used to set an array of strings which would be displayed in the form of a List.
- setMultiChoiceList – again we can set an array but this time we can select multiple items from the List thanks to CheckBox.
- setPositiveButtonIcon – set an icon alongside the Button
- show() – used to display the AlertDialog
- setDismissListener – Inside this, you can set the logic to be triggered when the alert dialog is dismissed.
- setShowListener – set the logic to be triggered when the alert dialog is dismissed.
- setCancelable – requires a boolean value. By default all alert dialogs are cancelable on button click or touch outside. If this method is set to false, you need to explicitly cancel the dialog using dialog.cancel() method.
Alert Dialog Kotlin Code
To use AlertDialog in your Android Studio project, import the following class.
Following Kotlin code is used to create a simple alert dialog.
The builder.show() displays the Alert Dialog on the screen.
Inside the setPositiveButton function, we pass the Button text along with a Kotlin function that’s triggered when that button is clicked. The function is a part of the DialogInterface.OnClickListener() interface.
The function type is (DialogInterface, Int) -> Unit . DialogInterface is an instance of the Dialog and Int is the id of the button that is clicked.
In the above code, we’ve represented this function as a Higher Order Kotlin function. The dialog and which represents the two arguments.
We can improve the function by passing _ if the arguments aren’t used.
The functions would look like these:
Alternatively, we can also display the Dialog through the AlertDialog class instance.
Replace builder.show() with:
Instead of defining the button click listener functions for each of the buttons, we can define the higher-order functions separately as well.
Now set this val property inside the setPositiveButton Kotlin function as:
The latter makes the code look much concise.
Following is a screenshot from our Activity class with the above function applied for each of the Buttons.

Kotlin has still more power to improve the readability of the above code.
Simple Alert Dialog Kotlin code
Using the with function, we can enhance the readability of the Kotlin code to create an Alert Dialog.
In the next section we’ll be creating our Android Application where we will implement the following features in our AlertDialog.
- Simple Alert Dialog
- Alert Dialog With Icon and Button Customisation
- Alert Dialog With List
- Alert Dialog With MultiChoice List
- Alert Dialog With Style
- Alert Dialog With Custom Style
- Alert Dialog With EditText
Android Studio Project Structure

1. XML Layout Code
The code for the activity_main.xml layout is given below.
For each of the buttons we’ve set an android:onClick attribute with the function name. These Kotlin functions would be triggered in the MainActivity.kt class. We’ll discuss each of them one at a time.
2. Kotlin Main Activity Code
We’ve already created the first Alert Dialog above. Let’s see how the MainActivity.kt looks with it.
3. Alert Dialog With Icons and Customisation
Using the getButton , we can retrieve any of the Buttons by setting their respective constant.
Once the Button is retrieved, we can customise it as done above.
4. Alert Dialog With Items
Inside the setItems we pass the Kotlin Array.
The which argument represents the index of the element clicked in the List.
5. Alert Dialog With MultiChoice List
In the above code, we save the choices in an array list of integers and retrieve them again to show them in the Toast message.
6. Alert Dialog With Style
If you don’t use ContextThemeWrapper, the Alert Dialog would be displayed on the full screen.
7. Alert Dialog With Custom Style
Add the following code in the styles.xml file:
Following is the Kotlin function:
8. Alert Dialog With Button Centered
9. Alert Dialog With Edit Text
The code for the custom layout alert_dialog_with_edittext.xml is given below:
The output of the above application is given below:
Источник
Dialogs
In this document
Key classes
See also
A dialog is a small window that prompts the user to make a decision or enter additional information. A dialog does not fill the screen and is normally used for modal events that require users to take an action before they can proceed.
Dialog Design
For information about how to design your dialogs, including recommendations for language, read the Dialogs design guide.

The Dialog class is the base class for dialogs, but you should avoid instantiating Dialog directly. Instead, use one of the following subclasses:
AlertDialog A dialog that can show a title, up to three buttons, a list of selectable items, or a custom layout. DatePickerDialog or TimePickerDialog A dialog with a pre-defined UI that allows the user to select a date or time.
Avoid ProgressDialog
Android includes another dialog class called ProgressDialog that shows a dialog with a progress bar. However, if you need to indicate loading or indeterminate progress, you should instead follow the design guidelines for Progress & Activity and use a ProgressBar in your layout.
These classes define the style and structure for your dialog, but you should use a DialogFragment as a container for your dialog. The DialogFragment class provides all the controls you need to create your dialog and manage its appearance, instead of calling methods on the Dialog object.
Using DialogFragment to manage the dialog ensures that it correctly handles lifecycle events such as when the user presses the Back button or rotates the screen. The DialogFragment class also allows you to reuse the dialog’s UI as an embeddable component in a larger UI, just like a traditional Fragment (such as when you want the dialog UI to appear differently on large and small screens).
The following sections in this guide describe how to use a DialogFragment in combination with an AlertDialog object. If you’d like to create a date or time picker, you should instead read the Pickers guide.
Note: Because the DialogFragment class was originally added with Android 3.0 (API level 11), this document describes how to use the DialogFragment class that’s provided with the Support Library. By adding this library to your app, you can use DialogFragment and a variety of other APIs on devices running Android 1.6 or higher. If the minimum version your app supports is API level 11 or higher, then you can use the framework version of DialogFragment , but be aware that the links in this document are for the support library APIs. When using the support library, be sure that you import android.support.v4.app.DialogFragment class and not android.app.DialogFragment .
Creating a Dialog Fragment
You can accomplish a wide variety of dialog designs—including custom layouts and those described in the Dialogs design guide—by extending DialogFragment and creating a AlertDialog in the onCreateDialog() callback method.
For example, here’s a basic AlertDialog that’s managed within a DialogFragment :
Figure 1. A dialog with a message and two action buttons.
Now, when you create an instance of this class and call show() on that object, the dialog appears as shown in figure 1.
The next section describes more about using the AlertDialog.Builder APIs to create the dialog.
Depending on how complex your dialog is, you can implement a variety of other callback methods in the DialogFragment , including all the basic fragment lifecycle methods.
Building an Alert Dialog
The AlertDialog class allows you to build a variety of dialog designs and is often the only dialog class you’ll need. As shown in figure 2, there are three regions of an alert dialog:

Figure 2. The layout of a dialog.
This is optional and should be used only when the content area is occupied by a detailed message, a list, or custom layout. If you need to state a simple message or question (such as the dialog in figure 1), you don’t need a title.
Content area
This can display a message, a list, or other custom layout.
There should be no more than three action buttons in a dialog.
The AlertDialog.Builder class provides APIs that allow you to create an AlertDialog with these kinds of content, including a custom layout.
The following topics show how to define various dialog attributes using the AlertDialog.Builder class.
Adding buttons
To add action buttons like those in figure 2, call the setPositiveButton() and setNegativeButton() methods:
The set. Button() methods require a title for the button (supplied by a string resource) and a DialogInterface.OnClickListener that defines the action to take when the user presses the button.
There are three different action buttons you can add:
Positive You should use this to accept and continue with the action (the «OK» action). Negative You should use this to cancel the action. Neutral You should use this when the user may not want to proceed with the action, but doesn’t necessarily want to cancel. It appears between the positive and negative buttons. For example, the action might be «Remind me later.»
You can add only one of each button type to an AlertDialog . That is, you cannot have more than one «positive» button.

Figure 3. A dialog with a title and list.
Adding a list
There are three kinds of lists available with the AlertDialog APIs:
- A traditional single-choice list
- A persistent single-choice list (radio buttons)
- A persistent multiple-choice list (checkboxes)
To create a single-choice list like the one in figure 3, use the setItems() method:
Because the list appears in the dialog’s content area, the dialog cannot show both a message and a list and you should set a title for the dialog with setTitle() . To specify the items for the list, call setItems() , passing an array. Alternatively, you can specify a list using setAdapter() . This allows you to back the list with dynamic data (such as from a database) using a ListAdapter .
If you choose to back your list with a ListAdapter , always use a Loader so that the content loads asynchronously. This is described further in Building Layouts with an Adapter and the Loaders guide.
Note: By default, touching a list item dismisses the dialog, unless you’re using one of the following persistent choice lists.

Figure 4. A list of multiple-choice items.
Adding a persistent multiple-choice or single-choice list
To add a list of multiple-choice items (checkboxes) or single-choice items (radio buttons), use the setMultiChoiceItems() or setSingleChoiceItems() methods, respectively.
For example, here’s how you can create a multiple-choice list like the one shown in figure 4 that saves the selected items in an ArrayList :
Although both a traditional list and a list with radio buttons provide a «single choice» action, you should use setSingleChoiceItems() if you want to persist the user’s choice. That is, if opening the dialog again later should indicate what the user’s current choice is, then you create a list with radio buttons.
Creating a Custom Layout

Figure 5. A custom dialog layout.
If you want a custom layout in a dialog, create a layout and add it to an AlertDialog by calling setView() on your AlertDialog.Builder object.
By default, the custom layout fills the dialog window, but you can still use AlertDialog.Builder methods to add buttons and a title.
For example, here’s the layout file for the dialog in Figure 5:
Tip: By default, when you set an EditText element to use the «textPassword» input type, the font family is set to monospace, so you should change its font family to «sans-serif» so that both text fields use a matching font style.
To inflate the layout in your DialogFragment , get a LayoutInflater with getLayoutInflater() and call inflate() , where the first parameter is the layout resource ID and the second parameter is a parent view for the layout. You can then call setView() to place the layout in the dialog.
Tip: If you want a custom dialog, you can instead display an Activity as a dialog instead of using the Dialog APIs. Simply create an activity and set its theme to Theme.Holo.Dialog in the manifest element:
That’s it. The activity now displays in a dialog window instead of fullscreen.
Passing Events Back to the Dialog’s Host
When the user touches one of the dialog’s action buttons or selects an item from its list, your DialogFragment might perform the necessary action itself, but often you’ll want to deliver the event to the activity or fragment that opened the dialog. To do this, define an interface with a method for each type of click event. Then implement that interface in the host component that will receive the action events from the dialog.
For example, here’s a DialogFragment that defines an interface through which it delivers the events back to the host activity:
The activity hosting the dialog creates an instance of the dialog with the dialog fragment’s constructor and receives the dialog’s events through an implementation of the NoticeDialogListener interface:
Because the host activity implements the NoticeDialogListener —which is enforced by the onAttach() callback method shown above—the dialog fragment can use the interface callback methods to deliver click events to the activity:
Showing a Dialog
When you want to show your dialog, create an instance of your DialogFragment and call show() , passing the FragmentManager and a tag name for the dialog fragment.
The second argument, «missiles» , is a unique tag name that the system uses to save and restore the fragment state when necessary. The tag also allows you to get a handle to the fragment by calling findFragmentByTag() .
Showing a Dialog Fullscreen or as an Embedded Fragment
You might have a UI design in which you want a piece of the UI to appear as a dialog in some situations, but as a full screen or embedded fragment in others (perhaps depending on whether the device is a large screen or small screen). The DialogFragment class offers you this flexibility because it can still behave as an embeddable Fragment .
However, you cannot use AlertDialog.Builder or other Dialog objects to build the dialog in this case. If you want the DialogFragment to be embeddable, you must define the dialog’s UI in a layout, then load the layout in the onCreateView() callback.
Here’s an example DialogFragment that can appear as either a dialog or an embeddable fragment (using a layout named purchase_items.xml ):
And here’s some code that decides whether to show the fragment as a dialog or a fullscreen UI, based on the screen size:
For more information about performing fragment transactions, see the Fragments guide.
In this example, the mIsLargeLayout boolean specifies whether the current device should use the app’s large layout design (and thus show this fragment as a dialog, rather than fullscreen). The best way to set this kind of boolean is to declare a bool resource value with an alternative resource value for different screen sizes. For example, here are two versions of the bool resource for different screen sizes:
Then you can initialize the mIsLargeLayout value during the activity’s onCreate() method:
Showing an activity as a dialog on large screens
Instead of showing a dialog as a fullscreen UI when on small screens, you can accomplish the same result by showing an Activity as a dialog when on large screens. Which approach you choose depends on your app design, but showing an activity as a dialog is often useful when your app is already designed for small screens and you’d like to improve the experience on tablets by showing a short-lived activity as a dialog.
To show an activity as a dialog only when on large screens, apply the Theme.Holo.DialogWhenLarge theme to the manifest element:
For more information about styling your activities with themes, see the Styles and Themes guide.
Dismissing a Dialog
When the user touches any of the action buttons created with an AlertDialog.Builder , the system dismisses the dialog for you.
The system also dismisses the dialog when the user touches an item in a dialog list, except when the list uses radio buttons or checkboxes. Otherwise, you can manually dismiss your dialog by calling dismiss() on your DialogFragment .
In case you need to perform certain actions when the dialog goes away, you can implement the onDismiss() method in your DialogFragment .
You can also cancel a dialog. This is a special event that indicates the user explicitly left the dialog without completing the task. This occurs if the user presses the Back button, touches the screen outside the dialog area, or if you explicitly call cancel() on the Dialog (such as in response to a «Cancel» button in the dialog).
As shown in the example above, you can respond to the cancel event by implementing onCancel() in your DialogFragment class.
Источник


