- Папки в Android-смартфоне и что они означают
- Константин Иванов
- Иерархия памяти устройства на Android
- Приложения и папки в разделе данных
- Итак, какие папки мне можно (или нужно) удалять?
- How to Make App Folders on Android
- Organize your apps and save screen space
- What to Know
- How to Make a Folder
- Name Your Folder
- Add Your Folder to the Home Row
- Some Things Do Not Drag Like the Others
- Android App / Project Folder Structure
- Java Folder
- res (Resources) Folder
- Drawable Folder (res/drawable)
- Layout Folder (res/layout)
- Mipmap Folder (res/mipmap)
- Values Folder (res/values)
- Manifests Folder
- Gradle Scripts
- Android Layout File (activity_main.xml)
- Android Main Activity File (MainActivity.java)
- Android Manifest File (AndroidManifest.xml)
Папки в Android-смартфоне и что они означают
Константин Иванов

Файловые менеджеры на Android могут быть удобным инструментом для организации хранения данных в вашем смартфоне, но сама структура Android (или ее кажущееся отсутствие) c непривычки может показаться несколько запутанной. Данные приложений, картинки, музыка – и доступ к этому всему из одной корневой папки – это несколько иной подход к иерархической структуре, чем то, к чему привыкли пользователи ПК и Mac, и подход этот дает пользователям намного больше возможностей, чем iOS.
В Android вы не сможете получить доступ к глубоко спрятанным системным файлам через обычный файловый менеджер или с помощью подключения к ПК. Но это не значит, что вы можете удалить по своей прихоти любой файл, какой захотите. Давайте посмотрим, как организованы типичные папки в памяти устройства, для чего они нужны и что из этого вы можете удалить, а что нет.
Иерархия памяти устройства на Android
Поскольку Android – это операционная система на базе Linux, в вашем телефоне файловая система также организована по принципу Linux. В этой системе на каждом устройстве есть шесть основных разделов: boot, system, recovery, data, cache и misc. Карты памяти microSD также имеют собственную иерархию памяти. Устройства, несущие на борту Android 7.0 Nougat, получили возможность непрерывного обновления за счет того, что в пару к системному разделу создается второй и один из них в фоне обновляется, а при перезагрузке происходит переключение, позволяющее обновленной системе заработать.
Вот краткое описание того, что содержится в каждой папке.
- boot – Эта папка содержит ядро, виртуальный диск и др., то есть то, что требуется для загрузки телефона, когда вы его включаете.
- system – Папка system содержит файлы операционной системы (также известные как образ системы), которые включают в себя также графический интерфейс Android и предустановленные приложения.
- recovery – Альтернативная возможность загрузить ОС, программы из папки recovery позволяют пользователю делать бэкапы других папок и восстанавливать их.
- data – Папка data сохраняет информацию пользователя, от контактов и сообщений до приложений и музыки, и вот к этому разделу вы имеете доступ через файловый браузер. После сброса до заводских настроек этот раздел стирается.
- cache – Android хранит здесь часто используемые данные и компоненты приложений. Этот раздел может быть стерт для устранения определенных проблем и автоматически восстановлен и обновлен со временем.
- misc – Этот раздел содержит другую важную информацию о настройках системы, такую как конфигурация USB, настроек сети вашего оператора и другие аппаратные настройки, которые в графическом интерфейсе отображаются в виде переключателей вкл./выкл.
Без root–прав пользователи Android могут иметь доступ только к разделу с данными, который открывается вам, когда вы подключаете устройство к своему ПК или используете файловый браузер. Если память вашего телефона может быть расширена при помощи карты, память карты также включается в этот раздел с данными, доступными через ПК или просмотрщик файлов.
Обычно у вас есть доступ только данным приложений, которые хранятся в разделе пользовательских данных. Для доступа к остальной памяти вам потребуются root-права
Приложения и папки в разделе данных
Итак, бегло окинув взглядом основные папки, мы отметили, что у нас нет доступа к загрузочным файлам, файлам восстановления и или системным файлам Android, когда мы просто просматриваем файлы при помощи браузера. Из чего следует утешительный вывод: нельзя просто так взять и вызвать своими действиями крах системы. Совсем другая ситуация возникает, когда у вас есть root-права. Так или иначе, с тем, что хранится в данном разделе, надо быть поаккуратнее: определенные приложения могут задействовать данные, которые здесь сохранены, и перемещение или удаление их может повлечь за собой нестабильную работу системы.
Теперь давайте посмотрим, что находится в разделе данных на вашем устройстве. Для того, чтобы это было возможно, в телефонах с Android версий Marshmallow или Nougat есть свой файловый менеджер, который дает доступ ко всему разделу. Эту опцию можно найти в меню Настройки- Память-Накопитель-Другое. Ряд аппаратов на более старых версиях Android могут иметь, а могут не иметь собственный файловый менеджер, зависит от производителя.
В качестве альтернативы есть множество сторонних приложений, доступных в Play Store, которые выполняют ту же самую роль, например, FX File Explorer или Total Commander.
Можно также управлять вашими файлами с вашего ПК при помощи подключения по USB. Стоит только удостовериться, что ваш телефон находится в режиме MTP (Передача файлов), чтобы вы могли видеть все свои файлы.

Получить доступ к памяти вашего устройства можно при помощи ПК или напрямую через файловый браузер
Если у вас есть ощущение, что память устройства выглядит переполненной и папок слишком много, приглядитесь к ним. Вы увидите многочисленные папки, связанные с приложениями, возможно, даже остатки от тех приложений, что вы уже удалили. Как правило, лучше не трогать никакие папки приложений, но если вы помните, что приложение было удалено, а папка от него осталась, ее удаление вреда не причинит. Скорее всего, она пустая или в ней остались какие-то бесполезные лог-файлы.
Даже если вы не устанавливали большого количества приложений, по умолчанию этот раздел с пользовательскими данными может содержать ряд папок – в них хранятся ваши контакты, музыка, картинки и все остальное. Вот самые основные папки, не связанные со сторонними приложениями, которые вы можете найти.
- Android – это место, куда по умолчанию сохраняются кэш приложений и данные. Эту папку не рекомендуется удалять, если вы не хотите потерять данные приложений. Удаление этой папки может привести к некорректной работе некоторых из них.
- Alarms, Ringtones, Notifications – как видно из названий, в этих папках хранятся аудиофайлы для будильников, рингтонов и уведомлений, которые могут быть использованы как дефолтными, так и сторонними приложениями.
- Cardboard – здесь хранятся данные для ряда приложений VR, а если таковых нет, она остается пустой.
- DCIM – здесь лежат фотографии, которые вы делали при помощи своего основного приложения камеры. Также вы можете увидеть такую папку и на карте microSD, если вы сохраняете фотографии и на нее.
- Downloads – здесь находится все, что скачано вами в веб-браузере, например, в Chrome или Firefox.
- Pictures, Music, Movies, Video – Это папки, которые по умолчанию используются вашими медиаприложениями. Некоторые приложения позволяют вам назначать другие папки, но большая часть медиаплееров по умолчанию будет использовать эти директории. Скриншоты чаще всего сохраняются в папке с картинками.
- Podcasts – Эта папка используется рядом приложений, чтобы отделять подкасты от остальных музыкальных файлов. Если вы не пользуетесь приложениями для прослушивания подкастов, она будет пустой.
Итак, какие папки мне можно (или нужно) удалять?
Не уверен – не удаляй. Это справедливо для всех папок приложений, и трогать их не стоит, за исключением тех случаев, когда вы точно знаете, что хотите сделать. Добавлять и удалять файлы из любых папок с медиа абсолютно безопасно, но постарайтесь в порыве наведения порядка не снести саму папку. Если вы видите, что папка пуста, например, ничего нет в папке Alarms, вы, можете подумать, что она и сама не нужна. Но, с другой стороны, папка не занимает много места. И возможно, она потребуется какому-либо приложению впоследствии, поэтому так ли вам необходимо ее удалять?
Со временем встроенная память вашего устройства будет содержать гораздо больше папок, чем было перечислено выше. Вы будете устанавливать и удалять все большее число приложений. Поэтому наводить порядок в своем устройстве никогда не повредит, ну, разве что вы вообще редко перемещаете файлы в своем телефоне, скачиваете и удаляете их. И еще, удаление пустой папки не освободит вам дополнительного места в памяти. Так что, если требуется выиграть место, лучше посмотрите, какие вы можете удалить ненужные приложения/фильмы, которые не станете пересматривать и т.п.
Теперь, когда вы получили более полную картину того, что это за папки хранятся в памяти вашего устройства, вам будет проще управлять своими файлами, не боясь «сделать что-нибудь не то».
Источник
How to Make App Folders on Android
Organize your apps and save screen space
:max_bytes(150000):strip_icc()/MarziahBioPic-57fc61e83df78c690f7dd0a7-e388c9f1295b4bdc9a8001547e9aca6f.png)
:max_bytes(150000):strip_icc()/WorkBadgePhoto-61c0b98ef5a74e4a85851a8f706dbd65.jpg)
What to Know
- Long-press an app and drag it onto another app to create a folder.
- Long-press the folder to rename it. (On some devices, tap the folder to open it, then tap the name to edit it instead).
- You can also drag the folder into the row of favorite apps on the bottom of the Home screen on Android phones.
This article explains how to create new folders on an Android device, how to rename those folders, and how to move them around your Home screen. The directions below should apply no matter who made your Android phone: Samsung, Google, Huawei, Xiaomi, etc.
:max_bytes(150000):strip_icc()/app-folders-on-android-1616144-b80a82347c9b4d0a937251f14923821c.png)
How to Make a Folder
To create a folder, long-press an app. Press and hold a finger on the app until you feel a mild feedback vibration and the screen changes.
Then, drag the app onto another app to make a folder. This is the same as on iOS devices such as the iPad and iPhone.
:max_bytes(150000):strip_icc()/001_app-folders-on-android-1616144-5c58a3e346e0fb00012bb286.jpg)
Name Your Folder
Unlike iOS, Android doesn’t provide a default name for new folders; it appears as an unnamed folder. When a folder is unnamed, nothing displays as the name of the collection of apps.
To give the folder a name, long-press the folder. It opens, displays the apps, and launches the Android keyboard. Enter a name for the folder and tap the Done key. The name displays on the Home screen.
Some phones do this differently. On a Samsung or Google Pixel device, tap the folder to open it, then tap the name to edit it.
Add Your Folder to the Home Row
You can also drag the folder onto your favorite apps on the bottom of the Home screen on Android phones. That makes it two clicks to get to the app, but Google demonstrates this by grouping Google apps into a folder and putting it on the Home row at the bottom.
Some Things Do Not Drag Like the Others
Dragging order is important. You can drag apps onto other apps to make folders. You can drag apps into existing folders to add the app to the folder. You cannot drag folders onto apps. If an app runs away when you drag something on it, that could be what happened. The other thing you can’t do is drag Home screen widgets into folders. Widgets are mini apps that run continuously on the Home screen, and won’t run properly inside a folder.
Источник
Android App / Project Folder Structure
To implement android apps, Android Studio is the official IDE (Integrated Development Environment) which is freely provided by Google for android app development.
Once we setup android development environment using android studio and if we create a sample application using android studio, our project folder structure will be like as shown below. In case if you are not aware of creating an application using an android studio please check this Android Hello World App.

The Android project structure on the disk might be differs from the above representation. To see the actual file structure of the project, select Project from the Project dropdown instead of Android.
The android app project will contain different types of app modules, source code files, and resource files. We will explore all the folders and files in the android app.
Java Folder
This folder will contain all the java source code (.java) files which we’ll create during the application development, including JUnit test code. Whenever we create any new project/application, by default the class file MainActivity.java will create automatically under the package name “com.tutlane.helloworld” like as shown below.

res (Resources) Folder
It’s an important folder that will contain all non-code resources, such as bitmap images, UI strings, XML layouts like as shown below.

The res (Resources) will contain a different type of folders that are
Drawable Folder (res/drawable)
It will contain the different types of images as per the requirement of application. It’s a best practice to add all the images in a drawable folder other than app/launcher icons for the application development.
Layout Folder (res/layout)
This folder will contain all XML layout files which we used to define the user interface of our application. Following is the structure of the layout folder in the android application.

Mipmap Folder (res/mipmap)
This folder will contain app / launcher icons that are used to show on the home screen. It will contain different density type of icons such as hdpi, mdpi, xhdpi, xxhdpi, xxxhdpi, to use different icons based on the size of the device.
Following is the structure of the mipmap folder in the android application.

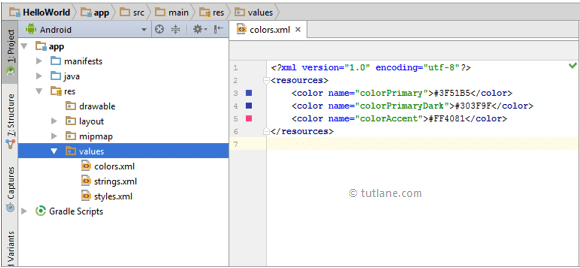
Values Folder (res/values)
This folder will contain various XML files, such as strings, colors, style definitions and a static array of strings or integers. Following is the structure of the values folder in android application.
Manifests Folder
This folder will contain a manifest file (AndroidManifest.xml) for our android application. This manifest file will contain information about our application such as android version, access permissions, metadata, etc. of our application and its components. The manifest file will act as an intermediate between android OS and our application.
Following is the structure of the manifests folder in the android application.

Gradle Scripts
In android, Gradle means automated build system and by using this we can define a build configuration that applies to all modules in our application. In Gradle build.gradle (Project), and build.gradle (Module) files are useful to build configurations that apply to all our app modules or specific to one app module.
Following is the structure of Gradle Scripts in the android application.

Following are the important files which we need to implement an app in android studio.
Android Layout File (activity_main.xml)
The UI of our application will be designed in this file and it will contain Design and Text modes. It will exists in the layouts folder and the structure of activity_main.xml file in Design mode like as shown below.

We can make required design modifications in activity_main.xml file either using Design or Text modes. If we switch to Text mode activity_main.xml file will contain a code like as shown below.
xml version= «1.0» encoding= «utf-8» ?>
android.support.constraint.ConstraintLayout xmlns: android = «http://schemas.android.com/apk/res/android»
xmlns: app = «http://schemas.android.com/apk/res-auto»
xmlns: tools = «http://schemas.android.com/tools»
android :layout_width= «match_parent»
android :layout_height= «match_parent»
tools :context= «com.tutlane.helloworld.MainActivity» >
TextView
android :layout_width= «wrap_content»
android :layout_height= «wrap_content»
android :text= «Hello World!»
app :layout_constraintBottom_toBottomOf= «parent»
app :layout_constraintLeft_toLeftOf= «parent»
app :layout_constraintRight_toRightOf= «parent»
app :layout_constraintTop_toTopOf= «parent»/>
Android Main Activity File (MainActivity.java)
The main activity file in the android application is MainActivity.java and it will exist in the java folder. The MainActivity.java file will contain the java code to handle all the activities related to our app.
Following is the default code of MainActivity.java file which is generated by our HelloWorld application.
package com.tutlane.helloworld;
import android.support.v7.app.AppCompatActivity;
import android.os.Bundle;
public class MainActivity extends AppCompatActivity <
@Override
protected void onCreate(Bundle savedInstanceState) <
super .onCreate(savedInstanceState);
setContentView(R.layout. activity_main );
>
>
Android Manifest File (AndroidManifest.xml)
Generally, our application will contain multiple activities and we need to define all those activities in the AndroidManifest.xml file. In our manifest file, we need to mention the main activity for our app using the MAIN action and LAUNCHER category attributes in intent filters ( ). In case if we didn’t mention MAIN action or LAUNCHER category for the main activity, our app icon will not appear in the home screen’s list of apps.
Following is the default code of AndroidManifest.xml file which is generated by our HelloWorld application.
xml version= «1.0» encoding= «utf-8» ?>
manifest xmlns: android = «http://schemas.android.com/apk/res/android»
package= «com.tutlane.helloworld» >
application
android :allowBackup= «true»
android :icon= «@mipmap/ic_launcher»
android :label= «@string/app_name»
android :roundIcon= «@mipmap/ic_launcher_round»
android :supportsRtl= «true»
android :theme= «@style/AppTheme» >
activity android :name= «.MainActivity» >
intent-filter >
action android :name= «android.intent.action.MAIN»/>
category android :name= «android.intent.category.LAUNCHER»/>
intent-filter >
activity >
application >
manifest >
These are the main folders and files required to implement an application in android studio. If you want to see the actual file structure of the project, select Project from the Project dropdown instead of Android.
Источник


