- Как включить отладку по USB на Android
- Включение отладки по USB на Android телефоне или планшете
- Видео инструкция
- Как включить режим отладки USB на Андроид
- Включаем отладку по USB на Android
- Этап 1: Переход в режим разработчика
- Этап 2: Включение отладки по USB
- Knowledge about USB Debugging Android
- Part1
- Part2
- Part3
- What is USB Debugging?
- Why I need to enable USB Debugging Mode?
- How to Enable USB Debugging on Android?
- How to Enable USB Debugging on Samsung Devices
- How to Enable USB Debugging on HUAWEI Devices
- How to Enable USB Debugging and Developer Mode on Android
- Part 1. How to Enable and Disable USB Debugging on Android Device
- Tips on How to Check Version of Android on Your Phone
- For Android 4.2 Jelly Bean to Android 10:
- For Android 4.0 Ice Cream Sandwich and 4.1 Jelly Bean:
- For Android 2.3 Gingerbread and Earlier:
- Part 2. How to Enable USB Debugging on Broken Screen Android
- Part 3. How to Enable USB Debugging on Android from PC Remotely
- Here are the steps to enable USB Debugging on Android from PC using the ADB command:
- Summary
Как включить отладку по USB на Android
Включенная отладка по USB на Android устройстве может потребоваться для самых разных целей: прежде всего, для выполнения команд в adb shell (прошивка, кастомный рекавери, запись экрана), но не только: например, включенная функция может пригодиться и для восстановления данных на Android.
В этой пошаговой инструкции подробно о том, как включить отладку по USB на Android 5-7 (в общем-то, то же самое будет и на версиях 4.0-4.4), в видео показано включение отладки на Android 9 Pie и на смартфонах Samsung Galaxy.
Скриншоты и пункты меню в руководстве соответствуют почти чистой ОС Android 6 на телефоне Moto (то же самое будет на Nexus и Pixel), но принципиальной разницы в действиях на других устройствах, таких как Samsung, LG, Lenovo, Meizu, Xiaomi или Huawei не будет, все действия практически те же самые, также в статье присутствуют текстовые пути для настроек на других версиях Android и марках телефонов.
Включение отладки по USB на Android телефоне или планшете
Для того, чтобы появилась возможность включить отладку по USB, сначала необходимо включить режим разработчика Android, сделать это можно следующим образом.
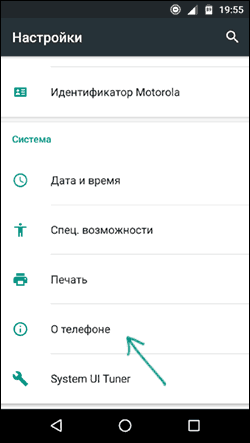
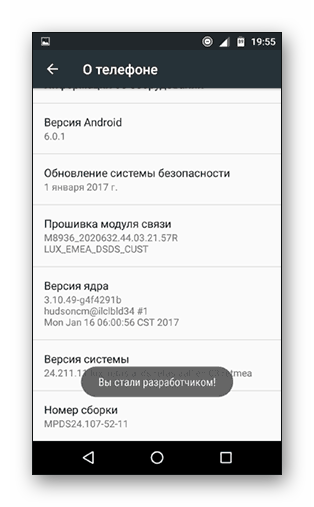
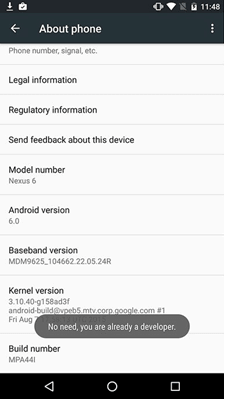
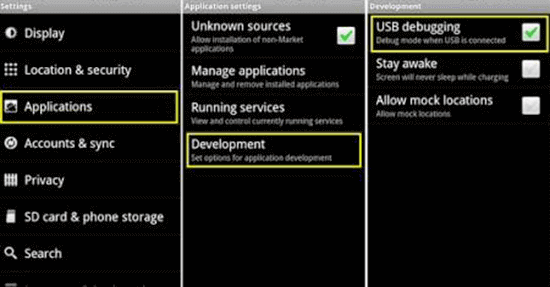
- Зайдите в Настройки и нажмите пункт «О телефоне» или «О планшете», на Samsung — «Сведения о телефоне» — «Сведения о ПО». На чистом Android 9.0 зайдите в пункт «Система» — «О телефоне».

- Найдите пункт «Номер сборки» (на телефонах Xiaomi и некоторых других — пункт «Версия MIUI») и несколько раз нажимайте по нему, пока не увидите сообщение о том, что вы стали разработчиком.

Теперь в меню «Настройки» вашего телефона появится новый пункт «Для разработчиков» и можно переходить к следующему этапу (может быть полезно: Как включить и отключить режим разработчика на Android).
Процесс включения отладки по USB также состоит из нескольких очень простых шагов:
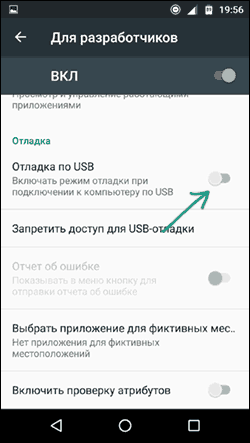
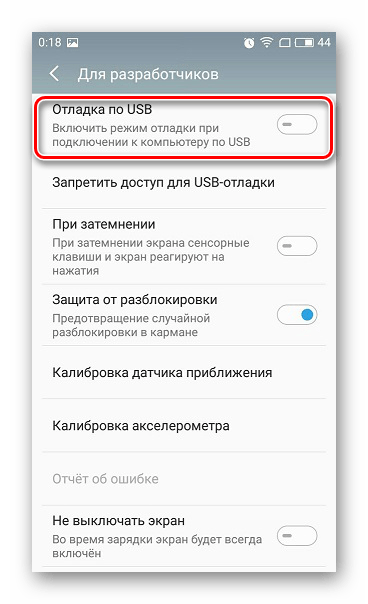
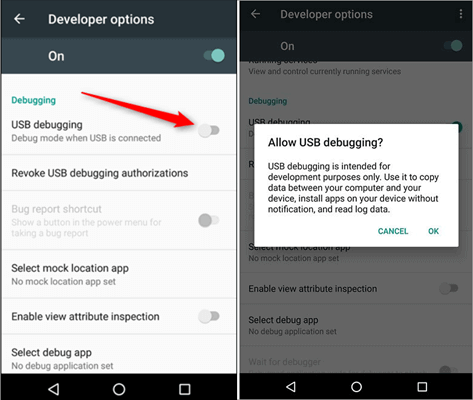
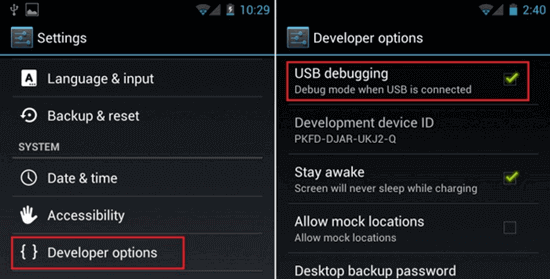
- Зайдите в «Настройки» — «Для разработчиков». На Android 9, например, на Nokia — в Настройки — Система — Дополнительно — Для разработчиков. На некоторых китайских телефонах, например, на Xiaomi — в Настройки — Дополнительно — Для разработчиков или Настройки — Расширенные настройки — Для разработчиков. Если вверху страницы есть переключатель, который установлен в положение «Выкл», переключите его в «Вкл».
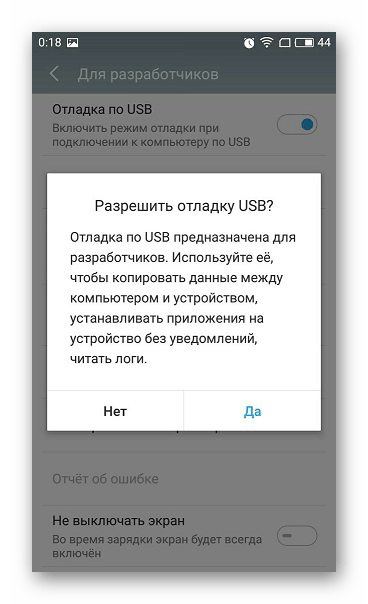
- В разделе «Отладка» включите пункт «Отладка по USB», чтобы включить режим отладки по USB.
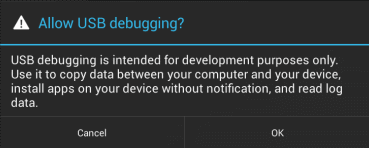
- Подтвердите включение отладки в окне «Разрешить отладку по USB», внимательно прочитав предупреждение.


На этом всё готово — отладка по USB на вашем Android телефоне включена и ее можно использовать с нужными вам целями.
Видео инструкция
В дальнейшем, вы можете отключить отладку в том же разделе меню, а при необходимости — отключить и убрать из меню Настроек пункт «Для разработчиков» (ссылка на инструкцию с необходимыми действиями была приведена выше).
А вдруг и это будет интересно:
17.07.2021 в 22:27
Здравствуйте! С помощью «Для разработчиков» и «Отладки USB» я удалял проблему связи, через кабель компьютер видел и изображения, и видео, и я оперировал ими. И это прекрасно!
Но есть пару но.
1. На всё время данной связи связи с интернетом не было (пока я работал с файлами через кабель, файлы, направляемые ко мне как и всегда через вай-фай, отсутствовали. И как только восстановил через Google связь, файлы гурьбой прилетели).
2. Второе но — после восстановления интернета связь через кабель с компьютером опять отсутствует. Как и ранее.
Есть ли вариант разовой настройки на связи одновременно и с интернетом, и компьютером по USB навсегда, кто знает?
28.09.2021 в 17:24
13.10.2021 в 18:30
Спасибо, никак не мог разобраться с просмотром файлов с телефона Redmi 4 на ПК, очень помогли.
Источник
Как включить режим отладки USB на Андроид
Переход в режим отладки по USB нужен в нескольких случаях, чаще всего это необходимо, чтобы запустить Recovery или совершить прошивку девайса. Реже запуск данной функции нужен, чтобы восстановить данные на Android через компьютер. Осуществляется процесс включения в несколько простых шагов.
Включаем отладку по USB на Android
Перед началом инструкции хочется отметить, что на разных устройствах, особенно на тех, в которых установлена уникальная прошивка, переход к функции отладки может немного отличаться. Поэтому рекомендуем обратить внимание на правки, которые мы сделали в некоторых шагах.
Этап 1: Переход в режим разработчика
На отдельных моделях устройств может потребоваться включение доступа разработчика, после чего откроются дополнительные функции, среди которых находится необходимая. Для этого вам потребуется:
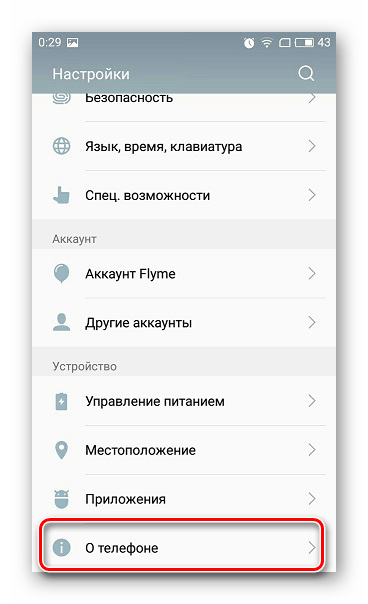
- Запустить меню настроек и выбрать «О телефоне» или же «О планшете».
Пару раз нажать на «Номер сборки», пока не высветится уведомление «Вы стали разработчиком».
Обратите внимание, что иногда режим разработчика уже включен автоматически, только нужно найти специальное меню, возьмем в пример смартфон Meizu M5, в котором установлена уникальная прошивка Flyme.
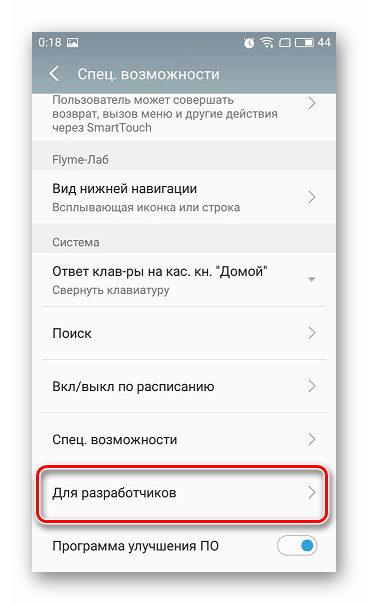
- Снова откройте настройки, после чего выберите «Спец.возможности».
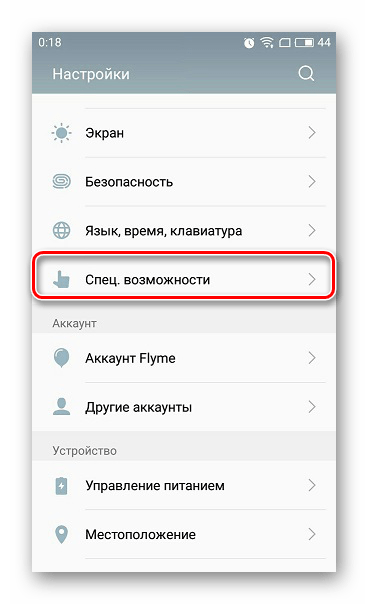
Опуститесь в самый низ и нажмите «Для разработчиков».

Этап 2: Включение отладки по USB
Теперь, когда дополнительные возможности были получены, осталось только включить необходимый нам режим. Для этого выполните несколько простых действий:
- Перейдите в настройки, где уже появилась новое меню «Для разработчиков», и нажмите на него.
Прочтите предложение и согласитесь или откажитесь от разрешения включения.
На этом все, весь процесс выполнен, остается только подключиться к компьютеру и произвести желаемые действия. Кроме этого доступно отключение данной функции в том же меню, если она больше не нужна.
Помимо этой статьи, на сайте еще 12473 инструкций.
Добавьте сайт Lumpics.ru в закладки (CTRL+D) и мы точно еще пригодимся вам.
Отблагодарите автора, поделитесь статьей в социальных сетях.
Источник
Knowledge about
USB Debugging Android
What is USB debugging? How do I enable USB debugging?
Just follow the manual instructions in our guide, and you’ll be a master in no time.
(Recommended: Mirror Android phone after USB debugging? Tenorshare Phone Mirror can easily display Android screen on PC in real-time.)
Free Download For Windows 11/10/8.1/8/7
Part1
What is USB Debugging Android?
Part2
How to Enable USB Debugging?
Part3
How to Turn off USB Debugging?
What is USB Debugging?
In a word, USB debugging is a way for an Android device to communicate with the Android SDK (Software Developer Kit) using USB connectivity. It permits an Android device to communicate with computers directly, thus the Android device can receive terminal commands, files, etc. from the computer, and the computer can pull crucial information like log files of the Android device.
Why I need to enable USB Debugging Mode?
USB debugging mode grants you high-level access to your device. It is important when you need system-level clearance, such as coding a new app, transferring data between an Android device and the computer, mirroring Android to PC, rooting your device, flashing firmware with ADB commands, and reading log data of the Android device.
How to Enable USB Debugging on Android?
The steps to enable USB debugging depend on the version of Android and vary from the Android device brand to brand. If you are not sure about how to enable USB debugging on Samsung, Huawei, Xiaomi, HTC, LG, etc., follow the quick guide given below.
How to Enable USB Debugging on Samsung Devices
Step 1: Unlock your phone and go to «Settings» and select «About phone».
Step 2: Choose «Software information» and tap «Build number» about seven times until you see a message saying «Developer mode has been enabled».
Step 3: Go back to Settings and the «Developer options» menu is now under Settings.
Step 4: Enter «Developer options» and turn on the «USB debugging» button.
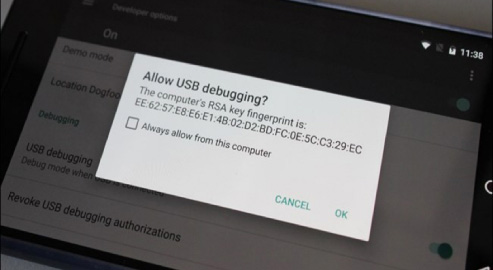
Step 5: If you see a messages «Allow USB Debugging», click «OK». Now you have enabled debugging on your Samsung Galaxy successfully.
Step 1: On your Samsung Galaxy S7/S7 Edge. Head to «Settings» > «About phone» > «Software info».
Step 2: Tap «Build number» several times until you see a message that says «Developer mode has been enabled».
Step 3: Go back to Settings and the «Developer options» menu is now under Settings.
Step 4: Enter «Developer options» and enable «USB debugging» option.
Step 5: When you connect your Samsung phone to computer using a USB cable, you will see a message «Allow USB debugging» for connection, click «OK».
Step 1: On your device, head to «Settings» > «About device» (About phone for S5).
Step 2: Scroll down and tap «Build number» several times until you see a message that says «Developer mode has been enabled».
Step 3: Go back to Settings and the «Developer options» menu is now under Settings.
Step 4: Select «Developer options» and enable the USB debugging option.
Step 5: Now you can connect your device to a desktop computer via USB and you will see a message «Allow USB debugging» for connection, click «OK».
Step 1: Turn on your Samsung Galaxy Note 10/9/8. Head to «Settings» > «About phone» > «Software information».
Step 2: Tap «Build number» about seven times and you will see a message saying «Developer mode has been enabled».
Step 3: Select on the Back button and tap on «Developer options» under Settings.
Step 4: Slide the «Developer Options» button to «On» and turn on «USB debugging». If prompted, tap OK to confirm.
Step 1: Unlock your phone and go to Settings > About device > Software info.
Step 2: Scroll down the screen and tap «Build number» several times until you see a message that says «You are now a developer! /Developer mode has been enabled».
Step 3: Go back to Settings. Tap on «Developer option» and drag the switch to right to turn it on.
Step 4: Under developer option, enable «USB debugging» and you will see a message “Allow USB debugging” when you connect your phone to the computer.
How to Enable USB Debugging on HUAWEI Devices
Step 1: Head to «Settings» > «About phone» at the bottom of the interface.
Step 2: Tap «Build number» about seven times until you get the prompt «You are now a developer!».
Step 3: Go back to setting and you can see the «Developer options», select Developer options.
Step 4: Turn on the “USB debugging”, and you have debugged your Huawei Mate 7 or Huawei Mate 8 successfully. Remember to tap «OK» to allow USB debugging when connect your Huawei phone to computer with the USB cable.
Step 1: Go to «Settings» > «About phone».
Step 2: Find «Build number» and tap seven times on it until you get a message saying that «You are now a developer!».
Step 3: Return to Settings and the «Developer options» menu in now under Settings. Select Developer options.
Step 4: Enter «Developer options» and slide to turn «USB debugging» on.
Step 5: After that, when connect your Huawei phone to computer via USB cable you will see a message «Allow USB debugging». Click «OK» to allow a connection.
Step 1: Unlock your phone and go to «Settings» > «About phone».
Step 2: Tap «Build number» seven times until you see a message saying that » You are now a developer!».
Step 3: Now you have enabled developer option. Go back to settings and you will see «Developer options» under Settings.
Step 4: Enter «Developer options» and slide to turn on the «USB debugging».
Step 5: Now you have successfully debugged your Huawei Honor 6/7/8. Next time when you connect your phone to computer using a USB cable and see a message «Allow USB debugging», click «OK» to allow a connection.
Источник
How to Enable USB Debugging and Developer Mode on Android
What is USB Debugging? If you ever attempted to tinker with your Android device, you may have heard of “USB Debugging”. Android USB debugging may sound scary, however, it is not as complicated as you think. Instead, it is just an essential option that allows Android phone to transfer data to/from a computer. The coolest thing is that it allows you to root your Android, install custom ROMs, fix bricked Android, give ADB commands and so forth.
Enabling USB debugging indeed helps a lot for developers and enthusiasts who want to enhance the usage of their Android smartphone. Android users need to enable this feature to recover deleted data on Android with Android Data Recovery software, while Android developers require this feature most frequently to test Android applications on Android devices.
If you intend to have much more freedom of control over your device, you will want to read this article which shows you how to enable USB debugging on Android device. There can be done in many ways and many situations when we need to enable USB debugging, so we will discuss such three important situations in three different parts in our post:
Part 1. How to Enable and Disable USB Debugging on Android Device
Whenever you trying connecting your Android device to the computer or laptop, your phone must always asks you to enable the USB debugging first before it can be recognized by the computer. So in this section, we will firstly tell you how to enable or disable the option of USB debugging on your Android device running from Android 2.3 to Android 9.0.
Before we go on, one thing you should know in advance. As with further versions of Android, security is getting tighter and so are the options on your device. Previously there were direct options to enable USB debugging on the old Android versions, and nowadays you have to first enable Developer Options to breakthrough the USB debugging option on Android 4.0 to Android 10. Developer Options is a great way to enhance the functionality of your phone, but improper use of it could affect the way your device functions. Hence, you should know exactly what you are doing before proceeding any settings. And we advise you to avoid configuring any other settings in Developer Options after enabling USB debugging.
Tips on How to Check Version of Android on Your Phone
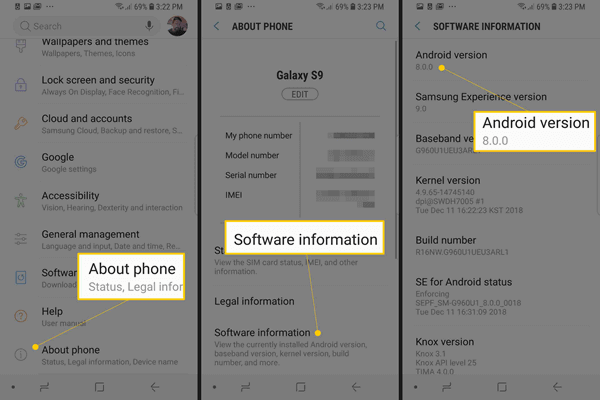
In order to pick out the right way to enable USB debugging on your Android mobile, you should first find out what version of Android you have on your device. To do that, please go to Settings > About Device > Software infomation > Android version, and they will tell you your Android version.
For Android 4.2 Jelly Bean to Android 10:
Step 1: On your Android device, head to “Settings”, and then scroll download to the bottom and hit “About phone”. After that, locate the “Build Number”, and then tap on the Build number seven times constantly. When you are done, you will get a short pop-up in the lower area of your display saying that “you are now a developer”.
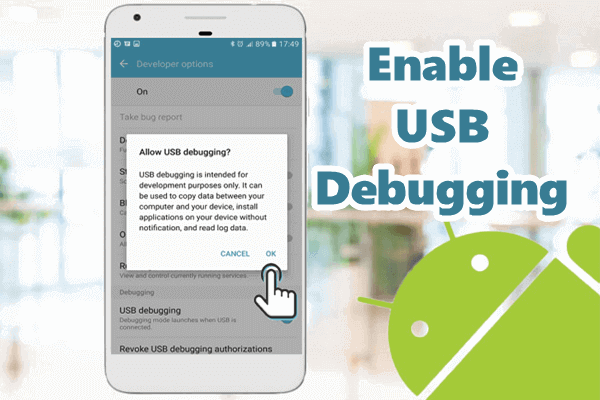
Step 2: After you enabled the Developer mode on Android, now you have to go back and you will find there is the Developer options menu. Once you enter it, you can find the USB debugging options. Now, just simply turn on the USB debugging option and click “OK” on the prompt.
After that, you can enable and disable USB debugging whenever you want by going to Settings -> Developer Options -> Debugging -> USB debugging.
For Android 4.0 Ice Cream Sandwich and 4.1 Jelly Bean:
Step 1. Go to Settings -> Developer options, and enable it.
Step 2. Once you have enabled the Developer options, you just simply scroll all the way down until you see the USB debugging option, and check it.
Step 3. After that, a pop-up window will appear and ask you whether to allow USB debugging. You just need to tap “OK” to confirm it.
For Android 2.3 Gingerbread and Earlier:
As we mentioned earlier, there is direct way to enable USB debugging on the old Android versions, so you don’t have to enable Developer Options firstly. Instead, you can directly go to Settings and turn on the USB debugging mode.
Here is the simple step to do that: Settings -> Applications -> Development -> USB debugging -> Enable it.
Part 2. How to Enable USB Debugging on Broken Screen Android
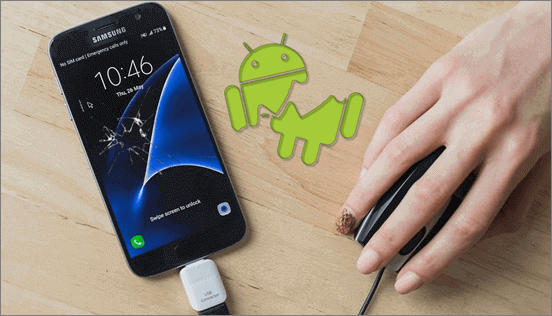
We know that many people may face this situation, that is, the touch screen on Android device gets broken, but fortunately the screen might still light up. If you are stuck in this situation and want to enable USB debugging without screen, you can still use a USB OTG and a mouse to control your smartphone easily.
The USB OTG (USB On-The-Go) is a technology which allows you to connect any external device such as a mouse, a USB drive, a keyboard, etc to your Android smartphone or tablet through a USB Type-C or a micro USB port that is given on your device. For example, you can connect a mouse to your smartphone via an OTG cable and use the mouse to control your Android device without even touching the screen.
But this OTG technology is not supported on every Android smartphone. So before proceeding, you should actually check whether your broken screen smartphone is OTG compatible or not. You can just refer to your user manual of the smartphone or just simply Google that if your device supports USB OTG connection or not.
Here are the simple steps to follow so that you can enable USB debugging on your broken screen Android smart device with USB OTG. If you want to know more about how to use USB OTG on broken screen Android, you can refer to this post.
Step 1. Use an OTG adapter to connect your Android smartphone with a mouse.
Step 2. Connect your broken screen Android to your PC or laptop, and the smartphone will be recognized after the drivers get installed.
Step 3. Now, just left click on the mouse to unlock your smartphone and then head over to Settings and turn on USB debugging. Please refer to PART 1 if you have any problems.
With these easy steps you can directly enable the USB debugging settings and increase the functionality of your device even if your touch screen might not be working on your Android smartphone.
Part 3. How to Enable USB Debugging on Android from PC Remotely
Have you ever thought if it is possible to enable USB debugging on your Android device remotely from your computer or laptop? The straight answer to the question is a simple no. Though there is no immediate way to enable the USB debugging option directly from your PC/Mac, you can still use the ADB commands or via terminal to enable USB debugging on Android through your PC or laptop.
On Android OS, there’s a tool named SDK that can be used to debug any problems happen on your Android device. Android Debug Bridge (ADB) tool is one of the parts of the SDK tool. By using this ADB tool on your computer, you can connect as well as communicate with your Android device via a USB cable and execute a series of commands for various functionalities.
Here are the steps to enable USB Debugging on Android from PC using the ADB command:
Step 1: Firstly, you have to install the ADB tool on your PC or laptop. You can download minimal ADB and Fastboot tool here.
Step 2: Normally the ADB needs to communicate with your Android device via USB debugging. As the USB debugging option is turned off, you will have to boot your device into the ClockworkMod Recovery mode by holding the Power button + Home + Volume Up or Down which depends on the model.
Step 3: When your smartphone enters the recovery mode, launch the ADB tool and then connect your Android device to PC or laptop via a USB cable.
Step 4: Now go to the command prompt and type: adb_enabled. Now the USB debugging option gets enabled by default and now you can use your Android device without any problem.
Summary
So, here are several simple procedures for Android users to enable USB debugging, even on a broken screen Android. Some steps might seem a bit complex, but if you follow the above-mentioned instructions carefully then you can easily get things done without facing any hiccups whatsoever.
Источник


