- COM порт на Android
- Работа с COM портом в Android приложениях
- Virtual serial communication between PC and Android emulator
- Tool introduction
- Virtual Serial Port Driver
- Virtual Com Port Emulator
- Oracle VM VirtualBox
- Serial debugging assistant
- Friendly serial debugging assistant (v2.6.5)
- Serial debugging assistant (V2.2)
- SSCOM3.2
- PCOMAPR1.5 (pcomtest)
- Accesport1.33
- Communication process
- Android Communication: Use of COM Port for Data Transfer
- What do we need?
- Organization of the project
- Accessing a serial port
- Result
COM порт на Android
Сейчас я расскажу, как, имея в наличии совершенно стандартное устройство на Android с поддержкой USB Host (в моем случае Nexus 7), совершенно стандартный USB Host переходник на полноразмерный разъем «мама», совершенно стандартный USB serial контроллер на чипе PL2303 (они почти все работают именно на этом чипе) и не менее стандартный цискин голубой шнурок, зайти на консоль сетевого оборудования и без всяких ограничений работать с ней. Хотя никто не мешает подключать к планшету/телефону и любое другое оборудование, работающее с командной строкой поверх RS-232.
Первым делом получаем на планшете рут-права. Иначе никак.
Вторым делом ставим Busybox. Кто не знает — это отличный комплект утилит, одна из которых нам потребуется. После установки надо запустить его и нажать в самой программе «Install», когда программа спросит про метод установки — сказать «Normal».
Затем понадобится любой приличный эмулятор терминала. Мне нравится Irssi ConnectBot.
Ну и напоследок — штатные клавиатуры плохо годятся для работы с консолью. Нам ведь нужны клавиши Tab, ctrl и прочие, верно? Да и цифры хочется иметь в верхнем ряду, над буквами, а не где-то еще. Потому — Hacker’s Keyboard. Лучше, конечно, подключить внешнюю клавиатуру, но мы пока не собираемся набивать вручную многоэкранные конфиги.
Всё готово для подключения.
Запускаем терминальный клиент, выбираем локальное подключение, и подключаем к планшету контроллер. Нужно убедиться, что он определился, хотя тут проблем не ожидается, драйвера для PL2303 уже много лет как включены в ядро Linux. Под рутом запускаем dmesg. 
(если кому мелковато — кликните на картинку)
Нужно запомнить, куда смонтировало контроллер. В моем случае это всегда был /dev/ttyUSB0.
Осталось установить соединение. В комплект Busybox входит программа «microcom», она-то нам и пригодится.
Набираем в консоли «microcom -s [скорость порта] [точка монтирования устройства]».
Выход из microcom по ctrl+x. Break должен посылаться по ctrl+b (пока не проверял). Другие горячие клавиши передаются корректно.
Альтернативы?
Можно купить один из многих «Bluetooth Serial» адаптеров. Вот только такие адаптеры и стоят дороже (>$50), и требуют внешнего питания. Ни одного на аккумуляторах не видел. В лучшем случае батарейку надо самому прикрутить.
Для пользователей техники Apple есть проводное решение за те же >$50.
Источник
Работа с COM портом в Android приложениях
Все доброго времени суток!
Однажды я задумался над разработкой приложения, которое требовало бы общения с hardware устройством, через COM порт. Хотя Android заботливо предоставляет api для работы с usb устройствами, оно мне к сожалению не подходило, так как хотелось осуществлять поддержку моего старого планшета на базе андроид версии 2.2. Стандартное api ото Гугла, не подходило
по двум причинам:
- во первых оно не сработало для меня.
- девайс у меня все-таки старенький
Итак, после длительного поиска в интернете, я наткнулся на очень интересное решение android-serialport-api. Данное решение представляет собой Java обертку в которой через JNI в которой осуществляются вызовы к USB устройству.
Разработчики библиотеки предлагают 4 различных варианта подключения Android устройства к COM порту через USB.
Так как я имел в своем распоряжении планшет с USB host портом, и у меня под рукой имеется USB to RS232 преобразователь, то я пошел по варианту номер 2.
Преимущества и недостатки такого решения заключаются в
Преимущества
- USB — RS232 преобразователь можно легко найти на ближайшем радио рынке
- никаких извращений с моим дорогим моему сердцу планшетом
- возможная высокая скорость передачи информации
Недостатки
- потребуется USB хост коннектор
- возможно, что девайс придется рутануть
Тут я опишу подход в использовании этой библиотеки.
Для корректной работы serialPortFinder необходимо чтобы переходник USB-RS232 был подключен, определен в /dev.
Вот таким нехитрым способом можно осуществлять общение с очень большим количеством железа через COM порт,
Источник
Virtual serial communication
between PC and Android emulator
When working with serial communication, there are many instances where the ability to create a virtual serial port can greatly facilitate our work. Without this capability, it would be necessary to connect and swap hardware devices to perform serial debugging. The standard method of debugging a device is to create a virtual serial port on a computer. We can then use virtual serial communication to debug Android device without directly connecting it to the computer.
Table of contents:
Tool introduction
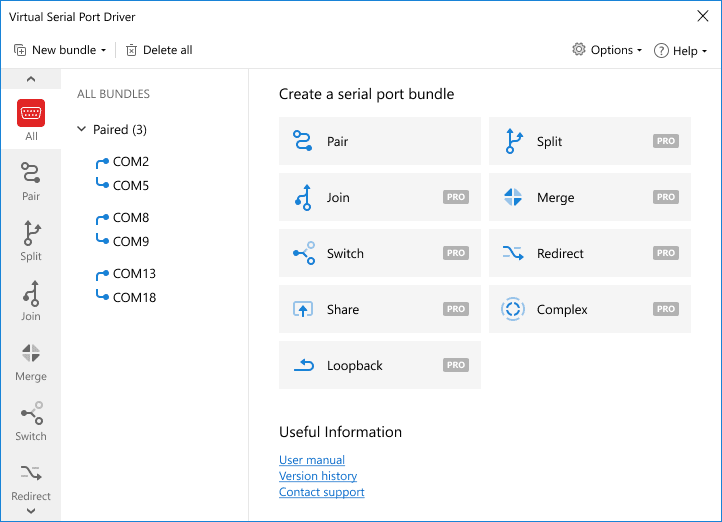
Virtual Serial Port Driver
The Virtual Serial Port Driver provides emulation of virtual serial ports and enables the creation of pairs of available serial ports over a virtual null-modem cable. This allows two applications to exchange data through the connection created by this software tool. The virtual serial ports are displayed in Device Manager and emulate the settings and functionality of a physical interface. Users no longer need to struggle with a lack of serial ports or excessive cabling. The application is fully compatible with ActiveX, DDL, and core-level utilities among other technologies
Virtual Com Port Emulator

Virtual Serial Port Driver
Oracle VM VirtualBox
VirtualBox is a powerful x86 and AMD64/intel64 virtualization product for businesses and home users. VirtualBox is not only an extremely feature-rich, high-performance product for enterprise customers but also the only professional solution available as open-source software under the terms of the GNU General Public License (GPL) version 2.
Currently, VirtualBox runs on Windows, Linux, Mac, and Solaris hosts and supports a large number of other operating systems, including but not limited to Windows (NT 4.0, 2000, XP, Server 2003, Vista, Windows 7, Windows 8, Windows 10). DOS/Windows 3.x, Linux (2.4, 2.6, 3.x, and 4.x), Solaris and OpenSolaris, OS/2, and OpenBSD.
With Oracle VM VirtualBox we can virtualize a Linux system and create a virtual Android serial port in the Android emulator (because the Android OS is based on Linux).
Serial debugging assistant
There are a lot of serial debugging assistants, which can be found in a quick search on Google. Here are some common tools:
Friendly serial debugging assistant (v2.6.5)
- Easy to use;
- Automatic identification of serial ports;
- Support multi-serial port debugging;
- COM numbers higher than COM 9 can be used;
- Support sending of historical records;
- Supports various baud rates up to 10 Mbps baud rate to for compatibility with hardware devices.
- Potential data loss;
- Lack of a smooth display;
- Not suitable for stability testing.
Serial debugging assistant (V2.2)
- Easy to use;
- Has the most user groups;
- User-guide;
- Free source code.
- Due to the multi-threaded receiving technology, the number of received calls is sometimes lost, especially when the high baud rate or the USB to serial port function is used.
- It only supports a maximum of 115.2K baud rate.
- You can only select COM1
COM2. When using USB to serial port emulator, you must remap the serial port.
SSCOM3.2
- Supports automatic identification of connected serial devices;
- Easy to use;
- No counting;
- Good stability;
- Simple interface that provides a good user experience.
- Plugging and unplugging the serial port program will crash your machine, resulting in a blue screen;
- The high baud rates are only 115.2K, 128K, 256K, and there is no 230.4K;
- As a console, echo is not supported;
- Save display data is not supported under Win10.
PCOMAPR1.5 (pcomtest)
- High baud rate of up to 921.6K with no loss of reception.
- Only COM1 through COM4 is available;
- When using USB to a serial port, you need to remap the serial port.
Accesport1.33
- Strong functionality;
- Many configuration parameters;
- No reception loss.
- When the baud rate is high (such as 230.4K), large amounts of received data can cause disruption in the data sending process.
Communication process
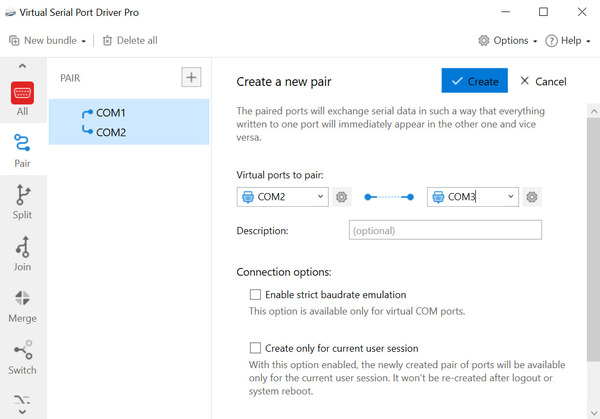
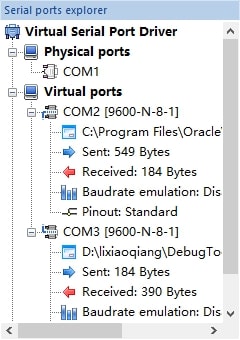
First, create two virtual ports COM2 and COM3 through Virtual Serial Port Driver. Of course, you can also create COM4 and COM5. This has no effect, as shown below:
After the creation is successful, click the Settings button, then find the serial port item and set the port 1.
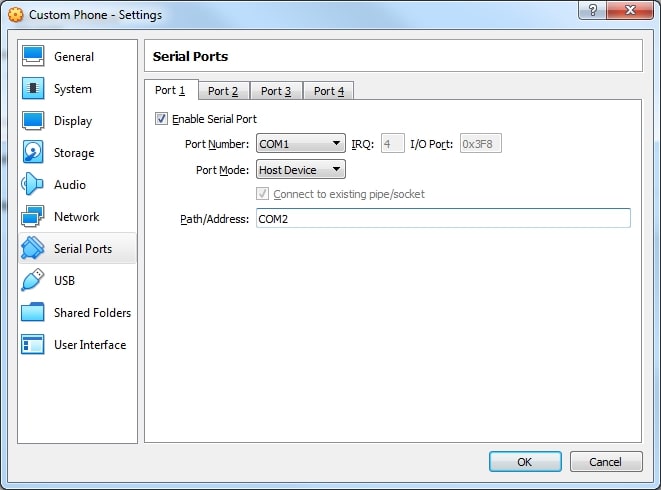
The port number COM1 corresponds to the Android virtual machine, /dev/ttyS0and the COM2 port of the address (p) corresponds to our virtual COM2 port. Of course, you can also set it to COM3 because we created two virtual ports in front.
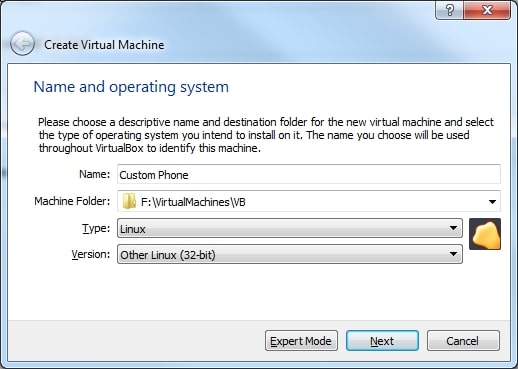
Next, we start the Android emulator, I am using Genymotion, here we should note that the emulator we created is lower than the Android 4.4 version, otherwise the emulator does not support the virtual serial port.
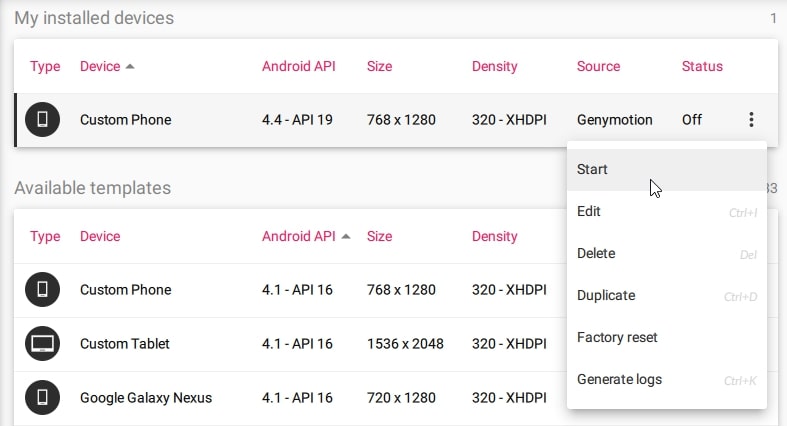
After starting the emulator, open the serial debugging assistant, let the serial debugging assistant connect to another port (COM2 for the emulator, so connect COM3 here), click to open the serial port after setting.
At this time, you will find that the status of the two virtual serial ports in the Virtual Serial Port Driver is active, as shown below:
Finally, we open the serial port in the apk /dev/ttyS0send analog data, you can see the received data, pay attention to both sides here you need to set the same baud rate in serial debugging assistant.
Источник
Android Communication: Use of COM Port for Data Transfer

Back in 2013, our development team created a dashboard for Android which could display electricity network data in a workshop. Their main problem was that the device that collected the data stood alone and had to be connected to an Android device via a serial port. One of the developers published a blog post which explored the possibility of using a COM port in applications for an Android OS. It has soon turned out that many people around the globe have come across similar issues when trying to connect the devices and, as a result, the post has gained much popularity since the date of its publication. As this post is quite popular on our blog, we think that it is high time we updated the post to make it easily available for anyone who has recently had any difficulties with COM ports for an Android device.
A few months ago I was asked to develop a dashboard for Android which could display electricity network data in a workshop. The main problem was that the device that collects the data stands alone and must be connected to an Android device via a serial port. In this article, I will explore the possibility using a COM port in applications for an Android OS. It is needed when your application must receive/send data from the other device that only has RS 232 serial port as a means of communication.
What do we need?
- First, you need to download Android NDK to work with native code in Java: http://developer.android.com/tools/sdk/ndk/index.html It will be necessary to call code on C to work with the serial port.
- Second, it is necessary to check out the source code of the project from svn to work with Serial port RS 232: android- serialport — api
Organization of the project
It is necessary for us to create a / jni folder and to copy the contents of the project / jni folder, that was downloaded from svn (or simply to copy complete folder / jni ), in the Android project. After that we need to add the following files from the downloaded project:
The given files allow us to work with the COM port but you will need to edit the files to serve the needs of the project. It is known all devices in the systems are similar to a *nix one are on a path /dev. To establish a path to the device (COM port) and baud rate it is necessary to set the appropriate values of the fields in the Application.java file:
Class SerialPortActivity.java is an extension of Activity class and contains an abstract method protected abstract void onDataReceived (final byte [] buffer, final int size). You can inherit the Activity from this class where they will work with the serial port, and to process data acquisition from the port having redefined the method onDataReceived.
It is possible to extract logic of the information system port in your own class/classes and not to use the inheritance from SerialPortActivity.java. You can receive the lists of all the devices and their paths by means of class SerialPortFinder.java with its methods getAllDevices () and getAllDevicesPath () accordingly. The write-In port is carried out by using a simple record in OutputStream created by means of class SerialPort.java, COM port.
Accessing a serial port
Native code loading in the Android application may be found in class SerialPort.java by calling System.loadLibrary (‘ serial_port ‘):
The parameter serial_port is a module that has occurred as a result of code C compilation through/via NDK. It is specified in file make /jni/Android.mk. File SerialPort.c in /jni folder and contains native functions of the system calls to work with Serial port. Such parameters for the COM port as Data bits, Parity, Stop bits and the others may be changed in this file by means of structure termios, for example:
After changing the file SerialPort.c it is necessary to compile the libraries as follows:
Open command line
Go to the NDK folder
Set path to the Android project – set NDK_PROJECT_PATH= -path to your android project-
The libraries will be compiled and added in a /libs folder of your project. After that it is possible to perform the following command in order to install an Android application in a device:
Result
As a result we have all the instruments that can help us to connect a third-party device via a serial port. Sending and receiving data using these instruments also allow us to manage devices which give us great opportunities for new business ideas.
Источник


