- Полный список
- Реализация приложения – device owner-а под Android
- Терминология
- Что потребуется?
- Приложение – device owner
- Приложение – инсталлятор
- Эксперименты
- Provision devices
- Device provisioning basics
- Deployment scenarios
- Modes of operation
- Device owner provisioning methods
- Profile owner provisioning methods
- Provisioning methods for legacy devices
- Key provisioning differences across Android versions
- General implementation considerations
- Google Play services compatibility
- Implementation considerations for profile owner mode
- Remove or disable the personal DPC
- User removes the personal DPC
- Personal DPC disables itself
- Implementation considerations for device owner mode
- Device must be new or factory reset
- Set up device owner mode only on company-owned devices
- Enable system apps
- Enable system apps through Google Play
- Enable system apps using Android framework APIs
- Implementation considerations for legacy mode
- Determine if a device supports work profiles
- Test scenarios for your DPC
- Customize provisioning
- QR code method
- Use cases for QR code provisioning
- Create a QR code
- QR code provisioning process
- Managed Google Play Accounts method
- Prerequisites to provisioning devices
- Set up profile owner mode
- Set up device owner mode
- Set up legacy mode
- Final setup steps for all modes of operation
- Google Account method
- Set up profile owner mode
- Set up device owner mode
- Set up legacy mode
- Implementation considerations for the Google Account method
- NFC method
- Create the NFC programmer app and programmer device
- Provision a customer device
- Code samples from the NFC programmer app
- initializePropertyUI() method
- Default parameters
- onCreate() Method
- Additional resources
- Manual DPC install method
- Set up profile owner mode
- Add the managed Google Account first
- Create the work profile first
- Set up legacy mode
Полный список
— разбираемся, что такое Package для приложения
Package можно перевести как пакет. Этот вариант перевода я и буду использовать в уроке.
Пакет приложения мы прописываем в визарде создания приложения.
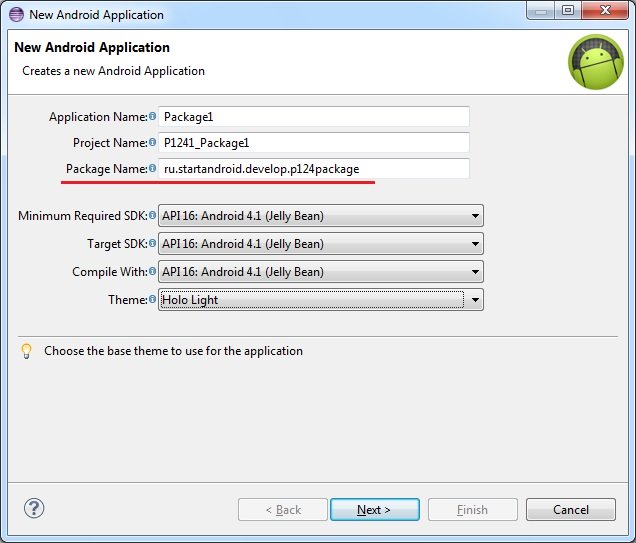
Потом его можно найти в манифесте.

Он же по дефолту становится пакетом для Java-классов

Как-то не особо значимая цель .
Может быть он используется как-то еще? Оказывается да. Более того, пакет — это крайне важная вещь при создании приложения. Пакет является идентификатором приложения в системе. Т.е. когда вы устанавливаете приложение, система смотрит его пакет и ищет уже установленное приложение с таким пакетом. Если не нашлось, то все ок и приложение устанавливается.
А вот если нашлось, то тут в дело вступает механизм подписи приложения ключом, который мы рассмотрели на прошлом уроке. Система проверяет, если установленное и устанавливаемое приложения подписаны одним и тем же ключом, то, вероятнее всего, это означает, что оба приложения создал один автор. И устанавливаемое приложение является обновлением установленного, т.к. их пакеты и ключи одинаковы. Система устанавливает новое приложение, заменяя старое — т.е. обновляет старое.
Если же система определила, что приложения были подписаны разными ключами, то это значит, что приложения были созданы разными авторами, пакеты совпали случайно, и новое вовсе не является обновлением старого. В этом случае при установке нового, старое было бы заменено, а значит потеряно (а не обновлено), т.к. приложения абсолютно разные. И система не дает поставить новое приложение, пока не будет вручную удалено старое.
Проведем пару тестов. Я создам два приложения Package1 и Package2 с одинаковым пакетом.
Установлю первое. Оно появилось в списке.

Теперь не удаляя первое, установлю второе.
Первое исчезло. Осталось только второе.

Система решила, что второе является обновлением первого (т.к. пакеты и ключи совпадают), поэтому первое благополучно снесла и заменила вторым. Собственно, это и происходит при обычном обновлении.
Теперь подпишу Package2 другим ключом, чем оно было подписано изначально и попробую обновить через adb.

Параметр r здесь означает, что приложение надо переустановить, если оно уже существует.
Видим ошибку Failure [INSTALL_PARSE_FAILED_INCONSISTENT_CERTIFICATES]. Система сверила ключи у установленного и устанавливаемого приложений, увидела, что они разные и решила, что это будет не обновление, а просто приложение от другого разработчика ломится с тем же пакетом. И вполне разумно решила не удалять имеющееся приложение, а предупредить пользователя, что не совпадают ключи.
Если закинуть это приложение на эмулятор и поставить через файловый менеджер, получим примерно то же сообщение.

Из вышесказанного можно сделать следующий вывод: ваш ключ, которым вы подписываете приложение ни в коем случае нельзя терять или давать кому-либо.
Если вы ключ потеряете, то ваше приложение навсегда потеряет возможность быть обновленным. Даже если вы создадите новый ключ с тем же алиасом, паролем и данными владельца, это все равно будет другой ключ. И подписанная им следующая версия приложения будет рассматриваться системой не как обновление, а как попытка приложения от другого разработчика заменить ваше приложение и не даст его установить, пока не удалите установленное.
Если же вы ключ кому-то предоставите, то этот человек сможет сделать обновление для вашего приложения без вашего участия. И если этот человек имеет доступ и к вашей учетке разработчика в маркете, то он сможет залить туда свою версию вашего приложения.
Также не забывайте пароли от хранилища и от ключа. Это будет равносильно тому, что вы потеряли ключ. В общем, относитесь к вашим ключам со всей серьезностью.
И в конце урока небольшой ликбез. Пакет имеет еще одно значение. Как вы уже наверно заметили по вкладке Devices в Eclipse, пакет используется в качестве имени процесса, в котором запускается приложение. При этом, под каждое приложение система создает пользователя. Это позволяет разграничить доступ к данным. Каждое приложение запускается и работает со своими данными в отдельном процессе под отдельным пользователем. Соответственно, другие приложения не имеют к этим данным доступа, т.к. запущены под другими пользователями.
На следующем уроке:
— разбираемся с ViewPager
Присоединяйтесь к нам в Telegram:
— в канале StartAndroid публикуются ссылки на новые статьи с сайта startandroid.ru и интересные материалы с хабра, medium.com и т.п.
— в чатах решаем возникающие вопросы и проблемы по различным темам: Android, Kotlin, RxJava, Dagger, Тестирование
— ну и если просто хочется поговорить с коллегами по разработке, то есть чат Флудильня
— новый чат Performance для обсуждения проблем производительности и для ваших пожеланий по содержанию курса по этой теме
Источник
Реализация приложения – device owner-а под Android
Эта статья представляет собой инструкцию по написанию и установке на целевое устройство приложения – device owner-а. Меня побудило написать эту статью то, что когда я сам принялся изучать этот вопрос, оказалось, что хорошей официальной документации с примерами нет, а информацию пришлось собирать с помощью Гугла.
В ОС Android, начиная с версии 5.0 Lollipop (API 21) появилась замечательная возможность управлять устройством программно, находясь в режиме device owner. Например, стало возможно производить «тихую» установку/удаление приложений, «скрывать» приложения (причем скрываются они качественно, т.е. исчезают из списка приложений в настройках, исчезают из лаунчера и списка последних использованных приложений), и делать многое другое. Это очень полезные возможности для реализации MDM. Обзор всех возможностей, которые предоставляются device owner-у выходят за рамки статьи, о них можно почитать здесь и здесь.
Терминология
Для начала определимся с терминами. Device owner – очевидно владелец устройства. Обычно владельцем устройства становится первый созданный пользователь при начальной настройке устройства, которая происходит после того как устройство впервые включается после покупки. Но в нашем случае мы сделаем так, что владельцем устройства будет наше приложение, которое и получит доступ к использованию расширенных возможностей управления устройством. Unprovisioned state – состояние устройства до того как будет проведена первичная настройка. Устройство находится в этом состоянии после первого включения и после wipe. Provisioned state – состояние устройства после того, как была проведена первичная настройка.
Что потребуется?
Для наших экспериментов нам понадобятся два устройства на которых есть NFC и одно из этих устройств нам придется wipe-нуть. Для того чтобы установить приложение – device owner на целевое устройство нужно загрузить его на сервер так, чтобы оно было доступно по URL целевому устройству, например example.com/deviceowner.apk (я пробовал только протокол http). Далее нужно привести целевое устройство в unprovisioned state, например сделать wipe. После этого нужно установить на другое устройство приложение – инсталлятор. Потом нужно совместить эти два устройства так, чтобы был возможен обмен данными по NFC, обычно надо просто приложить устройства друг к другу задними поверхностями, далее надо подтвердить передачу по NFC тапнув по экрану устройства с приложением – инсталлятором. После этого первичная настройка целевого устройства продолжится и потребуется настроить сеть так, чтобы устройство смогло скачать apk файл с приложением – device owner-ом. После завершения первичной настройки приложение – device owner будет доступно для запуска и использования и его невозможно будет остановить/удалить никак и ничем, кроме wipe-а устройства.
Приложение – device owner
Я написал пример приложений device owner и инсталлятора. Ниже приведу наиболее интересные фрагменты кода. Весь код писать в статье смысла нет, в конце статьи будут ссылки на проекты с полным исходным кодом.
Приложение – device owner будет управлять видимостью других приложений. Т.е. с его помощью можно скрывать/показывать другие приложения. В приложенит есть класс AppsManager, он инкапсулирует построение списка и управление приложениями. Список получается в AsyncTaske-е:
Управление происходит через DevicePolicyManager:
Основой UI служит RecyclerView, все тривиально, приведу код адаптера:
Особенность приложения в том, что ему нужно реализовать какой-нибудь reciever чтобы получить права администратора, хотя бы пустой:
В манифесте нужно указать этот receiver с соответствующими настройками:
Для того, чтобы эти настройки заработали надо также положить в директорию ресурсов «xml» файл device_owner_receiver.xml с описанием того, чем приложение собирается управлять как администратор:
В итоге приложение надо собрать и apk файл выложить на сервер.
Приложение – инсталлятор
Приложение – инсталлятор это просто приложение, которое запускается и после совмещения с целевым устройством передает по NFC данные в которых содержится информация откуда целевое устройство должно брать приложение – device owner, ниже код формирующий NFC-сообщение:
Обратите внимание на следующие моменты:
- Не забудьте добавить в манифест;
- Вам нужно указать package name вашего приложения – device owner-a (в нашем случае это «com.example.deviceowner»)
- Вам нужно указать правильный URL по которому доступен apk-файл приложения – device owner-a (вместо [Device owner app URL])
- А также вам нужно указать контрольную сумму (вместо [Device owner app checksum]). Контрольная сумма считается коммандой cat Something.apk | openssl dgst -binary -sha1 | openssl base64 | tr ‘+/’ ‘-_’ | tr -d ‘=’ (команда взята отсюда)
Эксперименты
Оба приложения надо собрать, инсталлятор установить на одно устройство, device owner надо выложить на сервер, целевое устройство wipe-нуть. После этого можно начать эксперименты.
Для демонстрации работы функции скрытия приложения я скрою системные настройки на целевом устройстве:

Здесь мы видим, что настройки есть в списке приложений.
Здесь мы видим, что настройки есть в списке последних использованных приложений.
Выключаем приложение – настройки.
Настройки исчезли из списка последних использованных приложений.
И из списка приложений.
Даже если вы попытаетесь запустить настройки из “шторки” (обведено зеленым прямоугольником) и другими способами у вас ничего не получится.
Источник
Provision devices
There are several ways to provision devices. Your customers’ business requirements determine which provisioning methods you’ll want to use.
Device provisioning basics
The device provisioning deployment scenarios that your customers want to support (such as BYOD or company-owned) determine the modes of operation you’ll use (such as device owner mode or profile owner mode). Similarly, the modes of operation and Android releases you need to support determine which provisioning methods you’ll implement.
Deployment scenarios
In a company-owned deployment scenario, the enterprise owns and fully controls the devices its employees use. Typically, organizations deploy company-owned devices when they need to strictly monitor and manage the whole device.
Companies that support a BYOD deployment scenario allow their employees to bring personally-owned devices to work, and to use those devices to access privileged company information and applications.
Modes of operation
Company-owned deployments are supported by the device owner mode of operation. In Android, your management app is called the device policy controller (DPC). The DPC enforces policies on an Android device and when it acts as the device owner, it manages the entire device. As device owner, the DPC can perform device-wide actions, such as configure device-wide connectivity, configure global settings, and perform a factory reset.
BYOD deployments are supported by the profile owner mode of operation. Through the DPC, the enterprise enables personal devices for work use by adding a work profile to the primary user account on the device. The work profile is associated with the primary user, but as a separate profile. As profile owner, the DPC manages only the work profile on the device and has limited control outside of the work profile.
Legacy device deployments are supported by the legacy mode of operation, which allows the DPC limited control of a device (such as the ability to wipe a device, require a pass code, or enforce some policies). You can provide app management on legacy devices through Google Play by allowing the user to add a Google Account or by having your DPC add a managed Google Play Account to the legacy device.
Legacy mode is discouraged for deployments where you can implement device owner mode or profile owner mode. You should use the highest level of device management possible instead of using a “lowest common denominator” solution across a large fleet.
Device owner provisioning methods
You must provision the device owner mode of operation during the initial setup of a new device or after a factory reset. Device owner mode can’t be provisioned on a device at any other time.
Depending on the use case, there are 2 main types of provisioning methods for provisioning device owner mode.
- In a device-driven flow, IT admins can use NFC to provision large numbers of devices. This flow can be used for managed Google Play Account or G Suite scenarios.
- In a user-driven flow, the options depend on whether the organization uses G Suite.
- In a G Suite scenario, the user adds their Google Account during initial device setup, and the DPC must guide the user through the steps to set up the device owner. A user-driven flow can help end users set up new devices and also is an alternative when devices don’t support NFC.
- When an organization doesn’t use G Suite, you should use the managed Google Play Accounts method.
Profile owner provisioning methods
The recommended method to provision the profile owner mode of operation depends on whether the organization uses G Suite.
- In the G Suite case, the recommended method is a user-driven flow where the user adds their user Google Account, and the DPC guides the user through the steps to set up the profile owner.
- When an organization doesn’t use G Suite, the recommended method is the managed Google Play Accounts method.
The traditional method, where the user is instructed to manually install the DPC, is also supported. It relies on the user to download your DPC from Google Play and install it, and then the DPC guides the user through the rest of the process to set up the profile owner.
Provisioning methods for legacy devices
Legacy devices run Android versions earlier than 5.0 or don’t support work profiles. The recommended method to provision a legacy device depends on whether the organization uses managed Google Accounts.
- In the managed Google Accounts case, the recommended method is a user-driven flow where the user adds their Google Account, and the DPC guides the user through the steps to set up.
- When an organization doesn’t use managed Google Accounts, the recommended method is the managed Google Play Accounts method, where the user installs the DPC from Google Play. The DPC can add managed Google Play Accounts to a legacy device, similar to the way it adds the account to a work profile.
The traditional method, where the user is instructed to manually install the DPC, and the DPC then adds a Google Account, is also supported. It relies on the user to download your DPC from Google Play and install it, and then the DPC guides the user through the rest of the process to set up.
Key provisioning differences across Android versions
| Deployment scenario | Mode of operation | Provisioning method | *Pre 5.0 | 5.0, 5.1 | 6.0, later | 7.0, later |
| Company-owned | Device owner | QR code | ✓ | |||
| Managed Google Play Accounts | ✓ | ✓ | ||||
| Google Account | ✓ | ✓ | ||||
| NFC | ✓ | ✓ | ✓ | |||
| Legacy | Managed Google Play Accounts | ✓ | ||||
| Google Account | ✓ | |||||
| BYOD | Profile owner | Managed Google Play Accounts | ✓ | ✓ | ✓ | |
| Google Account | **5.1 | ✓ | ✓ | |||
| Manual DPC install | ✓ | ✓ | ✓ | |||
| Legacy | Managed Google Play Accounts | ✓ | ||||
| Google Account | ✓ | |||||
| Manual DPC install | ✓ |
*Legacy mode is also recommended for devices that don’t support work profiles, even if the device runs an Android version later than 5.0. These are typically devices that have a low amount of RAM.
**The Google Account method in Android 5.1 supports only the profile owner mode of operation, and the user can configure it only from Settings > Add account.
General implementation considerations
Here are some things to consider as you write your DPC, regardless of which mode of operation you implement.
Google Play services compatibility
The Google Play services APK guide instructs developers to perform a version check of Google Play services before performing API transactions. Because attempting to update Google Play services causes serious disruptions in the device setup process, your DPC must not attempt to update Google Play services before device provisioning is complete.
Key points about DPC compatibility with Google Play services are:
- The DPC should run using the Google Play services that shipped with a particular device.
- The DPC shouldn’t rely on new features in future versions of Google Play services being available at the time of device provisioning.
When device provisioning is complete, the DPC can prompt the user to update Google Play services so the DPC can use the latest features. However, if a feature isn’t available for some reason, the DPC must fall back gracefully to the version that shipped with the device.
Implementation considerations for profile owner mode
Here are some things to consider as you write your DPC to implement the profile owner mode of operation.
Remove or disable the personal DPC
When provisioning the profile owner mode of operation, the DPC starts running in the personal profile and initiates the process to create a work profile. Once the work profile is created, the DPC is also running inside the work profile. The DPC in the work profile completes the provisioning process. At that point, the DPC in the personal profile should disable itself or the device user should remove it.
User removes the personal DPC
- The personal DPC listens for ACTION_MANAGED_PROFILE_PROVISIONED. (For Android 5.1 devices, the personal DPC should instead listen for ACTION_MANAGED_PROFILE_ADDED .)
- The personal DPC initiates an uninstall request ACTION_UNINSTALL_PACKAGE . This prompts the user to uninstall the personal DPC. For the best user experience, the uninstall process should happen during the provisioning flow.
Personal DPC disables itself
- The personal DPC listens for ACTION_MANAGED_PROFILE_PROVISIONED. (For Android 5.1 devices, the personal DPC should instead listen for ACTION_MANAGED_PROFILE_ADDED .)
- If applicable, the personal DPC should release device admin privileges before disabling itself.
- The personal DPC initiates a setApplicationEnabledSetting disable request with the COMPONENT_ENABLED_STATE_DISABLED parameter.
- The user can re-enable the personal DPC from Google Play.
Implementation considerations for device owner mode
Here are some things to consider as you write your DPC to implement the device owner mode of operation.
Device must be new or factory reset
You must provision the device owner mode of operation during the initial setup of a new device or after a factory reset. Device owner mode can’t be provisioned on a device at any other time.
Device owner mode gives the DPC complete control over a device. If provisioning device owner mode after initial setup were allowed:
- Malware could potentially create a device owner and take over the device.
- Privacy issues could result if there were already some user data or apps on the device.
Set up device owner mode only on company-owned devices
You should provision device owner mode only on devices that you identify as being owned by your customer’s company. You can verify this by detecting a unique device identifier (such as a serial number), or by using a dedicated set of accounts that are authorized for device enrollment through your EMM policy.
If you can’t verify company ownership of a device, you must create a fail-safe mechanism so that device owner mode is not provisioned by mistake. For example, you could prompt the device user to confirm or take some affirmative action before provisioning device owner mode.
Enable system apps
When the DPC provisions a work profile, any system apps without launcher icons are assumed to be critical to the device and are automatically allowed to run in the work profile. System apps that have launcher icons are considered to be optional, and you can decide whether to enable them.
Enable system apps through Google Play
Enabling system apps using Google Play is easy, and users get app updates as they’re available.
Enable system apps using Android framework APIs
If you want users to see system apps as soon as they start using their devices, enable system apps as part of the device provisioning process. The DPC enables system apps by package name or by intent using DevicePolicyManager.enableSystemApp() .
There are a few ways to identify the system apps you want to enable and present in your EMM console to IT admins.
Create system app catalogs
In this method, each device determines which apps are on the device and sends this data back to the EMM console. The EMM console dynamically displays this data when creating device policy, which allows the IT admin to manage apps on a per-app basis.
- If the work profile isn’t provisioned yet on the device, pull a list of all apps with launcher icons on a device using queryIntentActivities() :
private List getAppsWithLauncher() <
Intent i = new Intent(Intent.ACTION_MAIN);
i.addCategory(Intent.CATEGORY_LAUNCHER);
return getPackageManager().queryIntentActivities(i, 0);
> - If the work profile is already provisioned on the device, pull a list of all apps in the work profile using PackageManager.GET_DISABLED_COMPONENTS and PackageManager.GET_UNINSTALLED_PACKAGES .
- Find system apps in the apps list by checking FLAG_SYSTEM , which indicates if an app is installed in the device’s system image.
- Provides IT admins with a complete picture of the apps on all devices.
- Provides granular control over which apps are enabled.
- Because each device has a different app catalog, it’s hard to apply a model of single policy configuration to multiple device types.
- It can be challenging to present the volume of OEM-specific apps in a meaningful way for IT admins.
Categorize system apps by functionality
When an IT admin wants to enable a system app for a group of devices, they select a generic app based on functionality; for example, “System Browser.” The DPC then allows all system apps for that intent.
- Simple, functionality-based enablement for IT admins.
- Ensures consistent functionality across a variety of devices (at least for common use cases).
- Limits system apps to those that are supported across all device types.
- IT admins might want to push one OEM version of an app (such as a Samsung® browser), but not another (such as an LG® browser).
- IT admins might not want to push multiple apps, but they can’t prevent it when there are multiple intent handlers.
Support only approved system apps
You work with the OEM to identify specific OEM packages and support only those packages within the EMM console. This also allows you to catalog the managed configurations for the OEM app, which you would not know otherwise because the OEM app isn’t hosted on Google Play.
- Vastly simplifies the integration workflow, and eliminates the edge cases that are problematic in the first two options.
- You can catalog the managed configurations for the OEM app and present them in the EMM console for IT admins.
- Enables close relationships with OEMs for supporting flagship devices.
- Less scalable and reduces consumer choice as a result.
Implementation considerations for legacy mode
Here are some things to consider as you write your DPC to implement the legacy mode of operation.
Determine if a device supports work profiles
For devices that don’t support work profiles, you can provision the legacy mode of operation. A device doesn’t support work profiles when the device:
- Runs a version of Android earlier than 5.0.
- Has a low amount of RAM, even if it runs an Android version later than 5.0.
To determine if work profiles are supported, the DPC can use PackageManager.
Test scenarios for your DPC
Test DPC is an open-source app provided by Google for testing enterprise functionality in your DPC app. Test DPC is available from github or Google Play. You can use Test DPC to:
- Simulate features in Android
- Set and enforce policies
- Set app and intent restrictions
- Set up work profiles
- Set up fully managed Android devices
While Test DPC is intended primarily as a vehicle to test your enterprise solution for Android, you can also use it as a source of sample code for Android features.
Customize provisioning
During device provisioning, the system user interface shows a default color in the status bar and a default logo at the top of the screen. Set custom colors and logos to provide a consistent visual transition between your DPC and the system interface, or allow admins to do so using your EMM console. For example, an admin might upload a company logo or customize the look of screens that show notifications.
To set a custom color, use EXTRA_PROVISIONING_MAIN_COLOR to set an integer that indicates the predominant color to show during device provisioning. Put the extra (constant) in an intent with ACTION_PROVISION_MANAGED_PROFILE or ACTION_PROVISION_MANAGED_DEVICE .
To see how the integers are represented, see Color. For an example, see MAIN_COLOR in the TestDPC app .
To set a custom logo, use EXTRA_PROVISIONING_LOGO_URI to set an image that’s displayed at the top of the screen during device provisioning. Put the extra (constant) in an intent with ACTION_PROVISION_MANAGED_PROFILE or ACTION_PROVISION_MANAGED_DEVICE . Make sure the image has a reasonable pixel density for the device.
For an example, see LOGO_URI in the TestDPC app.
QR code method
The QR code provisioning method sets up and configures device owner mode by scanning a QR code from the setup wizard. The QR code contains a payload of key-value pairs with all the information that’s needed for the DPC to provision a device.
Your EMM console should provide a way for IT admins to create QR codes for the devices they want to provision. The IT admin sends the QR codes to their end users, and the end users provision their devices by scanning the QR codes.
Use cases for QR code provisioning
Some devices, such as tablets, don’t support NFC. QR code provisioning is an easy way to provision a distributed fleet of devices that don’t support NFC. An IT admin can send QR codes to their users to allow user-driven provisioning.
QR code provisioning doesn’t require a Google identity, such as a Google domain or Google Account. Organizations that use Android, but don’t use G Suite, don’t have a Google identity.
Like NFC, QR-code provisioning enables kiosk and single-use deployments where a Google identity (or any identity) isn’t needed or desirable. For example, a kiosk device in a store belongs to no one and shouldn’t have an end user identity.
Create a QR code
A valid QR code for QR code provisioning is a UTF-8 encoded JavaScript® Object Notation (JSON) string. You can include these properties in valid QR code:
Always required
Required if a DPC isn’t already installed on the device
Recommended if the device isn’t already connected to Wi-Fi
Optional
This sample builds a valid QR code:
QR code provisioning process
- The setup wizard prompts the user to tap the Welcome screen 6 times. The taps have to be done in the same place on the screen.
- The setup wizard prompts the user to connect to the Internet so the setup wizard can download a QR code reader.
- Google Play services downloads a module that contains a QR code recognition engine.
- The user scans the QR code provided by their IT admin.
- The setup wizard downloads your DPC app and initiates the device owner provisioning process using ACTION_PROVISION_MANAGED_DEVICE .
Managed Google Play Accounts method
A DPC can use the managed Google Play Accounts provisioning method to set up device owner mode or profile owner mode. This provisioning method is targeted at organizations that aren’t currently using G Suite.
The managed Google Play Accounts provisioning method uses the DPC Support Library. This client library ensures the smooth operation of managed Google Play Accounts. It also maintains compatibility with future updates to the managed Google Play Accounts provisioning process.
Prerequisites to provisioning devices
- The enterprise ID is created and enrolled with an EMM identity and the ESA is set, as described in Create and Enroll an Enterprise.
- The user’s corporate identity is known to your EMM console.
- The user can sign in to the DPC app using credentials accepted by your EMM console, typically corporate email credentials.
Set up profile owner mode
You can provision the profile owner mode of operation on a device that’s being used in a BYOD scenario as a personal device.
- The user manually downloads your DPC from Google Play and launches it.
- The DPC provisions the work profile using ACTION_PROVISION_MANAGED_PROFILE .
- Complete the final setup steps.
Set up device owner mode
You must provision the device owner mode of operation during initial setup of a new device or after a factory reset. Device owner mode can’t be provisioned on a device at any other time.
During device setup, the user enters a special DPC-specific token when they are prompted to add an account. A token is in the format “afw#DPC_IDENTIFIER.” For an EMM named ACME, “afw#acme” would install the default DPC of the ACME EMM. Each EMM must request a specific DPC identifier from Google before they can use it in the provisioning process.
- The user turns on a new or factory reset device and the setup wizard launches.
- When prompted to add an account, the user enters a special token in the format “afw#DPC_IDENTIFIER” that identifies the DPC for your EMM.
- Using the DPC identifier in the token, the setup wizard adds a temporary Google Account to the device. This temporary account is only used to download the DPC for your EMM from Google Play, and is removed in the final setup steps.
- The DPC provisions the device using ACTION_PROVISION_MANAGED_DEVICE .
- Complete the final setup steps.
Set up legacy mode
You can provision the legacy mode of operation on a device that’s being used in a BYOD scenario as a personal device if the device doesn’t support work profiles.
- The user manually downloads your DPC from Google Play and launches it.
- The DPC sets itself as device admin.
- Complete the final setup steps.
Final setup steps for all modes of operation
Perform these steps only after the initial steps for setting up profile owner mode, device owner mode, or legacy mode are complete.
- The DPC makes sure that the device can support managed Google Play Accounts by initializing the DPC Support Library:
If you’re setting up device owner mode on a device, this step removes the temporary Google Account that was added to download the DPC. - The user signs into the DPC using their EMM credentials. These are typically corporate email credentials.
- The DPC requests managed Google Play Account credentials for the authenticated corporate user from the EMM console.
- If the EMM console doesn’t have a Google Play userId for the user, it creates a new user by calling Users.insert() . If you are provisioning device owner mode, specify a device account (for dedicated device deployments) or a user account (for company-owned deployments).
Note: Because user IDs are EMM-specific, they can’t be reused if the enterprise is unenrolled and re-enrolled with a different EMM.
Set the Device’s policy by calling Devices.update . You should set the policy before adding the managed Google Play Account to the device, otherwise the policy will not be applied for a short period of time after adding the account to the device.
Google Account method
A DPC can use the Google Account provisioning method to set up device owner mode, profile owner mode, or legacy mode. With the Google Account provisioning method, the DPC guides the user through the provisioning steps after the user adds their Google Account during the initial device setup.
When a user enters their Google Account credentials:
- The Google authentication server authenticates the user account.
- The authentication server then communicates with the enterprise server to see if the account’s domain is registered as either a G Suite domain or an EMM-managed domain.
- If so, the system automatically downloads the DPC associated with the domain from Google Play and installs it.
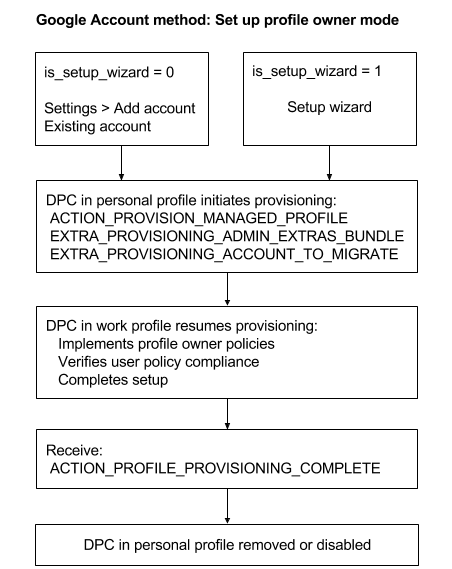
Set up profile owner mode
You can provision the profile owner mode of operation during initial setup of a device or when the user is adding an account using Settings > Add account.
- Account authentication is started by a user from the setup wizard or from Settings > Add account.
The DPC is automatically downloaded to the device and launched.
The DPC uses the value of is_setup_wizard to determine where account authentication started:
0 = From Settings > Add account.
1 = In the setup wizard during initial device setup.
The DPC starts running in the personal profile and initiates the process to create a work profile using:
ACTION_PROVISION_MANAGED_PROFILE —Provisions the work profile.
EXTRA_PROVISIONING_ADMIN_EXTRAS_BUNDLE —Extra information for the work profile such as locale, Wi-Fi, email address.
EXTRA_PROVISIONING_ACCOUNT_TO_MIGRATE —Name of the authenticated account to be migrated into the new work profile.
The DPC in the work profile completes the provisioning process. Once the work profile is created, the DPC is also running inside the work profile. The DPC pushes policies for that managed Google Account, ensures that the device isn’t in a compromised state, and verifies that the policies are enforced (such as requiring a password).
When the work profile is provisioned, the DPC receives the broadcast
ACTION_PROFILE_PROVISIONING_COMPLETE .
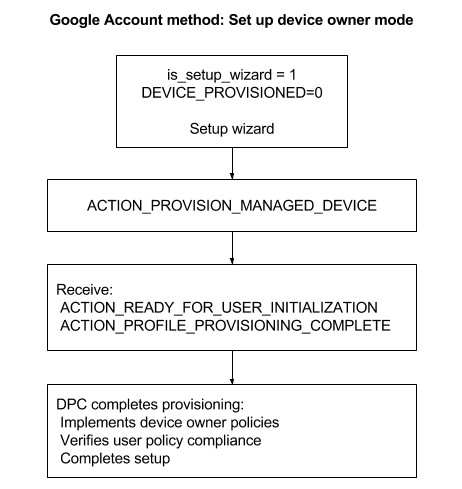
Set up device owner mode
You must provision the device owner mode of operation during initial setup of a new device or after a factory reset. Device owner mode can’t be added to a device at any other time.
- Account authentication is started by a user from the setup wizard or from Settings > Add account.
The DPC is automatically downloaded to the device and launched.
The DPC uses the value of is_setup_wizard to determine where account authentication started:
0 = From Settings > Add account.
1 = In the setup wizard during initial device setup.
The DPC uses the value of Global.DEVICE_PROVISIONED to verify that the device is new or factory reset (unprovisioned):
0—Unprovisioned.
1—Provisioned.
The DPC initiates device owner provisioning using ACTION_PROVISION_MANAGED_DEVICE .
The DPC completes the provisioning process by pushing policies for that managed device, ensuring that the device isn’t in a compromised state, and verifying that the policies are enforced (such as requiring a password).
Set up legacy mode
You can provision the legacy mode of operation during initial setup of a device or when the user adds an account in Settings > Add account. The requirements for making managed Google Play available to users with a Google Account are:
- The Google Account is part of a managed Google domain.
- The managed Google domain is set up for Android with an EMM that’s bound to the Google Play EMM API.
If you only want to do app management on legacy devices, you don’t need a DPC. In this case the user adds their Google Account in Settings > Add account. App management includes curating recommended apps, making private apps available, and purchasing licenses and distributing them.
If you want your DPC to add the Google Account:
- The user downloads your DPC from Google Play and launches it.
- The DPC adds the managed Google Account using AccountManager.addAccount() . See TestDPC for a sample implementation of adding a specific Google Account using AccountManager.KEY_ACCOUNT_NAME .
- (Optional) The DPC sets itself as device admin. As device admin, the DPC has device management capabilities beyond app management.
Implementation considerations for the Google Account method
The DPC should detect the Google Account authentication flow by looking for specific extras in the launch intent that was used (see LaunchIntentUtil ):
- Account of type android.accounts.Account —Indicates that the account was added from the setup wizard or from Settings > Add account, which requires the launched DPC to manage the device or profile.
- is_setup_wizard of type Boolean—If true, the DPC was launched in the setup wizard before the setup wizard completed, otherwise from Settings > Add account or another flow.
A simple check for whether the DPC was launched as part of the Google Account method is:
The DPC should not call finish() before it has finished setup. It should also return a positive result code (such as RESULT_OK ) as the DPC is launched with startActivityForResult() and waits for a result.
The DPC should wait for a result code from the provisioning process before calling finish() if the DPC setup flow reaches the point of sending an ACTION_PROVISION_* intent. Use the startActivityForResult() and onActivityResult() callbacks when launching ACTION_PROVISION_* intents. (See LaunchActivity and SetupSyncAuthManagement for examples).
Due to the potentially asynchronous nature of the setup process, the DPC can’t rely on a result code of RESULT_OK to indicate that provisioning succeeded. The only guaranteed way is to rely on DeviceAdminReceiver callbacks on provisioning success. RESULT_CANCELED indicates that the user backed out in a synchronous part of the setup flow, and the DPC should react to this.
In this example, the DPC launches provisioning and waits for the result code from an activity:
- The DPC should not attempt to set up the device owner mode of operation if the device is already provisioned (see ProvisioningStateUtil.isDeviceProvisioned() ). In this example, the DPC checks if the device is provisioned:
- Optional. The DPC can use the EXTRA_PROVISIONING_ADMIN_EXTRAS_BUNDLE extra when launching provisioning to pass state information back to its DeviceAdminReceiver (which in the profile owner case is running inside the work profile). Test DPC uses this extra to enter a different set of activities in the Google Account flow after provisioning completes. For details see DeviceAdminReceiver .
- To set up a work profile, the DPC must migrate the added account into the new work profile. To do this, the DPC should pass the account provided in the launch intent for ACTION_PROVISION_MANAGED_PROFILE .
- The DPC should provide the user with a clear call to action (such as a Finish button) to exit the app at the end of setup so the user doesn’t think they’ve reached a dead end in the flow.
- The DPC should use the setup wizard theme or layout library so the user experience is smooth and feels well integrated.
NFC method
A DPC can use the NFC provisioning method to set up device owner mode. In the NFC provisioning method, or NFC bump, you create an NFC programmer app that contains the initial policies and Wi-Fi configuration, settings, and provisioning details required by your customer to configure the device owner mode of operation. When your or your customer install the NFC programmer app on an Android device, that device becomes the programmer device.
To provision a device, the IT admin takes a new device out of the box and bumps it against the programmer device. The bump transfers configurations to the device so it connects to the Internet and downloads the appropriate policies and settings. The device is then managed by your DPC.
After a device is provisioned, for a short time Google Play displays unmanaged consumer content instead of the approved apps and collections that should display. This delay can last from a few minutes up to an hour.
Create the NFC programmer app and programmer device
- Download the NFC programmer sample app from the EMM community on Google Cloud Connect. You can use the sample app as is or modify it for your default values. See the Default parameters sample code.
- Install the NFC programmer app on the device that will be the programmer device.
- Launch the NFC programmer app and select Load Defaults for com.example.android.apis. (This text can vary depending on the default parameters that you set.)
Provision a customer device
- Bump the programmer device with a new device or one that has been factory reset.
- Verify that the device remains on the initial Welcome screen that’s displayed when it starts. The text is specified in Ready to send: <. >in the programmer app.
- Wait while the DPC:
- Encrypts the device.
- If it’s a Code-Division Multiple Access (CDMA) device: Activates the phone while a telephony user interface is shown (no interaction required).
- Sets up the Wi-Fi connection.
- Downloads the .apk file for com.example.android.apis.
- Installs com.example.android.apis.
- Sets the Sample Device Admin in com.example.android.apis as the device owner.
- Shows a success “toast” when the device owner is activated.
- After returning to the home page (setup wizard is skipped automatically), check that com.example.android.apis is set as the device owner:
- In Settings > Security > Device admins, make sure that Sample Device Admin can’t be removed.
- In Settings > Users > Users & profiles > You (owner), make sure that Owner is the only account available (a device can have only one active device owner at a time).
Code samples from the NFC programmer app
Sections from the NFC programmer app that you’ll find especially useful have inline comments. To view all of the sample code in the NFC programmer app, unpack the sample .apk file using a Java decompiler program.
initializePropertyUI() method
The initializePropertyUI() method initializes user interface elements (editable text boxes and checkboxes) in the NFC programmer app. Changes in those elements sync to the key value pairs (KVPs) that the mProps variable holds. The mProps variable is eventually sent to a device on an NFC bump.
Default parameters
This code sample sets the default values that will be pushed to a device on an NFC bump. Some configurable parameters are not included in the sample, but you might need to include them in your implementation. (You can find parameters that are not in the sample here.)
onCreate() Method
The onCreate() method initializes the NFC programmer app and its functions and capabilities. The android.app.extra strings correspond to the strings described in the DevicePolicyManager documentation. For example: DevicePolicyManager.EXTRA_ PROVISIONING_WIFI_SSID == «android.app.extra.PROVISIONING_WIFI_SSID» .
Additional resources
Advanced NFC describes advanced NFC topics, such as working with various tag technologies, writing to NFC tags, and foreground dispatching.
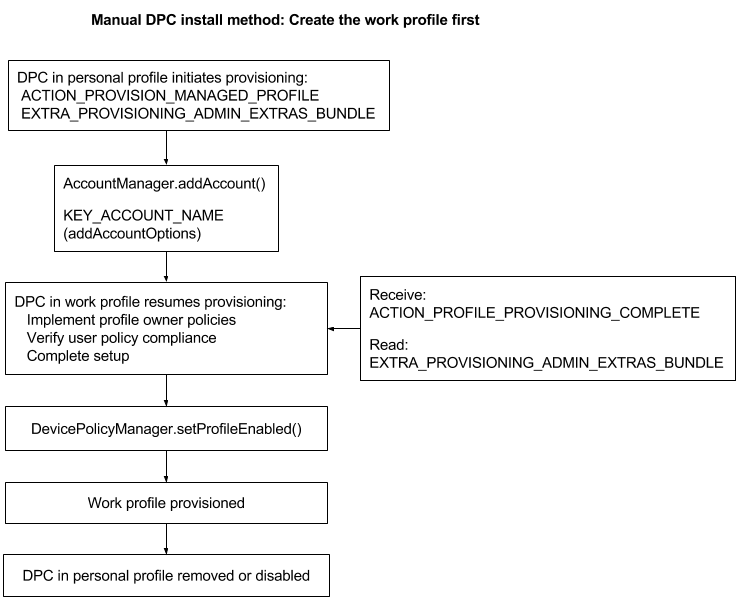
Manual DPC install method
To set up profile owner mode using the manual DPC install provisioning method, the user downloads your DPC from Google Play and installs it. Then the DPC guides the user through the rest of the process to set up the profile owner for the managed Google Account.
The DPC can add the managed Google Account before or after creating the work profile. For example, the DPC can create a work profile based on a user’s EMM credentials instead of prompting for the managed Google Account first.
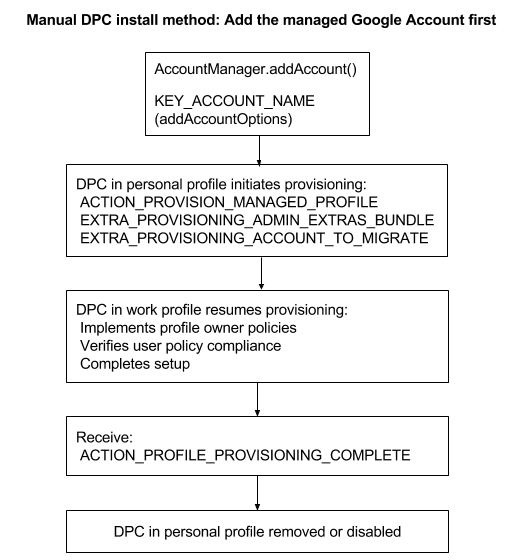
Set up profile owner mode
Add the managed Google Account first
- The user downloads your DPC from Google Play and installs it.
- The DPC adds the managed Google Account before creating the work profile using AccountManager.addAccount() .
- The DPC starts running in the personal profile and initiates the process to create a work profile using: ACTION_PROVISION_MANAGED_PROFILE—Provisions the work profile.
EXTRA_PROVISIONING_ADMIN_EXTRAS_BUNDLE—Extra information for the work profile such as locale, Wi-Fi, email address.
EXTRA_PROVISIONING_ACCOUNT_TO_MIGRATE—Name of the authenticated account to be migrated into the new work profile. - The DPC in the work profile completes the provisioning process. Once the work profile is created, the DPC is also running inside the work profile. The DPC in the work profile completes the provisioning process by pushing policies for that managed Google account, ensuring that the device isn’t in a compromised state, and verifying that the policies are enforced (such as requiring a password).
- When the work profile is provisioned, the DPC receives the broadcast ACTION_PROFILE_PROVISIONING_COMPLETE .
- The DPC in the personal profile disables itself or the user removes it.
Create the work profile first
- The user downloads your DPC from Google Play and installs it.
- The DPC starts running in the personal profile and initiates the process to create a work profile using: ACTION_PROVISION_MANAGED_PROFILE—Provisions the work profile.
EXTRA_PROVISIONING_ADMIN_EXTRAS_BUNDLE—Extra information for the work profile such as locale, Wi-Fi, email address. - The DPC adds the managed Google Account using AccountManager.addAccount() .
- The DPC receives the broadcast ACTION_PROFILE_PROVISIONING_COMPLETE and reads EXTRA_PROVISIONING_ADMIN_EXTRAS_BUNDLE .
- The DPC in the work profile completes the provisioning process. Once the work profile is created, the DPC is also running inside the work profile. The DPC in the work profile completes the provisioning process by pushing policies for that managed Google account, ensuring that the device isn’t in a compromised state, and verifying that the policies are enforced (such as requiring a password).
- The DPC enables the work profile using DevicePolicyManager.setProfileEnabled() .
- The DPC in the personal profile disables itself or the user removes it.
Set up legacy mode
You can provision the legacy mode of operation during initial setup of a device or when the user adds an account in Settings > Add account. The requirements for making managed Google Play available to users with a Google Account are:
- The Google Account is part of a managed Google domain.
- The managed Google domain is set up for Android in the enterprise with an EMM that’s bound to the Google Play EMM API.
If you only want to do app management on legacy devices, you don’t need a DPC. In this case the user adds their Google Account in Settings > Add account. App management includes curating recommended apps, making private apps available, and purchasing licenses and distributing them.
If you want your DPC to add the Google Account:
- The user downloads your DPC from Google Play and launches it.
- The DPC adds the managed Google Account using AccountManager.addAccount() . See TestDPC for a sample implementation of adding a specific Google Account using AccountManager.KEY_ACCOUNT_NAME .
- (Optional) The DPC sets itself as device admin. As device admin, the DPC has device management capabilities beyond app management.
Except as otherwise noted, the content of this page is licensed under the Creative Commons Attribution 4.0 License, and code samples are licensed under the Apache 2.0 License. For details, see the Google Developers Site Policies. Java is a registered trademark of Oracle and/or its affiliates.
Источник


