- Delphi. FireMonkey. Первое приложение под Android – “Позвони маме”
- Настраиваем Delphi для работы с FireMonkey – Android
- Building your first app bundle
- Android App Bundle is the new and official publishing format for Android applications.
- Building on the command line
- Building in Android Studio
- Uploading through the Play Console
- Exploring your Android App Bundle
- Download the app bundle and install locally
- Disabling optimizations
- Android App Bundle Part-2 : BundleTool
- Android App Bundle Part -1
- Modular and Dynamic App Delivery : Android App Bundle
- Android App Bundle
- Build App Bundle
- Test/Analyze App Bundle
- Generate all possible APKs archive set
- Generate APKs archive set for connected/specific device
- Install/Deploy to a connected device
- Extract APKs for a specific device configuration
- Open Questions/Issues
- Is there any way to generate final installable apk from bundle or apks archive set?
- Bundle tool » install apks” command isn’t working
Delphi. FireMonkey. Первое приложение под Android – “Позвони маме”
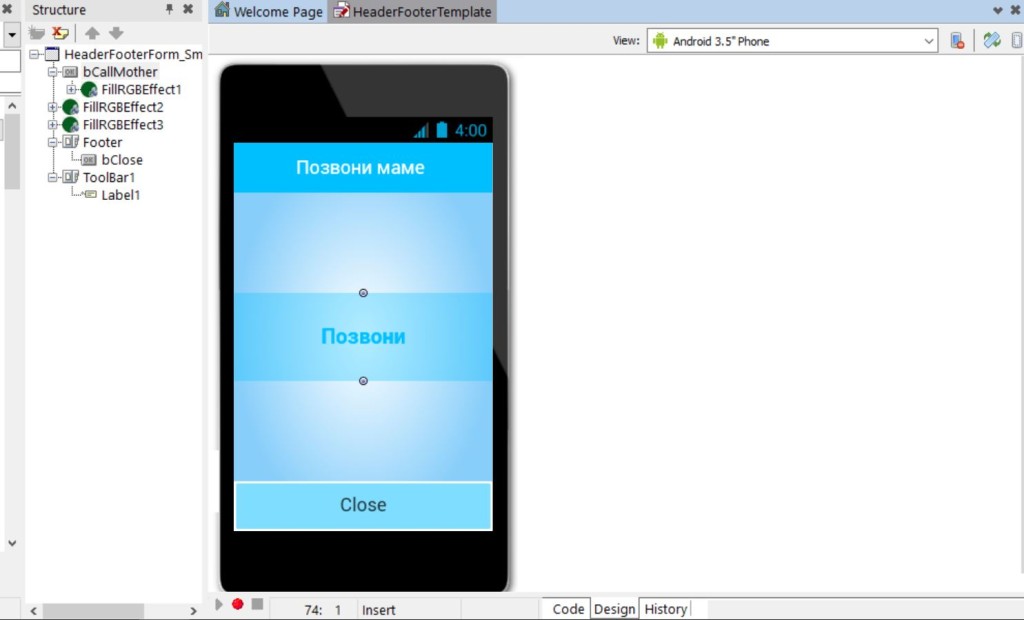
В Delphi, насколько я вижу, под Android можно писать на Firemonkey – и тогда мы получим нативное приложение. А можно писать при помощи UniGUI фрэймворка и тогда мы получим приложение работающее через браузер, основанное на популярной библиотеке jQueryMobile.
Плюс первого подхода (приложения на FireMonkey), насколько я понимаю в скорости, производительности программы, а также в том, что есть доступ к железу (вспышка, датчики и др.), минус в том, что такое приложение запустится не на всех устройствах, насколько я вижу по информации с форумов. Но на большинстве.
Ещё один плюс – приложение может быть полностью автономным, не зависящим от сети. Если, скажем использовать базу данных SQLite для каких то небольших приложений.
Также лично для меня, человека работающего с mySQL есть ещё один финт в работе с FireMonkey – напрямую, я оказывается не могу подключиться, в связи с ограничениями в FireDAC – библиотекой доступа к данным, выход – либо переход на другие компоненты либо через DataSnap.
Плюс второго подхода (приложения на UniGUI) состоит в том, что такое приложение будет работать практически везде, где есть браузер и интернет. На айфонах, айпадах, планшетах и так далее. Наверное, это даже удобнее, нежели 100 приложений под разные платформы. То есть, мы выходим за рамки конкретной платформы. Само приложение будет работать через сеть.
Минус этого подхода в том, что у нас практически нет доступа к железу. Но если этого не требуется, а для большинства задач этого достаточно – то всё в порядке. Также хорошо то, что вся мощь javascript библиотек будет под рукой и её можно будет использовать как напрямую, так и через язык Delphi. Другое ограничение – постоянный доступ к сети, но с этим проблем вроде бы нет в современном мире.
Есть ещё и третий подход)) Соединить первый и второй подходы – а именно – завернуть UniGUI приложение в FireMonkey. То есть, если, скажем нам нужно разместить наше приложение в магазине PlayMarket – мы просто берем TWebBrowser и прописываем в нём ссылку на наше приложение на UniGUI в сети.
Настраиваем Delphi для работы с FireMonkey – Android
Об этом много и хорошо написано на сайте Влада. За что ему огромное спасибо. Для меня это был стартовый импульс. Не всё, конечно, прошло гладко. Но, тем не менее, результат достигнут за приемлемое время.
Я, в частности, столкнулся вот с такой ошибкой…
Источник
Building your first app bundle
Android App Bundle is the new and official publishing format for Android applications.

This article is available as a video and linked at the end of the post.
With the Android App Bundle we created a format that unlocks, amongst other things, shipping smaller apps to your users. Smaller apps are more likely to be installed and less likely to be uninstalled when disk space gets tight.
In this post we’ll take a closer look at how to build your first app bundle, how you can upload it using the Play Console and dive into some configuration options.
Getting started doesn’t require any changes to your existing codebase.
All you’ll need to do is create an Android App Bundle, using the command line or Android Studio.
Building on the command line
On the command line, you’ll run one of the bundle tasks like this:
Then locate the bundle in your application’s build directory. The default location is app/build/outputs/bundle/release .
This bundle needs to be signed. When using jarsigner , this is how you sign the bundle:
Once the variables are replaced with actual values and the keystore password is entered, the bundle will be signed and ready for upload.
Building in Android Studio
In Android Studio, select “Build => Generate Signed Bundle / APK” and follow the dialog.
Whether you use the command line or Android Studio, the process will leave you with a built and signed release bundle that’s ready for upload to the Play Store.
Uploading through the Play Console
To upload your app bundle to the Play Store, create a new release on a chosen release track. You can drag and drop the bundle into the “App bundles and APKs” section or use the Google Play Developer API.
Once the Bundle is uploaded, the Play Store can optimize the APKs it delivers to users’ devices based on their configuration. This in turn reduces download and installation size.
Exploring your Android App Bundle
To take a look at how the Play Store ships your app to a user’s device, you can click on the “Details” button at the end of the bundle’s row.
In the details screen you already see a lot of information on your app bundle such as version code, minSdk level, target SDK, required features, permissions, screen layouts, localizations and much more.
And you also can download signed APKs for your app, to see exactly what the Play Store delivers to a specific device. To navigate there, click on “Explore Bundle” and then open the “Downloads” tab.
You can either select a specific device or apply one or more of the many filters from the “Add filter” tab.
Download the app bundle and install locally
In the app bundle explorer, at the end of your screen, there is a “Download” button which provides a zip file, containing several APK, which are tailored to the specific device in question.
After you download and unzip the file, the containing APK can be installed on a local emulator or device by using `adb install — multiple *.apk` from the containing directory.
While each apk in this set is relevant to guarantee correct execution of your app, I want to point out that the base.apk always has to be installed on a device in order to provide your app’s core functionality. Next to code and resources the base module also contains the merged AndroidManifest and shared dependencies for the entire application.
Each feature module or configuration split provides its own resources and can contain code, but the base module is what ties it all together.
Disabling optimizations
You can disable the optimization in each module’s build.gradle file. All you have to do is edit the language , density or abi property and set enableSplit to false . This will tell the build system that it should not optimize this specific dimension.
Unless you have a good reason to, I recommend not touching this section as setting enableSplit to false can dramatically increase the on-device installation size of your app.
There could be exceptions, such as when your app has its own language selector built in and you want to have all potential languages available for selection at all times. But even then, using the Android App Bundle provides you with ways to load features on demand instead. This could be used to avoid to pre-install parts of your app that only a subset of users might need.
And since we enable you to download and install features in a programmatic way, we provide an unbundled API that you can use. It is part of the PlayCore library and is covered as part of the next post and this video in our Modern Android Development Skills series.
Источник
Android App Bundle Part-2 : BundleTool

I tried to explain Android App Bundle in my previous post. Before you read this part 2, I strongly recommend start with part 1 and get the better understanding for Android App bundle. This part will cover how to generate app bundle and generate apks with the bundletool for the testing purpose.
Android App Bundle Part -1
Modular and Dynamic App Delivery : Android App Bundle
Android App Bundle
Android App Bundlemedium.com
Build App Bundle
Let’s play around with bundleTool and see the all possible ways to generate app bundle or apks.
- Clone/Download this sample open source application https://github.com/naman14/Timber, you can pick your application or any open source application. Thanks, Naman Dwivedi for this awesome application (github).
- Now, update the Android Gradle Plugin version to 3.2.0-alpha14 or above in project build.gradle file to use the Android App Bundle feature, build/sync the project.
- You might need to use the new gradle version too if that’s the case then change the gradle version in gradle-wrapper.properties file, build/sync the project.
4. Now time to generate the bundle and analyze it.
As I mentioned in my previous post there two ways to generate the bundle
- Using Android Studio, Go to Build > Build Bundle(s) / APK(s) and select Build Bundle(s), you will find the built bundle at : ./app/outputs/bundle/debug/bundle.aab
- Using command line, ./gradlew bundleDebug from the root directory of project.
Test/Analyze App Bundle
These are the just ways to generate your application publishing bundle, Once you build your Android App Bundle, you should test/understand how Google Play uses it to generate APKs for the device. There are two ways you should consider testing your app bundle:
- Locally using the bundletool command line tool, download this tool from github, It’s open sourced by Google.
- Through Google Play by uploading your bundle to the Play Console and using the new internal test track
Only the first option is a feasible option here. Let’s analyze this bundle in detailed and learn more about how it helps us to reduce the app size. We’ll use bundletool command to analyze or generate apks as per our need. I discussed bundletool in my previous post and how it will be helpful.
In this article, I’ve mentioned only bundletool , instead of using the actual command : jar
/Downloads/bundletool-all-0.3.3.jar Actually, I’m using an alias for it which I’ve configured under
You can also setup alias for java -jar
If you don’t want to use the aliases then use the actual command.
Generate all possible APKs archive set
- Generate an APK set archive using bundletool basic command, you will have timber_app.apks zip file.
Note : Make sure to add language apks configuration manually as there is bug with 3.2.0-alpha14 and 3.2.0-alpha15 versions, none of them generates language configuration apks. Open app/build.gradle and add the following inside the android <> block:
- Unzip this apks zip archive file into the different directory. Wow !! That’s a lot of apks !! 🤔 😲 😲 You can see the every apk size and get the idea that how it helps to reduce the application size when it gets installed on the device.
If I just consider the en language then there is a reduction of 1 MB in the application size, that’s huge !! 😄 😲, even I’ve not considered density and abi
Note that all apks are prefixed with base-, since our app only contains the one base module, there is not dynamic feature module.
base-master.apk Contains the code and resources for the base module
base-armeabi_v7a.apk, base-arm64_v8a.apk, etc. ABI configuration splits
base-xhdpi.apk, base-mdpi.apk, etc. Screen density configuration splits
base-ko.apk, base-fr.apk, etc. Language configuration splits
standalone-x standalone splits for that configuration
Generate APKs archive set for connected/specific device
As per Google IO’18 official video, bundletool has an ability to generate the apk archive set which contains the apks for the connected device only. In this video, they demonstrated two commands, they generate the my_app.apks apks archive set for just the connected device or as per the specs from provided json.
Sadly, they’re giving me error, I’ve opened the issue under bundletool repo, it may be tool issue or something I’m missing.
Install/Deploy to a connected device
As per my understanding and based on the official documentation it should generate and install the APK from the my_app.apks archive set which we generated in the previous step. Use device-id parameter if you have more than 1 device connected.
Note : I’ve tried both commands are and they’re giving me a problem, I’ve opened the issue under bundletool github repo. My guess is it’s related to signing apk.
Extract APKs for a specific device configuration
To extract apks from generated APKs archive set for a specific device configs, you’ve to provide the device information to the bundletool command. Either you can create manually .json file which contains the device specs or get the device specs from the connected device.
- bundletool get-device-spec , this command will give the error for missing required flag output flag. Android developer website doesn’t mention this. Once you’ve the device specs json then use bundletool extract-apks command to generate apks only for pixel2 device.
2. Manually create a device specification JSON as per the below example and just apply the same bundletool extract-apks command with custom json file.
Thats’ it, I explored most of the major operations on the bundletool. Just try this tool with your application and see that how much application size you can reduce before uploading to the Google Play Console
Open Questions/Issues
There are some questions and issues after playing with this tool for few hours.
Is there any way to generate final installable apk from bundle or apks archive set?
I want to compare/analyze the two apks: Universal (tradinational) apk vs APK to specific device (for eg. pixel 2 XL). But I didn’t find any way where I can generate apk for a specific device, I can extract the apks as per device configuration but it gives me all different apks. I am looking for a way to generate only one apk which should be for that particular device (for eg : base+en_US+arm64+xxxhdpi = pixel2 XL)

Although, there is a way to install the apk buildtool install-apks , which I discussed above but it’s giving the error : INSTALL_PARSE_FAILED_NO_CERTIFICATES
Bundle tool » install apks” command isn’t working
Update : Have to set the —ks and —ks-key-alias flags to ensure that the APKs are signed. Only signed APKs can be installed on a device, updated the commands, check the above sections.
Источник


