- Правильная работа с БД в Android
- How to store data locally in an Android app
- Ways to store data
- Using Shared Preferences
- Using internal storage
- External Storage
- SQLite database
- Create a Database Android Application in Android Studio 3.0
- This article explains the steps for creating a database application in Android Studio for those getting started with Android programming.
- Background
- SQLite
- Android SQLite Java Classes
- Create a Database Android Application
- Data Model Class
- Data Handler Class
- Main Activity
Правильная работа с БД в Android
Приветствую всех дроидеров в эти непростые для нас времена.
Честно говоря, заколебала эта шумиха о патентах, войнах и т.д., но в данной статье речь пойдет не об этом.
Я не собирался писать статью на данную тему, так как везде всего полно о работе с базой данных в Android и вроде бы все просто, но уж очень надоело получать репорты об ошибках, ошибках специфичных и связанных с БД.
Поэтому, я рассматрю пару моментов с которыми я столкнулся на практике, чтобы предостеречь людей, которым только предстоит с этим разбираться, а дальше жду ваших комментариев на тему решения указанных проблем после чего внесу изменения в пост и мы сделаем отличный туториал, который будет образцом работы с SQLite в Android не только для начинающих, но и для тех, кто уже знаком с основами и написал простые приложения.
Способы работы с БД
Существует три способа работы с данными в БД, которые сразу бросаются на ум:
1) Вы создаете пустую структуру базы данных. Пользователь работает с приложением(создает заметки, удаляет их) и база данных наполняется. Примером может служить приложение NotePad в демо-примерах developer.android.com или на вашем дроид-девайсе.
2) Вы уже имеете готовую БД, наполненную данными, которую нужно распространять с приложением, либо парсите данные из файла в assets.
3) Получать данные из сети, по мере необходимости.
Если есть какой-то еще один или два способа, то с радостью дополню данный список с вашей помощью.
Все основные туториалы расчитаны как раз на первый случай. Вы пишите запрос на создание структуры БД и выполняете этот запрос в методе onCreate() класса SQLiteOpenHelper, например так:
Примерно так. Более полный вариант класса и других составляющих можно посмотреть по ссылке внизу статьи.
Дополнительно можно переопределить методы onOpen(), getReadableDatabase()/getWritableDatаbase(), но обычно хватает того, что выше и методов выборки данных.
Далее, экземпляр этого класса создаем в нашем приложении при его запуске и выполняем запросы, то бишь проблемная часть пройдена. Почему она проблемная? Потому что, когда пользователь качает приложения с маркета, то не задумывается о вашей базе данных и может произойти что угодно. Скажем сеть пропала или процесс другой запустился, или вы написали уязвимый к ошибкам код.
Кстати, есть еще один момент, на который стоит обратить внимание. Переменную экземпляра нашего класса можно создать и хранить в объекте Application и обращаться по мере необходимости, но нужно не забывать вызывать метод close(), так как постоянный коннект к базе — это тяжелый ресурс. Кроме того могут быть коллизии при работе с базой из нескольких потоков.
Но есть и другой способ, например, создавать наш объект по мере необходимости обращения к БД. Думаю это вопрос предпочтения, но который также необходимо обсудить.
А теперь самое главное. Что, если нам понадобилось использовать уже сушествующую БД с данными в приложении?
Немного погуглив, Вы сразу наткнетесь на такую «замечательную статью» — www.reigndesign.com/blog/using-your-own-sqlite-database-in-android-applications в которой, как покажется, есть нужная панацея. Но не тут то было. В ней еще и ошибок несколько.
Вот они:
1) В методе createDataBase() строка:
SQLiteDatabase dbRead = getReadableDatabase();
и далее код… содержит crash приложения на НТС Desire, потому что получаем БД для чтения(она создается), но не закрывается.
Добавляем строкой ниже dbRead.close() и фикс готов, но момент спорный.
Вот что говорит дока на тему метода getReadableDatabase():
Create and/or open a database. This will be the same object returned by getWritableDatabase() unless some problem, such as a full disk, requires the database to be opened read-only. In that case, a read-only database object will be returned. If the problem is fixed, a future call to getWritableDatabase() may succeed, in which case the read-only database object will be closed and the read/write object will be returned in the future.
Like getWritableDatabase(), this method may take a long time to return, so you should not call it from the application main thread, including from ContentProvider.onCreate().
И так. Данный метод не стоит вызывать в главном потоке приложения. В остальном все понятно.
2) Ошибка: No such table android_metadata. Автор поста выкрутился, создав данную таблицу заранее в БД. Не знаю на сколько это правильный способ, но данная таблица создается в каждой sqlite-бд системой и содержит текущую локаль.
3) Ошибка: Unable to open database file. Здесь много мнений, разных мнений, которые Вы можете прочесть по ссылкам ниже.
Возможно, что проблемы связаны с тем, что один поток блокирует БД и второй не может к ней обратиться, возможно проблема в правах доступа к приложению(было замечено, что чаще проблемы с БД проявляются на телефонах марки НТС именно на тех моделях, которые нельзя рутануть, хотя не только на них, например на планшетах Асер), но как бы то ни было проблемы эти есть.
Я склоняюсь к варианту, что проблема в потоках, не зря ведь нам не рекомендуют вызывать методы создания базы в главном потоке.
Возможно выходом из этого будет следующее решение(рассматривается вариант №2). Используя первый вариант работы с базой, наполнить ее данными после создания, например:
Данный подход еще нужно проверить на практике, но так как этот пост нацелен на выработку верного коллективного решения по данной тематике, то комментарии и пробы на даннную тему только приветствуются.
Мораль истории такова: если вы нашли какой-то хороший кусок кода для вашего решения, то проверьте его, не поленитесь, прежде чем копипастить в свой проект.
Вцелом, данный пост показывает(касательно способа №2) как делать не надо, но и также содержит пару любопытных мыслей.
Метод getReadableDatabase() можно переопределить например так:
Кстати: следуя практике самой платформы, поле первичного ключа стоит называть «_id».
Пишите в комментарии свои используемые практики. Мы сделаем данный пост лучше для всех, а может и мир станет чуточку добрее.
UPD Только что проверил свой подход. Все работает в эмуляторе, но будьте осторожны.
Файлик data.txt лежит в assets такой:
Zametka #1
Zametka #2
Zametka #3
Zametka #4
И класс приложения:
Отмечу, что данный класс используется только для демонстрации и проверки того, что произойдет при вызове методов getReadableDatabase()/getWritableDatabase() и создании базы. В реальных проектах код нужно адаптировать.
Кроме того в базе появилась табличка android_metadata(без моего участия), поэтому указанная выше ошибка решена.
Надеюсь кому-то пригодится.
Любопытные дополнения №1(от хабраюзера Kalobok)
Источник
How to store data locally in an Android app

Almost every app we use or develop has to store data for one purpose or another. It’s not all the same data, either — some apps need access to settings, images, and much more. The big question is how to manage this data so that your device can grab only what it needs. Luckily for developers, Android is full of ways to store data, and we’re here to run you through how they work.
For this article, we’ll discuss the different data storage techniques available to Android developers, along with sample code to get you started or to refresh your memory.
Ways to store data
Using Shared Preferences

Shared Preferences is the way to go if you’re saving primitive data as key-value pairs. It requires a key, which is a String, and the corresponding value for the said key. The value can be any of the following: a boolean, float, int, long, or another string.
Your Android device stores each app’s Shared Preferences inside of an XML file in a private directory. Apps can also have more than one Shared Preferences file, and they’re ideally used to store app preferences.
Before you can store data with shared preferences, you must first get a SharedPreferences object. There are two Context methods that you can use to retrieve a SharedPreferences object.
For when your app will have a single preferences file, and
for when your app could have multiple preferences files, or if you prefer to name your SharedPreferences instance.
On getting the SharedPreferences object, you then access its Editor using the edit() method. To actually add a value, use the Editor’s putXXX() method, where XXX is one of Boolean, String, Float, Long, Int, or StringSet. You can also remove a key-value preference pair with remove().
Finally, make sure to call the Editor’s commit() method after putting or removing values. If you don’t call commit, your changes will not be persisted.
For our sample app, we allow the user to specify a SharedPreferences filename. If the user specifies a name, we request for the SharedPreferences with that name; if not, we request the default SharedPreference object.
Unfortunately, there is no way to get a single list of all SharedPreferences files stored by your app. Instead, you will need a static list or access to the SharedPreferences name if you’re storing more than one file.
You could also save your SharedPreferences names in the default file. If you need to store user preferences, you may want to use the PreferenceActivity or PreferenceFragment command. Just remember that they both use Shared Preferences, too.
Using internal storage

There are plenty of times where you may need to persist data, but you find Shared Preferences too limiting. For example, you may need to persist objects or images in Java. You might also need to persist your data logically with the file system hierarchy. This is where internal storage comes in. It is specifically for when you need to store data on the file system, but you don’t want other apps or users to have access.
This data storage is so private, in fact, that it’s deleted from the device as soon as you uninstall your app.
Using internal storage is similar to saving with any other file system. You can get references to File objects, and you can store data of virtually any type using a FileOutputStream. What sets it apart is the fact that its contents are only accessible by your app.
To get access to your internal file directory, use the Context getFilesDir() method. To create (or access) a directory within this internal file directory, use the getDir(directoryName, Context.MODE_XXX) method. The getDir() method returns a reference to a File object representing the specified directory, creating it first if it doesn’t exist.
In the sample above, if the user-specified filename is empty, we get the base internal storage directory. If the user specifies a name, we get the named directory, creating first if needed.
To read files, use your preferred file reading method. For our example, we read the complete file using a Scanner object. To read a file that’s directly within your internal storage directory (not in any subdirectory), you can use the openFileInput(fileName) method.
Similarly, to access a file for writing directly within the Internal Storage directory, use the openFileOutput(fileName) method. To save files, we use the FileOutputStream write.
As you can see in the image above, the file path is in a folder not accessible by the file manager or other apps. The only exception to this will be if you have a rooted device.
External Storage

Google has made a few key changes to external storage, beginning with Android 10 and continuing in Android 11. To give users better control over their files and cut down on clutter, apps now have scoped access to external storage by default. This means that they can tap into the specific directory on external storage and the media that the app creates.
For more information about requesting scoped directory access, check out this Android developer tutorial.
If your app tries to access a file that it did not create, you will have to permit it to do so every single time. Data you store outside of select folders will also disappear if you delete your app.
Apps are expected to store files in one of two app-specific locations designed for the app’s specific persistent files and cached files, respectively. To access these locations, the app must verify the storage is available (which is not guaranteed, as it is for internal storage). The volume’s state can be queried using:
If MEDIA_MOUNTED is returned, that means you can read and write files to external storage. You will find a number of predefined directories that should aid with logical storage and prevent clutter. These include the likes of DIRECTORY_DOCUMENTS and DIRECTORY_MOVIES.
You can read a full explanation of how to use scoped storage here.
SQLite database

Finally, Android provides support for apps to use SQLite databases for data storage. The databases you create remain specific to your app and can only be accessed inside your app. Of course, you should have at least some knowledge of SQL before you attempt to store data with an SQLite database.
We’ll discuss each of these in turn, and we use data binding techniques for our sample code. Android provides complete support for SQLite databases. The recommended way of creating SQLite databases is to subclass the SQLiteOpenHelper class and override the onCreate() method. For this sample, we create a single table.
Источник
Create a Database Android Application in Android Studio 3.0
This article explains the steps for creating a database application in Android Studio for those getting started with Android programming.
Join the DZone community and get the full member experience.
Background
SQLite
SQLite is a relational database management system (RDBMS). If most RDBMSs such as MySQL, Oracle, etc. are standalone server processes, then SQLite is embedded because it is provided in the form of a library that is linked in applications.
Like other RDBMSs, data is accessed in a SQLite database by using Structured Query Language (SQL).
Android SQLite Java Classes
Cursor: a class provides access to the results of a database query. Its methods include:
close(): release all resources used by cursor and close it.
getCount(): returns the number of rows contained within the result set.
moveToFirst(): moves to the first row in the result set.
moveToLast(): moves to the last row in the result set.
moveToNext(): moves to the next row in the result set.
move(): moves by a specified offset from the current position in the result set.
get () (such as getInt(), getDouble(), so on): returns the value of the specified contained at the specified column index of the row at the current cursor position.
SQLiteDatabase provides the primary interface between the application code and underlying SQLite database. Its methods include:
insert(): inserts a new row into a database table.
delete(): deletes rows from a database table
query(): performs a specified database query and returns matching results via a Cursor object.
execSQL(): executes a single SQL Statement that does not return result data.
rawQuery(): executes an SQL query statement and returns matching results in the form of a Cursor object.
SQLiteOpenHelper is designed to make it easier to create and update databases. Its methods include:
onCreate(): called when the database is created for the first time.
onUpgrade(): called in the event that the application code contains a more recent database version number reference.
onOpen(): called when the database is opened.
getWritableDatabase(): opens or creates a database for reading and writing.
getReadableDatabase(): creates or opens a database for reading only.
close(): closes the database.
ContentValues allows key/value pairs to be declared consisting of table column identifiers and the values to be stored in each column. Its methods include:
put(): adds a value to the set.
Create a Database Android Application
We will create a database Android application that has a UI as follows:
 My application will interact with a database named StudentDB.db, which contains a single table named Student. The Student table schema will look like this:

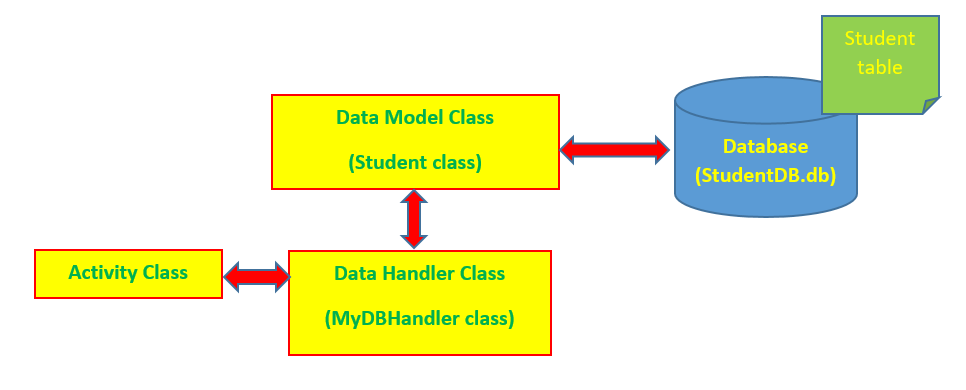
The application will consist of an activity and a database handler class (MyDBHandler class). The database handler will be a subclass of SQLiteOpenHelper and will provide an abstract layer between the underlying SQLite database and the activity class. A third class (Student class) will need to be implemented to hold the database entry data as it is passed between the activity and the handler. My application model can be shown in the following figure:
Data Model Class
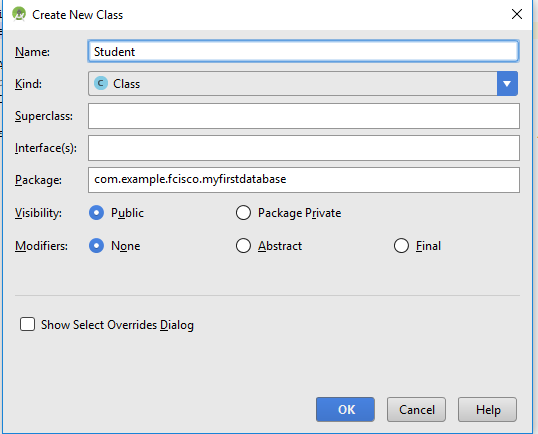
The Student class contains fields, constructors, and properties as follows: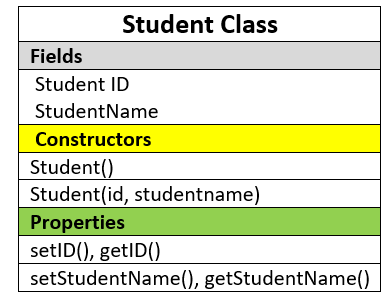 We create the Student class in the Android Studio 3.0 by selecting app > java.
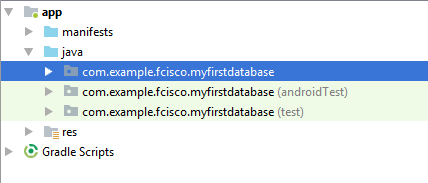
Right-click the myfirstdatabase package and selecting New > Java Class.
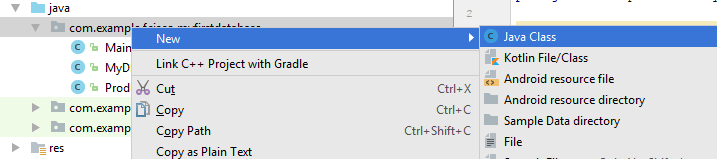
Type Student in the Name item, maintain the default options, and click the OK button:
Adding the following lines of code for the Student class:
Data Handler Class
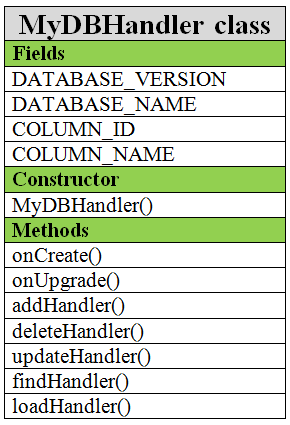
The database handler class is a subclass of SQLiteOpenHelper class, named MyDBHandler, as in the following figure: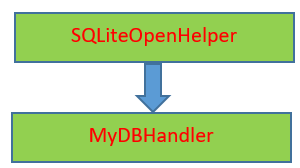 The MyDBHandler class contains fields, constructors, and methods, as follows:
Steps for creating the MyDBHandler class like the Student class and its code can look like this:
We must also use import statements, as follows:
Initialize the Database
The database can be initialized in the constructor of the MyDBHandler class. The code of this constructor looks like this:
Create the Student Table
The SQL statement creates a table:
We need to convert the SQL statement to a string and implement it by using the execSQL() method of a SQLiteDatabase object. All of these statements will be put inside the onCreate method of the handler class, as follows:
Our application can load all of the students from the database, add a new student to the database, remove a student from the database, find a student from the database and modify the information of a student from the database. Therefore, we need to add corresponding methods to the handler class.
Load Data
To load data, we use a SQL query statement:
The result of above SQL statement is a table. We use the rawQuery() method of a SQLiteDatabase object to implement SQL statement and display result via a Cursor object. The following code will demonstrate the loadHandler method:
Add a New Record
To add a new record to the database, we must use the ContentValues object with the put() method that is used to assign data to ContentsValues object and then use insert() method of SQLiteDatabase object to insert data to the database. The addHandler method can look like this:
Find Information by Condition
To find information in the database by condition, we must use the SQL query statement as follows:
In the next step, we save the result that is returned from implementation of the rawQuery() method of the SQLiteDatabase object into a Cursor object and find the matching result in this object. The code of the findHandler method looks like this:
Delete a Record by Condition
To delete a record by condition, we must use a SQL query statement, as follows:
We will save the result that is returned from the implementation of the rawQuery() method of the SQLiteDatabase object into a Cursor object and find the matching result in this object. In the final step, we use the delete() method of the SQLiteDatabase object to delete the record. The code of the deleteHandler method looks like:
Update Information of a Record
To update the information of a record, we can use the ContentValues object and the update() method of the SQLiteDatabase object. Use the updateHandler() method as follows:
Main Activity
So far, let’s look at our application model again: And our user interface:
Источник


