- Top 5 Android App Development Fundamentals for Beginners
- Table of Contents
- Full Stack Java Developer Course
- Android App Development Fundamentals
- 1. MasterВ the Language
- 2. Familiarity with the Right Application Development Tools and Environment
- 3. Knowledge of the Application Components
- Activities:
- Services:
- Content providers:
- FREE Java Certification Training
- Broadcast receivers:
- Activating components:
- 4. Awareness over Fragmentations, Android Application, Threads, Loaders, and Tasks
- Free Course: Programming Fundamentals
- 5. Making the Right Choice over Needed Tools
- Conclusion
- Find our Java Certification Training Online Classroom training classes in top cities:
- About the Author
- Recommended Programs
- 5 Android App Development Fundamentals for Beginners
- Recommended Resources
- A guide to Android app development for complete beginners in 5 easy steps
- Step 1: Downloading the tools you need for Android app development
- Step 2: Start a new project
- Java vs Kotlin for Android app development
- Minimum SDK
- Step 3: Familiarize yourself with the files
- Introducing layout files
- The other files and folders
- Step 4: Test your app
- Step 5: Make a thing!
Top 5 Android App Development Fundamentals for Beginners

Table of Contents
The cool features that come along with apps are what draw the interests of users. Apps make phones “smart” and through their benefits, apps have drastically transformed how we function today. Adept programmers are getting busy, designing, and building apps of their own and embedding them with favorable features. In this article we will cover the top 5 Android App development fundamentals that you should know before you begin programming an Android application:
- Master the language
- Familiarity with the right application development tools and environment
- Knowledge of the application components
- Awareness over fragmentations, android application, threads, loaders, and tasks
- Choosing the right tools.
Full Stack Java Developer Course

Android App Development Fundamentals
1. MasterВ the Language
Java and XML are the two main programming languages used in Android App development. Knowledge and mastery over these programming languages are, therefore, prerequisites to developing an Android app. Some of the fundamentals of the Java programming language include:
- Packages
- Objects & classes
- Inheritance & interfaces
- Strings & numbers, generics,
- Collections
- Concurrency
Proper understanding of Java and XML will help you build/develop a more robust and elegant android app.
2. Familiarity with the Right Application Development Tools and Environment
If you are stepping into Android App development, it is very important that you familiarize yourself with the build automation tools as well as the integrated development environment before you start developing your app. You can use Android app studio IDE or Eclipse for the tools; they will help you learn the basics and many other things that will help improve your code. You can learn Apache Maven, Apache Ant, and Gradle as they provide a powerful set of tools to help in managing your builds.
В
It is also important that you familiarize yourself with source control tools and concepts. Learn git and then create a git-source repository (by creating an account on Bitbucket or GitHub). To understand the basic concepts and terms of how the platform operates, you can use the Git Pocket Guide.
3. Knowledge of the Application Components
Application components are the essential building blocks of Android app development. Each of the components is a different point by which the system can enter your app. Although each one of them exists as its own entity and plays a specific role, there are some which depend on each other, and not all of them are actual entry points.
There are five different types of app components each serving a distinct purpose with a distinct life cycle which defines how it is created and destroyed. They include:
Activities:
Services:
Content providers:
FREE Java Certification Training
Broadcast receivers:
Activating components:
4. Awareness over Fragmentations, Android Application, Threads, Loaders, and Tasks
Android is a fragmented market with many different devices and operating system versions. Note that, if your device supports more devices and/or versions it will definitely require more maintenance and testing as well as the related costs. The vice-versa is also true. You also require appropriate fonts, assets, and layouts that will help in ensuring that the best possible experiences in the various screen characteristics are given. You should also consider the array of android supported sensors or UI facilities. All android apps have an application class, one or more activities, and one or more fragments.
Sometimes, you may have services for background tasks that should run continuously but other times you may not. If you want to deliver a great and smooth user interface, always ensure that the thread is never blocked. Therefore, the long operations (computations, I/O, network, etc.) should all be run asynchronously in the background (mainly on a different thread of execution). This is why it is important to learn the Java language concurrency facilities.
Free Course: Programming Fundamentals
5. Making the Right Choice over Needed Tools
The simple tools that you need for Android app development are just a Mac or Windows PC, any type of Linux, and Eclipse, the ADT Plugin, and the Android SDK—all of which are free. You can go through the installation guide on Google to learn how to set up your development environment; it provides documentation of everything needed. Android has some unique parameters that you should consider when writing an Android app. Some of them include:
- Performance and responsiveness: You should always respond to user input within five seconds otherwise the operating system will ANR you. (ANR-application not responding – the only option that you will have is to force close your app.)
- Lags of more than 100ms will be noticed by the users: As mentioned above, the UI thread should never be blocked because it is only one.
- Limited resources: Wake-locks (the mechanism that forces the device to do a certain thing despite the recommendation to put the device to sleep by the battery manager) should be used sparingly. Do not unnecessarily poll hardware (e.g. GPS or accelerometer) because it will quickly run down the battery.
Check out our video that takes you through the introduction to Android Application Development to get a taste of what the course entails.
Learn top skills demanded in the industry, including Angular, Spring Boot, Hibernate, Servlets, and JSPs, and SOA to build highly web scalable apps with the Full Stack Java Developer Masters Program.
Conclusion
77% of Americans today own a smartphone, and apps are where the majority of their time is spent. In fact, in 2017, 197 billion apps were downloaded, ensuring that a career as an Android App Developer is a stable one with lots of opportunities for growth. When it comes to Android App development, there’s a lot to learn, so consider getting started with Simplilearn’s Google-authorized Certified Android App Developer training course. You’ll learn to master Android fundamentals along with the other skills you need with hands-on experience, developing six trending applications during the course. The course is aligned with the Associate Android Developer (AAD) Exam conducted by Google. Happy app-developing!
Find our Java Certification Training Online Classroom training classes in top cities:
| Name | Date | Place | |
|---|---|---|---|
| Java Certification Training | 5 Feb -19 Mar 2022, Weekend batch | Your City | View Details |
About the Author
Eshna writes on PMP, PRINCE2, ITIL, ITSM, & Ethical Hacking. She has done her Masters in Journalism and Mass Communication and is a Gold Medalist in the same. A voracious reader, she has penned several articles in leading national newspapers like TOI, HT, and The Telegraph. She loves travelling and photography.
Recommended Programs
Java Certification Training
Full Stack Java Developer
*Lifetime access to high-quality, self-paced e-learning content.
5 Android App Development Fundamentals for Beginners
Recommended Resources
Free eBook: 37 Resources for Android App Developers
App Development with Android or the iOS: Which One to Choose?
Getting Started With Web Application Development in the Cloud
6 Reasons Why You Should Get an Android Certification
An Easy Guide To Build A Calculator App In JavaScript
Источник
A guide to Android app development for complete beginners in 5 easy steps

Learning Android app development may seem like a daunting task, but it can open up a world of possibilities. You could create the next “hit app” that changes the way we work or interact with each other. Maybe you’ll develop a tool that you can use yourself to improve your workflow. Or perhaps you’ll just gain a new skill that lands you a great job!
Whatever the case, learning Android app development might not be as tough as you think, as long as you understand what all the different moving parts are for, and have a roadmap to guide you through. This post is that road map!
Step 1: Downloading the tools you need for Android app development
First, you need to create your development environment so that your desktop is ready to support your Android development goals. For that, you will need Android Studio and the Android SDK. Thankfully, these both come packaged together in a single download that you can find here.
Android Studio is an IDE. That stands for “integrated development environment,” which is essentially an interface where you can enter your code (primarily Java or Kotlin) and access all the different tools necessary for development. Android Studio allows you to access libraries and APIs from the Android SDK, thereby giving you access to native functions of the operating system. You’ll also be able to build your app into an APK using Gradle, test it via a “virtual device” (emulator), and debug your code while it runs.

With all that said, keep in mind that there are other options available for your Android app development. For example, Unity is a very powerful tool for cross-platform game development that also supports Android. Likewise, Visual Studio with Xamarin is an excellent combination for creating cross-platform apps in C#.
Android Studio is the best place for most people to start (with Android game development being an exception), particularly as it provides all these additional tools and resources in a single place.
Fortunately, set up is very simple and you only need to follow along with the instructions on the screen.
If you need help getting set up, check out our Android Studio tutorial for beginners. And our guide on how to install the Android SDK.
Step 2: Start a new project
Once you have Android Studio on your machine, the next step is to start a new project. This is a straightforward process, but you’ll need to make a few decisions that will impact on your Android app development going forward.
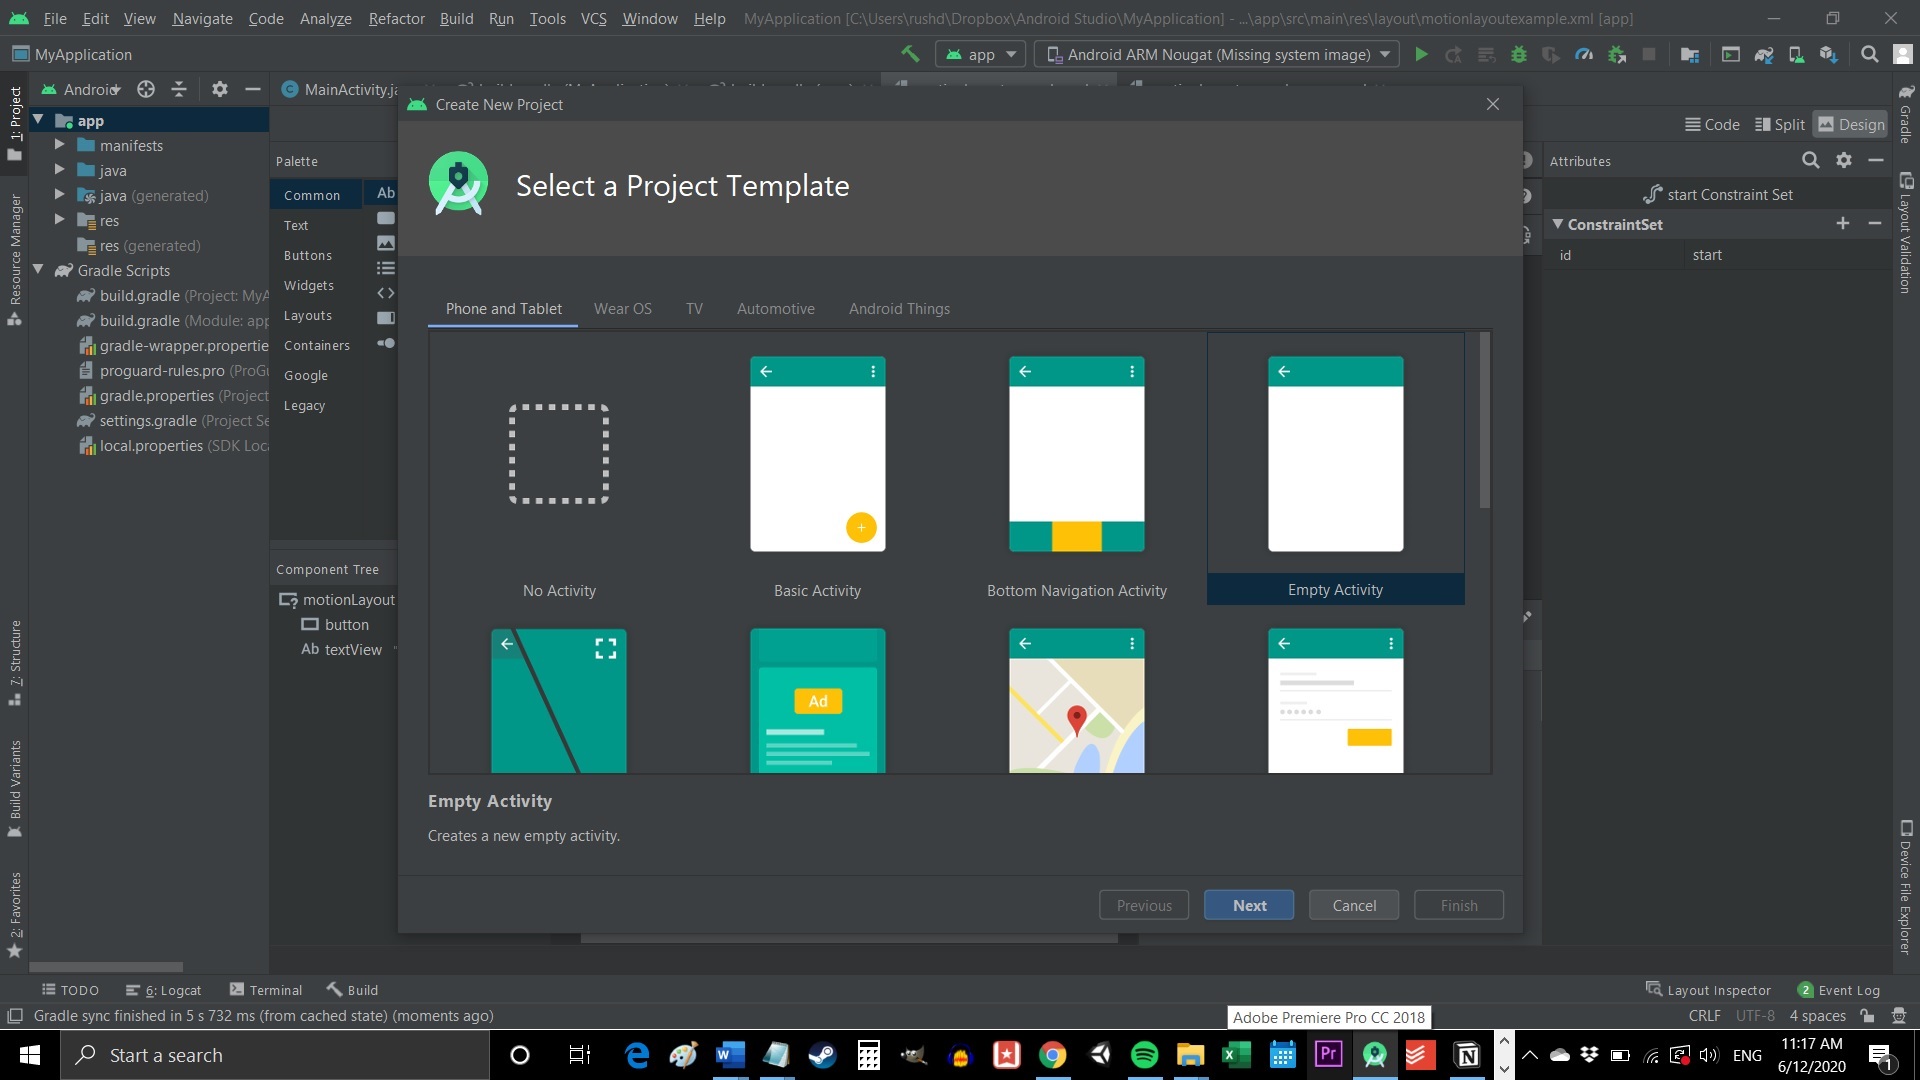
Go to File > New > New Project. You will now be asked to select a “Project Template.” This defines the code and UI elements that will be included in your new app when it loads.
The word “Activity” refers to a “screen” in your app. Thus, a project with “No Activity” will be completely empty, apart from the basic file structure. A “Basic Activity” on the other hand will create a starting screen for your app and will add a button in the bottom and a hamburger menu at the top. These are common elements in many Android apps, so this can save you some time.
That said, it can also risk making things more complicated when you’re first getting to grips with development. For that reason, we’re going to choose the “Empty Activity.” This will create an activity and some files for us, but it won’t add a lot of additional code.

Choose a name and “package name” for your new app. The name is what your audience will see when the app is installed on their device. The package name is an internal reference used by Android to differentiate it from other apps. This should be composed using your top level domain (e.g. .com), domain name, and app name.
For example: com.androidauthority.sampleapp.
If you don’t have a domain or a company, just use “com” followed by something that appeals to you!
You’ll also need to decide where you want the files to be saved and what language you’re going to code in: Java or Kotlin.
Java vs Kotlin for Android app development
One of the biggest decisions you’ll need to make as an Android developer is whether you’re going to learn Kotlin or Java. Both languages are officially supported by Google and Android Studio, but they have some distinct differences.
Java has been supported by Google the longest and is what developers have been using to craft Android apps for years. Java is also one of the most in-demand programming languages in the world, which makes it a great choice for those who want to begin a career in development. As the oldest Android programming language, there is also slightly more support for Java vs Kotlin, although it’s not by much.

Kotlin, on the other hand, has become Google’s preferred choice for Android development. This is the default when starting a new app, and it is likely to become more common going forward. Kotlin is also significantly easier to get to grips with if you’re a complete beginner.
For these reasons, Kotlin is probably the language of choice for Android developers that are learning for fun, or that have no aspirations to develop for other platforms. However, Java makes more sense if you’re interested in becoming a professional developer.
You can learn more about the two options here by reading our guide to Kotlin vs Java for Android.
Minimum SDK
Finally, you also need to consider your Minimum SDK. This is the lowest version of Android that you want your app to support.
The lower you make this number, the broader your potential audience will be. Keep in mind that there is a relatively low adoption rate for the latest versions of Android, so sticking with the latest update will prevent a lot of users from trying your creation.
However, you will only be able to access the latest features of Android if you target a more recent version. If you like the sound of supporting chat bubbles, then you’ll want to stick with the most recent version.
Step 3: Familiarize yourself with the files
I remember the first time I tried Android app development. I loaded up Android Studio and was immediately baffled by what I saw. There are just so many different files, multiple types of code, folders, and more! This was worlds away from the single blank file I was used to working with in Python or even QBasic (anyone remember QBasic??).
This can be rather daunting, but here’s what you need to know.
![]()
The file that is open is MainActivity.java or MainActivity.kt. This is the main logic file for the activity that is going to define how your app behaves. Look on the left, and you’ll see that this file is found in: MyApplication > app > src > main > java > com > companyname > myapplication.
The folders used are important for Android app development, as they help Android Studio and Gradle to find everything and build it correctly (more on Gradle in a moment). Suffice to say, you can’t just rename these as you please!
You’ll notice that there is already some code on the main page. This is what we call “boilerplate code,” meaning that it is code that is almost identical across different app projects and that is needed to make basic functions work. Boilerplate code is what you’ll find yourself typing out over and over again! One of the benefits of Kotlin is that it requires less boilerplate, meaning that you’ll have less code on your screen if that is what you chose.
Introducing layout files
The role of this code is to tell Android where the associated layout file is. A layout file is slightly different from a Kotlin/Java file. This defines the way that an activity looks, and lets you add things like buttons, text, and browser windows.
You’ll find this file in: MyApplication > app > src > res > layout.
It will be called activity_main.xml. Note that files stored in the resources folder can’t use capitals; they need to use the underscore symbol to distinguish different words. Double click on this file and it will open in the main window where you edit your code. Notice that you can switch between the open files using tabs along the top.
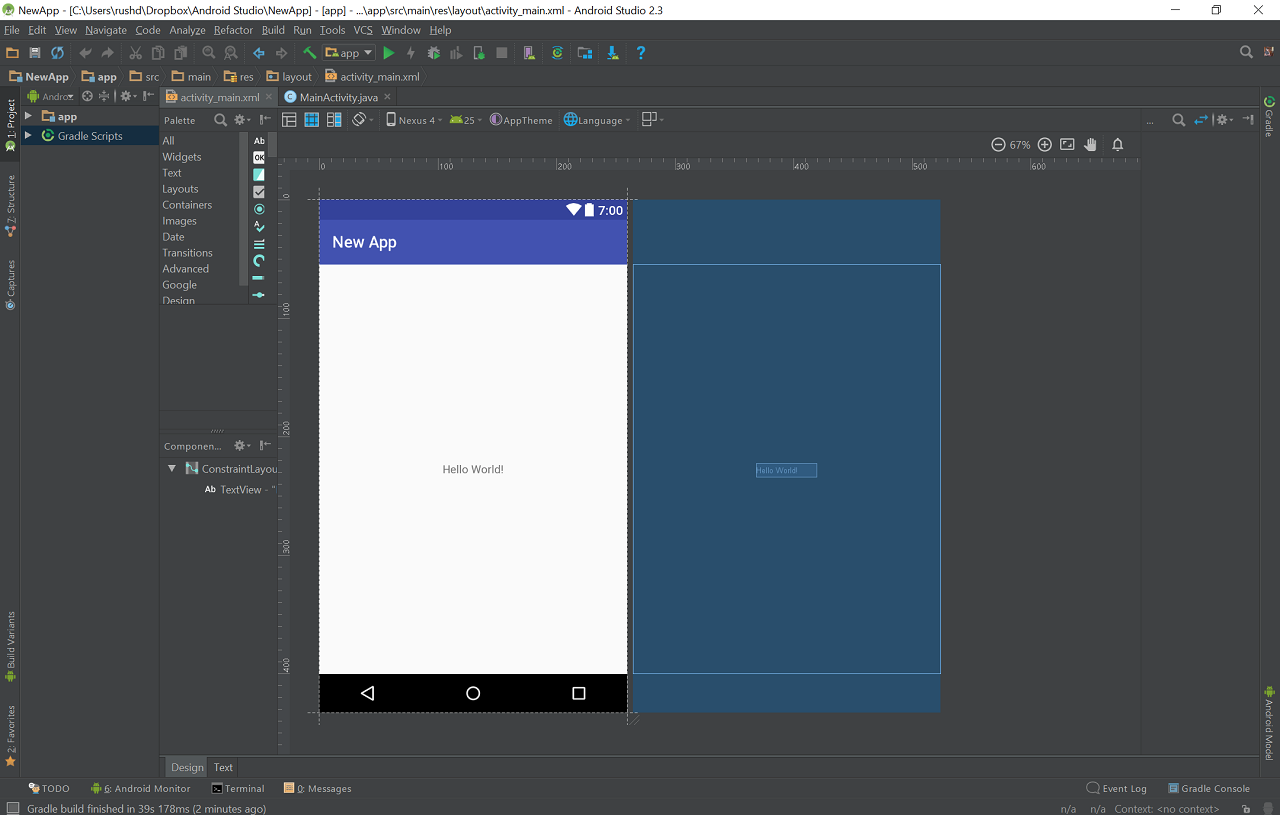
You can view this file via the “Code” view, the “Design” view, or a split view that shows these windows side-by-side. There are buttons to switch mode in the top right.
In the design view, you can actually drag and drop different widgets onto the screen. The code view shows you a load of XML script. When you add new widgets via the Design view, this script will update. Likewise, you can tweak properties of the widgets (called “views”) in here and see them reflected in real-time via the Code view.
In the vast majority of apps, you’ll need to create a new Java/Kotlin file and a corresponding XML file, each time you want a new activity. And for those that were wondering: yes, that means you have to learn either Kotlin or Java and XML. This is a bit of a headache, but it actually simplifies the process in the long run.
The other files and folders
There are lots more files and folders here though, so what do they all do?
In truth, you don’t need to know what everything here is. But some things that are useful to know about:
The Android Manifest: This is an XML file in the res folder that defines important features of your app. That includes the orientation of the app, the activities that you want to be included in it, the version, etc.
Drawable: This folder is found in res. This is where you will put things like images that you want to reference later.
Values: This resource folder is a useful place to store values that will be used globally across your app. For example, this can include color codes (making it easy for you to change the look of your entire app) or strings (words). You’ll define these values in individual XML files, such as colors.xml.
Gradle: Gradle is the tool that takes all your files and bundles them into a workable APK for testing. It is also useful for generating previews etc. You won’t need to worry about the files in here often, but if you want to add a “dependency,” this is where you will do it. Dependencies are external libraries that let you access additional functionality from within your own code.
Of course, we also have a detailed introduction to Gradle for new Android developers.
Step 4: Test your app
The first thing that you are supposed to do when familiarizing yourself with any new programming language, is to create an app that says “Hello World.” Thankfully, this is very easy in this case seeing as that’s what the code that’s already here does! If you look at the XML, it includes a small label that just says: Hello World!
If you look at the controls along the top, you’ll see there’s a little green play arrow. On the left of this is a drop-down menu, with a phone name in it. When you installed Android Studio, this should also have installed an Android system image along with the Virtual Device Manager. In other words, you should already have an Android emulator set up and ready to go! By clicking on this green arrow, you’ll be able to launch that and test your app! Notice that this will also let you use the emulated phone as though it were a real device.
You can change the settings for your virtual device – such as screen size, Android version, space etc. – by going to Tools > AVD Manager. You can also download new system images here. Make sure that your virtual device meets or exceeds the minimum SDK you set at the start.
Alternatively, you can try plugging a physical device into your computer and using this to test your new app. You’ll need to turn on Developer Options though, and enable USB Debugging.
Step 5: Make a thing!
The best way to learn Android app development is by doing! That means you should have a stab at editing the code in front of you, to see if you can make it do something new.
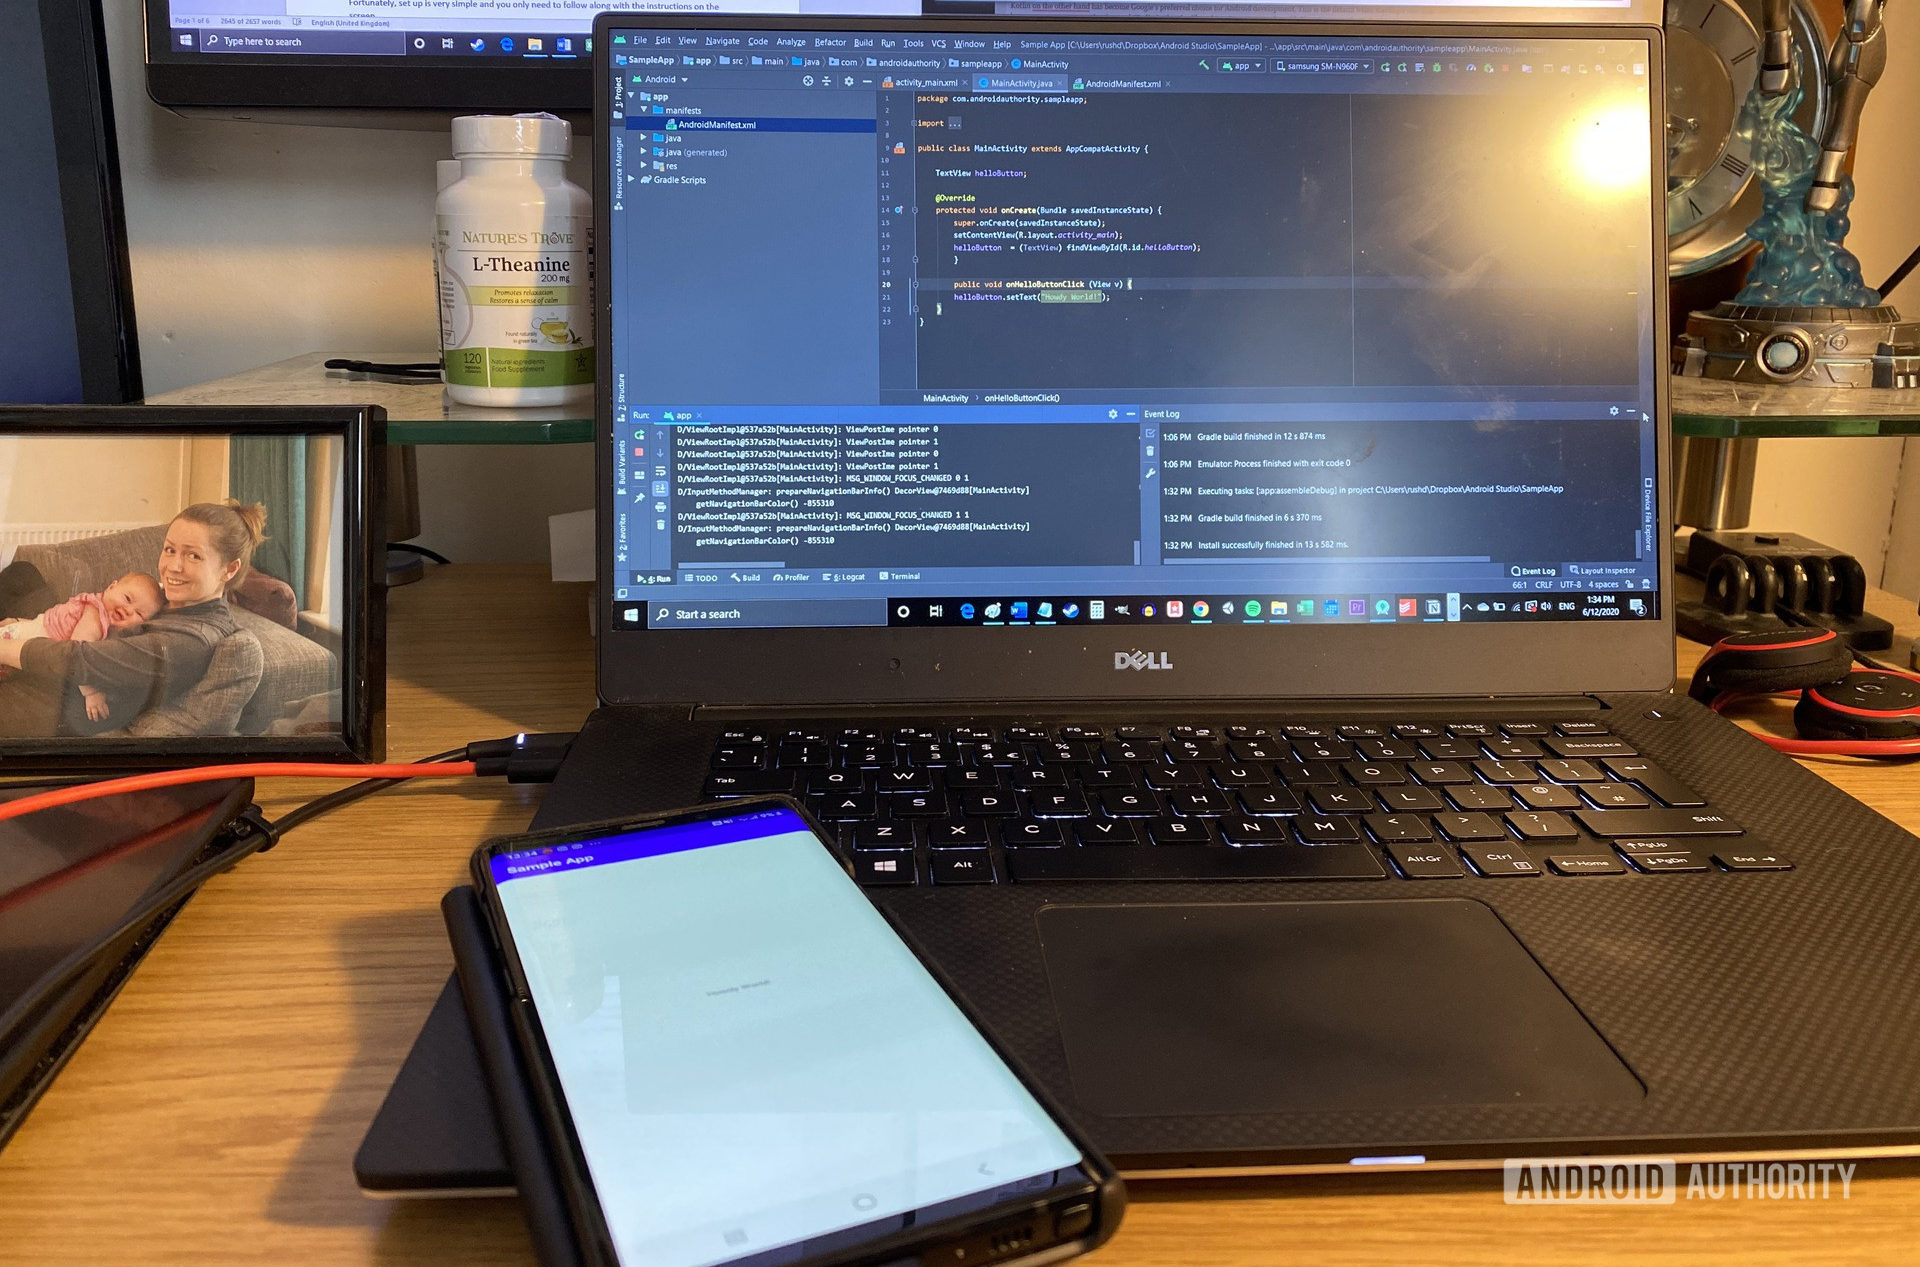
Changing the message that displays is as simple as going into your XML and changing the line that says “Hello World!” into “Howdy World!”
But what if you want to add some kind of interactive element to your creation? In that case, you might decide to let the user click the button to change the text.
First, you’ll need to place this line inside the TextView tag in your activity_main.xml:
This will give the text label the name “helloButton” and will state that the method “onHelloButtonClick” will reference this view. We’re going to add that to our code in a moment.
Now you can add the following code to your MainActivity. If you see any text appear red as you are typing it, that means you need to “import” that code from the Android SDK. Click on the red text then press Alt + Enter and Android Studio will do this for you automatically. In short, this tells Android that you are referencing a library that is a part of the Android SDK.
(The following example is written in Java.)
In this code example, we first create an “object” in the code called “helloButton.” Inside our “onCreate” method (everything within the curly brackets) we then tell Android that this object represents the button in our layout file. The code you place here is what will run first when you launch an app.
Next, we create the method that runs when someone clicks on the button. Once that happens, we can then change the text on the said button. Notice that once again, Kotlin requires significantly fewer lines to achieve the same thing!
Run the app and you should now see that when you click the button, the text changes!
This is a very simple app, but it demonstrates the basics of how Android app development works. Generally, you will be creating new on-screen elements in the layout file, then defining how they behave in the associated Java or Kotlin file.

As you get more advanced, you’ll need to start manipulating and storing data. To do this, you’ll use variables that contain numbers and strings (words).
We have an in-depth Java tutorial that will help you get started.
Once you’ve read through that, you’ll have a basic idea of how Java works, and all that is left is to learn how you can apply these skills to Android app development. To that end, a great strategy is to pick a project and then work on that.
And wouldn’t you know it: we have a ton of great projects to try out! Like an easy first project for Android app development noobs (math game).
The key is not to try and learn “all of Android app development” but to set your sights on a realistic first project. You’ll keep learning as you add new features and want to do new things, and having a goal will keep your learning fun and structured. Before you know it, you’ll be a pro!
Источник


