- How to make Android apps without IDE from command line
- How to do Android development faster without Gradle
- IntelliJ IDE, but not Gradle
- 1. Install Java
- 2. Install all SDK tools
- Download Android Studio and SDK Tools | Android Studio
- Download the official Android IDE and developer tools to build apps for Android phones, tablets, wearables, TVs, and…
- 3. Code the application
- How to use JavaMail on Android (without Gradle)
- Hello guys!
- 4. Build the code
- 5. Sign the package
- 6. Align the package
- 7. Test the application
- 8. Make a script
- Notes
- How to Generate APK and Signed APK Files in Android Studio
- Creating an APK file
- Creating a Signed APK File
- Creating a New Key Store
- Finishing Up
- Summary
- Create an APK File
- Create a Signed APK File
- Create a New Key Store and Key
How to make Android apps without IDE from command line

Nov 26, 2017 · 5 min read
A HelloWorld without Android Studio
Update: I’ve made a new course that explain how you can avoid Android Studio and Gradle, but still use IntelliJ iDE:
How to do Android development faster without Gradle
IntelliJ IDE, but not Gradle
In this tutorial, I will show you how you can build/compile an APK (an A n droid app) from your java code using terminal (on Linux) without IDE or in other words without Android Studio. At the end, I will also show you a script to automate the process. In this example, I will use Android API 19 (4.4 Kitkat) to make a simple HelloWorld. I want to say that I will do this tutorial without android command which is deprecated.
1. Install Java
First, you need to install java, in my case, I install the headless version because I don’t use graphics (only command line):
2. Install all SDK tools
Then download the last SDK tools of Android which you can find here:
Download Android Studio and SDK Tools | Android Studio
Download the official Android IDE and developer tools to build apps for Android phones, tablets, wearables, TVs, and…
I recommend to unzip it in the /opt directory inside another directory that we will call “android-sdk”:
Now, we have to install platform tools (which contain ADB), an Android API and build tools.
In fact, if you are on Debian, you can avoid installing platform-tools package and only install ADB like that:
3. Code the application
In this example, I want to compile a simple HelloWorld. So, first, we need to make a project directory:
Then we have to make the files tree:
If you use exernal libraries (.jar files), also make a folder for them:
You have an example here:
How to use JavaMail on Android (without Gradle)
Hello guys!
Make the file src/com/example/helloandroid/MainActivity.java and put that inside:
Make the strings.xml file in the res/values folder. It contains all the text that your application uses:
The activity_main.xml is a layout file which have to be in res/layout:
You also have to add the file AndroidManifest.xml at the root:
4. Build the code
Now, I recommend to store the project path in a variable:
First, we need generate the R.java file which is necessary for our code:
- -m instructs aapt to create directories under the location specified by -J
- -J specifies where the output goes. Saying -J src will create a file like src/com/example/helloandroid/R.java
- -S specifies where is the res directory with the drawables, layouts, etc.
- -I tells aapt where the android.jar is. You can find yours in a location like android-sdk/platforms/android-/android.jar
Now, we have to compile the .java files:
If you have use an external, add it the classpath:
The compiled .class files are in obj folder, but Android can’t read them. We have to translate them in a file called “classes.dex” which will be read by the dalvik Android runtime:
But if you use external libraries, do rather:
If you have the error UNEXPECTED TOP-LEVEL EXCEPTION , it can be because you use old build tools and DX try to translate java 1.7 rather than 1.8. To solve the problem, you have to specify 1.7 java version in the previous javac command:
The -source option specify the java version of your source files. Note that we can use previous versions of Java even we use OpenJDK 8 (or 1.8).
We can now put everything in an APK:
Be aware: until now, we used three AAPT commands, the first and the second one are similar but they don’t do the same. You have to copy the classes.dex file at the root of project like above! Otherwise, AAPT won’t put this file at right place in the APK archive (because an APK is like a .zip file).
The generated package can’t be installed by Android because it’s unaligned and unsigned.
If you want, you can check the content of the package like this:
5. Sign the package
To do so, we firstly create a new keystore with the command keytool given by Java:
Just answer the questions and put a password.
You can sign an APK like this:
Note that apksigner only exist since Build Tools 24.0.3.
6. Align the package
It’s as simple as that:
Alignment increase the performance of the application and may reduce memory use.
7. Test the application
To test the application, connect your smartphone with a USB cable and use ADB:
But before run this command, I recommend to run this one:
If there is an error during installation or running, you see it with that command.
Voila! Here’s the result:

8. Make a script
If you don’t want to run all these steps every time you would like to compile your app, make a script! Here’s mine:
Notes
- You can remove “test” if you just want to compile without testing.
- This script only compile and run the app on the phone. But I can also make a script to automatically generate a new project like this one. I think I have a good idea to do so, but I need to know if you are interested. If it’s the case, please leave a comment or send me an e-mail.
- I can also complete the script for external libraries. Likewise, let me know if you want this.
If you have any questions, don’t hesitate to ask them below or by e-mail ;-)! EDIT: Well I’m very busy actually…
Источник
How to Generate APK and Signed APK Files in Android Studio
Android Studio allows you to create two kinds of APK files.
First are the debug APK files that are generated solely for testing purposes. They will run on your Android mobile. However, they cannot be uploaded to the Play Store or made available to the public.
Secondly, you can generate signed APK files. Signed APK files come in handy when you’ve tested your application and it is ready to be uploaded on the Play Store and released to the general public.
This tutorial will show you how to create an Android app by generating APK files using Android Studio.
First things first: open up a project file in Android Studio. If you don’t have a project file yet, simply create a New Project.


Creating an APK file
Generating a debug APK file is easy and is a matter of just a few clicks.
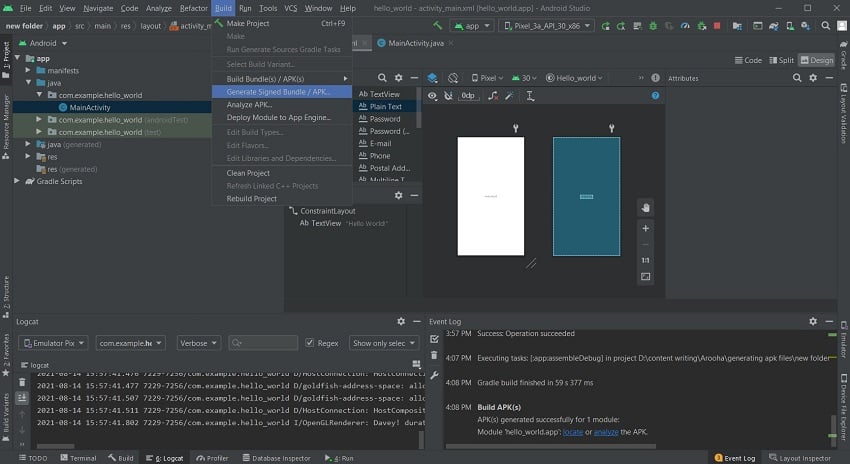
First, open up your project or application that you want to import into an APK file. Then, select Build > Build Bundle(s)/APK(s) > Build APK(s) from the toolbar menu.


Android Studio will take a few moments to generate an APK file.
Once the APK build is complete, you’ll receive a notification on the bottom right corner of your screen. From that notification, select Locate and you will be led to the APK file location.


If you miss the notification, you can still locate the APK file in the following path within your project folder: app/build/outputs/apk/debug. The file is named app-debug.apk by default.
Creating a Signed APK File
To generate a signed APK file, open the Build menu from the toolbar and select Generate Signed Bundle/APK.


This opens up a screen where you have to select between creating an Android App Bundle and creating an APK file. Check the APK radio button and proceed to the next window.


In the next window, you will be shown the module (your application) for which the APK file is being generated. You’ll be asked about your Key store path, Key store password, Key alias, and the Key password.


Creating a New Key Store
Assuming that this is the first time you’re creating a Signed APK file, you will have to create a new key store.
Keys are used by the developer to access their application once it has been uploaded to the Play Store. The need for the keys usually arises when you have to update your application. All of the keys are stored in the key store.
Both the key store and the keys are protected by passwords of their own. The passwords should be at least six characters in length. Also, it is a good practice to keep multiple copies of your keys since they are your only gateway to your application. If the key is lost, you will not be able to access your application or update it.
Creating your own app requires you to create a new key store. To do so, select Create new. You will find it underneath the input field where you enter the key store path.


You will then be redirected to a new window.


In the new window, enter the path for your new key store, and then enter a password to protect it.
In the same window, you will also be setting a new key for your application. Enter an identity for your key in the key alias field and then enter a password for it.
You can keep the same password as that of your key store, but it’s a good practice to give a new password to each of your keys. The same goes for the key alias.
The next field defines the validity of your application. This is the duration after which the key to your application will expire, leaving your application inaccessible. The default validity for a key is 25 years.
For each key that you generate, you’re given a certificate that contains all the information about you and your company. You don’t necessarily have to fill in all the details—just choose the ones you think should go on your certificate. A key will still be generated, even without filling in each field of the certificate.
Finishing Up
Once you have filled in the details for the certificate, select OK. You will then be directed back to the Generate Signed Bundle or APK screen.
Here, all of the fields will now be pre-filled for you. Go through all the details to stay on the safe side. Then, select Next.


On the last screen, you will now be able to see the destination of your Signed APK file. Below that, you will see two more options: Debug and Release.
Debugging is used when the application is still in the testing phase. Since your application has passed the testing phase and is ready for deployment, select Release.
There are two more checkboxes towards the bottom of the screen. Select V2 (Full APK Signature) and click Finish.


You will be notified by Android Studio once the APK build is finished. Now, you can click on Locate from the notification to open up the file location.
The Signed APK file is named app-release.apk by default. You will find it in your project folder in the app/release directory.
Summary
These are the steps you need to follow to generate APK and Signed APK files for the purposes of testing your app and making it downloadable via Google Play respectively:
Create an APK File
- Create the project in Android Studio.
- Select Build >Build Bundle(s)/APK(s) >Build APK(s) from the toolbar menu.
You can now transfer your debug APK file to your Android mobile phone and test it for bugs. You can also test it out on your PC using the Android emulator.
Create a Signed APK File
- Create the project in Android Studio.
- Select Build >Signed Bundle/APK from the toolbar menu.
- Configure the settings for your APK file and possibly create a new key store and key.
Create a New Key Store and Key
- Select a key store path.
- Enter a password for your key store.
- Give your key an identity, validity period, and password.
- Enter any personal or organizational details you want included in the key certificate.
You can now release this signed APK file to the public by publishing it on Google Play Store.
Easy but tricky, right? Hopefully, this tutorial helped to clear up any confusion you had about generating APK and signed APK files and bettered your understanding of both file types.
Источник


