- How to Set Up Email on Android
- Set Up Gmail on Android
- Set Up Your Business Email on Android
- 1. Finding Your Email Settings
- 2. Adding and Setting Up a New Email Account
- Expert’s Note
- Conclusion
- Get Android Device Primary Registered Email Address Programmatically
- How to Get Android Device Primary Registered Email Address Programmatically.
- Click here to download Get Android Device Primary Registered Email Address Programmatically project with source code.
- 10 best email apps for Android to manage your inbox
- Blue Mail
- Cleanfox
- Gmail
- K-9 Mail
- Newton Mail
- ProtonMail
- Spark Email
- TypeApp Email
- Individual clients like Outlook
- Bonus: OEM stock email apps
How to Set Up Email on Android
If you’re using an Android phone, accessing your emails on the go is easy. Even if you have personal and business email addresses, it’s possible to manage multiple accounts on the same device.
That’s because setting up a personal email account on Gmail, Android’s default email app, is quite simple. However, most business emails use a custom email address, requiring a manual setup.
In this article, we will show you how to set up Gmail and custom business email addresses on Android devices, so you can easily access and manage your email accounts from any location.
Set Up Gmail on Android
Android devices require you to log in to a Google Account to use Google’s services, including Gmail. That means you’re automatically logged in to your primary Gmail account the moment you first set up your device after buying it.
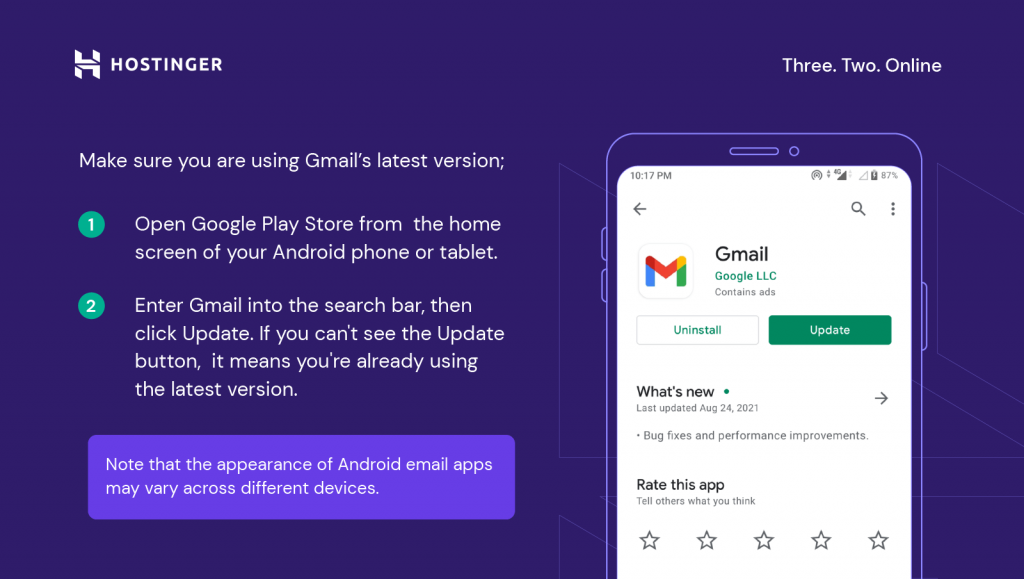
Moreover, it’s possible to add a secondary Gmail account on your Android device, like your side project’s email account. However, before you proceed to set up another account, make sure you are using the app’s latest version:
- Open Google Play Store from the home screen of your Android phone or tablet.
- Enter Gmail into the search bar, then click Update. If you can’t see the Update button, it means you’re already using the latest version.
Note that the appearance of Android email apps may vary across different devices. If you use a device like Samsung, which has Samsung Mail as its default mail app, these steps will serve as a general guide since the process will be slightly different.
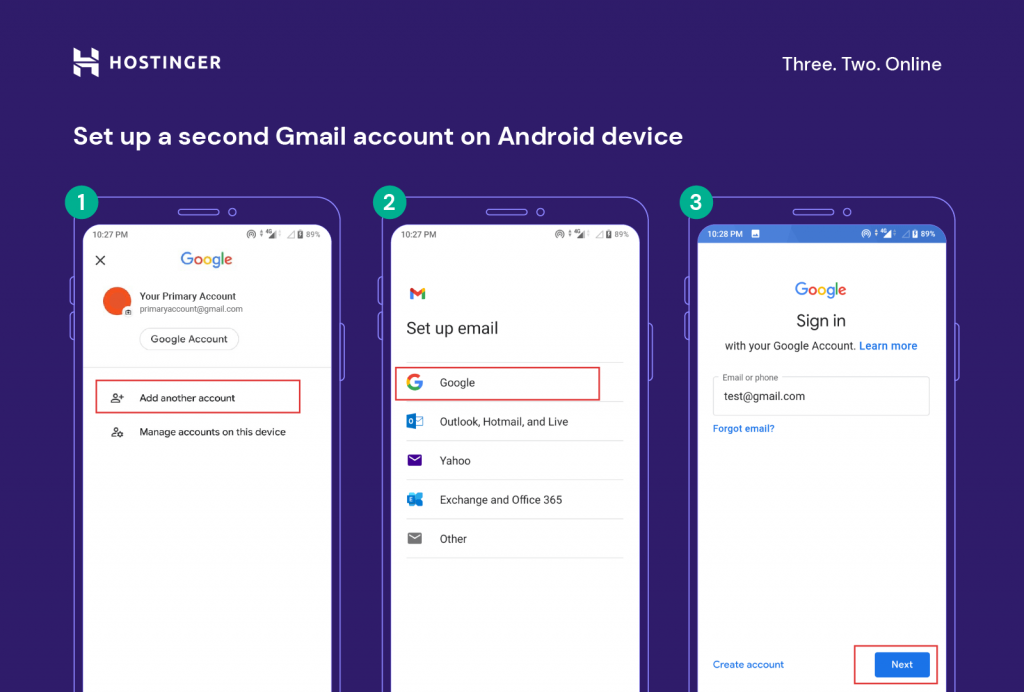
Here are the steps to set up a second Gmail account on the same Android device:
- Open the Gmail app.
- Click the Google Account icon at the top-right corner of the screen, then select Add another account.
- On the Set up email screen, select Google.
- Enter your secondary Google account address in the Sign in field and tap Next.
- Enter your password, tap Next again.
- Google will ask if you want to add a phone number for additional security. We recommend opting in. Tap the Yes, I’m in button.
- You’ll see the Google Terms of Service screen. Select I Agree.
Now you can manage your primary and secondary Gmail emails from one Android device simultaneously.
It’s also possible to use Gmail as the main platform to manage all of your business email messages.
Set Up Your Business Email on Android
Custom email addresses use a unique domain name instead of generic email provider extensions such as Gmail or Outlook. Username@mybusiness.com is an example – this address allows people to identify the name of a business or a website easily.
Setting up your business email on Gmail is a convenient solution. Doing it means you won’t have to log in to multiple platforms to manage your personal and business emails. It’s also free, and the familiar interface is easy to navigate.
Note that the steps to set up a business email on an Android device will vary depending on your hosting provider and the type of control panel you use. In this article, we will use Hostinger’s hPanel.
1. Finding Your Email Settings
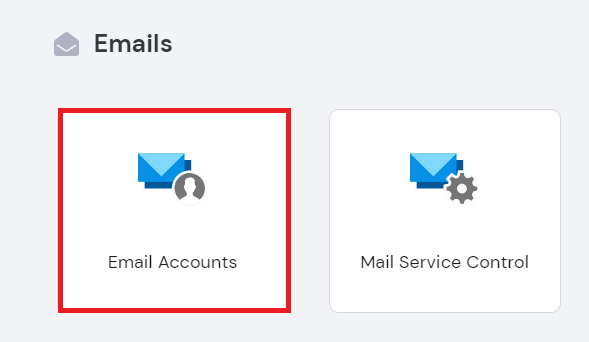
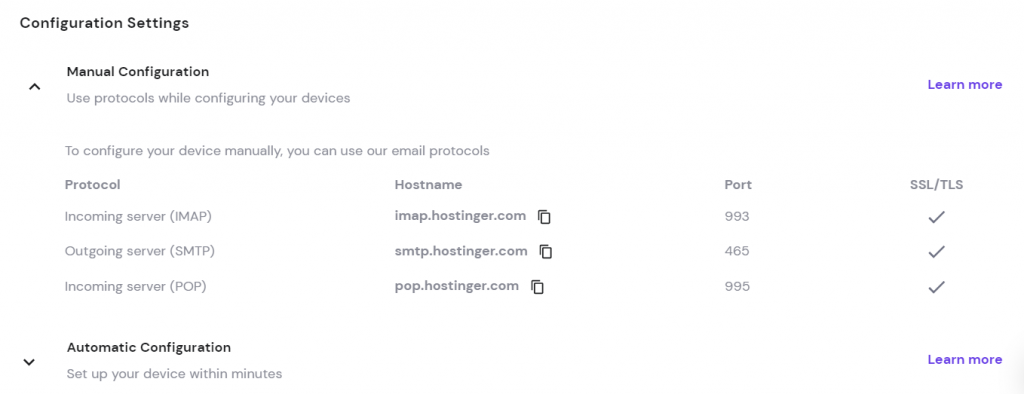
To set up your email on Android, the first thing to do is to find the email account details. If your business uses Hostinger’s email hosting, they will be located on your hPanel dashboard.
- Log in to your Hostinger account. Then, navigate to Emails ->Email Accounts.
- On the left navigation pane, click Configuration settings.
- In the Configuration Settings section, find the Manual Configuration dropdown menu containing the email protocols – IMAP, SMTP, and POP. Copy the protocol name, hostname, and port as you’ll need them later.
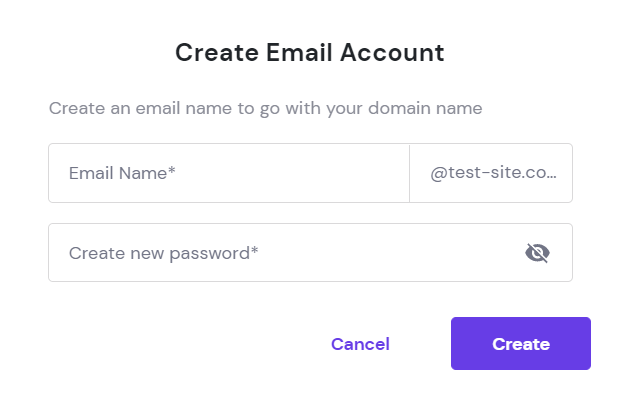
- If you don’t have a custom email address yet, set it up by navigating to the Create new email account section and clicking Add email account.
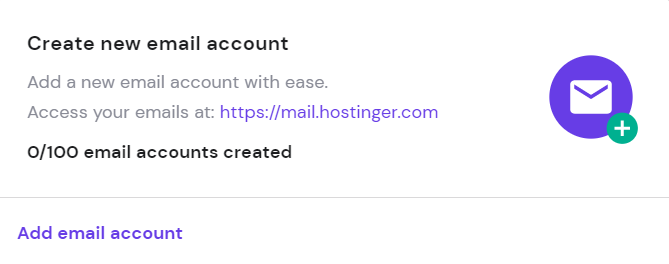
- Create a new email address by entering an email name in the available field. Then, create a password, and click the Create button.
2. Adding and Setting Up a New Email Account
Now that you have the email configuration details, it’s time to set up the email account on your Android device.
- Open the Gmail app. Tap the menu icon at the upper-left corner of the screen and select Settings.
- On the Settings screen, tap Add account.
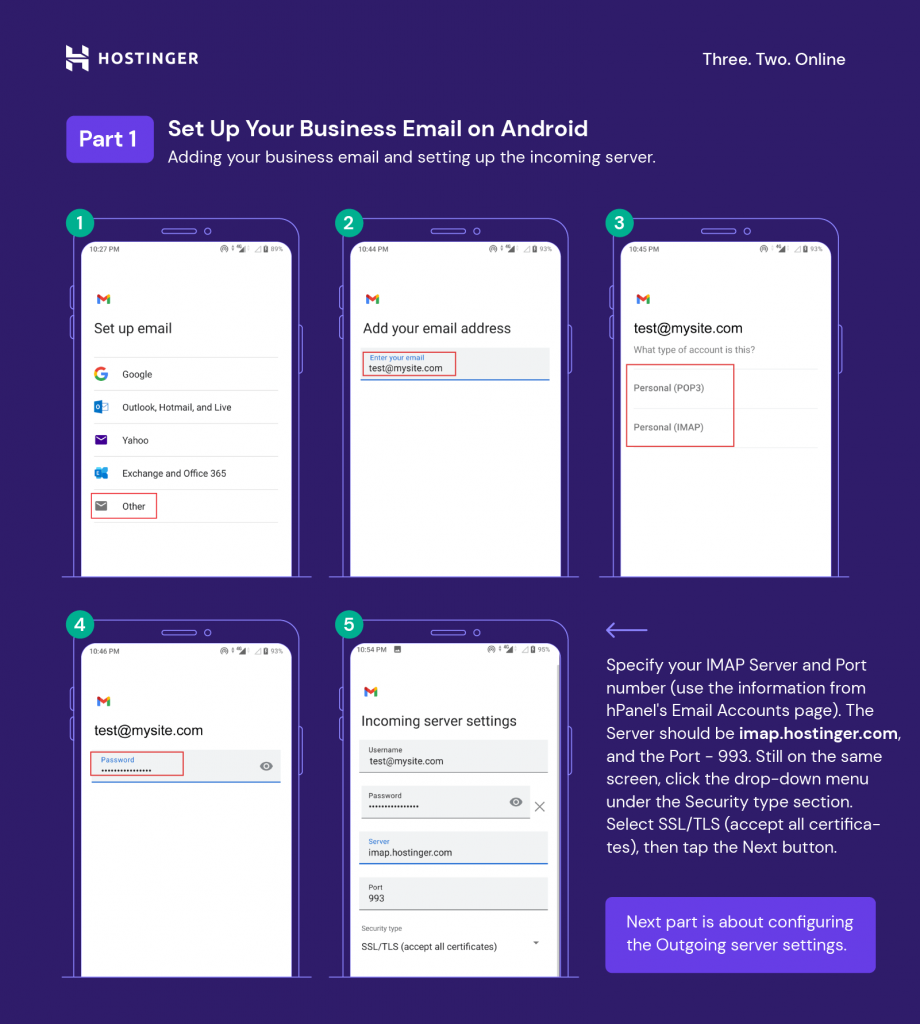
- You’ll see a Set up email window where you need to choose an email service. Since we’re about to set up a custom email, select Other.
- Enter your full email address and tap Manual Setup.
- The app will ask what account type your email is, which means choosing an email protocol to use. We recommend selecting IMAP since it lets you synchronize the email inbox across multiple devices. To do so, tap Personal (IMAP).
- Fill in the password and tap Next.
- Now it’s time to configure the Incoming server settings. The Username and Password fields will be automatically filled in with the appropriate details..
- Specify your IMAP Server and Port number – use the information from hPanel’s Email Accounts page. The Server should be imap.hostinger.com, and the Port – 993.
- Still on the incoming server settings screen, click the drop-down menu under the Security type section. Select SSL/TLS(accept all certificates), then tap the Next button.
- Next, configure the Outgoing server settings. Both the Username and Password fields will be automatically filled with your full email address and email password.
- On the same outgoing server settings screen, enter smtp.hostinger.com into the SMTP Server field. Tap Next.
- On the Account options screen, set up the Sync frequency and any additional preferences, such as Sync email for this account. Tap Next.
- Lastly, type in Your name, which is the display name on messages you send from this account. You can also set an Account name, but it’s not mandatory. Tap Next to finish the process.
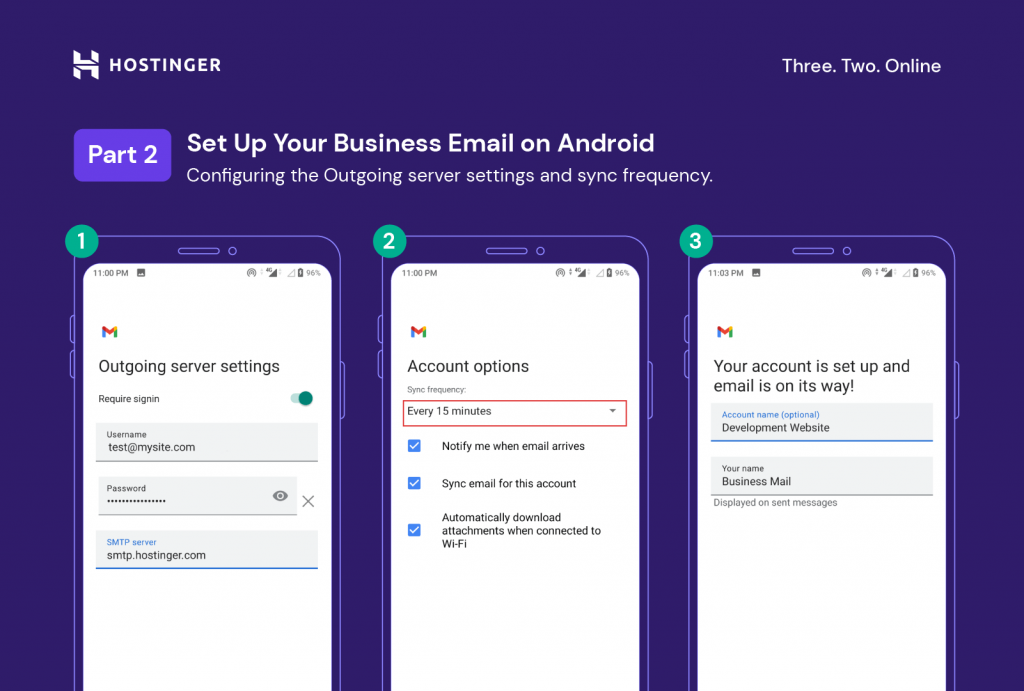
Congratulations – you have successfully added a custom email account on your Android device.
Expert’s Note
Some companies use the Microsoft Exchange email server to manage their business emails. It’s possible to set up an Exchange account on an Android device, enabling users to access Exchange ActiveSync, Exchange’s synchronization protocol.
It lets you access your email, calendar, contacts, tasks, and notes from mobile devices, even when offline. Reach out to your IT administrator to know the name of the Exchange server, as this information is necessary for the setup.

Chief Customer Officer
Conclusion
Accessing emails on your Android devices while you’re on the go is very convenient. You can set up multiple emails on your Android phone, which may include personal and business email addresses.
Setting up a personal email is simple, while setting up a business one takes a little extra effort since you have to do it manually.
However, as long as you have all the necessary server configuration details, your business email will be accessible from your Android device in no time.
We hope you found this article helpful. If you have any questions, feel free to leave us a comment below.
Elvinas is a senior server administrator at Hostinger. He monitors the infrastructure’s well-being and keeps the uptime at a maximum. Besides server management, web development has always been one of his biggest passions.
Nadia Maya Ardiani
Maya is a Digital Content Writer at Hostinger. As a website development and digital marketing enthusiast, she’s keen to share her knowledge so people can thrive online. When she’s not writing, you can find her watching sci-fi movies while eating ramen.
Источник
Get Android Device Primary Registered Email Address Programmatically
Getting primary email id from android apps is one of the most important security feature for all the developers because with this they can actually be managed their all users using their email Id’s and also they know who installed their apps and right now using it. In this tutorial we have to use two type of permissions GET_ACCOUNTS and READ_PHONE_STATE . They both are the dangerous permissions and from the Android Marshmallow 6.0 they only can be used as runtime permissions. So user can himself decide to allow it or not. So here is the complete step by step tutorial for Get Android Device Primary Registered Email Address Programmatically.
How to Get Android Device Primary Registered Email Address Programmatically.
Code for MainActivity.java file.
Code for activity_main.xml layout file.
Code for MainActivity.java file.
Screenshots:


Click here to download Get Android Device Primary Registered Email Address Programmatically project with source code.
Источник
10 best email apps for Android to manage your inbox

We’d also like to give an honorable mention to Hey (Google Play link). It’s really interesting and entertaining email app, but it gives you a new email address and is really expensive so it’s difficult to put it on the list. It has some decent features, though, so check it out if you want another option.
Read more:
Blue Mail
Price: Free
Blue Mail is one of the most popular email apps out there. It supports a variety of clients, including Gmail, Yahoo, Outlook, Office 365, and virtually any other POP3, IMAP, or Exchange clients. The app has a variety of notification settings for each one of your email accounts and also comes with some fun stuff like Android Wear support, configurable menus, and even a dark theme. It also has some smart features if you want them. It’s powerful and it’s completely free. There is a potential privacy issue since Blue Mail uses its own servers, but most likely won’t mind.

Cleanfox
Price: Free
Cleanfox isn’t an email client, but it’s a useful app for email users. It basically helps you unsubscribe from the likely large number of things you somehow ended up subscribed to. You connect your email accounts to the app and it runs through and finds all of your subscriptions. It then unsubscribes you from them if you want it to. It can also delete old emails from those subscriptions and help you manage things in other ways. It’s a free app and it’s honestly not difficult to use at all. Most of the complaints are regarding bugs and bugs do exist, but Cleanfox does what it can and it does work for most.

Gmail
Price: Free
Gmail is a bit of a cheap pick for email apps. It comes pre-installed on most Android devices. Thus, you probably already have it. The app supports multiple inbox settings, multiple accounts, and more. It supports most email services as well, including Yahoo, Microsoft Outlook, and others. It also supports a unified inbox, Material Design, and more. The team also added a bunch of Inbox by Google features before that client was taken down. It’s an excellent option for most folks.

K-9 Mail
Price: Free
K-9 Mail is one of the oldest email apps out there. Many enjoy it for its minimal interface, no BS experience, and unified inbox. It supports most IMAP, POP3, and Exchange 2003/2007 accounts. Otherwise, what you see is pretty much what you get. The UI isn’t overly inspiring, but it makes up for it by not having any quirky features that only half work. This is old school and reliable. The app is also open source. You can build it yourself or contribute to the community via Github. It’s definitely not flashy. However, it is functional and lightweight. It’s also completely free.

Price: Free / $9.99-$14.99
Nine is one of the better email apps out there if you’re concerned about security and also use Outlook. It boasts no server or cloud features whatsoever. The app just connects you to the email services. On top of that, it has support for Exchange ActiveSync which is to be expected for any app that boasts Exchange support. You have a variety of options, including selecting which folders you want to sync, Wear OS support, and more. It’s rather expensive as far as email clients goes and there are a few bugs here and there. However, definitely geared more toward business users.
See more:
Newton Mail
Price: Free trial / $49.99 per year
Newton Mail has a complicated past. It was CloudMagic, re-branded to Newton Mail, died, and was brought back by Essential (the phone maker). It stands as one of the best email apps on the list. The app has a clean, one of the best and cleanest UIs along with a slew of little goodies. That includes email snoozing, two-factor authentication, the ability to send emails later, read receipts, and one-click unsubscribe features. You can also connect a host of other apps in for better integration. Don’t get us wrong, this is way too expensive for basic email consumption. However, apps like this have a niche and Newton is among the best in that niche. Newton Mail was set to shut down on April 30th, 2020, but it seems as though they found a way to keep the doors open.
ProtonMail
Price: Free
ProtonMail is a great email client for security-minded folks. The app boasts end-to-end email encryption. That basically means the only two people who can read your emails are you and the person you’re emailing. The app also boasts OpenPGP support, self-destructing emails (where supported), and most of the typical stuff like labels and organization features. This one does store emails on a server. However, that server is completely encrypted and no one can read them, not even ProtonMail. Many of the features require a ProtonMail account, but this is about as good as it gets in terms of security unless you set up your own server.

Spark Email
Price: Free
Spark Email is the new kid on the block, so to speak. It launched in early 2019 to positive reviews. It has a lot of the basics, including email snoozing, sending emails later, reminders, pinned emails, and you can undo sent mail. Additionally, the UI is clean and you can view each email address separately or together in a universal inbox. We’re big fans of universal inboxes around here. The app’s big claim to fame is its Smart Inbox that filters out trash email in favor of only the important stuff. It’s a neat feature, but even without it, Spark is an excellent email client with support for most email addresses.

TypeApp Email
Price: Free / Up to $6.99
TypeApp Email is a fairly run-of-the-mill email client. It does all of the stuff you would expect. That includes support for most email services, a unified inbox, push notifications, rich text emails, wireless printing support, and some other useful features as well. You also get Wear OS support, a dark mode, themes, and other customization features. It certainly won’t blow your mind. However, it’s a good, simple email app that does what it says it does. We also liked the Material Design UI in our testing and the relatively simple method of switching accounts. It reminds us a lot of Blue Mail in terms of its UI. In any case, it’s good, it’s just not exciting.

Individual clients like Outlook
Price: Free (usually)
The thing is that most third party email apps work just fine. However, there is an advantage to just using the individual app for your email service. We listed Gmail above because it comes pre-installed on most devices anyway. However, others like Microsoft Outlook or Yahoo Mail don’t. They hook directly into the service and can do things that third party clients simply can’t. For instance, Outlook has a Focused Inbox feature that sorts emails based on importance. It also integrates directly with Microsoft’s calendar service. Yahoo Mail includes features like Travel View, more granular notification options, and theming. If you have only one email and it’s not a Gmail account, you may want to consider using the official app so you can get the most out of it.

Bonus: OEM stock email apps
Price: Free (usually)
The stock email apps that come on phones actually do work pretty well. They usually support the basics, like multiple email logins, various email clients, forwarding, archiving, deletion, and more. Many are likely on this list looking for something more than that. However, the stock email apps on your device are usually about as simple, clean, and easy as it gets. Additionally, virtually none of them have ads, cost any money, or anything like that. Plus, they’re already on your phone anyway so they can’t take up any extra storage. It’s a good option if you need something super simple. Those who need power user features shouldn’t use these.

Thank you for reading! Try these out too:
If we missed any of the best email apps for Android, tell us about them in the comments! You can also click here to check out our latest Android app and game lists!
Источник


