- Different Ways to Hide ActionBar in Android with Examples
- Different ways to Hide ActionBar
- 1. Hide ActionBar from the entire App using styles.xml
- How to Hide Navigation Bar on Android Without Root
- Hide Navigation Bar Using Third Party Apps
- Hide Navigation Bar Using Build.Prop Editor (Root)
- Hide Navigation Bar on Android for Immersive Mode
- How to hide status bar on Android devices?
- Steps to hide status bar/notification bar on Android devices
- Add device to Kiosk Mode
- How to hide status bar on Android devices?
- Android app hide bar
- Скрытый API: интерфейсы, которые Android прячет от разработчиков
- Содержание статьи
- Intro
- Начинаем разбираться
- Xakep #212. Секреты даркнета
- Кручу, верчу, запутать хочу
- И тут я подумал о рефлексии.
- Какие еще скрытые API существуют?
- Мораль
- Евгений Зобнин
Different Ways to Hide ActionBar in Android with Examples
ActionBar is a primary toolbar within the activity that may display the activity title, application-level navigation affordances, and other interactive items. Although, Action Bar is an important feature for android applications, sometimes we have the need to hide it in either the entire app, or some particular activity, or during some particular work. This article explains and demonstrates various ways to hide the ActionBar in an Android Application. There are various ways to hide Action Bar, demonstrated below:
Different ways to Hide ActionBar
1. Hide ActionBar from the entire App using styles.xml
If you want to hide Action Bar from the entire application (from all Activities and fragments), then you can use this method. Just go to res -> values -> styles.xml and change the base application to “Theme.AppCompat.Light.NoActionBar“.
Below is the code snippet for this method and changes are made to styles.xml:
Attention reader! Don’t stop learning now. Get hold of all the important Java Foundation and Collections concepts with the Fundamentals of Java and Java Collections Course at a student-friendly price and become industry ready. To complete your preparation from learning a language to DS Algo and many more, please refer Complete Interview Preparation Course.
Источник
How to Hide Navigation Bar on Android Without Root
Most of the smartphones these days come with the on-screen navigation bar, as opposed to including hardware buttons. For a company, this really saves their manufacturing cost of including an extra piece of hardware in the form of capacitive or physical buttons. Furthermore, the ‘soft keys’ do offer tons of customizability for OEMs, as well as for the consumers. However, it does come at the cost of decreasing your display’s real estate. If you’re one of those people who would really want the most out of your device’s display, chances are, you would be leaning towards the idea of hiding your navigation bar.
While manufacturers like Xiaomi, Samsung allow you to hide the navigation bar, most stock Android phones don’t have this functionality. Don’t worry, we’ve got you covered, as we’ll be sharing with you how you can hide navigation bar on Android:
Hide Navigation Bar Using Third Party Apps
You can use the Power Toggles app to enable immersive mode on your device, which essentially hides the status bar and the navigation Bar, thus giving you more screen space. To do so, follow the steps below:
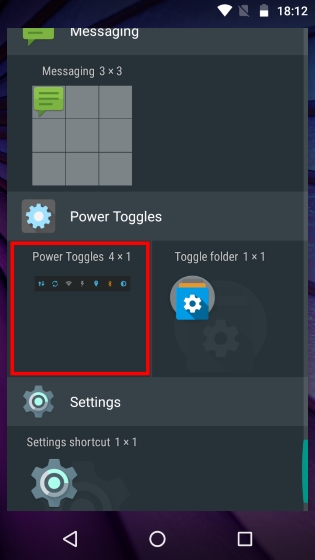
- Go to the Play Store and download Power Toggles from here. It’s free and it works with non-rooted devices.
- Then, long press on the home screen and go to the “Widgets” section, and select “Power Toggles”, and drag the “4×1 Panel Widget” to the desktop.
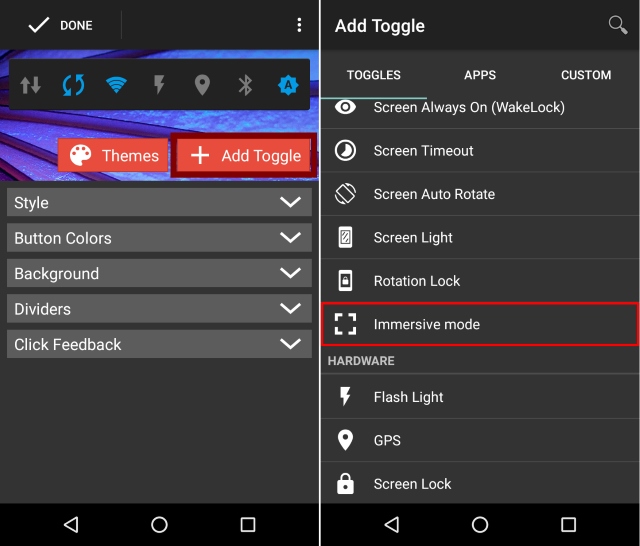
- Now, you need the customize the widget. Tap on the “Add Toggle” button, and scroll down to the “Display” section. Once there, you’ll find the toggle for “Immersive Mode”. Simply tap on it to add it to the widget.
- Tap on Done to leave the widget editing menu. Now, on your homescreen, simply tap the Immersive Mode Icon to toggle between the immersive mode on your device.
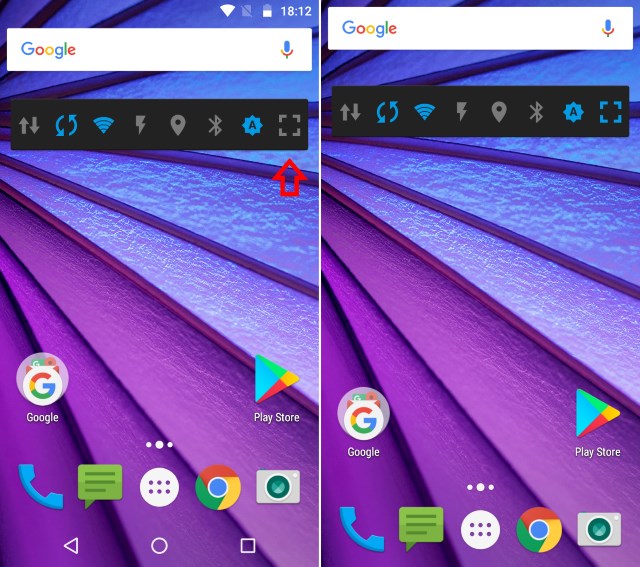
- That’s it. You can now use this toggle to enable or disable the Immersive Mode throughout your device.
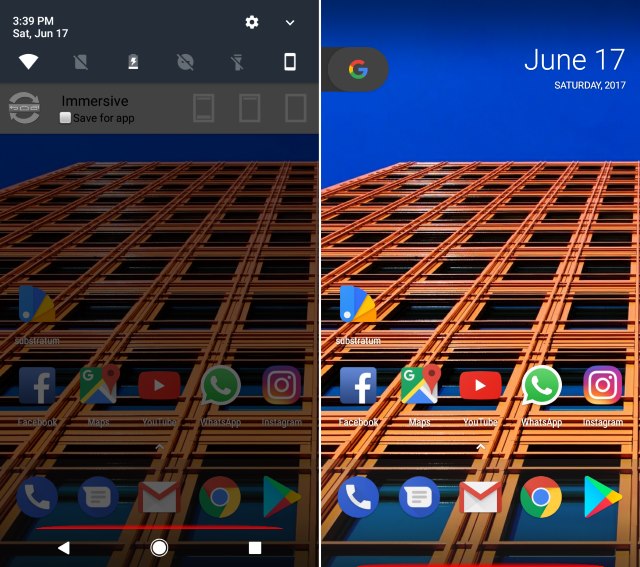
Another option to achieve these results is by the use of GMD Full Screen Immersive Mode app (free, with in-app purchases). While Power Toggles hides both the status bar and the navigation bar, this app gives you the option to hide either of them or both of them. You can use this app with the help of the simple toggle in the notification panel.
Hide Navigation Bar Using Build.Prop Editor (Root)
While the above mentioned apps are good enough to hide the navigation bar temporarily, one may want to get rid of it permanently and resort to other navigation methods such as Pie Control, or the hardware buttons (if your device has them). As such, you can edit the build.prop file of your device to completely get rid of the navigation bar.
Note – Before proceeding with the steps below, make sure you have at least one navigation method configured on your device such as Simple Pie or your capacitive hardware buttons.
- Go to the Play Store and download BuildProp Editor (free, with in-app purchases), and open it.
- Upon opening the app, tap the Edit icon in the top-right corner to open the editor. Scroll all the way down and add the following line “qemu.hw.mainkeys = 1” and then tap on the Save button in the top-right corner.
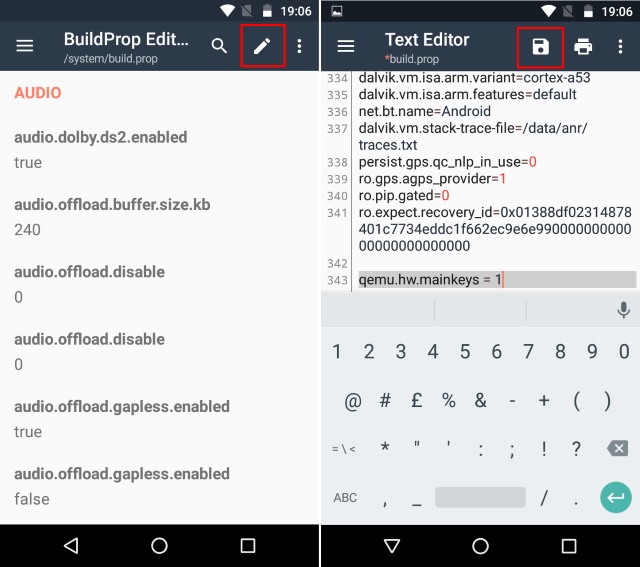
- When you tap on the save icon, you’ll be presented with a list of three options. Tap on “Save and Exit”. The application will then ask you to grant it root privileges to continue. Once done, reboot your device.

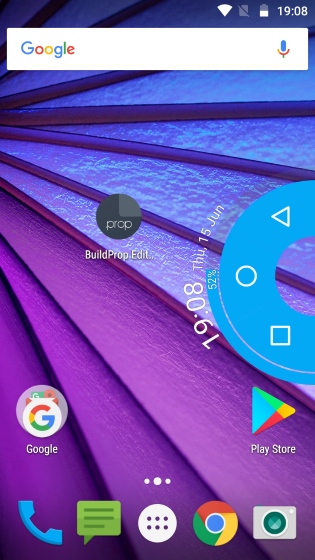
- That’s it. After rebooting your device, you’ll notice that your navigation bar is gone. You can now use your alternative navigation method (Simple Pie or others) as the primary method for navigating through the device.
Hide Navigation Bar on Android for Immersive Mode
You may want to hide the navigation bar temporarily to make use of the extra screen space. Or maybe just because you are annoyed with how the navigation bar looks, and would much prefer an alternative method. Either way, our guide should help you achieve your aim. Well, that was all, so go ahead and hide the navigation bar in your Android device. If you have any doubts, do let us know about it in the comments section below.
Источник
How to hide status bar on Android devices?
Status bar (or notification bar) is an interface element at the top of the screen on Android devices that displays the notification icons, minimized notifications, battery information, device time, and other system status details. Pulling down the Status Bar, displays a more detailed Notification Bar that reveals the most commonly or recently used settings such as Wi-Fi, Location Services, Brightness etc and recent device notifications.
In recent versions of Android, and in new smartphones, the status bar is designed to be extremely customizable, and provide better functionality. However , when organizations use devices for point-of-sale (POS), it’s critical to ensure these devices are locked down only to the required apps while restricting access to other apps such as phone, browser and settings to avoid misuse of the device and to provide a better user experience . Organizations have started using mobile devices as single purpose devices by locking them down using Kiosk Mode and restricting access to the Settings apps. Despite restricting access to the Settings app, some of the basic settings can be accessed from the notification bar or Status bar on the Android device. That’s why it’s essential to «remove» or temporarily disable the status bar and notification panel on Android devices when they’re locked down into Kiosk Mode. Hiding or disabling the status or notification bar on Android devices will not only ensure that the device settings are made inaccessible but will also provide a more immersive experience to the kiosk user.
Mobile Device Manager Plus allows admins to completely hide Android status bar and disable notification bar on Android devices using Kiosk Mode to prevent unauthorized access to notifications and settings. To learn how to hide the status or notification bar on Android read below.
Steps to hide status bar/notification bar on Android devices
To hide status bar or disable notification bar in Android, IT admins must perform the following two steps:
Add device to Kiosk Mode
The first step to hide Android status bar/ notification bar on Android devices using Mobile Device Manager Plus is to lock down the device into Kiosk Mode. Kiosk Mode allows the device to run specific apps on the devices while restricting access to other apps and device functionalities such as to hide status bar. Follow the steps given below to enable Android Kiosk Mode, in order to remove status bar/notification bar on Android devices.
- On the MDM console, create an Android profile by navigating to Device Mgmt -> Profiles -> New Profile -> Android.
- Specify a name and description before creating the profile.
- From the left pane, select Kiosk for creating a Kiosk Mode profile
- Select Single App if you want to run only one app on the device and Multi-app for running multiple apps on the devices
- Enter the name of the app(s) that need to be provisioned in Kiosk.
How to hide status bar on Android devices?
To hide or disable the status and notification bar on Android devices while enabling Kiosk Mode, follow the steps given below:
- Select the Kiosk Mode profile to which you’ve added the apps to be provisioned in Kiosk Mode.
- Navigate to Device Restrictions to disable the status bar in Android devices.
- Restrict the Status Bar option to disable the status bar on the device. By default the Status Bar expansion option is restricted, which disables the notification bar.
- You can also optionally disable the Task Bar to prevent users from accessing the default launcher or exiting Kiosk.
- Click on Save to save the profile. Distribute the profile to Groups or devices based on your requirements
This is how the device in Kiosk Mode looks once you disable notification bar and remove status bar on Android devices.

Using this method, you can hide the status and notification bar even on newer versions of Android like Android 10 and 11. In addition to enabling admins to disable/hide notification bar and remove status bar, Mobile Device Manager Plus provides a fully customizable Kiosk Mode with various settings. Refer this document for more details on how to configure Kiosk Mode on devices.
Источник
Android app hide bar

Для функционирования программы необходимы права root пользователя.
Краткое описание:
Скрытие любых значков с рабочего экрана, защита паролем для их восстановления.
Требуется Android: 2.3 и выше
Русский интерфейс: Нет
Сообщение отредактировал iMiKED — 03.08.21, 14:54
AppHider — Hide App только русская версия: 1.4.1  AppHider.Rus.apk ( 2.91 МБ )
Сообщение отредактировал papasha55 — 09.05.16, 19:33
Сообщение отредактировал dmitriy-inf — 18.05.16, 23:09
камрады, а есть ли аналогичное приложение, которое только скрывает иконки, не выключая приложение
например, есть приложение погода BZ. на рабочем столе висит виджет, но елси скрыть иконку приложения то виджет обновлять погоду
или ( в моем случае) есть во флайме приложение My Account, иконка на рабочем столе. если с помощью Hide App спрятать иконку то в аккаунт флайм из настроек телефона мне не войти уже. в случае с погодой это совсем неудобно — нужно зайти в hide app, нажать unhide and start и олько тогда можно обновить погоду
в твиках xposed для miui есть такая возможность. твиках для flyme — не нашел (
может порекомендуете альтернативу Hide app
Источник
Скрытый API: интерфейсы, которые Android прячет от разработчиков

Содержание статьи
В одной из своих предыдущих статей я уже писал о механизме под названием «уровень доступа» (protection level), который определяет, может ли твой код обращаться к тем или иным функциям ОС. Высокий уровень доступа получает только системный софт, поэтому для простых смертных он закрыт. Однако есть в Android и еще одна интересность, имя которой — скрытый API. И чтобы получить к нему доступ, не нужен root, не надо подписывать приложение ключом прошивки, достаточно лишь немного пораскинуть мозгами.
Intro
Написать эту статью подвигла одна история. Началась она с попытки создать простенькое приложение, которое позволяло бы разворачивать строку состояния свайпом с какой-то из сторон экрана. Современные смартфоны слишком велики, чтобы дотянуться до статусбара одной рукой, а свайп позволил бы решить эту проблему быстро и легко.
Подобная функция есть во многих лаунчерах, поэтому задача казалась простой и совершенно очевидной: завариваем кофе, открываем доки Android, находим нужную функцию и пишем простой сервис, который отслеживал бы касание края экрана и разворачивал статусбар.
Но жестокая реальность поубавила оптимизма: как следовало из документации Android, API не предоставлял такую функциональность! А значит, софт, умеющий разворачивать строку состояния, использовал хаки, а что еще более интересно — хаки, работающие без root, прав администратора и вообще каких бы то ни было разрешений.
Начинаем разбираться
Проще всего выяснить, как это вообще возможно, — посмотреть чужой код. Такого с ходу не нашлось, зато обнаружилась очень простая софтина Drop Down Status Bar. Она состояла из иконки, при нажатии которой разворачивался статусбар, а сам код приложения умещался в файле размером 1252 байт — идеальный кандидат для декомпиляции.
Оставалось только скачать APK и натравить на него jadx:
 Декомпилированный листинг Drop Down Status Bar
Xakep #212. Секреты даркнета
Очень простой код, который создает объект класса StatusBarManager и вызывает его метод expandNotificationPanel() , если приложение работает в среде Android 4.2, или метод expand() , если это Android предыдущих версий. Все очень просто, и код можно было банально скопировать в свое приложение:
Но не тут-то было. Оказалось, что класс StatusBarManager не просто не был описан в документации, — его вообще не существовало в SDK. Как же работал Drop Down Status Bar?
На самом деле все элементарно. Фреймворк, содержащий все классы пакета android (включая требуемый android.app.StatusBarManager), не один и тот же на реальном устройстве и в SDK. Версия фреймворка в SDK, во-первых, довольно сильно урезана в плане доступных классов, а во-вторых, не включает в себя самого кода реализации классов (вместо методов и конструкторов — заглушки).
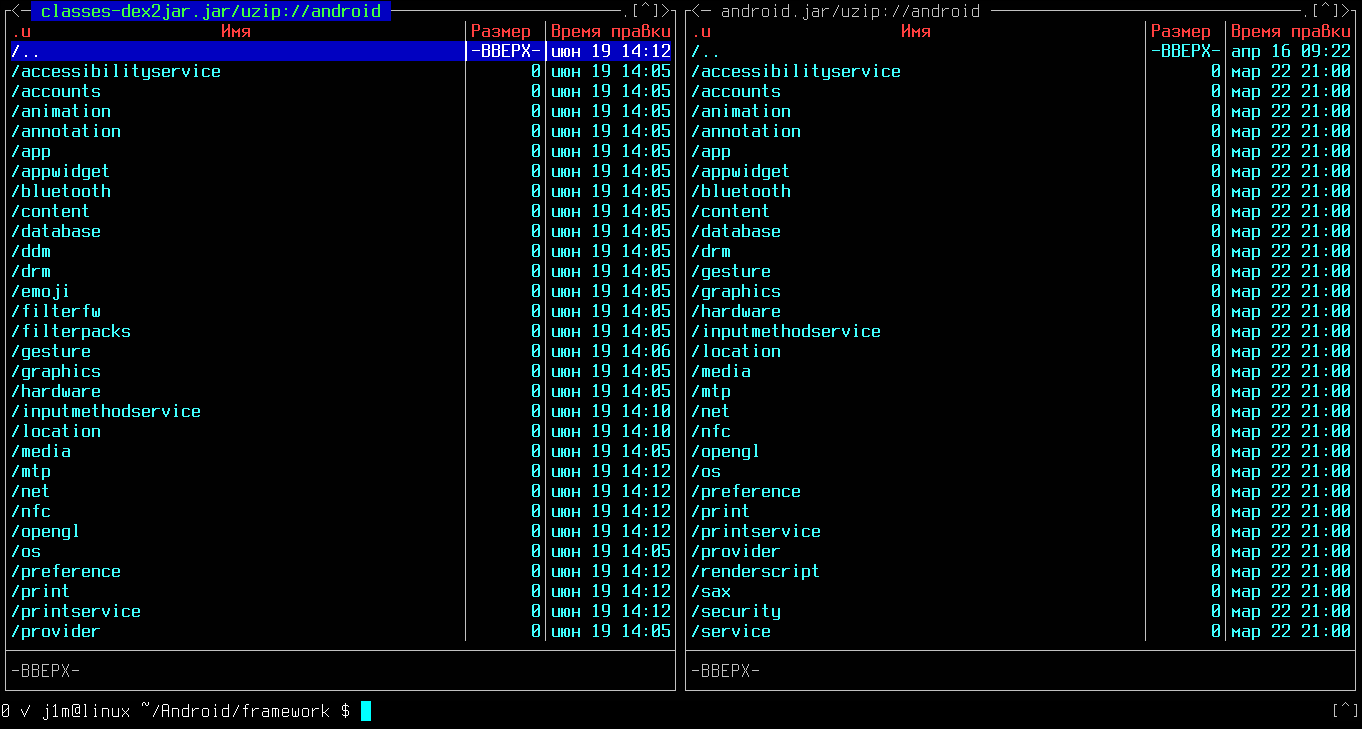 Содержимое фреймворков реального устройства и SDK
Это теория, а практика в том, что выдернутый с устройства фреймворк по логике можно было бы использовать не только чтобы сравнить с тем, что поставляется в SDK, но и чтобы подменить его! Сделать это оказалось несложно.
Кручу, верчу, запутать хочу
Фреймворк был выдернут с устройства (что такое adb shell):
С помощью dex2jar байт-код Dalvik был транслирован обратно в байт-код Java:
И затем размещен в проекте как обычная библиотека:
Оставалось только запустить Android Studio, выбрать библиотеку и присоединить ее к проекту с помощью меню «Add as library».
Но Android Studio продолжал упорствовать. Теперь ему не нравилось слово statusbar:
Оказалось, однако, что неправ в этой ситуации как раз Android Studio и это не что иное, как баг, обойти который можно с помощью комментария-директивы noinspection:
 Заставляем Android Studio принять наш код
Вот и все. нет, стоп, это я выдаю желаемое за действительное. На самом деле это еще далеко не все. Из-за огромного веса фреймворка Android Studio задыхался во время компиляции и постоянно прерывал этот процесс с самыми разными ошибками. И ошибки эти были вовсе не в коде, а в самих инструментах сборки. И даже не ошибки, а расход всей оперативной памяти, из-за которого инструменты сборки просто падали, как, например, утилита dx, перегоняющая байт-код Java в байт-код Dalvik:
Решение этому нашлось не сразу, и поначалу казалось, что нечего даже пытаться собрать код на ноуте с четырьмя гигами памяти. Однако и это было возможно, но только если указать Android Studio альтернативный каталог для хранения временных файлов (по умолчанию в Linux он использует каталог /tmp , который зачастую сам находится в оперативке), подключить swap и провести небольшой тюнинг системы сборки.
Первые две задачи решились просто:
Вторая чуть сложнее. Пришлось слегка подредактировать build.gradle проекта, чтобы выделить побольше памяти виртуальной машине Java, отключить ProGuard и снять ограничение на 65 тысяч методов (multiDex):
Оставалось только дождаться окончания сборки.
И тут я подумал о рефлексии.
На самом деле все сказанное выше — пустая болтовня. Не потому, что этот метод не работает, — он замечательно работает, и ты сам можешь в этом убедиться. Настоящая причина в том, что он невероятно избыточен, ведь есть более адекватный альтернативный путь. Итак, внимание, код для вытягивания шторки без замен фреймворков и возни с настройками Java и Gradle:
Все просто. Достаточно было использовать рефлексию, чтобы прямо во время исполнения найти класс StatusBarManager, найти его метод expandNotificationsPanel() и вызвать. И все это без лишних телодвижений (кроме того, что после каждого редактирования код приходится запускать для проверки).
Какие еще скрытые API существуют?
На самом деле их не так уж много. В основном Android использует скрытые API для взаимодействия между системными классами, поэтому обычно это различные константы и подсобные функции, малоинтересные обычным программистам. Но есть и несколько полезных API, которые позволяют:
- монтировать, размонтировать и форматировать файловые системы (StorageManager);
- получить расширенную информацию о Wi-Fi (WifiManager);
- узнать UID и прочую информацию о текущем процессе (Process);
- получить расширенную информацию о базовой станции (CellInfoLte);
- узнать тип сети (ConnectivityManager);
- получить список установленных пакетов, принадлежащих указанному юзеру (PackageManager);
- узнать реальный размер экрана с учетом наэкранных кнопок навигации (Display).
Я не проверял все эти API, поэтому не буду давать гарантий, что они корректно работают и не требуют каких-то привилегий в системе. Ты можешь проверить сам — просто найди API в исходном коде, введя в поиске директиву @hide. Удобнее всего сделать это с помощью веб-сервиса AndroidXRef: просто укажи @hide в поле Full search, а в In project(s) выбери frameworks.
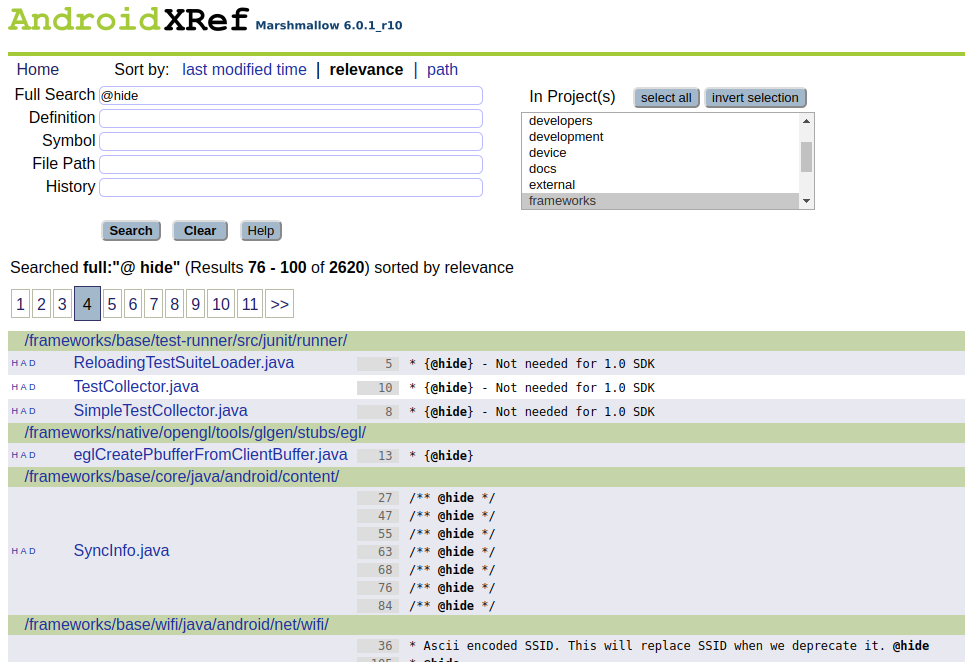 Ищем скрытые API в исходниках фреймворка
Мораль
Скрытые API и рефлексия позволили мне реализовать задуманное (если тебе интересно, это чудо есть в маркете). Однако это всего лишь маленькая софтинка, написанная для себя, и я настоятельно не рекомендую использовать скрытые API в больших проектах, особенно если ты собираешься их монетизировать.
В отличие от API с высоким уровнем доступа, наличие или неизменность скрытых API не гарантирована. В следующей версии Android они могут исчезнуть или измениться, они могут существовать в прошивках одних аппаратов и отсутствовать в других. Их использование — это всегда лотерея.

Евгений Зобнин
Редактор рубрики X-Mobile. По совместительству сисадмин. Большой фанат Linux, Plan 9, гаджетов и древних видеоигр.
Источник


