- Android — Session Management
- Shared Preferences
- Session Management through Shared Preferences
- Example
- Android User Session Management using Shared Preferences
- Initialization
- Storing Data
- Retrieving Data
- Clearing / Deleting Data
- User Session Management using Shared Preferences
- Android Session Management with Examples
- Android Session Management Example
- activity_main.xml
- details.xml
- MainActivity.java
- DetailsActivity.java
- AndroidManifest.xml
- Output of Android Session Management Example
Android — Session Management
Session help you when want to store user data outside your application, so that when the next time user use your application, you can easily get back his details and perform accordingly.
This can be done in many ways. But the most easiest and nicest way of doing this is through Shared Preferences.
Shared Preferences
Shared Preferences allow you to save and retrieve data in the form of key,value pair. In order to use shared preferences, you have to call a method getSharedPreferences() that returns a SharedPreference instance pointing to the file that contains the values of preferences.
You can save something in the sharedpreferences by using SharedPreferences.Editor class. You will call the edit method of SharedPreference instance and will receive it in an editor object. Its syntax is −
Apart from the putString method, there are methods available in the editor class that allows manipulation of data inside shared preferences. They are listed as follows −
| Sr.No | Mode & description | |||||||||||||
|---|---|---|---|---|---|---|---|---|---|---|---|---|---|---|
| 1 |
| Steps | Description |
|---|---|
| 1 | You will use android studio IDE to create an Android application under a package com.example.sairamkrishna.myapplication. |
| 2 | Modify src/MainActivity.java file to add progress code to add session code. |
| 3 | Create New Activity and it name as second.java.Edit this file to add progress code to add session code. |
| 4 | Modify res/layout/activity_main.xml file to add respective XML code. |
| 5 | Modify res/layout/second_main.xml file to add respective XML code. |
| 7 | Run the application and choose a running android device and install the application on it and verify the results. |
Here is the content of MainActivity.java.
Here is the content of second_main.java.
Here is the content of activity_main.xml.
Here is the content of second_main.xml.
Here is the content of Strings.xml.
Here is the content of AndroidManifest.xml.
Let’s try to run your application. I assume you had created your AVD while doing environment setup. To run the app from Android studio, open one of your project’s activity files and click Run  icon from the tool bar. Android studio installs the app on your AVD and starts it and if everything is fine with your set-up and application, it will display following Emulator window −
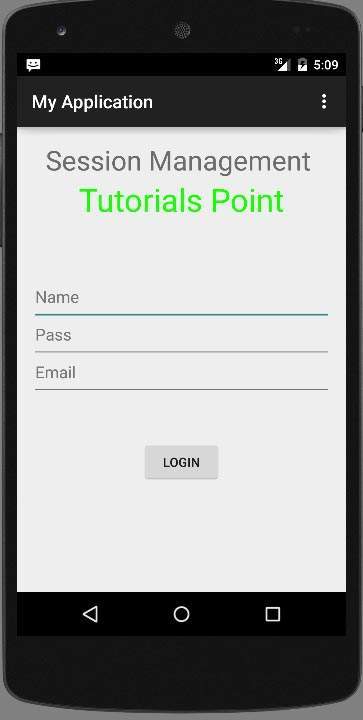
Type in your username and password (type anything you like, but remember what you type), and click on login button. It is shown in the image below −
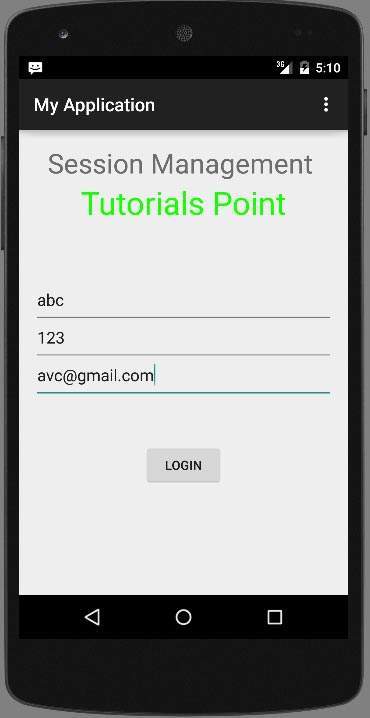
As soon as you click on login button, you will be brought to this Welcome screen. Now your login information is stored in shared preferences.
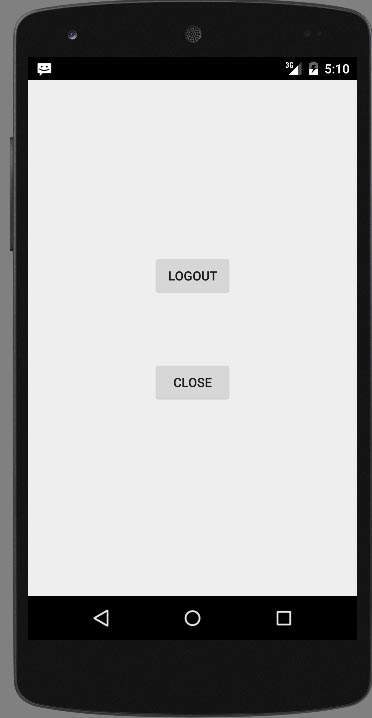
Now click on Exit without logout button and you will be brought back to the home screen and in preference file out put would be as shown below image
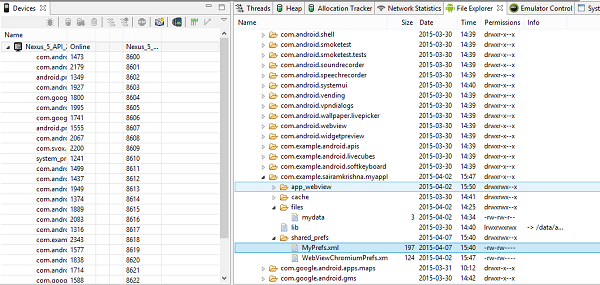
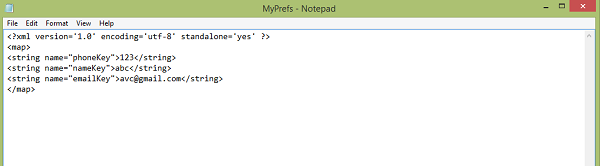
If you open myPref.xml file as note file, it would be as follows
If you click on logout button, it will erase preference values. and if you entered different values as inputs,it will enter those values as preference in XML.
Источник
Android User Session Management using Shared Preferences
Session are useful when you want to store user data globally through out the application. This can be done in two ways. One is storing them in a global variables and second is storing the data in shared preferences. The problem with storing data in global variable is data will be lost once user closes the application, but storing the data in shared preferences will be persistent even though user closes the application.

Application shared preferences allows you to save and retrieve key, value pair data. Before getting into tutorial, I am giving basic information needed to work with shared preferences.
Initialization
Application shared preferences can be fetched using getSharedPreferences() method.You also need an editor to edit and save the changes in shared preferences. The following code can be used to get application shared preferences.
Storing Data
You can save data into shared preferences using editor. All the primitive data types like booleans, floats, ints, longs, and strings are supported. Call editor.commit() in order to save changes to shared preferences.
Retrieving Data
Data can be retrived from saved preferences by calling getString() (For string) method. Remember this method should be called on Shared Preferences not on Editor.
Clearing / Deleting Data
If you want to delete from shared preferences you can call remove(“key_name”) to delete that particular value. If you want to delete all the data, call clear()
Following will clear all the data from shared preferences
The following is a simple tutorial which will have a login form and a dashboard screen. At first user will login using login details and once he successfully logged in his credentials (name, email) will be stored in shared preferences.
User Session Management using Shared Preferences
1. Create a new project in Eclipse IDE File ⇒ New ⇒ Android Application Project and fill all the required details
2. I am adding alert dialog manager class to show alert messages while validating the login form. Create a new class and name it as AlertDialogManager.java and paste the following code.
3. I am writing all session related functions in one class to make them available in all activities. Create a new class named SessionManagement.java and add following lines of code
4. In this example i am storing login status, name, email in shared preferences, so i added a function called createLoginSession(String name, String email) to SessionManagement class. Add the following function to SessionManagement.java.
> This function simply stores login status(true), name, email in shared preferences.
5.In order to get the stored preferences data, I added a function called getUserDetails() with the following code.
> The following function will read shared preferences and returns user data in HashMap
6. To check whether user logged in or not i added a function checkLogin() which you can call in all Activities to check user login status.
> This function simply check user login status from shared preferences and if user is not login it will redirect user to LoginActivity
7. Add a function called logoutUser() to clear all the data from shared preferences. Call this function when you want to logout the user.
> This function clears all session data and redirect the user to LoginActivity
Final Code
8. Until now we are done creating Session Management class and now we are going to learn how to use this class in your application. For this create a simple login form asking username, password.
Create a layout xml file and a class to create login form. Name the xml file as activity_login.xml and class name as LoginActivity.java
For testing purpose i am checking username, password as test, test.
Once the user enters correct login details a session will be created by calling session.createLoginSession(“Android Hive”, “[email protected]”) and user is redirected to MainActivity.


9. After user redirected to MainActivity, I am getting stored session data by calling getUserDetails() and displayed in textviews.
> session.checkLogin() is called to check user login status. Here if user is not login he will be redirected to LoginActivity.java
> If user is logged in, user details are fetched by calling session.getUserDetails() and displayed in textviews.
> Also I have logout button which invokes a function session.logoutUser() to clear the session data.
Layout code for activity_main.xml
Code for MainActivity.java

10. Open AndroidManifest.xml file, add the following code and run the project.
Hi there! I am Founder at androidhive and programming enthusiast. My skills includes Android, iOS, PHP, Ruby on Rails and lot more. If you have any idea that you would want me to develop? Let’s talk: [email protected]
Источник
Android Session Management with Examples
In android, Session Management is a process that is used to maintain the required values in a session to use it in the application.
Generally, in android, we can manage the logged in user details in session either by storing it in global variables or in Shared Preferences. In case, if we store the values in global variables, those will be lost whenever the user closes the application but if we store the values in Shared Preferences, those will be persisted even if the application closed by the user.
In android, Shared Preferences are used to save and retrieve the primitive data types (integer, float, boolean, string, long) data in the form of key-value pairs from a file within an apps file structure.
To know more about Shared Preferences, check this Android Shared Preferences with Examples.
Now we will see how to store and retrieve logged in user details from shared preferences file using SharedPreferences object and clear or delete the stored session values from Shared Preferences file whenever the user clicks on the logout button in android application with examples.
Android Session Management Example
Following is the example of storing and retrieving the logged-in user details from shared preferences file using SharedPreferences and clear the stored session values on the logout button click.
Create a new android application using android studio and give names as SharedPreferencesExample. In case if you are not aware of creating an app in android studio check this article Android Hello World App.
Once we create an application, open activity_main.xml file from \res\layout folder path and write the code like as shown below.
activity_main.xml
xml version= «1.0» encoding= «utf-8» ?>
LinearLayout xmlns: android = «http://schemas.android.com/apk/res/android»
android :orientation= «vertical» android :layout_width= «match_parent»
android :layout_height= «match_parent» >
TextView
android :id= «@+id/fstTxt»
android :layout_width= «wrap_content»
android :layout_height= «wrap_content»
android :layout_marginLeft= «100dp»
android :layout_marginTop= «150dp»
android :text= «UserName»/>
EditText
android :id= «@+id/txtName»
android :layout_width= «wrap_content»
android :layout_height= «wrap_content»
android :layout_marginLeft= «100dp»
android :ems= «10»/>
TextView
android :id= «@+id/secTxt»
android :layout_width= «wrap_content»
android :layout_height= «wrap_content»
android :text= «Password»
android :layout_marginLeft= «100dp»/>
EditText
android :id= «@+id/txtPwd»
android :inputType= «textPassword»
android :layout_width= «wrap_content»
android :layout_height= «wrap_content»
android :layout_marginLeft= «100dp»
android :ems= «10»/>
Button
android :id= «@+id/btnLogin»
android :layout_width= «wrap_content»
android :layout_height= «wrap_content»
android :layout_marginLeft= «100dp»
android :text= «Login»/>
LinearLayout >
Now we will create another layout resource file details.xml in \res\layout path to get the first activity (activity_main.xml) details in second activity file for that right click on your layout folder à Go to New à select Layout Resource File and give name as details.xml.
Once we create a new layout resource file details.xml, open it and write the code like as shown below
details.xml
xml version= «1.0» encoding= «utf-8» ?>
LinearLayout xmlns: android = «http://schemas.android.com/apk/res/android»
android :orientation= «vertical» android :layout_width= «match_parent»
android :layout_height= «match_parent» >
TextView
android :layout_width= «wrap_content»
android :layout_height= «wrap_content»
android :id= «@+id/resultView»
android :layout_gravity= «center»
android :layout_marginTop= «170dp»
android :textSize= «20dp»/>
Button
android :id= «@+id/btnLogOut»
android :layout_width= «wrap_content»
android :layout_height= «wrap_content»
android :layout_gravity= «center»
android :layout_marginTop= «20dp»
android :text= «Log Out»/>
LinearLayout >
Now open your main activity file MainActivity.java from \java\com.tutlane.sharedpreferencesexample path and write the code like as shown below
MainActivity.java
package com.tutlane.sharedpreferencesexample;
import android.content.Intent;
import android.content.SharedPreferences;
import android.support.v7.app.AppCompatActivity;
import android.os.Bundle;
import android.view.View;
import android.widget.Button;
import android.widget.EditText;
import android.widget.Toast;
public class MainActivity extends AppCompatActivity <
EditText uname , pwd ;
Button loginBtn ;
SharedPreferences pref ;
Intent intent ;
@Override
protected void onCreate(Bundle savedInstanceState) <
super .onCreate(savedInstanceState);
setContentView(R.layout. activity_main );
uname = (EditText)findViewById(R.id. txtName );
pwd = (EditText)findViewById(R.id. txtPwd );
loginBtn = (Button)findViewById(R.id. btnLogin );
pref = getSharedPreferences( «user_details» , MODE_PRIVATE );
intent = new Intent(MainActivity. this ,DetailsActivity. class );
if ( pref .contains( «username» ) && pref .contains( «password» )) <
startActivity( intent );
>
loginBtn .setOnClickListener( new View.OnClickListener() <
@Override
public void onClick(View v) <
String username = uname .getText().toString();
String password = pwd .getText().toString();
if (username.equals( «suresh» ) && password.equals( «dasari» )) <
SharedPreferences.Editor editor = pref .edit();
editor.putString( «username» ,username);
editor.putString( «password» ,password);
editor.commit();
Toast.makeText(getApplicationContext(), «Login Successful» ,Toast. LENGTH_SHORT ).show();
startActivity( intent );
>
else
<
Toast.makeText(getApplicationContext(), «Credentials are not valid» ,Toast. LENGTH_SHORT ).show();
>
>
>);
>
>
If you observe above code, we are checking whether the entered username and password details matching or not based on that we are saving the details in shared preferences file and redirecting the user to another activity.
Now we will create another activity file DetailsActivity.java in \java\com.tutlane.sharedpreferencesexample path to show the details from shared preference file for that right-click on your application folder à Go to New à select Java Class and give name as DetailsActivity.java.
Once we create a new activity file DetailsActivity.java, open it and write the code like as shown below
DetailsActivity.java
package com.tutlane.sharedpreferencesexample;
import android.content.Intent;
import android.content.SharedPreferences;
import android.os.Bundle;
import android.support.v7.app.AppCompatActivity;
import android.view.View;
import android.widget.Button;
import android.widget.TextView;
/**
* Created by tutlane on 03-01-2018.
*/
public class DetailsActivity extends AppCompatActivity <
SharedPreferences prf ;
Intent intent ;
@Override
protected void onCreate(Bundle savedInstanceState) <
super .onCreate(savedInstanceState);
setContentView(R.layout. details );
TextView result = (TextView)findViewById(R.id. resultView );
Button btnLogOut = (Button)findViewById(R.id. btnLogOut );
prf = getSharedPreferences( «user_details» , MODE_PRIVATE );
intent = new Intent(DetailsActivity. this ,MainActivity. class );
result.setText( «Hello, » + prf .getString( «username» , null ));
btnLogOut.setOnClickListener( new View.OnClickListener() <
@Override
public void onClick(View v) <
SharedPreferences.Editor editor = prf .edit();
editor.clear();
editor.commit();
startActivity( intent );
>
>);
>
>
Now we need to add this newly created activity in AndroidManifest.xml file in like as shown below.
AndroidManifest.xml
xml version= «1.0» encoding= «utf-8» ?>
manifest xmlns: android = «http://schemas.android.com/apk/res/android»
package= «com.tutlane.sharedpreferencesexample» >
application
android :allowBackup= «true»
android :icon= «@mipmap/ic_launcher»
android :label= «@string/app_name»
android :roundIcon= «@mipmap/ic_launcher_round»
android :supportsRtl= «true»
android :theme= «@style/AppTheme» >
activity android :name= «.MainActivity» >
intent-filter >
action android :name= «android.intent.action.MAIN»/>
category android :name= «android.intent.category.LAUNCHER»/>
intent-filter >
activity >
activity android :name= «.DetailsActivity» android :label= «Shared Preferences — Details» > activity >
application >
manifest >
If you observe above example, we are checking whether the entered user details matching or not based on that we are saving the user details in shared preferences file and redirecting the user to another activity file (DetailsActivity.java) to show the users details and added all the activities in AndroidManifest.xml file.
Output of Android Session Management Example
When we run above example in the android emulator we will get a result like as shown below

If you observe above result, the entered username and password matches then we are redirecting the user to another activity file to show the user details from the shared preferences file. After that, if we click on Logout button, it will clear all the values in shared preferences file and it will redirect the user to the login page.
This is how we can use session management in android applications with Shared Preferences to store and retrieve session values based on our requirements.
Источник


