- Android O and background services
- Android app in background model
- BragitOff.com
- READ-LEARN-BRAG!
- How to change the background of an App(Activity) using Android Studio? [SOLVED]
- Adding a background image to an Android Toolbar in the right way
- The final result
- Getting started
- Making the status bar transparent
- Adding a background image to the AppBarLayout
Android O and background services
Всем привет. Как и большенству разработчиков — мне было лень делать сложные изменения от версии к версии Андроида. Первым таким сложным изменением были -«Runtime permissions», которые пришли к нам с 6-м андроидом. Но это уже в прошлом.
Темой данной публикации будут изменения в Android Oreo. Вы можете почитать подробнее здесь. Все статьи которые я находил, с возможным вариантом решения проблем говорили «Просто наследуй сервис от JobIntentService и используй его в enqueueWork()».
Круто, да. Но не все так просто. Если заглянуть в CommandProcessor, то можно увидеть что сервис останавливается сразу после выполнения onHandleWork(). Это происходит потому, что IntentService не предназначем на выполнения сложных работ, он создан для вещей вроде: доставки ивентов, старта прочих сервисов и так далее.
Эти статьи и их решения ничем мне не помогли, так как они просто копия с developer.android.com. По этому я продолжил тестировать и искать простые варианты использования сервисов пока приложение в фоне ( в совместимости с Android O). И я нашел способ.
Используя JobIntentService можно попробовать запустить ваш сервис по старинке, но контекст предоставляемый JobIntentService не подходит для этих целей, но мы всегда можем запросить контекст приложения. Но даже когда у нас будет контекст приложения, при старте сервиса нас остановят ограничения андроида.
Что же дальше? Эти ограничения на фоновое выполнение работают только тогда, когда вы пытаетесь запустить сервис с помошью startService(), если же вы будете использовать bindService, то никаких ошибок вам андроид не выдаст. Но, в случае байнда сервис будет только создан и прикреплен к приложению и нужно это все делать вместе с созданием и реализацией ServiceConnection, по вызову которого необходимо запустить необходимый метод ( onHandleWork() или onHandleIntent() или необходимый метод вашего сервиса).
Проделывая все это я пришел к заключению что это не самый простой способ. Поэтому я написал маленькую и простую библиотеку которая может делать это все за вас. Она так же позволяет использовать фоновые сервисы без их обьявления в манифесте и создания каких-либо классов. Найти ее можно здесь.
И небольшой пример с гита:
Для того чтобы использовать 2 последних варианта — нужно пронаследовать CompatService
Пример можно найти здесь.
И возвращаясь к теме того с чего я начал «Первым таким сложным изменением были -Runtime permissions», можете так же оценить мой вариант решения этой проблемы.
Источник
Android app in background model
Cordova Background Plugin ![]()

Plugin for the Cordova framework to perform infinite background execution.
Most mobile operating systems are multitasking capable, but most apps dont need to run while in background and not present for the user. Therefore they pause the app in background mode and resume the app before switching to foreground mode. The system keeps all network connections open while in background, but does not deliver the data until the app resumes.
Infinite background tasks are not official supported on most mobile operation systems and thus not compliant with public store vendors. A successful submssion isn’t garanteed.
Use the plugin by your own risk!
- Android/Amazon FireOS
- Browser
- iOS
- Windows(see #222)
The plugin can be installed via Cordova-CLI and is publicly available on NPM.
Execute from the projects root folder:
Or install a specific version:
Or install the latest head version:
Or install from local source:
The plugin creates the object cordova.plugins.backgroundMode and is accessible after the deviceready event has been fired.
Enable the background mode
The plugin is not enabled by default. Once it has been enabled the mode becomes active if the app moves to background.
To disable the background mode:
Check if running in background
Once the plugin has been enabled and the app has entered the background, the background mode becomes active.
A non-active mode means that the app is in foreground.
Listen for events
The plugin fires an event each time its status has been changed. These events are enable , disable , activate , deactivate and failure .
To remove an event listeners:
Transit between application states
Android allows to programmatically move from foreground to background or vice versa.
Override the back button on Android to go to background instead of closing the app.
Recent task list
Exclude the app from the recent task list works on Android 5.0+.
Detect screen status
The method works async instead of isActive() or isEnabled().
Unlock and wake-up
A wake-up turns on the screen while unlocking moves the app to foreground even the device is locked.
To indicate that the app is executing tasks in background and being paused would disrupt the user, the plug-in has to create a notification while in background — like a download progress bar.
The title, text and icon for that notification can be customized as below. Also, by default the app will come to foreground when tapping on the notification. That can be changed by setting resume to false. On Android 5.0+, the color option will set the background color of the notification circle. Also on Android 5.0+, setting hidden to false will make the notification visible on lockscreen.
To modify the currently displayed notification
Note: All properties are optional — only override the things you need to.
Run in background without notification
In silent mode the plugin will not display a notification — which is not the default. Be aware that Android recommends adding a notification otherwise the OS may pause the app.
Various APIs like playing media or tracking GPS position in background might not work while in background even the background mode is active. To fix such issues the plugin provides a method to disable most optimizations done by Android/CrossWalk.
Note: Calling the method led to increased resource and power consumption.
- Fork it
- Create your feature branch ( git checkout -b my-new-feature )
- Commit your changes ( git commit -am ‘Add some feature’ )
- Push to the branch ( git push origin my-new-feature )
- Create new Pull Request
This software is released under the Apache 2.0 License.
Источник
BragitOff.com
READ-LEARN-BRAG!

How to change the background of an App(Activity) using Android Studio? [SOLVED]
I just started Android Development a few days ago and noticed that doing some of the trivial things is also very challenging and non-intuitive in Android Studio.
Take the example of setting a background to an Activity.
If you want your UI(user interface) to be attractive then you have to set an attractive wallpaper or image as the background.
You can change the background in Android Studio in two ways:
- First way gets the job done easily but is not the best way to do it as I will tell later.
All you need to do is add the following code to you activity’s layout xml file:
where background is the name of the image that you want to use as the background and is stored inside the drawable folder of your app.
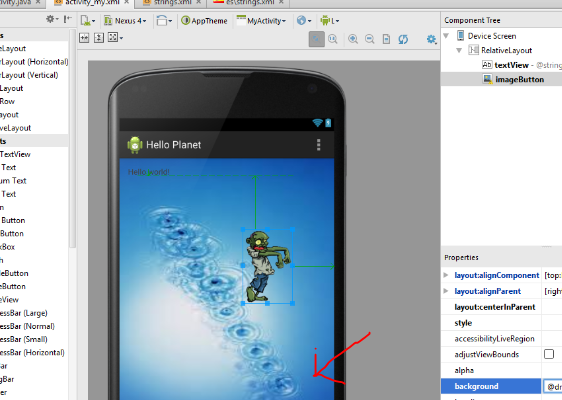
The following images will help you understand the process better:
1. Take the image that you want to use as a background and paste it inside the drawable folder of your app
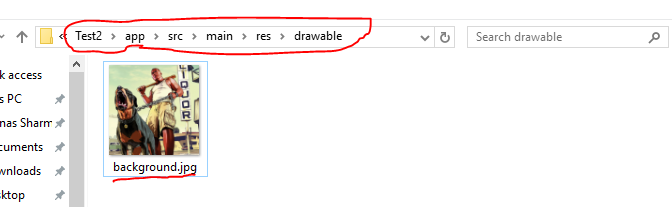 Location of the drawable folder where ‘Test2’ is the name of the app
2. Go to the xml layout file of your activity and the following code to the parent layout:
where background is the name of the image that you want to use as the background and is stored inside the drawable folder of your app. 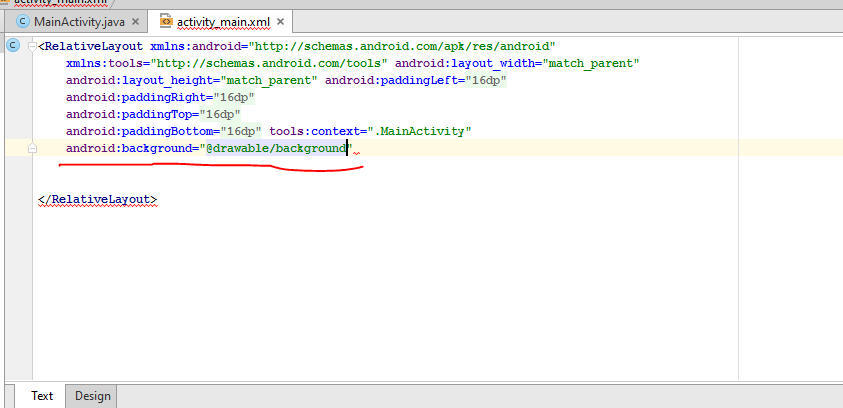
3.Background is changed!! 🙂 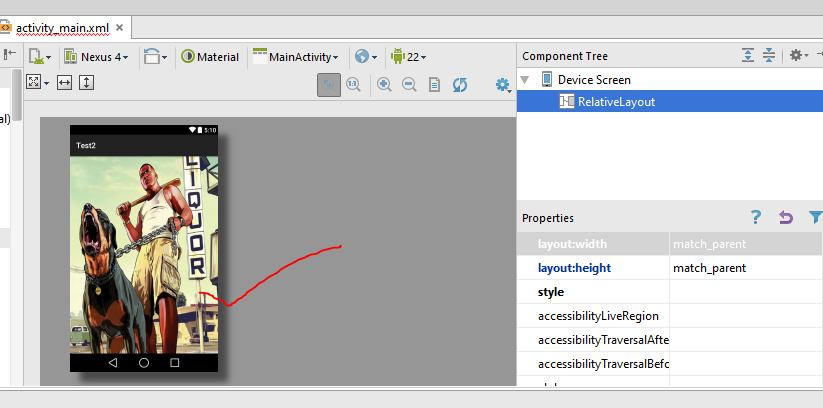
Note(Tip): Location of the xml files of layouts: 
Though the above method seems pretty good, it is pretty flawed.
Therefore, we look at a better way to change backgrounds, which takes us to method #2.
Method #2:
Using ImageView.
A background can be set for an activity by using an ImageView pretty easily.
1. Create an ImageView inside your activity’s layout.2. Set
4. and just set the
where ‘background’ is the name of the image you want to be used as background and is stored inside the drawables folder of your app.So that your ImageView looks like this: 
Now, let’s come back to why I recommend/prefer the second method rather than the first.
The first reason is that if the background image that you are using does not have the same aspect ratio as the device it is being run on, then the image gets stretched or compressed and spoils the look of the background.
However, with ImageView we can use the
which crops the image according to the device’s resolution and maintains the aspect ratio.
Have a look at how the background looks with both the methods:
Using Method #1: ‘android:background=….’
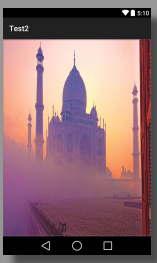 background gets stretched and compressed in portrait mode
 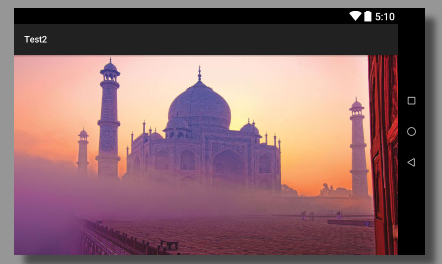 background goes out of aspect ratio and gets a little stretched and compressed to fill the screen
Using Method#2(ImageView):
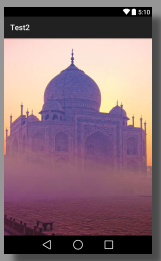 The Background image gets cropped to maintain the aspect ratio in portrait mode
 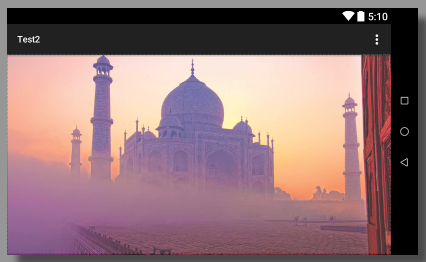 The Background image gets cropped to maintain the aspect ratio in landscape mode
Moreover, another advantage of ImageView is that we can set the alpha value for the background.
Alpha value is a number between 0-1, which decides the transparency/opacity of the background, 1 being fully visible and 0 being fully transparent..
So if you think that your text is the same color as the background and is not very clear then you can set a small value for alpha like 0.28.
That’s it. I hope that helped.
If you have any questions or doubts drop them in the comments section below.
Watch the following video for the video version of the above tutorial.
Источник
Adding a background image to an Android Toolbar in the right way

At first glance it seems pretty easy to add a background drawable to your Android material design Toolbar. However, if your app bar consists of several views (e.g. an additional tab layout) or if you want a transparent status bar, it gets complicated.

The final result
In this tutorial I will show you how to overcome several difficulties in order to implement a layout similar to the following:

Getting started
We start with a new Tabbed Activity with Action Bar Tabs (with ViewPager). Android Studio generates a layout file and the activity which are the perfect start for this project. We just need to make a few optimizations here and there so that it looks like the end result above. The first step is to get rid of the floating action button in your activity_main.xml and in the MainActivity.java code and after that your app should look like this:

With this being your layout file:
Making the status bar transparent
First of all, you need to change your activity theme to have a transparent status bar. Therefore add a theme to your styles.xml:
And set this theme as your activity theme in the AndroidManifest.xml:
This makes almost no difference to the appearance of your app, only the status bar looks a bit darker. However, this is necessary for your background image to be visible below the status bar.
Adding a background image to the AppBarLayout
After that, you need to add your background drawable resource to your layout by adding the following attribute to your AppBarLayout in your activity_main.xml layout file:
You can download the background drawable I am using here as vector graphic which was created in Adobe Illustrator. Unfortunately, the result looks not as good as expected (your layout can differ based on the size of the background image you chose):

There are several issues with your layout:
1. The Toolbar is not transparent so there is a lot of blue (primary color)
2. The image is not visible under our status bar, even though we made it transparent before
3. You can scroll the Toolbar away
4. The app bar layout changed its size based on the background image
To fix the first issue we simply need to remove the android:background=»?attr/colorPrimary» attribute from our Toolbar to make it transparent instead of filled with the primary color.
Furthermore, to fix the second issue we need to add some android:fitsSystemWindows=»true» attributes to our layout since this attribute is not inherited. So add it to your AppBarLayout and to your Toolbar in order to make the AppBarLayout use the space below the status bar and to position your Toolbar just below the status bar. Additionally, remove the android:paddingTop=»@dimen/appbar_padding_top» attribute from your AppBarLayout.
Moreover, to change the third issue remove the app:layout_scrollFlags=»scroll|enterAlways» attribute from your Toolbar.
Last but not least, the Toolbar is way to big because the background drawable is part of the content of the view and the attribute android:layout_height=»wrap_content» is set for your AppBarLayout. Nevertheless, you can’t just change the height of the app bar layout to a fixed value, since the status bar height differs from phone to phone. Luckily, I can tell you the height of a TabLayout which is 48dp high and the height of a Toolbar which is 56dp high. Consequently, our AppBarLayout needs to have the height 48dp+56dp+StatusBarHeight. You need to set this height programmatically in the onCreate method of your MainActivity.java by using the following code:
Just call the method setAppBarHeight in your onCreate method and that’s it!
Finally, your app should now look like this:
Источник


