- Developing Android unit and instrumentation tests — Tutorial
- 1. Introduction into Android testing
- 1.1. Testing Android applications
- 1.2. What to test on Android applications
- 1.3. Tooling support for Android testing
- 1.4. Android project organization for tests
- 2. Android unit testing
- 2.1. Unit testing in Android
- 2.2. Required dependencies in the Gradle build file
- 2.3. Running the unit tests
- 2.3.1. Using Gradle
- 2.3.2. Using Android Studio
- 2.4. Location of test reports
- 2.5. Activating default return values for mocked methods in android.jar
- 3. Exercise: Create unit test
- 3.1. Preparation: Create Android project
- 3.2. Add JUnit dependency
- 3.3. Create test
- 3.4. Run unit tests
- 4. Writing tests to run on the Android device
- 4.1. Instrumentation tests
- 4.2. How the Android system executes tests
- 4.3. Mocking objects in Android
- 4.4. Location of instrumentation tests
- 4.5. Define dependencies and testInstrumentationRunner in the Gradle build file
- 4.6. Using the @RunWith(AndroidJUnit4.class)
- 4.7. Run the tests on Android
- 4.8. Location of test reports
- 4.9. How to replace the application for instrumentation tests
- Instrumentation Class
- Definition
- Remarks
- Constructors
- Fields
- Properties
- Methods
- Explicit Interface Implementations
- Extension Methods
Developing Android unit and instrumentation tests — Tutorial
This tutorial describes how to write unit and instrumentation tests for your Android application. It describes how to execute these tests via Android studio and Gradle. This tutorial assumes that you are familiar with Android programming in general.
1. Introduction into Android testing
1.1. Testing Android applications
Android applications run on a variety of devices. Also the Android framework and the surrounding open source frameworks evolve at a high speed. To ensure that you application works well, it is import to write software tests. This helps you to enhance and maintain the Android application.
Unit testing for Android can be classified into:
Local unit tests — tests which can run on the JVM.
Instrumented unit tests — tests which require the Android system.
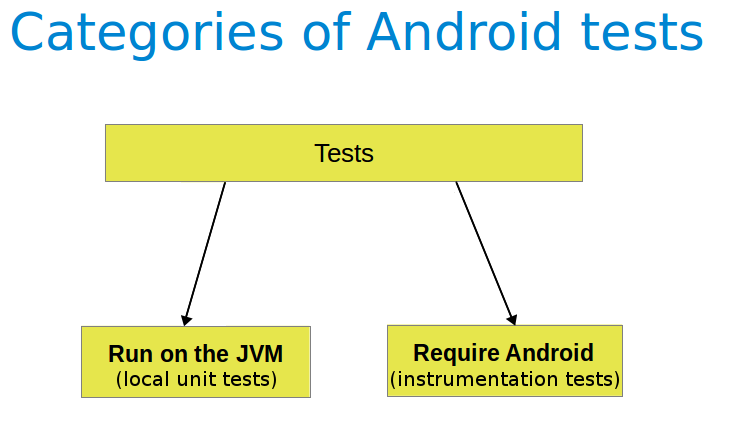
Local unit tests run much faster compared to the time required to deploy and run tests on an Android device. Prefer writing local unit tests and only run tests on Android, if you require a real Android system.
If you write local unit test and have dependencies to Android API, you need to replace them, e.g., via a mocking framework like Mockito.
1.2. What to test on Android applications
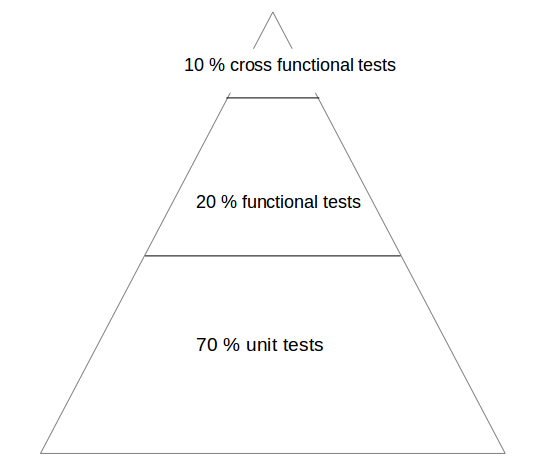
Your test should focus on the business logic of your application. A good rule of thumb is to have the following distribution of tests:
70-80 % unit tests to ensure stability of your code basis
20-30 % functional tests to ensure that the application really works
some cross functional tests if your application integrates intensively with other Application components
You should test your application at least on one device with the lowest possible configuration. In addition you should test on one device with the highest available configuration, e.g., pixel density, screen resolution to ensure that it works fine on these devices.
1.3. Tooling support for Android testing
The Android Testing Support library (ATSL) project from Google provides tooling for Android testing. For example, it ( AndroidJUnitRunner ).
If you run local unit tests, a special version of the android.jar (also known as the Android mockable jar ) is created by the tooling. This modified JAR file is provided to the unit test so that all fields, methods and classes are available. Any call to the Android mockable JAR results, by default, in an exception, but you can configure Android to return default values. See Activating default return values for mocked methods in android.jar for details.
The library provides a JUnit 4-compatible test runner ( AndroidJUnitRunner ), the Espresso test framework and the UI Automator test framework. Espresso test framework can be used to test the User Interface of your application. UI Automator allows to write cross application functional tests.
AndroidJunitRunner provides access to the instrumentation API, via the InstrumentationRegistery .
InstrumentationRegistry.getInstrumentation() , returns the Instrumentation currently running.
InstrumentationRegistry.getContext() , returns the Context of this Instrumentation’s package.
InstrumentationRegistry.getTargetContext() , returns the application Context of the target application.
InstrumentationRegistry.getArguments() , returns a copy of arguments Bundle that was passed to this Instrumentation. This is useful when you want to access the command line arguments passed to the instrumentation for your test.
It also gives access to the life cycle via the ActivityLifecycleMonitorRegistry .
1.4. Android project organization for tests
The following is the default directory structure for your application and test code:
app/src/main/java — for your source code of your main application build
app/src/test/java — for any unit test which can run on the JVM
app/src/androidTest/java — for any test which should run on an Android device
If you follow this conversion, the Android build system runs your tests on the correct target (JVM or Android device).
If you receive the following error message: «error duplicate files in path. Path in archive: LICENSE.txt» you can add the following to your app/gradle.build file.
2. Android unit testing
2.1. Unit testing in Android
A unit test verifies in isolation the functionality of a certain component. For example, assume a button in an Android activity is used to start another activity. A unit test would determine, if the corresponding intent was issued, not if the second activity was started
A unit tests for an Android application can be:
local unit test — which runs on the JVM
Android unit test — which runs on the Android runtime
If they run on the JVM, they are executed against a modified version of the android.jar Android library. In this version all final modifiers have been stripped off. This makes it easier to use mocking libraries, like Mockito.
The local unit tests of an Android project should be located in the app/src/test folder.
2.2. Required dependencies in the Gradle build file
To use JUnit tests for your Android application, you need to add it as dependency to your Gradle build file.
2.3. Running the unit tests
2.3.1. Using Gradle
Run your unit tests with the gradlew test command.
2.3.2. Using Android Studio
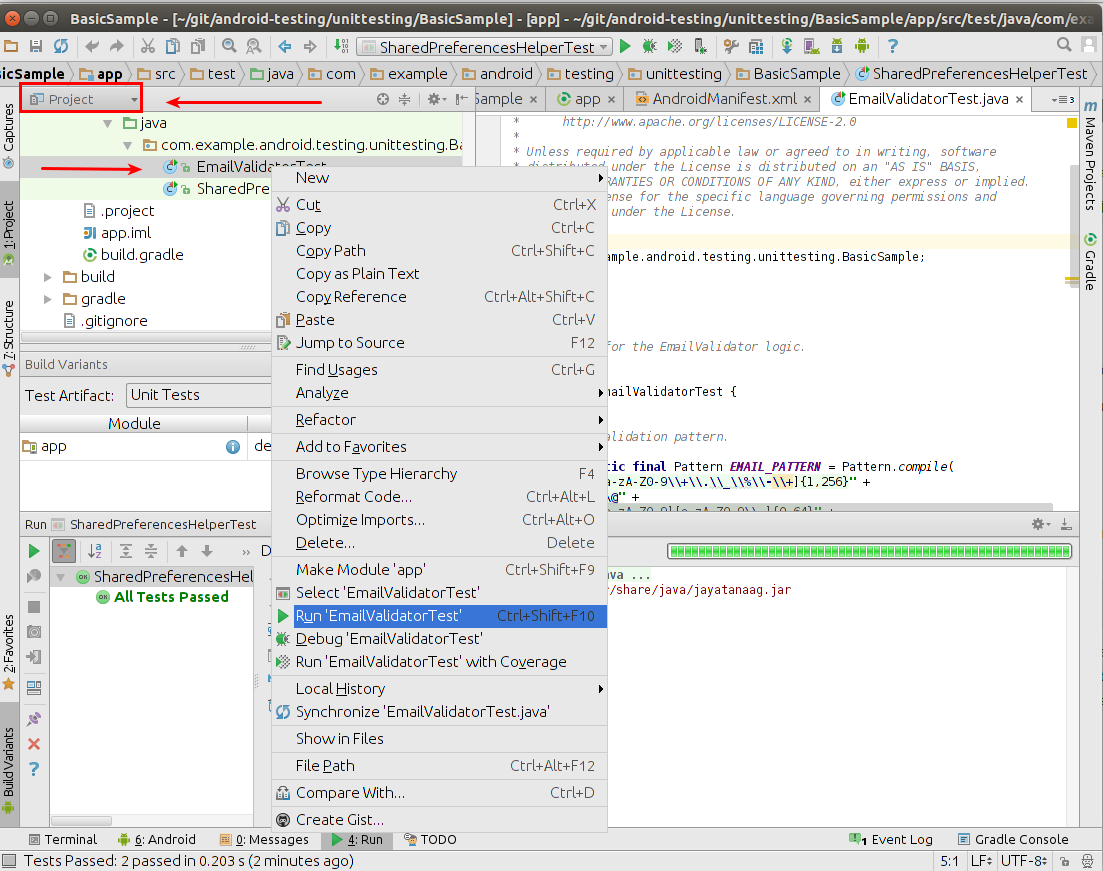
To run a unit test, right-click on your test class in the Project window and select Run.
2.4. Location of test reports
The Test reports are created in the app/build/reports/tests/debug/ directory. The index.html gives an overview and links to the individual test pages.
2.5. Activating default return values for mocked methods in android.jar
By default, all calls to methods in the modified android.jar file throw exceptions. This default should ensure that your unit tests only test your code and do not depend on any particular behavior of the Android platform. If you want to configure a certain behavior, you can use a mocking framework to replace these call.
You can also instruct the Gradle build system to return default values for method calls in the `android.jar`with the following configuration in your Gradle build file.
3. Exercise: Create unit test
In this exercise you learn how to create a simple JUnit4 test for an Android project.
3.1. Preparation: Create Android project
Create the Android project as described in Android temperature converter.
3.2. Add JUnit dependency
Ensure you have the dependency to Junit in your app/build.gradle file.
3.3. Create test
In your app/src/test directory create the following two test methods for the ConverterUtil class.
3.4. Run unit tests
Ensure your unit tests are correctly implemented by running test tests. They should run successfully.
4. Writing tests to run on the Android device
4.1. Instrumentation tests
The Android testing API provides hooks into the Android component and application life cycle. These hooks are called the instrumentation API and allow your tests to control the life cycle and user interaction events.
Under normal circumstances your application cannot control the life cycle events and the user drives the application. For example, if Android creates your activity the onCreate() method is called. Or if the user presses a button your corresponding code is called. Via instrumentation you can control these events via your test code. For example, your instrumentation test can start the activity. Afterwards, it can call the finish() and restart the activity to test if the instance state of the activity is correctly restored.
Instrumented unit tests are unit tests that run on Android devices and emulators instead of running on the Java virtual machine. These tests have access to the real device and its resources and are useful to unit test functionality which cannot be easily mocked by mocking frameworks. An example is a test which validates a Parcelable implementation.
An instrumentation-based test class allows you to send key events (or touch events) to the application under test.
With user interface testing framework like Espresso, the developer rarely has to use the instrumentation API directly.
4.2. How the Android system executes tests
The InstrumentationTestRunner is the base test runner for Android tests. This test runner starts and loads the test methods. Via the instrumentation API it communicates with the Android system. If you start a test for an Android application, the Android system kills any process of the application under test and then loads a new instance. It does not start the application, this is the responsibility of the test methods. The test method controls the life cycle of the components of the application.
The test runner also calls the onCreate() method of the application and activity under test during its initialization.
4.3. Mocking objects in Android
The mocking framework Mockito can also be used for instrumentation tests. This allows you to replace parts of the Android system which are not interesting for the test. The Android framework provided in the past specialized mocking classes but these are not necessary anymore.
4.4. Location of instrumentation tests
As described in Android project organization for tests the unit tests of an Android project should be located in the app/src/androidTest/java folder.
4.5. Define dependencies and testInstrumentationRunner in the Gradle build file
To use JUnit tests for your Android application you need to add the dependency to JUnit to your Gradle build file. You also need to specify android.support.test.runner.AndroidJUnitRunner as testInstrumentationRunner in the build file.
4.6. Using the @RunWith(AndroidJUnit4.class)
It is also recommended annotating the test with the @RunWith(AndroidJUnit4.class) annotation. AndroidJUnit4 extends JUnit4, so if you use pure Junit4 syntax and ActivityTestRule it is not required. But you need it, if you want to run, i.e., Espresso tests with ActivityTestRule and JUnit4.
4.7. Run the tests on Android
Run your local unit tests via Gradle with the gradlew connectedCheck command.
To run your local unit tests via Android Studio, right-click on your test class in the Project window and select Run.
4.8. Location of test reports
The test reports are created in the app/build/reports/androidTests/connected/ directory. The index.html gives an overview and links to the individual test pages.
4.9. How to replace the application for instrumentation tests
You can replace the application class for the instrumentation tests by overriding the AndroidJUnitRunner and its newApplication method.
Источник
Instrumentation Class
Definition
Some information relates to prerelease product that may be substantially modified before it’s released. Microsoft makes no warranties, express or implied, with respect to the information provided here.
Base class for implementing application instrumentation code.
Remarks
Portions of this page are modifications based on work created and shared by the Android Open Source Project and used according to terms described in the Creative Commons 2.5 Attribution License.
Constructors
A constructor used when creating managed representations of JNI objects; called by the runtime.
Fields
If included in the status or final bundle sent to an IInstrumentationWatcher, this key identifies the class that is writing the report.
If included in the status or final bundle sent to an IInstrumentationWatcher, this key identifies a string which can simply be printed to the output stream.
Properties
Returns a bundle with the current results from the allocation counting.
Returns a bundle with the counts for various binder counts for this process.
Returns the runtime class of this Object .
(Inherited from Object)
Returns complete component name of this instrumentation.
Return the Context of this instrumentation’s package.
The handle to the underlying Android instance.
(Inherited from Object)
Check whether this instrumentation was started with profiling enabled.
Return the name of the process this instrumentation is running in.
Return a Context for the target application being instrumented.
This API supports the Mono for Android infrastructure and is not intended to be used directly from your code.
This API supports the Mono for Android infrastructure and is not intended to be used directly from your code.
Gets the UiAutomation instance with no flags set.
Methods
Takes control of the execution of messages on the specified looper until TestLooperManager#release is called.
Add a new ActivityMonitor that will be checked whenever an activity is started.
Add a new ActivityMonitor that will be checked whenever an activity is started.
Add a new ActivityMonitor that will be checked whenever an activity is started.
Report some results in the middle of instrumentation execution.
Perform calling of an activity’s Activity#onCreate method.
Perform calling of an activity’s Activity#onCreate method.
Perform calling of an activity’s Activity#onNewIntent method.
Perform calling of an activity’s Activity#onPause method.
Perform calling of an activity’s Activity#onPictureInPictureRequested method.
Perform calling of an activity’s Activity#onPostCreate method.
Perform calling of an activity’s Activity#onPostCreate method.
Perform calling of an activity’s Activity#onRestart method.
Perform calling of an activity’s Activity#onRestoreInstanceState method.
Perform calling of an activity’s Activity#onRestoreInstanceState method.
Perform calling of an activity’s Activity#onResume method.
Perform calling of an activity’s Activity#onSaveInstanceState method.
Perform calling of an activity’s Activity#onSaveInstanceState method.
Perform calling of an activity’s Activity#onStart method.
Perform calling of an activity’s Activity#onStop method.
Perform calling of an activity’s Activity#onUserLeaveHint method.
Perform calling of the application’s Application#onCreate method.
Test whether an existing ActivityMonitor has been hit.
Creates and returns a copy of this object.
(Inherited from Object)
Indicates whether some other object is «equal to» this one.
(Inherited from Object)
Terminate instrumentation of the application.
Returns a hash code value for the object.
(Inherited from Object)
Gets the UiAutomation instance with no flags set.
Show the context menu for the currently focused view and executes a particular context menu item.
Execute a particular menu item.
Called by the garbage collector on an object when garbage collection determines that there are no more references to the object.
(Inherited from Object)
Perform instantiation of an Activity object.
Perform instantiation of an Activity object.
Perform instantiation of an Activity object.
Perform instantiation of the process’s Application object.
Perform instantiation of the process’s Application object.
Wakes up a single thread that is waiting on this object’s monitor.
(Inherited from Object)
Wakes up all threads that are waiting on this object’s monitor.
(Inherited from Object)
Called when the instrumentation is starting, before any application code has been loaded.
Called when the instrumented application is stopping, after all of the normal application cleanup has occurred.
This is called whenever the system captures an unhandled exception that was thrown by the application.
Method where the instrumentation thread enters execution.
Remove an ActivityMonitor that was previously added with #addMonitor .
Execute a call on the application’s main thread, blocking until it is complete.
Higher-level method for sending both the down and up key events for a particular character key code.
Sends an up and down key event sync to the currently focused window.
Send a key event to the currently focused window/view and wait for it to be processed.
Dispatch a pointer event.
Provide a status report about the application.
Sends the key events corresponding to the text to the app being instrumented.
Dispatch a trackball event.
Sets the Handle property.
(Inherited from Object)
Force the global system in or out of touch mode.
Create and start a new thread in which to run instrumentation.
Start a new activity and wait for it to begin running before returning.
Start a new activity and wait for it to begin running before returning.
This method will start profiling if isProfiling() returns true.
Stops profiling if isProfiling() returns true.
Returns a string representation of the object.
(Inherited from Object)
Causes the current thread to wait until another thread invokes the java.lang.Object#notify() method or the java.lang.Object#notifyAll() method for this object.
(Inherited from Object)
Causes the current thread to wait until another thread invokes the java.lang.Object#notify() method or the java.lang.Object#notifyAll() method for this object.
(Inherited from Object)
Causes the current thread to wait until another thread invokes the java.lang.Object#notify() method or the java.lang.Object#notifyAll() method for this object.
(Inherited from Object)
Schedule a callback for when the application’s main thread goes idle (has no more events to process).
Synchronously wait for the application to be idle.
Wait for an existing ActivityMonitor to be hit.
Wait for an existing ActivityMonitor to be hit till the timeout expires.
Explicit Interface Implementations
| IJavaPeerable.Disposed() | (Inherited from Object) |
| IJavaPeerable.DisposeUnlessReferenced() | (Inherited from Object) |
| IJavaPeerable.Finalized() | (Inherited from Object) |
| IJavaPeerable.JniManagedPeerState | (Inherited from Object) |
| IJavaPeerable.SetJniIdentityHashCode(Int32) | (Inherited from Object) |
| IJavaPeerable.SetJniManagedPeerState(JniManagedPeerStates) | (Inherited from Object) |
| IJavaPeerable.SetPeerReference(JniObjectReference) | (Inherited from Object) |
Extension Methods
Performs an Android runtime-checked type conversion.
Источник


