- Installing and Running the Emulator in AI2
- Step 1. Install the App Inventor Setup Software
- Step 2. Launch aiStarter (Windows & GNU/Linux only)
- Step 3. Open an App Inventor project and connect it to the emulator
- With MIT App Inventor, anyone can build apps with global impact
- Get Started
- Tutorials
- Teach
- Support
- Contribute
- Collaborate
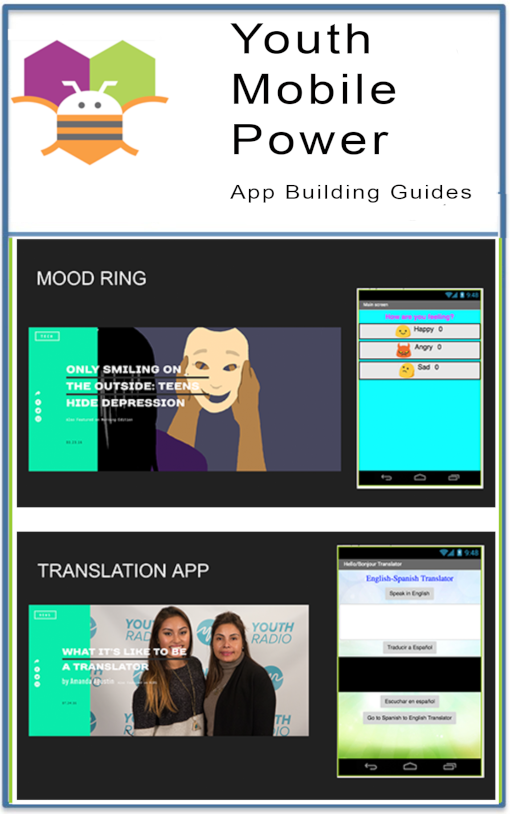
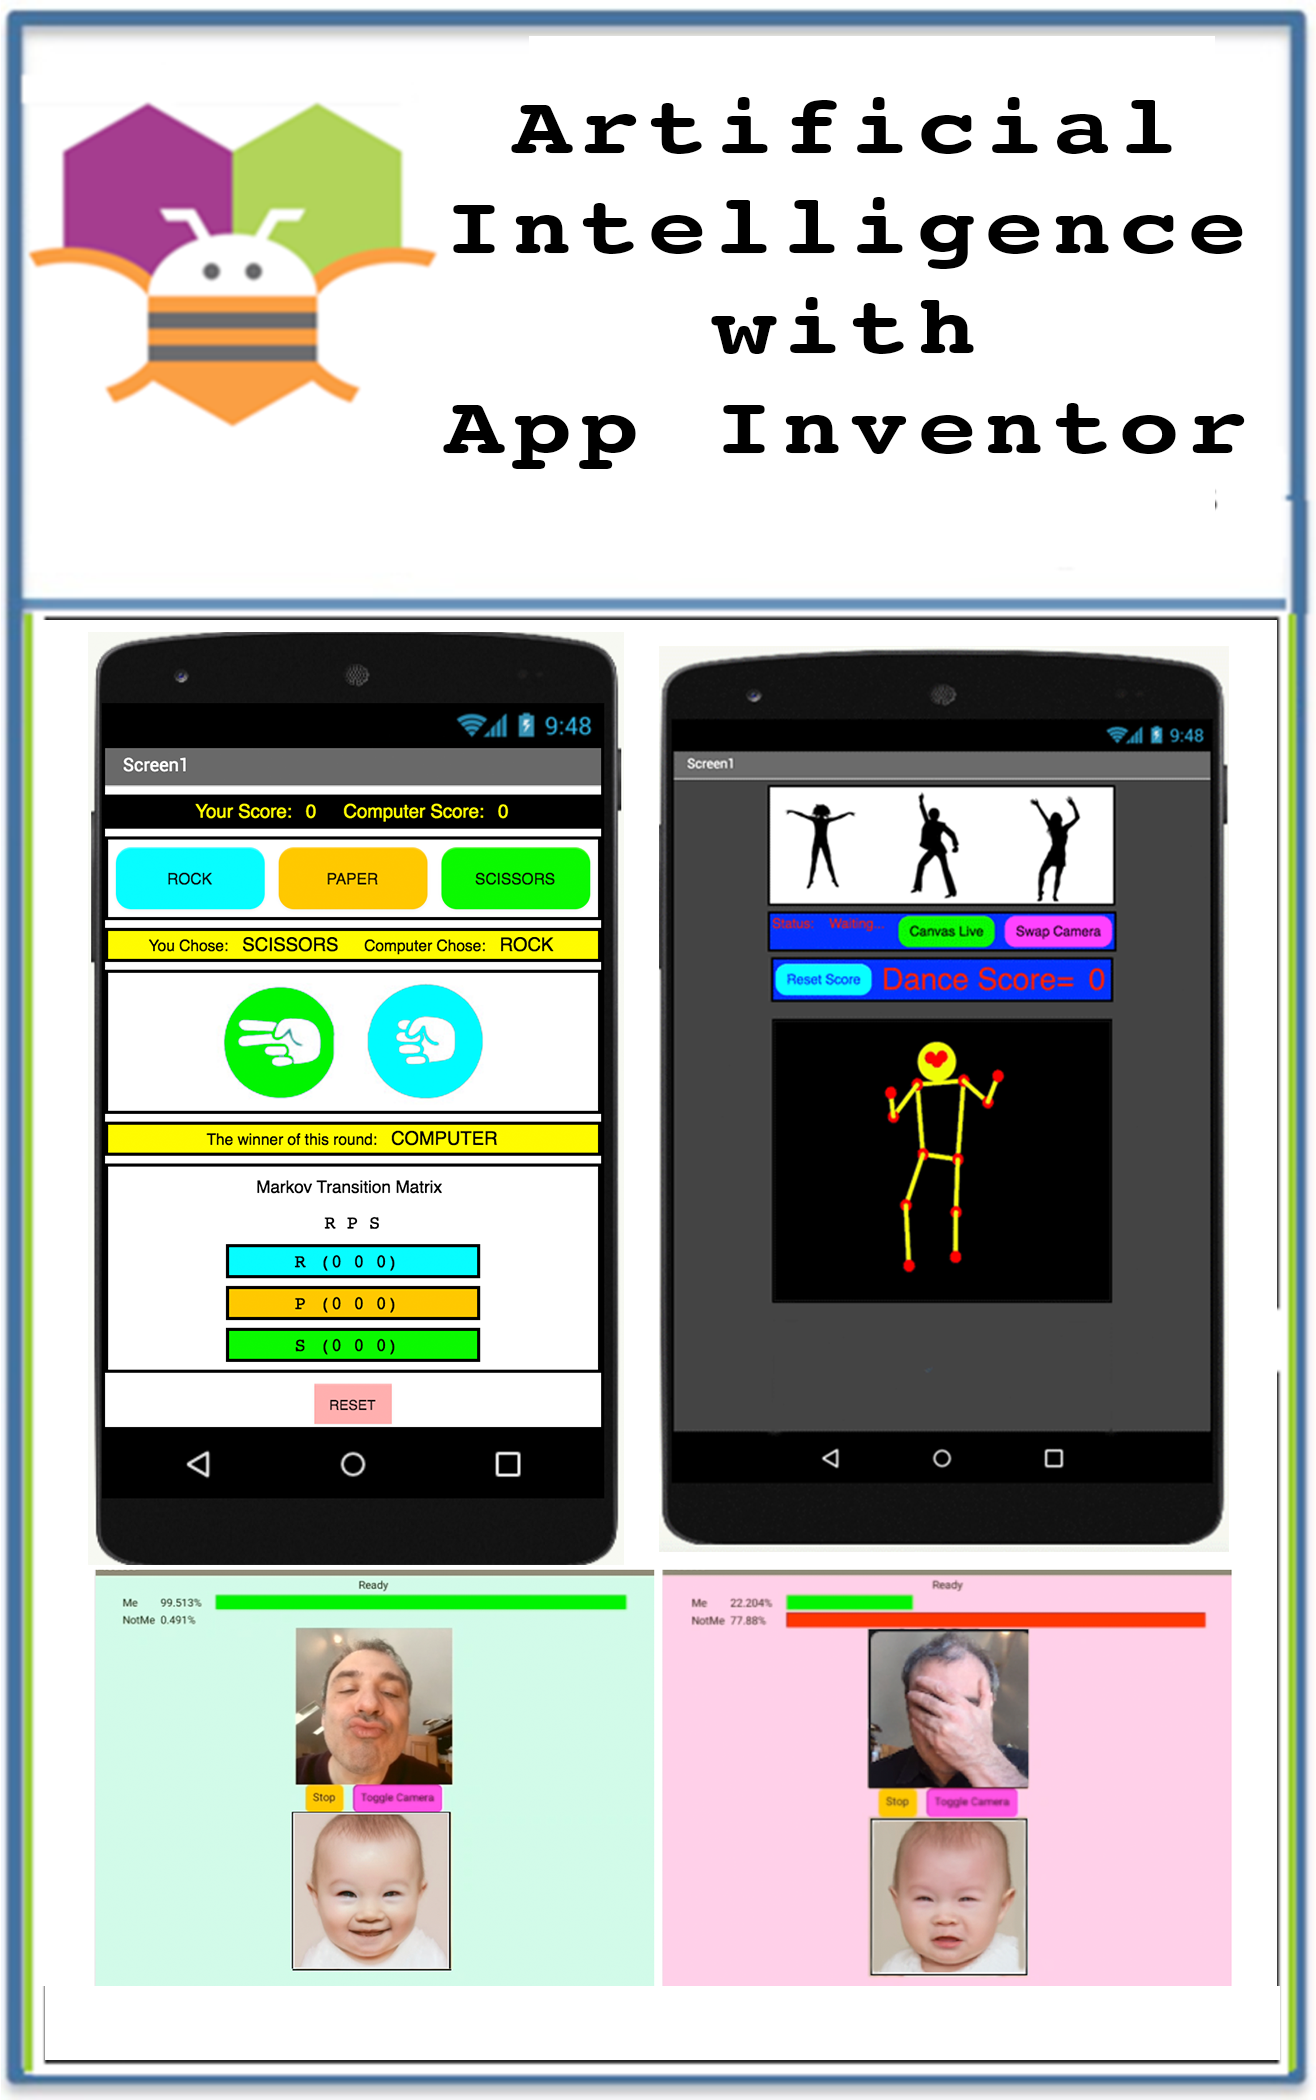
- Artificial Intelligence with App Inventor New Curriculum and Teacher Resources
- News & Events
- Announcing Become An App Inventor
- App Inventor Collaborator CoolThink@JC Awarded ISTE Seal of Alignment
- Appathon 2021 at MIT News
- Chromium 94 Issues
- Tutorials for MIT App Inventor
- There are many more tutorials available below. Scroll down to browse the list.
- Android, Where’s My Car?
- CloudDB Chat App
- Colored Dots
- Exploring with the Location Sensor
- Fake Voices Tutorial
- Firebase Authentication in App Inventor Using Javascript
- Get the Gold
- Hello Codi!
- Hello Purr
- LEGO EV3 Tilt-to-Drive Tutorial
- LEGO EV3 Pet Robot Tutorial
- LEGO EV3 Color Search
- Lego EV3 Pet Robot
- Magic 8 Ball
- MakeQuiz and TakeQuiz for App Inventor 2
- Map It: Displaying Locations on a Google Map
- Mini Golf: Fling, TouchUp, TouchDown Gestures for App Inventor 2
- Mole Mash
- Mole Mash V2 with Sprite Layering
- NFC Cup Game for AI2
- No Texting While Driving
- Oh My Spikes
- Paint Pot Extended with Camera
- PaintPot (Part 1)
- PaintPot (Part 2)
- Photo Booth App
- PicCall
- QuizMe for App Inventor 2
- Sharing Component: send files and text with the app of your choice
- Snow Globe Tutorial
- Space Invaders
- State Geography Quiz with Map Component
- VideoWall for App Inventor 2
- WebView Javascript Processor for App Inventor
- App Inventor — создание Android-приложений для каждого: Урок 1
- Приступаем к работе
- Обзор процесса разработки
- Окно конструктора
- Создаем метку
- Connect your Phone or Tablet over WiFi
- Step 1: Download and install the MIT AI2 Companion App on your device.
- Android APK File
- Step 2: Connect both your computer and your device to the SAME WiFi Network
- Step 3: Open an App Inventor project and connect it to your device
- Troubleshooting:
Installing and Running the Emulator in AI2
If you do not have an Android phone or tablet, you can still build apps with App Inventor. App Inventor provides an Android emulator, which works just like an Android but appears on your computer screen. So you can test your apps on an emulator and still distribute the app to others, even through the Play Store. Some schools and after-school programs develop primarily on emulators and provide a few Androids for final testing.
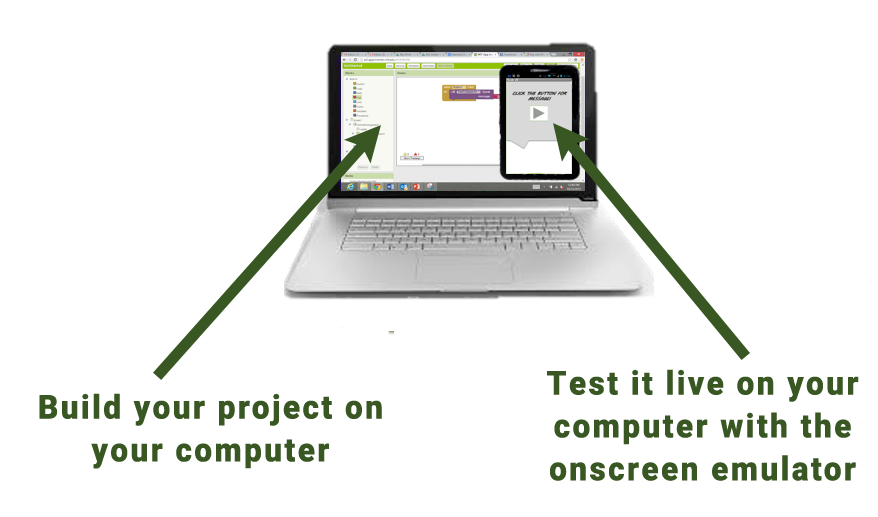
To use the emulator, you will first need to first install some software on your computer (this is not required for the wifi solution). Follow the instructions below for your operating system, then come back to this page to move on to starting the emulator
Important: If you are updating a previous installation of the App Inventor software, see How to update the App Inventor Software. You can check whether your computer is running the latest version of the software by visiting the page App Inventor 2 Connection Test.
Step 1. Install the App Inventor Setup Software
Step 2. Launch aiStarter (Windows & GNU/Linux only)
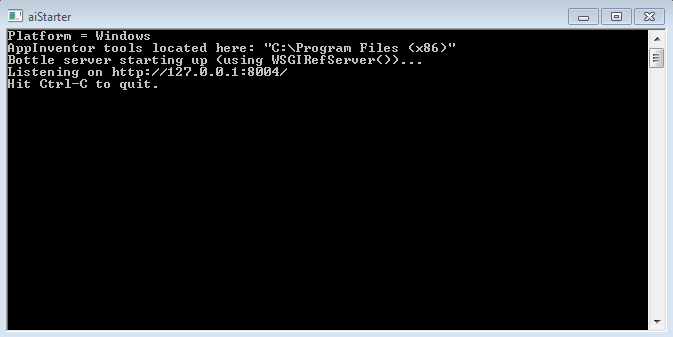
Using the emulator or the USB cable requires the use of a program named aiStarter. This program is the helper that permits the browser to communicate with the emulator or USB cable. The aiStarter program was installed when you installed the App Inventor Setup package. You do not need aiStarter if you are using only the wireless companion.
- On a Mac, aiStarter will start automatically when you log in to your account and it will run invisibly in the background.
On Windows, there will be shortcuts to aiStarter from your Desktop, from the Start menu, from All Programs and from Startup Folder. If you want to use the emulator with App Inventor, you will need to manually launch aiStarter on your computer when you log in. You can start aiStarter this by clicking the icon on your desktop or using the entry in your start menu.
To launch aiStarter on Windows, double click on the icon (shown above). You’ll know that you’ve successfully launched aiStarter when you see a window like the following:
For Help with aiStarter, see Connection Help.
Step 3. Open an App Inventor project and connect it to the emulator
First, go to App Inventor and open a project (or create a new one — use Project > Start New Project and give your project a name).
Then, from App Inventor’s menu (on the App Inventor cloud-based software at ai2.appinventor.mit.edu), go to the Connect Menu and click the Emulator option.

You’ll get a notice saying that the emulator is connecting. Starting the emulator can take a couple of minutes. You may see update screens like the following as the emulator starts up:
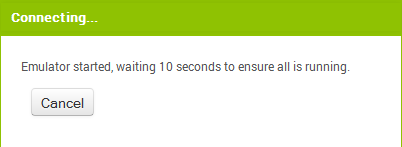
The emulator will initially appear with an empty black screen (#1). Wait until the emulator is ready, with a colored screen background (#2). Even after the background appears, you should wait until the emulated phone has finished preparing its SD card: there will be a notice at the top of the phone screen while the card is being prepared. When connected, the emulator will launch and show the app you have open in App Inventor.
#1 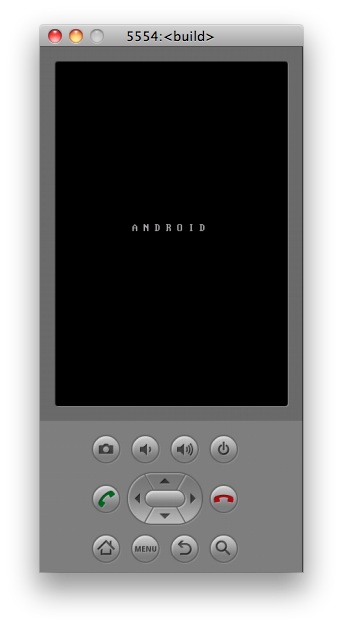 #2
#2 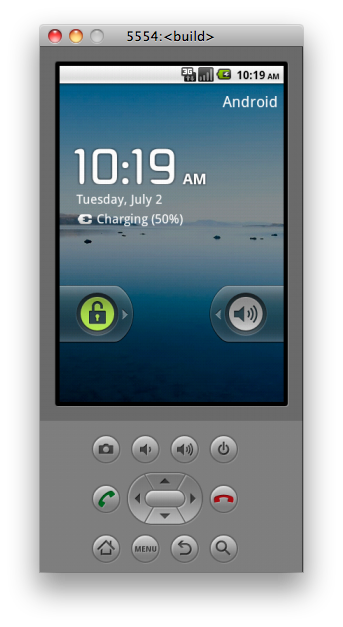 #3
#3 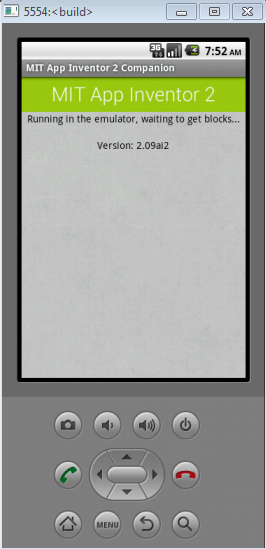 #4
#4 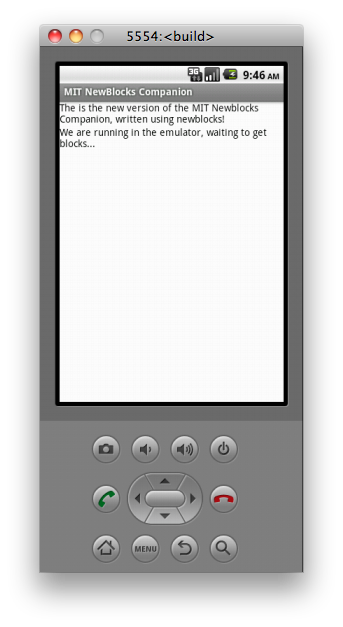
Источник
With MIT App Inventor, anyone can build apps with global impact

Join the MIT App Inventor Appathon for Good 2021.
Click here to learn more.
Get Started
Follow these simple directions to build your first app!
Tutorials
Step-by-step guides show you how to create even more apps.
Teach
Find out about curriculum and resources for teachers.
Support
Get answers to your questions in our community.
Contribute
Contribute to the App Inventor system or educational resources.
Collaborate
Learn about research and affiliations with App Inventor.
Artificial Intelligence with
App Inventor
New Curriculum and Teacher Resources
Made in partnership with YR Media.
News & Events
Announcing Become An App Inventor
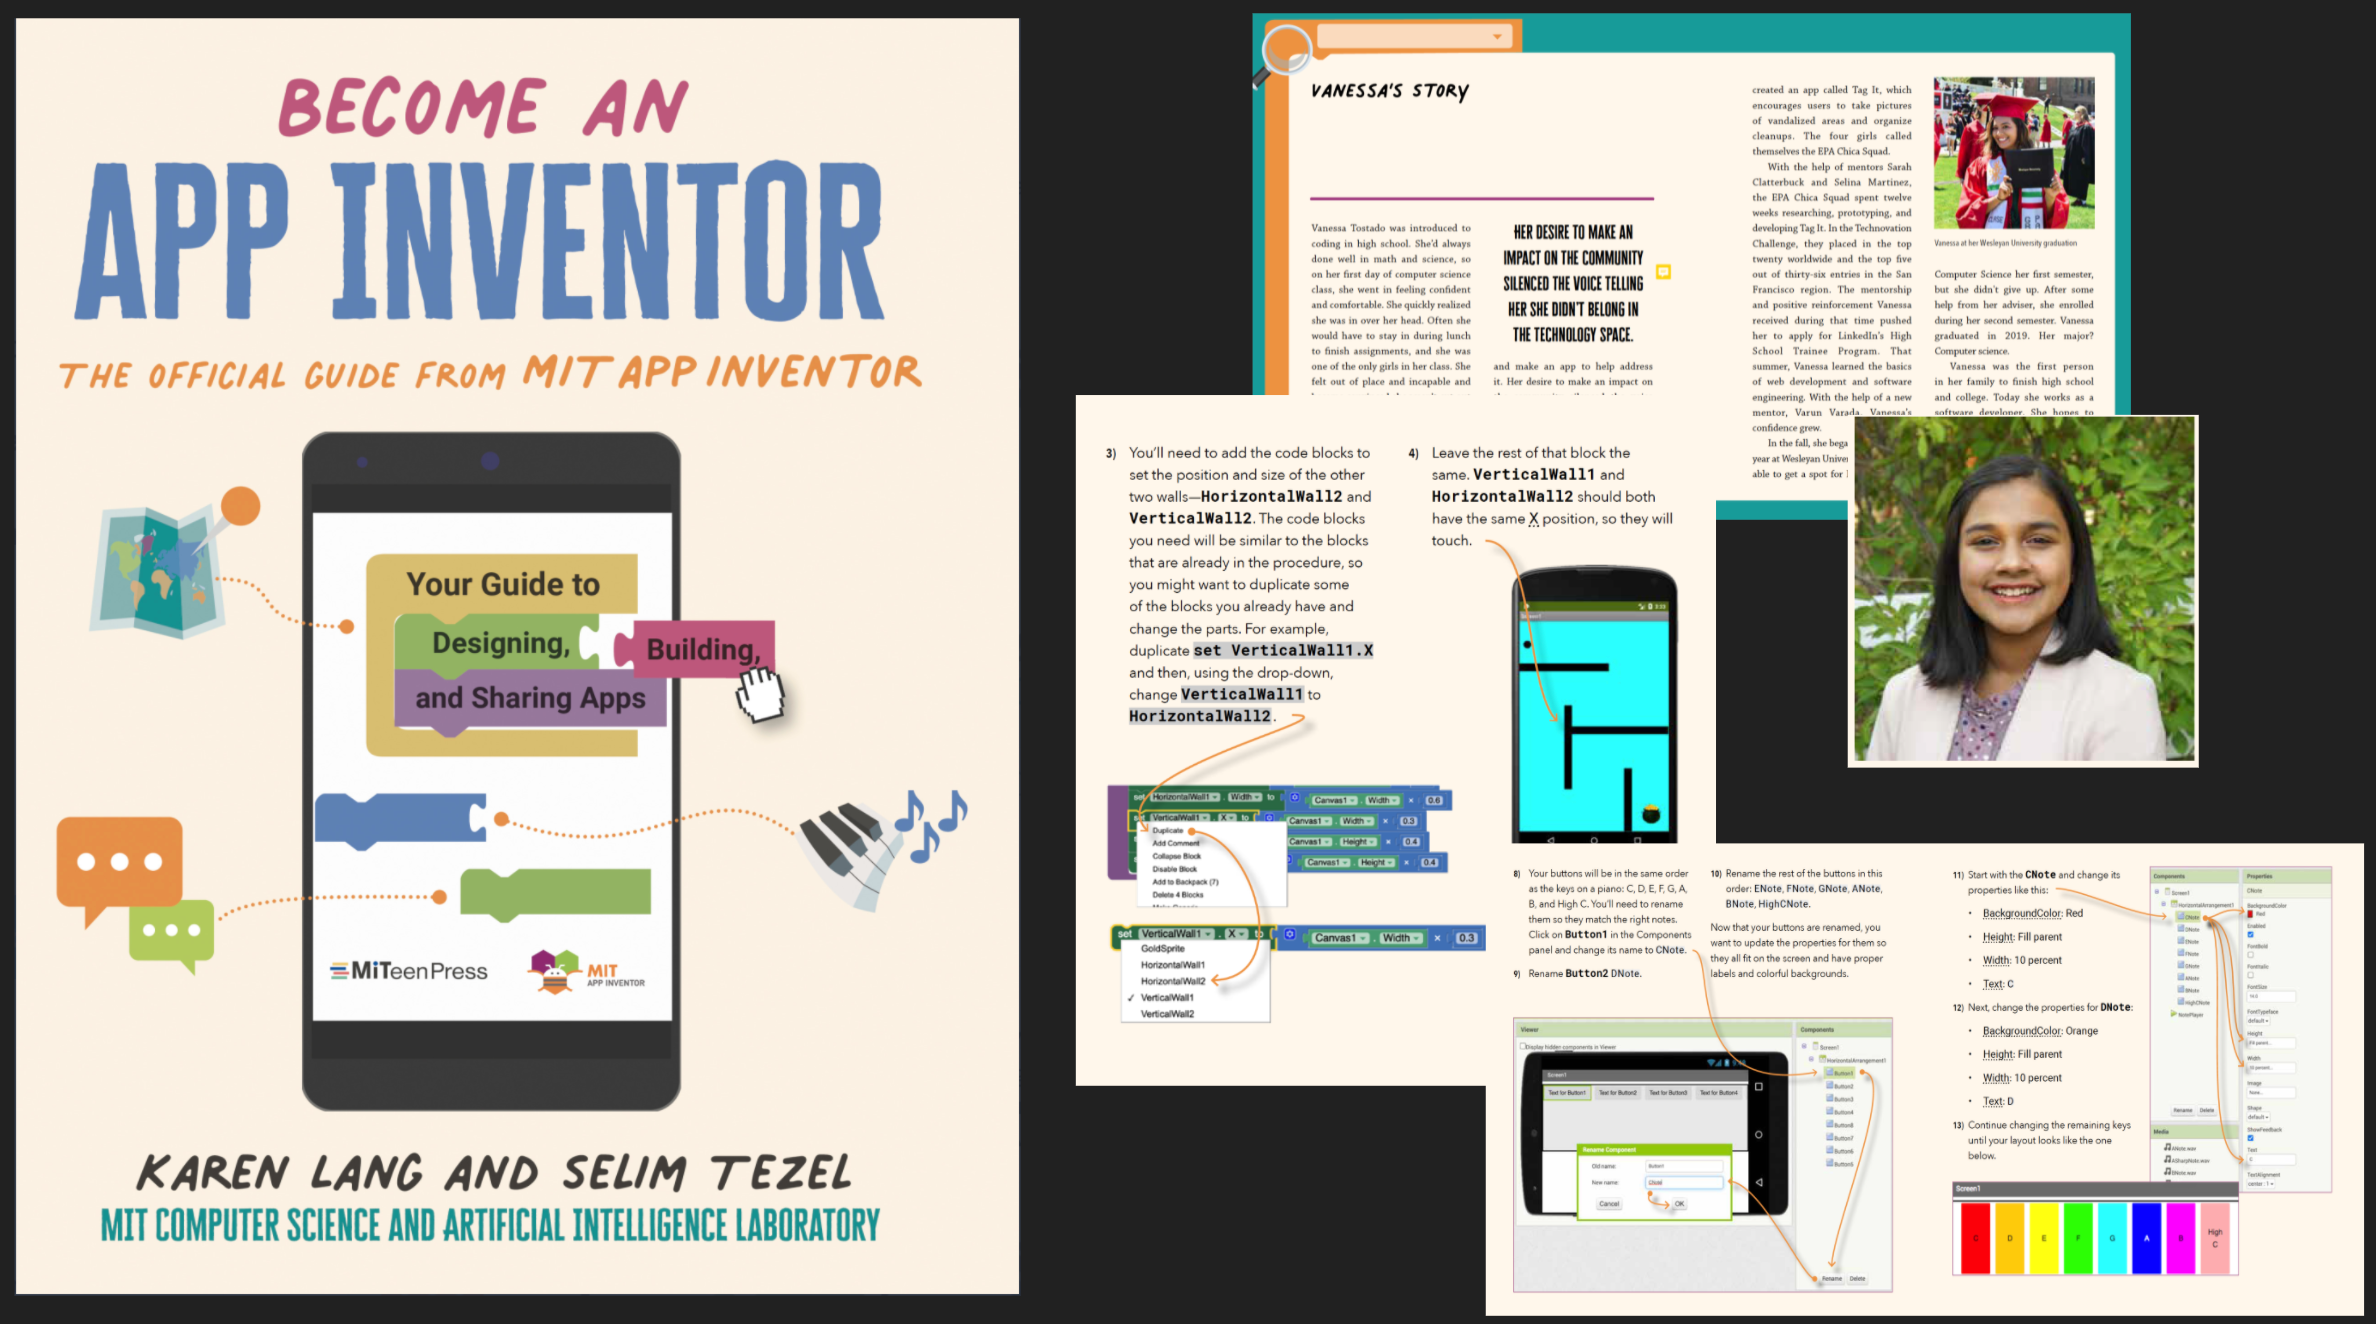
The MIT App Inventor team is delighted to announce the publication of Become an App Inventor: The Official Guide from MIT App Inventor, by Karen Lang and Selim Tezel.
(Release date February 8, 2022)
App Inventor Collaborator CoolThink@JC Awarded ISTE Seal of Alignment

MIT App Inventor collaborator CoolThink@JC, a Computational Thinking Education Programme targetting primary school students, receives the ISTE Seal of Alignment!
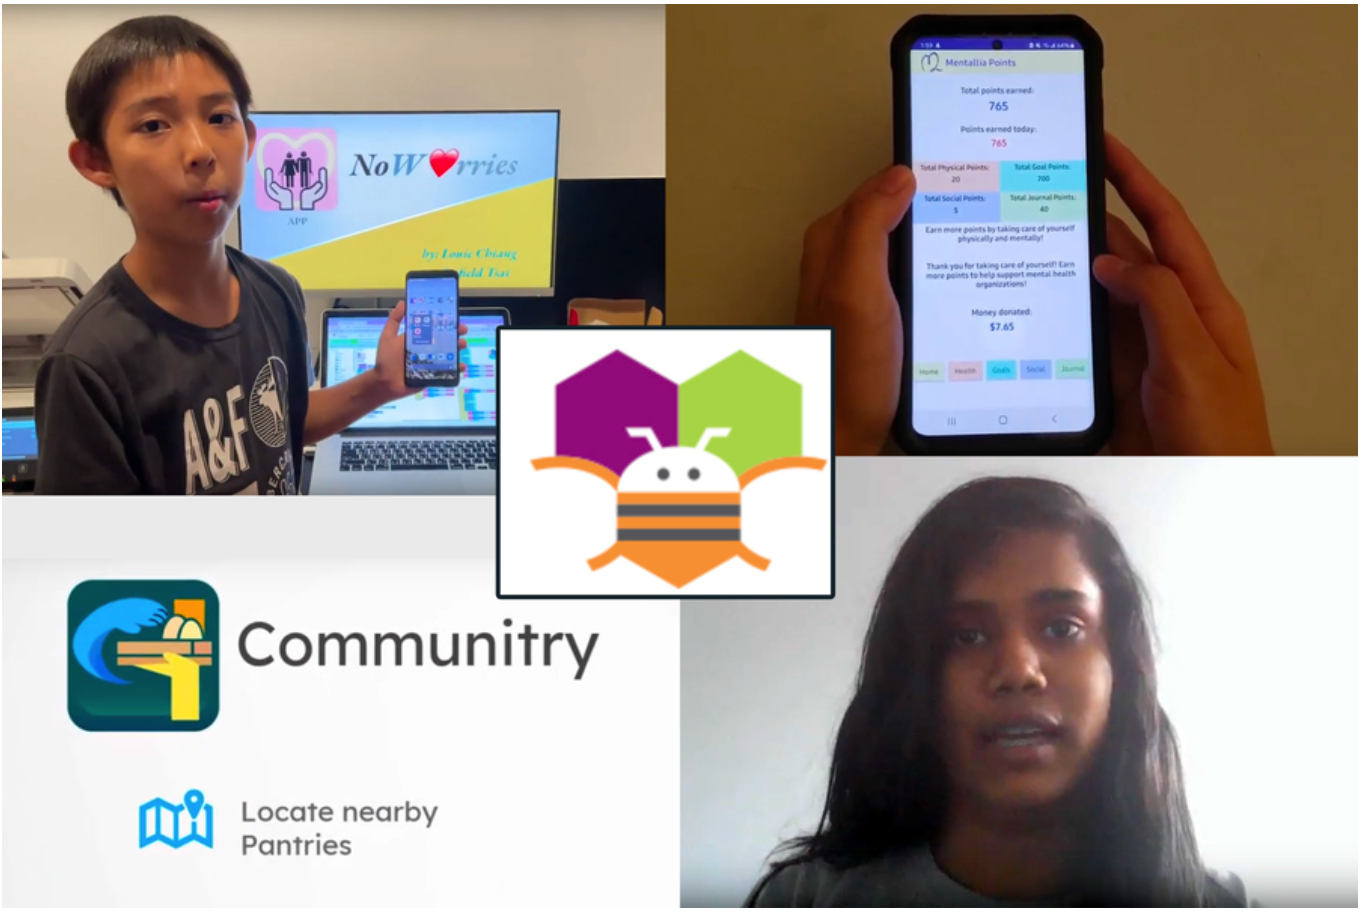
Appathon 2021 at MIT News
Budding coders create apps aimed at real-world impact
MIT App Inventor’s “Appathon” joins programmers from around the world to imagine a better future and start building it one app at a time.
Chromium 94 Issues
Chromium 94, the core browser functionality for Google Chrome and Microsoft Edge, among others, recently introduced a new feature to protect local network devices from malicious websites. This change unfortunately affects many App Inventor users. If you use Chrome or Edge and you live test your App Inventor project using.
Источник
Tutorials for MIT App Inventor
There are many more tutorials available below. Scroll down to browse the list.
Android, Where’s My Car?
Component(s): Activity Starter
Difficulty: advanced
CloudDB Chat App
Component(s): CloudDB, ListView
Difficulty: intermediate
Colored Dots
Component(s): Drawing Canvas
Difficulty: advanced
Exploring with the Location Sensor
Component(s): Location Sensor
Difficulty: advanced
Fake Voices Tutorial
Component(s): Text-To-Speech, Speech Recognizer
Difficulty: basic
Firebase Authentication in App Inventor Using Javascript
Component(s): WebViewer
Difficulty: advanced
Get the Gold
Component(s): Sprites
Difficulty: intermediate
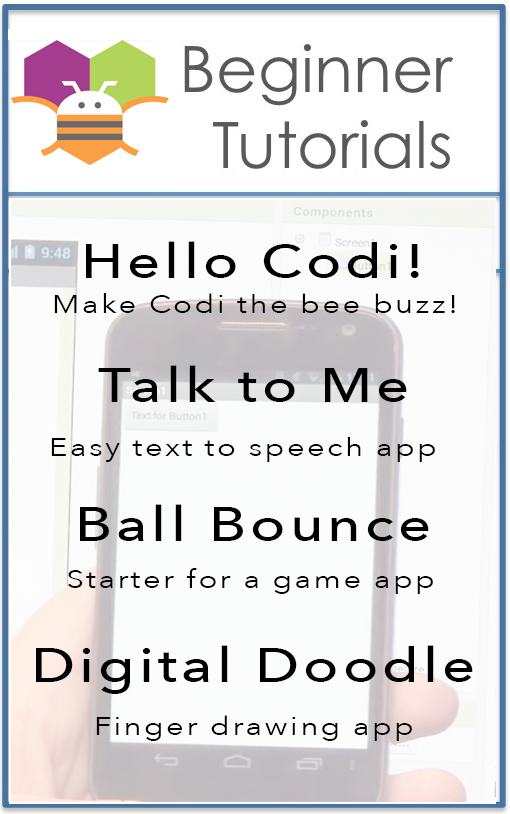
Hello Codi!
Component(s): Unknown
Difficulty: basic
Hello Purr
Component(s): Button, Sound
Difficulty: basic
LEGO EV3 Tilt-to-Drive Tutorial
Component(s): LEGOВ® EV3
Difficulty: intermediate
LEGO EV3 Pet Robot Tutorial
Component(s): LEGOВ® EV3
Difficulty: intermediate
LEGO EV3 Color Search
Component(s): LEGOВ® EV3
Difficulty: intermediate
Lego EV3 Pet Robot
Component(s): LEGOВ® EV3
Difficulty: intermediate
Magic 8 Ball
Component(s): Game
Difficulty: basic
MakeQuiz and TakeQuiz for App Inventor 2
Component(s): Unknown
Difficulty: intermediate
Map It: Displaying Locations on a Google Map
Component(s): ListPicker
Difficulty: advanced
Mini Golf: Fling, TouchUp, TouchDown Gestures for App Inventor 2
Component(s): Sprites
Difficulty: intermediate
Mole Mash
Component(s): Sprites
Difficulty: basic
Mole Mash V2 with Sprite Layering
Component(s): ImageSprites
Difficulty: intermediate
NFC Cup Game for AI2
Component(s): NFC (Near Field Comm.)
Difficulty: advanced
No Texting While Driving
Component(s): Texting, TextToSpeech
Difficulty: intermediate
Oh My Spikes
Component(s): Game
Difficulty: advanced
Paint Pot Extended with Camera
Component(s): Drawing Canvas
Difficulty: intermediate
PaintPot (Part 1)
Component(s): Drawing Canvas
Difficulty: basic
PaintPot (Part 2)
Component(s): Drawing Canvas
Difficulty: basic
Photo Booth App
Component(s): Camera
Difficulty: intermediate
PicCall
Component(s): Unknown
Difficulty: basic
QuizMe for App Inventor 2
Component(s): Unknown
Difficulty: intermediate
Sharing Component: send files and text with the app of your choice
Component(s): File Sharing
Difficulty: intermediate
Snow Globe Tutorial
Component(s): Any Component
Difficulty: intermediate
Space Invaders
Component(s): Sprites
Difficulty: intermediate
State Geography Quiz with Map Component
Component(s): Map
Difficulty: intermediate
VideoWall for App Inventor 2
Component(s): Video
Difficulty: intermediate
WebView Javascript Processor for App Inventor
Component(s): WebViewer
Difficulty: advanced
Источник
App Inventor — создание Android-приложений для каждого: Урок 1
Для начала я расскажу вам немного про App Inventor, а потом мы напишем первое приложение, где будем кормить кота.
App Inventor может использовать человек, не владеющий языками программирования. По принципу действия мне он напоминает WYSIWYG-редактор. Пока регистрация доступна только с разрешения Google. App Inventor освобождает вас от написания кода, вместо этого вы используете подобие блок-схем.
Приступаем к работе
Вначале настройте ваш компьютер и телефон для работы с App Inventor. Затем создайте новый проект, назовите его «HelloPurr», откроете редактор блоков и присоедините телефон. Затем перейдите обратно в окно браузера.
Сейчас в вашем браузере должен быть открыт appinventor.googlelabs.com, а на вашем телефоне должен быть запущен App Inventor Phone Application. Браузер должен быть открыт на странице конструктора, которая выглядит так:

Обзор процесса разработки
В App Inventor приложения строятся объединением стандартных компонентов. Компоненты являются основным элементом разработки Android-приложений, как ингредиенты в рецепте. Некоторые компоненты очень просты, например Label(метка), который просто показывает текст на экране, или Button, который реализует кнопку. Другие же компоненты более сложны: Canvas, в котором можино располагать изображения или анимацию; accelerometer (motion) sensor, который работает как контроллер от Wii, и определяет когда вы трясете или переворачиваете телефон; компоненты, отправляющие сообщения, проигрывающие видео, получающие данные с сайтов, и много других.
Окно конструктора
Посмотрев на окно конструктора вы увидите, что оно состоит из нескольких областей:
- В центре — белая область называемая Viewer(просмотрщик). Это место где вы работаете с компонентами. Эта область показывает как ваше приложение будет выглядеть на вашем телефоне.
- Слева находится Palette(палитра), где показаны доступные компоненты. Palette разделена на секции.
- Справа от Viewer — список компонентов, где показываются используемые компоненты.
- Под компонентами — Media, где показаны используемые картинки и аудио.
- Еще правее — Настройки компонентов: цвет, размер текста, шрифт, и прочее.
Вам понадобится изображение котенка и звук «Мяу».
Создаем метку
- Перейдите в палитру и нажмите на Label, и перетащите его в окно просмотрщика. Далее введите текст метки.
- Посмотрите в окно настроек, там показаны настройки метки. В параметре «Text» вы можете указать текст метки, напишите там «Pet the Kitty» и нажмите Enter. Текст изменится как в окне просмотрщика, так и на телефоне.
- Измените BackgroundColor метки, который сейчас не задан. Также можете изменить цвет текста в параметре TextColor, в конце измените FontSize на 20.
Источник
Connect your Phone or Tablet over WiFi
You can use App Inventor without downloading anything to your computer! You’ll develop apps on our website: ai2.appinventor.mit.edu. To do live testing on your smartphone or tablet device, just install the MIT App Inventor Companion app on your phone, tablet, or supported Chromebooks. Once the Companion is installed, you can open projects in App Inventor on the web, open the companion on your device, and you can test your apps as you build them:
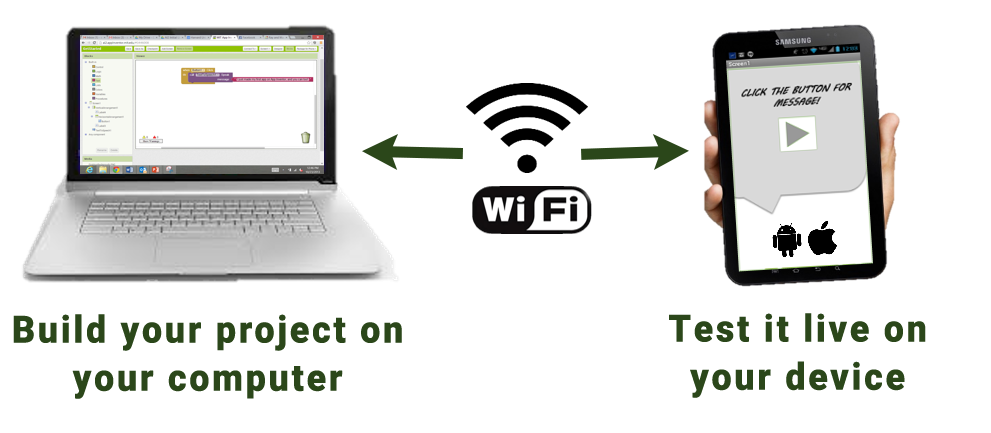
The following steps will walk you through the process.
Step 1: Download and install the MIT AI2 Companion App on your device.
Open you the Apple App Store or Google Play Store on your device, or use the buttons below to open the corresponding store page. If you are on Android but can’t use the Play Store, you can also scan the QR code below to download the Companion app directly to your phone.

![]()
Android APK File
Manual updates required

Scan this QR code (or click this link) to download the Android app directly
After downloading, step though the the instructions to install the Companion app on your device. You need to install the MIT AI2 Companion only once, and then leave it on your phone or tablet for whenever you use App Inventor.
Note 1: There are some differences between the iOS and Android versions. Please review this page for more details.
Note 2: If you are unable to use the QR code, you can still install MIT AI2 Companion on your phone or tablet. Use the Web browser on your device to go to the Google Play Store; look for MIT AI2 Companion in the store. Once you find Companion, click the INSTALL button for the Companion app.
Note 3: If you choose not to go through the Play store and instead load the app directly (aka “side load”), you will need to enable an option in your device’s settings to allow installation of apps from “unknown sources”. To find this setting on versions of Android prior to 4.0, go to “Settings > Applications” and then check the box next to “Unknown Sources”. For devices running Android 4.0 or above, go to “Settings > Security” or “Settings > Security & Screen Lock” and then check the box next to “Unknown Sources” and confirm your choice.
Step 2: Connect both your computer and your device to the SAME WiFi Network
App Inventor will automatically show you the app you are building, but only if your computer (running App Inventor) and your device (running the Companion) are connected to the same WiFi Network. See a more detailed explanation of this here.
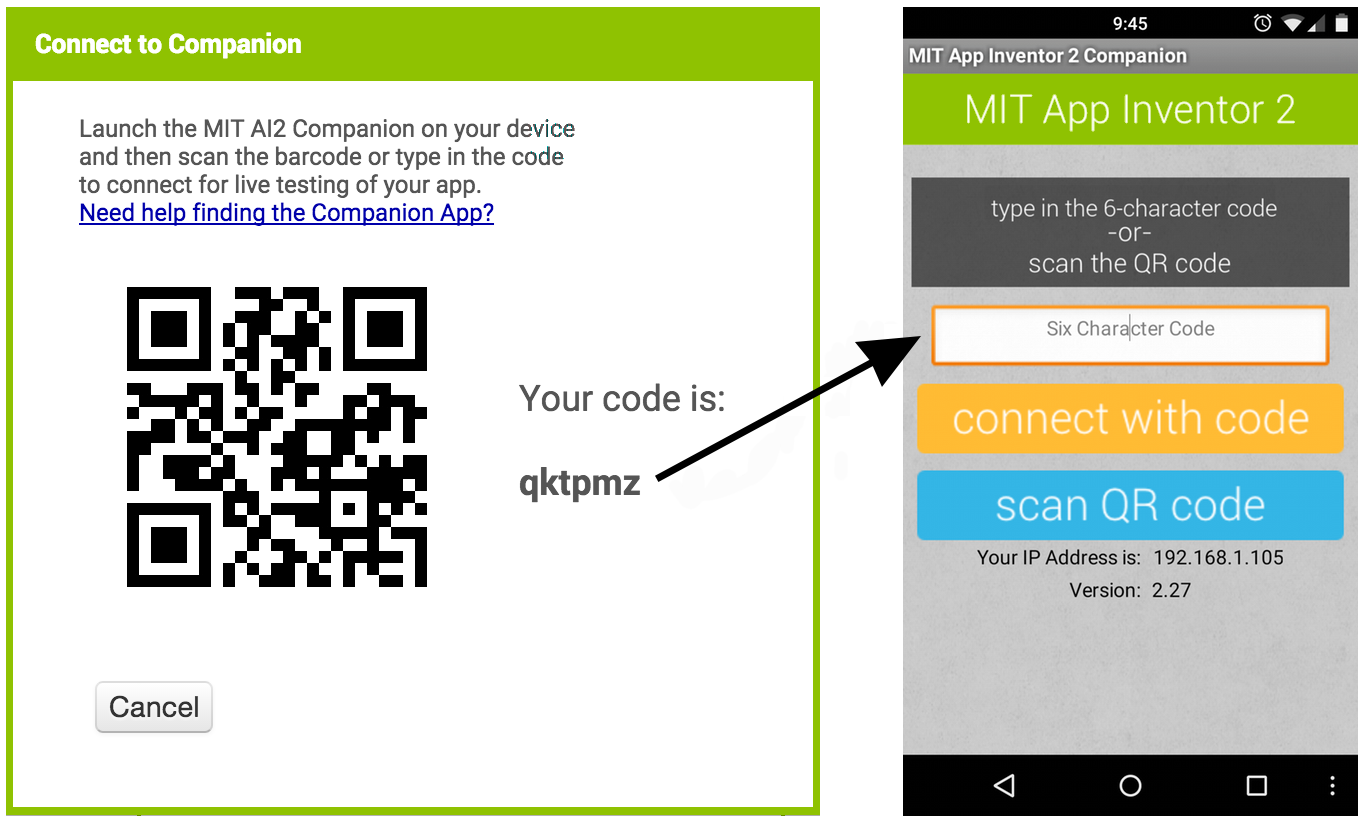
Step 3: Open an App Inventor project and connect it to your device
Go to App Inventor and open a project (or create a new one – use Project > Start New Project and give your project a name).
Then Choose “Connect” and “AI Companion” from the top menu in the AI2 browser:

A dialog with a QR code will appear on your PC screen. On your device, launch the MIT App Companion app just as you would do any app. Then click the “Scan QR code” button on the Companion, and scan the code in the App Inventor window:
Within a few seconds, you should see the app you are building on your device. It will update as you make changes to your design and blocks, a feature called “live testing”.
If you have trouble scanning the QR code or your device does not have a scanner, type the code shown on the computer into the Companion’s text area on your device exactly as shown. The code is directly below where the screen on your PC shows “Your code is” and consists of six characters. Type the six characters and choose the orange “Connect with code”. Do not type an Enter or carriage return: type just the six characters followed by pressing the orange button.
Troubleshooting:
If your app does not appear on your device, the most likely problems are:
- You may have an outdated version of the App Inventor Companion App. Download the latest Companion App for App Inventor 2 from above.
- Your device may not be connected to wifi. Make sure you see an IP address at the bottom of the AI Companion App screen on your phone or tablet.
- Your device may not be connected to the same wifi network as your computer. Make sure both devices are connected to the same wifi network name.
- Your school or organization may have network protocols in place such that the wifi connection is not allowed. If this is the case, you can still use App Inventor with the emulator or you can use a USB cable to connect your device. Go back back the main setup page for these options.
Источник


