- Layout интерфейса приложения Android
- Привязка компонента в ConstraintLayout
- Как добавить привязки?
- «Привязка» компонентов между собой
- Удаление привязки
- Исходный текст activity_main.xml
- Шаблон LinearLayout
- Android SDK Tools: Layout Optimization
- Step 0: Getting Started
- Running layoutopt
- Examining layoutopt Results
- Useless Layout
- Root Can Be Replaced
- Too Many Views
- Too Many Levels
- Conclusion
Layout интерфейса приложения Android
В приложении Android контейнер компонентов имеет тип ViewGroup. Существует несколько разновидностей классов, наследующих свойства ViewGroup и определяющих структуру расположения компонентов в интерфейсе : LinearLayout, RelativeLayout, FrameLayout, TableLayout, ConstraintLayout и т.д. Отличия этих классов связаны с упорядочиванием компонентов :
| • ConstraintLayout | позволяет привязывать компонент к границам экрана или к другим компонентам. |
| • LinearLayout | позволяет размещать View-компоненты в виде одной строки (horizontal) или одного столбца (vertical). |
| • RelativeLayout | настраивает положение каждого компонента относительно других. |
| • AbsoluteLayout | использует для каждого компонента явную позицию на экране в системе координат X, Y. |
| • TableLayout | отображает элементы в виде таблицы, по строкам и столбцам. |
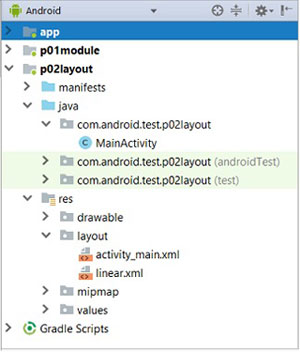
Рассмотрим вопрос привязки компонентов в ConstraintLayout. Для этого создадим новое приложение p02layout по типу и подобию, описанному на странице Модули Android.
Привязка компонента в ConstraintLayout
Во вновь созданном проекте p02layout откроем модуль activity_main.xml в режиме Design и удалим включаемый по умолчанию компонент TextView с текстом «Hello World!», поскольку ему не требуется привязка; она создана студией. После этого добавим новый компонент TextView из палитры (Pallete) в интерфейс окна.
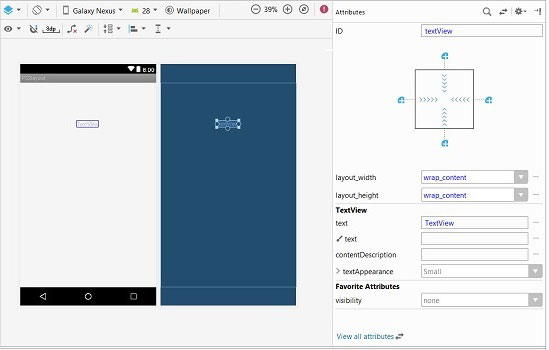
Если переключиться на текстовое представление модуля activity_main.xml, то можно сразу же увидить, что :
- в качестве контейнера компонентов студия использовала при создании приложения ConstraintLayout;
- компонент TextView подчеркнут красной линией.
При наведении на TextView мышкой во всплывающей подсказке Android Studio покажет ошибку :
This view is not constrained, it only has designtime positions, so it will jump to (0,0) unless you add constraints.
Этим сообщением IDE подсказывает нам, что компонент не «привязан», и его текущее положение в интерфейсе актуально только на время разработки. А при старте приложения положение компонента будет проигнорировано, и View переместится в точку (0,0), т.е. в верхний левый угол. Чтобы зафиксировать положение View в определенном месте ConstraintLayout необходимо добавить привязки (constraints). Они будут задавать положение View на экране относительно каких-либо других элементов или относительно родительского View.
Как добавить привязки?
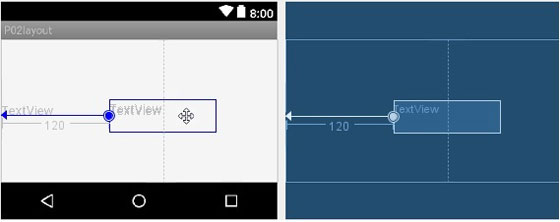
Если выделить на экране TextView, то можно увидеть 4 круга по его сторонам. Эти круги используются для привязки компонента по горизонтали и вертикали. Напоминаю, что контейнер ConstraintLayout занимает весь экран и его края совпадают с краями экрана, а также он является родителем TextView.
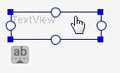
Чтобы привязать компонент к левой стороне экрана по горизонтали выделите его левой кнопкой мыши, после этого тащите левый круг к левой границе экрана. Как только стрелка коснется левой границы экрана, то компонент также сразу же переместиться к левой стороне экрана. Изображение курсора меняется в зависимости от нахождения курсора на компоненте, перемещения круга или перемещения компонента.
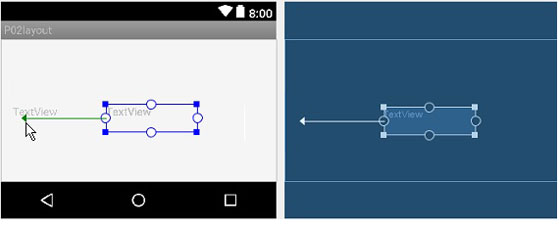
После этого необходимо «схватить» компонент левой клавишей мыши и переместить вправо на требуемую величину (нижний скриншот). Обратите внимание на число под стрелкой, которое меняется при перемещении компонента. Это величина отступа TextView от объекта, к которому он привязан; в нашем случае от левой границы родителя ConstraintLayout.
Теперь, Вам не составит труда привязать компонент к верхней границе экрана. Для этого необходимо повторить предыдущую операцию, но только уже с верхней стороной компонента.
Примечание : привязка компонента изображается на экране в виде прямой сплошной линии. Но если сделать двустороннюю привязку по горизонтали или вертикали, т.е. привязать компонент, например, к левой и правой сторонам экрана, то привязки будут изображены на экране в виде пружины.
«Привязка» компонентов между собой
Компоненты можно привязывать не только к границам родителя, но и к другим View. Связанные между собой компоненты перемещаются по экрану вместе. То есть, перемещение главного компонента в новую позицию формы автоматически переместит и связанные с ним другие компоненты.
Давайте разместим в интерфейсе новый компонент типа PlainText и привяжем его к компоненту TextView. Компоненты связываются между собой также соответствующими кругами на сторонах. Как только вы подводите стрелку «дочернего» компонента к «родительскому», то студия подсветит у родителя его круги. Останется только совместить стрелку с кругом. После этого можно привязанный компонент перетаскивать и менять его относительное удаление.

Удаление привязки
Чтобы удалить привязку, необходимо просто нажать на соответствующий кружок компонента.
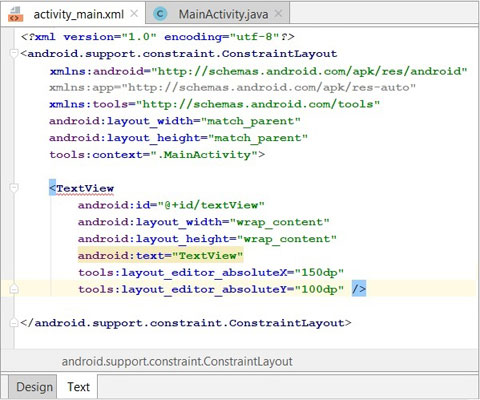
Исходный текст activity_main.xml
Исходный текст включает описания двух компонентов. Главный тег описания макета интерфейса представлен типом android.support.constraint.ConstraintLayout. Идентификатор компонента в описании обозначается атрибутом android:id. Остальные параметры (атрибуты) определяют размеры, относительные положения и специфические свойства компонента.
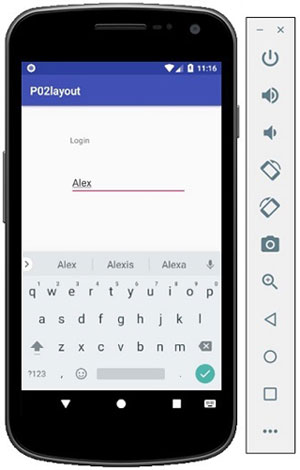
На следующем скриншоте представлен интерфейс работающего приложения. При вводе в текстовую строку PlainText символов устройство Android (эмулятор) открыл панель клавиатуры и высветил подсказки.
Шаблон LinearLayout
Прежде чем переходить к линейному макетированию компонентов заглянем в основной класс приложения MainActivity.java.
Класс MainActivity.java имеет метод onCreate, который вызывается, когда приложение создает и отображает Activity. В первой строке метода происходит обращение к суперклассу. А вот во второй строке метод setContentView(int) фоормирует интерфейс Activity из layout-файла. В качестве аргумента методу передается не путь к layout-файлу (res/layout/activity_main.xml), а идентификатор файла ID.
Создадим новый layout. Для этого выберем пункт меню New => XML => Layout XML file. Любители горячих клавиш могут использовать второй способ : при выделенной папке res/layout нажать ALT+Insert, и там уже клавишами выбрать соответствующий пункт.
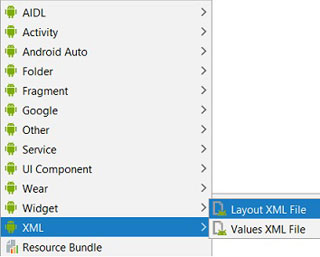
Во вновь открывшемся окне необходимо определить наименование XML-файла макетирования интерфейса и выбрать тип (Root Tag).
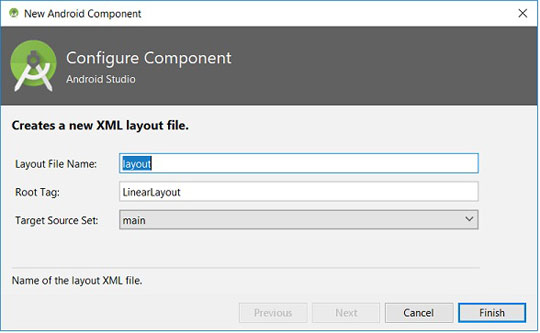
После определения имени linear в папке layout должна появиться новая запись (linear.xml). Все файлы XML, связанные с настройкой интерфейса, размещаются в директории приложения res/layout.
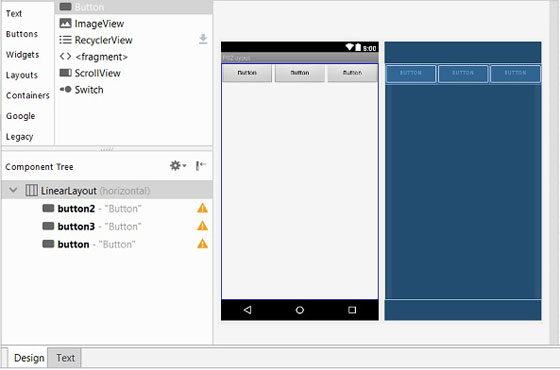
Теперь откроем файл linear.xml в режиме Design и разместим в интерфейсе три кнопки. При перетаскивании первой кнопки, Вы увидете, что она заняла весь экран по ширине. После перетаскивания второй кнопки размер первой уменьшился наполовину. И так далее. На скриншоте можно увидеть положения кнопок в интерфейсе. Кроме этого, в панели дерева (Component Tree) родителем кнопок является контейнер LinearLayout.
В исходном коде файла linear.xml (вкладка Text) можно посмотреть описание интерфейса :
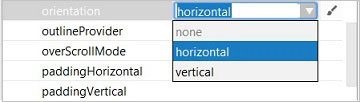
Положение с горизонтального без каких-либо проблем можно изменить на вертикальное. Для этого следует либо в тексте файла linear.xml переопределить атрибут «android:orientation» на «vertical», либо в панели атрибутов установить соответствующее значение, как это представлено на скриншоте.
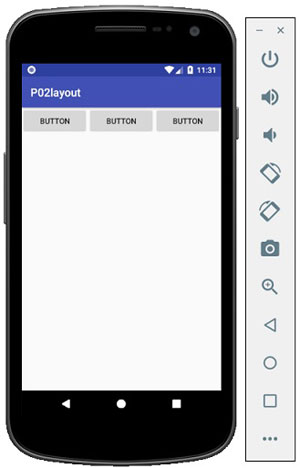
Чтобы стартовать приложение с шаблоном интерфейса linear.xml необходимо в метод onCreate класса MainActivity.java внести изменения во вторую строку : setContentView(R.layout.linear). Интерфейс работающего приложения с линейным контейнером расположения компонентов LinearLayout представлен на скриншоте.
Если Вы полностью самостоятельно повторили все действия, связанные с привязками компонентов в контейнерах типа ConstraintLayout и LinearLayout, то Вам не составит труда выполнить подобные действия с контейнерами RelativeLayout и AbsoluteLayout.
Продолжение статьи с табличным расположением компонентов TableLayout представлено здесь.
Источник
Android SDK Tools: Layout Optimization
Creating Android layouts that look good can be challenging. Once you’ve spent hours tweaking them to suit multiple devices, you often won’t want to revisit them. However, bulky, nested layouts can be tremendously inefficient. Luckily, there’s a tool available in the Android SDK that can help optimize your project layouts to decrease memory usage and improve performance.
Optimization is always tricky business. Having good, well behaved, high performance code is great. But at what cost? You never want to prematurely optimize or spend too much time on code that may only run once or is in a short-lived feature. On the flip-side, if your application is unresponsive, takes up too much memory, or slows down the rest of the system users will notice and your application downloads will likely suffer.
Optimizing your layouts fairly early in the development process is one easy way to save memory and increase performance. Some changes will be negligible, others may be quite noticeable. The Android SDK comes with a tool to automatically analyze your layouts and find potential areas of unnecessary layout complexity.
Step 0: Getting Started
In order to use the layout optimization tools provided with the Android SDK, you need to be comfortable working at the command line on your development system. If you aren’t familiar with command line tools and how to access the command line on your particular operating system, you will need to come back when you are. This isn’t a tutorial on how to use the command line on various operating systems.
We highly recommend that you add your Android tools paths to the path setting for your operating system. This will make it much easier to run specific tools by name, without having to give the full path to their file location. There are now two tools directories in the Android SDK: /tools and /platform-tools. The layoutopt tool, which is the primary tool used in this tutorial, is found in the /tools directory. (The ADB tool, for instance, is found in the /platform-tools directory.)
Running layoutopt
Running the layoutopt tool is straightforward with easy command-line options. Simply run it with a single layout file or a directory of layout files as the option. The main caveat here is that you must include the full path to the layout file or directory in question, even if it’s in the current working directory.
Let’s look at a simple, working example of a layout file that doesn’t have any issues found by layoutopt:
Notice in the above example that the name of the file checked is shown. If you don’t include the full path to the layout file or files, the output shows nothing. For example:
Thus, if you see nothing, then the file wasn’t parsed even though no errors show indicating that the file wasn’t found.
Examining layoutopt Results
The results of layoutopt are only suggestions. You can pick and choose which items to incorporate into your application. But, why would you be running the tool to just ignore its output? Let’s look at a few examples of the suggestions that might result from running the layoutopt tool.
Useless Layout
Sometimes we move things around so much during layout design that we end up with unused or abandoned controls. Take this layout, for example:
The tool will quickly tell us that a LinearLayout within a LinearLayout is unnecessary:
The two numbers at the beginning of each line of output indicate the line numbers of the suggestions. This is usually the end line of the opening tag and the closing tag. We’ve highlighted these in the XML listing above.
Root Can Be Replaced
Sometimes the output from the layoutopt tool can seem to be contradictory. For instance, take this layout:
This layout will result in the following output:
You have to read both items before you can decide what to do. The first line, although true, is not necessary. We know we want both text views to be stacked vertically, so the LinearLayout should stay. Thus, based on the second line, we can remove the useless FrameLayout and not replace it with a merge.
Interestingly, the tool isn’t all-powerful. For instance, in this example, if we add a foreground attribute to the FrameLayout and rerun the tool, the first warning will — correctly — disappear, but the second warning will still be shown. The tool knows that we can’t control the foreground with a merge, but once it has moved on the LinearLayout, it seems to forget that the FrameLayout was providing an attribute that LinearLayout can’t provide.
Too Many Views
Each view in a layout uses memory. Put too many views in a layout, and the layout will use too much memory. Imagine a layout with more than 80 views. The layoutopt tool might display the following types of output:
The number of views are calculated at each level. (Though, you might notice in the above run that the output doesn’t show which specific view is being referred to.) The suggested limit to views of 80 is just that: a suggestion. New phones and devices may do just fine with that number of views. However, if the layout performs slowly on some phones or if there is lag or stuttering when scrolling around on such a layout, this would be a likely candidate as to why.
Too Many Levels
Along similar lines, layouts should not be too deeply nested, in terms of parent and child layouts. The tool (and the Android team) recommends keeping layouts under 10 levels deep. Considering the size of even the largest tablet screens, most layouts should be far shallower than 10 levels. If you find yourself continually making very deep layouts, we would suggest really looking closely at the RelativeLayout control, as it can usually be used to keep otherwise complex layouts fairly flat. RelativeLayout can be a bit trickier to use, but the latest updates to the Graphical Layout resource tool in Eclipse certainly make this easier.
In any case, here’s a sample output from a layout that’s far too deeply nested:
The nested layout warning will typically be accompanied by warnings of possible useless layout widgets that can help assist in finding which layouts to remove, short of a full redesign of the screen layout.
Conclusion
The layoutopt tool is a fast and easy tool to analyze your layouts to look for possible inefficiencies and useless layouts. You still have to make the decision yourself as to how to deal with the optimization suggestions. Making the suggested changes won’t (usually) suddenly make your perform hugely better, but there’s no reason to have an overly complex layout that is slow, inefficient and more difficult to maintain. Simplified layouts simplify testing and maintenance, so optimize your layouts earlier in your application development so you don’t have to retest at the last minute. There are almost always several ways ways to design a similar screen. Regardless of the method used, the layoutopt tool can shed light on potential inefficiencies with your method.
Источник


